

NNBS CCSB Cam Swap/DOD Delete
 Jan 19, 2015 | 12:23 AM
#1

Thread Starter
TECH Enthusiast
iTrader: (4)
Joined: Apr 2007
Posts: 632
Likes: 6
From: San Deigo, CA
I'm about half way done with the cam swap and dod delete on my truck. I started yesterday and have about 11 hours into it so far. I must say, this is no easy task. I am doing more stuff than I need to and without the best tools, it's a slow process.
So far I've done all of the disassembly. I just need to clean the heads and block surface, replace the springs, drill and tap the oil pan, and do the trunion upgrade. Then it's just a matter of putting it back together.
I am also preparing for the turbo while I'm in there too. I already rerouted the heater hose. I also pulled the oil pan and I'm going to tap it tomorrow.
Here's a list of parts I am using:
-ISKY Triple 12 (Stock 48 $389 shipped)
-LS7 lifters (GM 17122490 $129)
-Alper Head studs (GEN IV head studs $109.50)
-BTR hardened pushrods (PR7350312-16 $94)
-LS9 head gaskets (GM 12622033 $47 EACH)
-TSP Ported LS6 oil pump (25-TspPortedPump $189)
-LS2 timing chain (GM 12646386 $40)
-LS2 tensioner (GM 12588670 $15.61)
-4x 3 bolt cam gear (GM 12586481 $26)
-Arp cam bolts (ARP 134-1003 $9.30)
-LS2 lifter trays (GM 12595365 $8 EACH x4)
-BTR springs (SK001 $229)
-Comp trunion upgrade (13702-KIT $131)
-ARP crank bolt (234-2503 $27.99)
-LS7 crank bolt to put balancer on (GM 11570163 $8.50)
-4.8L valley cover (GM 1259832 $42)
-10' 5/8" heater hose
-2 brass 3/4" elbows (all Home Depot had and they work fine)
-2 brass 3/4" couplings
-hose clamps
-new gaskets all around except valve cover and int/exh manifolds (TSP 28-CamGskKit $61.99)
-Arp thread tap
-mineral spirits and plastic scraper for cleaning head surfaces
TOTAL $1,627.93. This doesn't include the misc stuff I bought at the auto parts store like spark plugs, fluids etc.
I was hoping to get more pictures but my hands were dirty and phone has no storage.. Yadda yadda


Box of some of the new stuff.

Bed of parts.

So far I've done all of the disassembly. I just need to clean the heads and block surface, replace the springs, drill and tap the oil pan, and do the trunion upgrade. Then it's just a matter of putting it back together.
I am also preparing for the turbo while I'm in there too. I already rerouted the heater hose. I also pulled the oil pan and I'm going to tap it tomorrow.
Here's a list of parts I am using:
-ISKY Triple 12 (Stock 48 $389 shipped)
-LS7 lifters (GM 17122490 $129)
-Alper Head studs (GEN IV head studs $109.50)
-BTR hardened pushrods (PR7350312-16 $94)
-LS9 head gaskets (GM 12622033 $47 EACH)
-TSP Ported LS6 oil pump (25-TspPortedPump $189)
-LS2 timing chain (GM 12646386 $40)
-LS2 tensioner (GM 12588670 $15.61)
-4x 3 bolt cam gear (GM 12586481 $26)
-Arp cam bolts (ARP 134-1003 $9.30)
-LS2 lifter trays (GM 12595365 $8 EACH x4)
-BTR springs (SK001 $229)
-Comp trunion upgrade (13702-KIT $131)
-ARP crank bolt (234-2503 $27.99)
-LS7 crank bolt to put balancer on (GM 11570163 $8.50)
-4.8L valley cover (GM 1259832 $42)
-10' 5/8" heater hose
-2 brass 3/4" elbows (all Home Depot had and they work fine)
-2 brass 3/4" couplings
-hose clamps
-new gaskets all around except valve cover and int/exh manifolds (TSP 28-CamGskKit $61.99)
-Arp thread tap
-mineral spirits and plastic scraper for cleaning head surfaces
TOTAL $1,627.93. This doesn't include the misc stuff I bought at the auto parts store like spark plugs, fluids etc.
I was hoping to get more pictures but my hands were dirty and phone has no storage.. Yadda yadda


Box of some of the new stuff.


Bed of parts.

Last edited by mdwatts11; Jan 29, 2015 at 11:25 AM. Reason: Added parts
Jan 19, 2015 | 06:50 AM
#2
TECH Apprentice
Joined: Nov 2009
Posts: 355
Likes: 8
From: Columbus, IN
Looks like you are moving right along. I am less than a month away from getting mine torn down, but I am still waiting for some of the stuff to show up at the house. What items were hard to do, and what tools were you missing?
 Jan 19, 2015 | 09:10 AM
#4
Thread Starter
TECH Enthusiast
iTrader: (4)
Joined: Apr 2007
Posts: 632
Likes: 6
From: San Deigo, CA
Yes. This is my first time taking apart an ls motor. I've been going slow and taking my time. The wife is gone all week and next weekend so I have an extra car. It would probably would go a lot faster if I had someone to help. I had to crawl in and out of the engine bay 1,000 times. Not fun haha.
 Jan 19, 2015 | 03:54 PM
#7
Thread Starter
TECH Enthusiast
iTrader: (4)
Joined: Apr 2007
Posts: 632
Likes: 6
From: San Deigo, CA
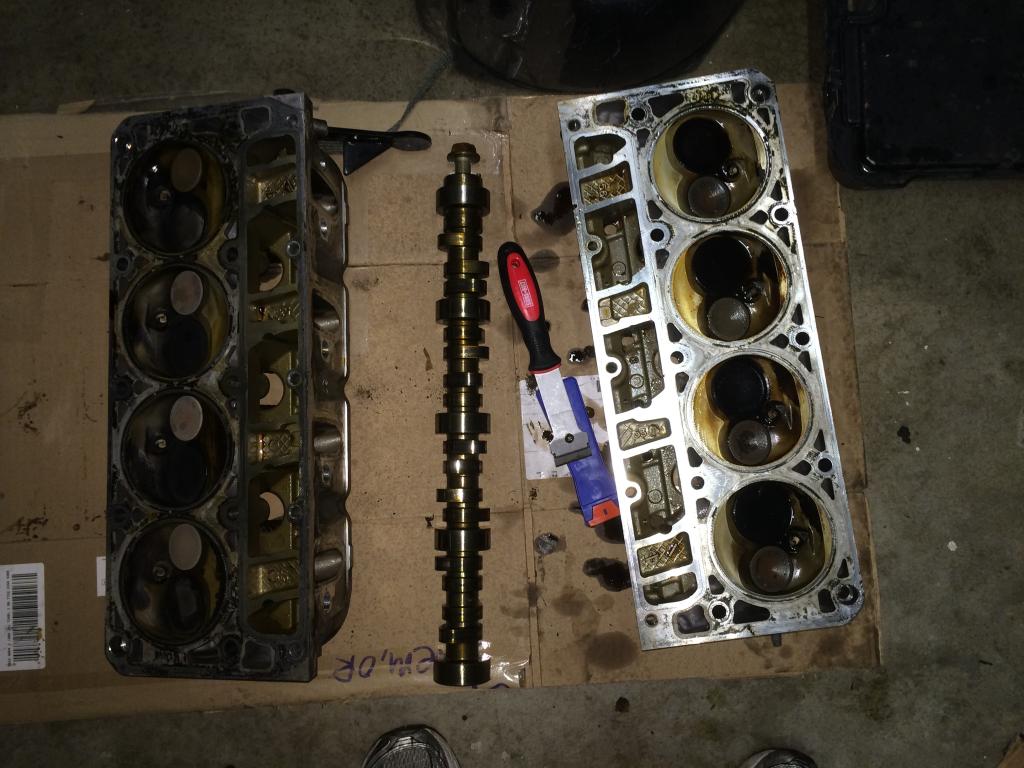
Lunch break progress pics.
New cam going in.

Put the thing on the thing.


My buddy is on his way over with the drill bit and tap for the pan. My goal is to have the pan back on today and then I will be happy.
New cam going in.

Put the thing on the thing.


My buddy is on his way over with the drill bit and tap for the pan. My goal is to have the pan back on today and then I will be happy.
Trending Topics
Jan 19, 2015 | 08:10 PM
#9
Thread Starter
TECH Enthusiast
iTrader: (4)
Joined: Apr 2007
Posts: 632
Likes: 6
From: San Deigo, CA
Well got the pan and all the stuff underneath all wrapped up. I wasn't sure which o-ring to use with the new pump. The one I took off was orange, but I guess it had just turned that color over the years. I asked around and it appears the red is the correct one. Thanks to the guys on the fb page and Autot3k for helping me out.
I'm just gonna cap it for now until I get the turbo kit.
O-ring dilemma

I'm just gonna cap it for now until I get the turbo kit.

O-ring dilemma


