

2000 Chevy Silverado project "Charlie Murphy"
 Jun 30, 2013 | 03:17 AM
#201

I've pondered for quite a bit about how this occurred. Then I remembered the time that the jack gave out and my truck fell onto a jack stand.
Here's the result:
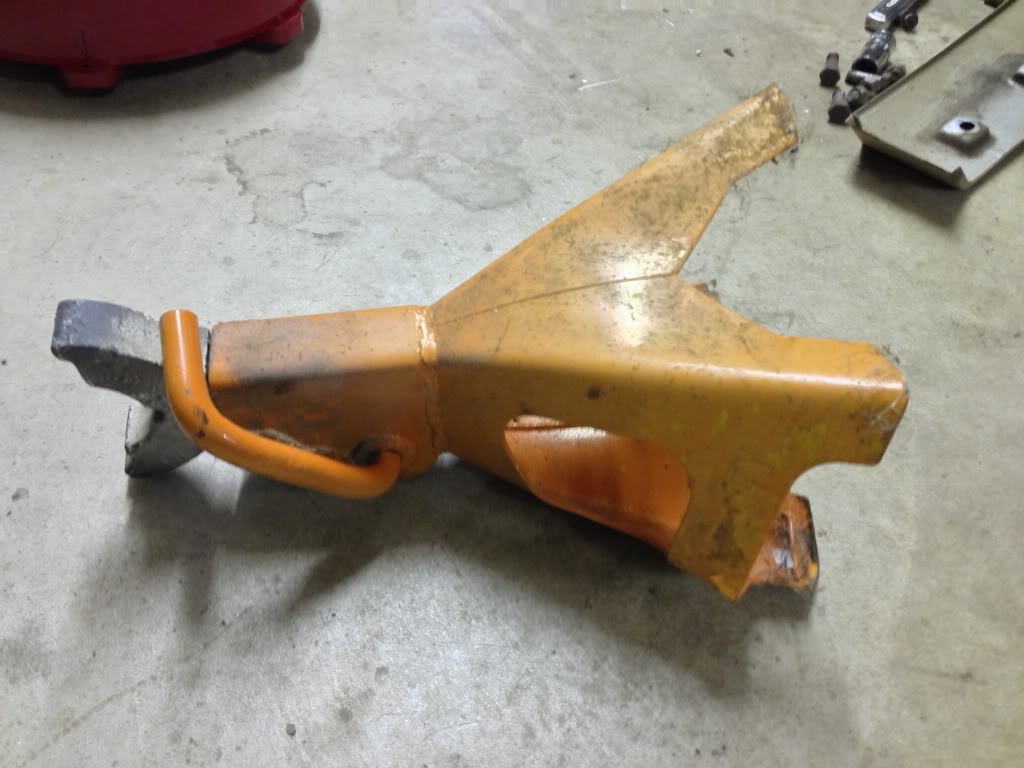
Remember kids, always use jack stands and never rely on the jack alone! Also, try to place the jack stands as far apart as possible for stability.
 Jun 30, 2013 | 05:50 PM
#203
It does kind of suck how weak the front end actually is. It's too bad it has an aluminum housing.
Last edited by iregret; Jun 30, 2013 at 09:26 PM.
Jun 30, 2013 | 06:31 PM
#204

I just wish I could find all the cool **** off Craigslist that everyone on here seems to find.. Nice find, hope you get the black beast back on the road soon!
Jun 30, 2013 | 09:47 PM
#205
Naw you're not alone, I dropped a Mitsubishi Eclipse off the jack once, fell right smack dab on the jackstand I intended to put UNDER the car.. Was sorta funny at the time, it cracked some plastic but the car was a daily MPG beater with 210k on it so I didn't care..
I just wish I could find all the cool **** off Craigslist that everyone on here seems to find.. Nice find, hope you get the black beast back on the road soon!
I just wish I could find all the cool **** off Craigslist that everyone on here seems to find.. Nice find, hope you get the black beast back on the road soon!
I just read and read. I made a list of the parts I needed and searched Craigslist on my downtime at work. That, and a bit of luck, is all it takes.
I use an app on my iPhone that let me search the entire state.
Jul 3, 2013 | 03:50 AM
#206
I worked on my truck a little bit today. The first thing I did was pop out the old tie rods. I was having a problem getting the front differential to drop down. It's hanging up on the centerlink. It occurred to me that the reason that it wouldn't drop down was because I installed lowering spindles. The lowering spindles compromise my turning radius.
Earlier I had tried removing the tie rods with a pickle fork. I ended up destroying the boot. I actually have a tie rod puller. The problem was, the factory tie rods were too long. So I went to AutoZone and ordered replacements. When I got home I cut the factory tie rods down and broke them free with the puller. I wish I would have just done this in the first place. Now I have to measure and try to get my alignment right.
Once I got the tie rods free of the spindles sure enough, I could turn the steering wheel all the way to the left and get the front differential to come out.
With the factory differential finally removed I turned to my newly modified AWD/4WD front diff.
I removed the factory black vent so that I could inspect the gearset inside the differential.


Since I have the front diff out and everything I went ahead and replaced the black vent with the newer white vent. Supposedly there were problems with the black vent backing out and being incompatible with synthetic gear oil. Looking at both of them side-by-side the only difference I can tell is that the newer one (white) has a metal breather instead of a plastic one.
After that I filled it up with approximately 1.5 L of Mobile1 75/90 weight synthetic gear oil.

Then I bench-pressed this into place.


Now all I've got left to do is to button everything up and torque everything down. Oh yeah, I have to replace the tie rods too.
Earlier I had tried removing the tie rods with a pickle fork. I ended up destroying the boot. I actually have a tie rod puller. The problem was, the factory tie rods were too long. So I went to AutoZone and ordered replacements. When I got home I cut the factory tie rods down and broke them free with the puller. I wish I would have just done this in the first place. Now I have to measure and try to get my alignment right.
Once I got the tie rods free of the spindles sure enough, I could turn the steering wheel all the way to the left and get the front differential to come out.
With the factory differential finally removed I turned to my newly modified AWD/4WD front diff.
I removed the factory black vent so that I could inspect the gearset inside the differential.
Since I have the front diff out and everything I went ahead and replaced the black vent with the newer white vent. Supposedly there were problems with the black vent backing out and being incompatible with synthetic gear oil. Looking at both of them side-by-side the only difference I can tell is that the newer one (white) has a metal breather instead of a plastic one.
After that I filled it up with approximately 1.5 L of Mobile1 75/90 weight synthetic gear oil.
Then I bench-pressed this into place.
Now all I've got left to do is to button everything up and torque everything down. Oh yeah, I have to replace the tie rods too.
Jul 5, 2013 | 01:19 AM
#207
The first thing I did today was clean up this piece.
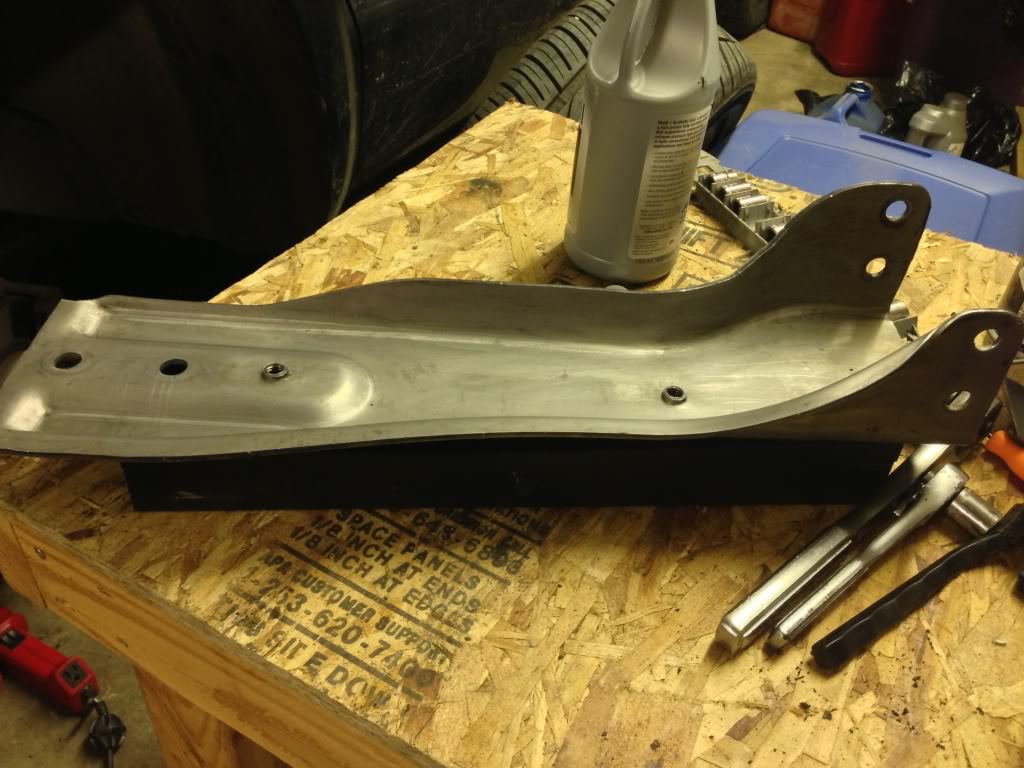
This part goes under the oil pan. It was full if gunk and build up oil. You basically fill it with oil every time you perform an oil change. LOL. I scrubbed it down with a wire brush, a screw driver, paper towels and brake cleaner.
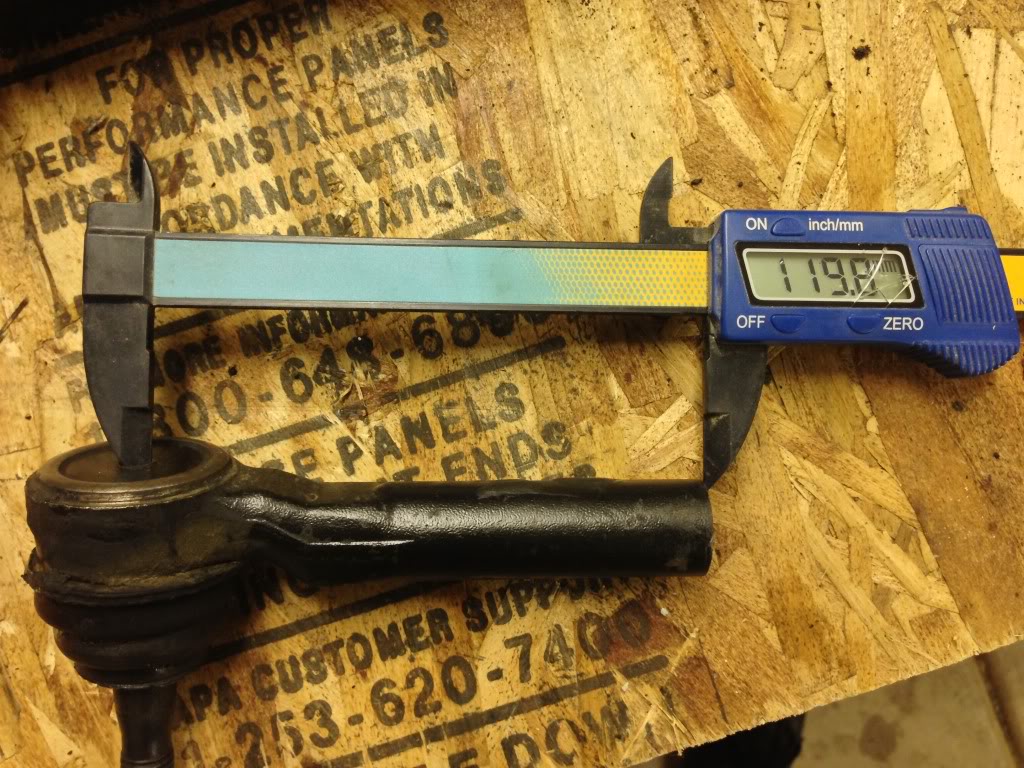
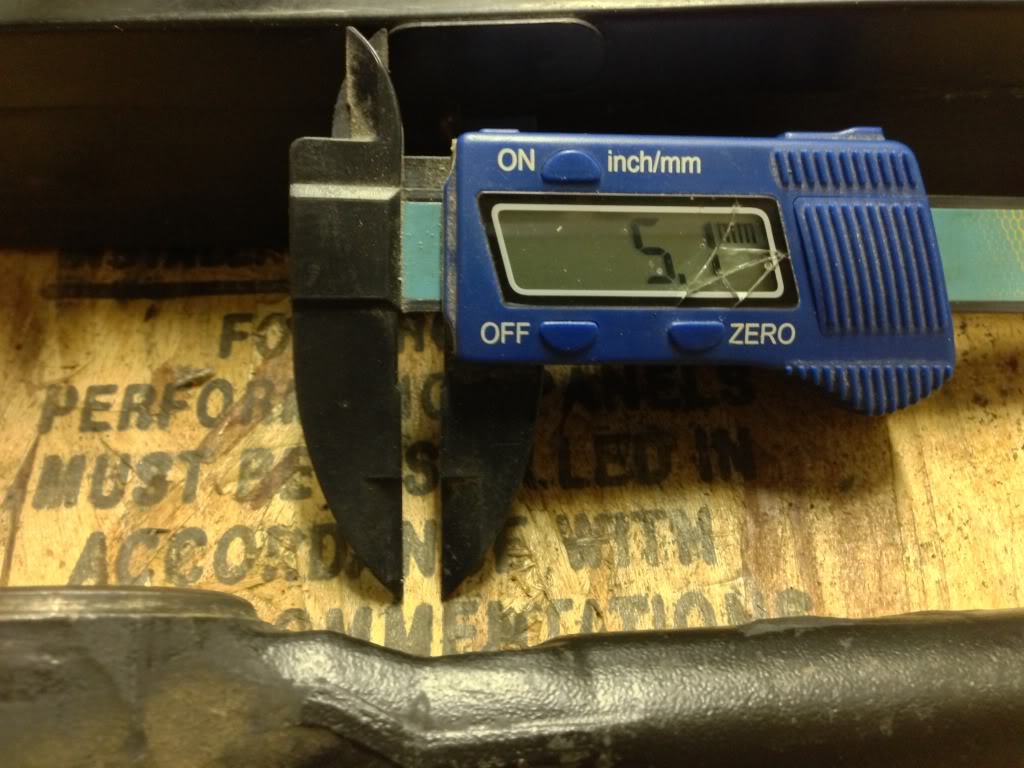
Then I moved on to the tie rods. I don't want to pay for an alignment, so I did some measuring.
So the replacement tie rods from autozone are slightly different. So to get it as close to where it was as possible, I measured the length from the grease zerk. I needed to get as close to the center of the tie rod as possible.
The factory piece measured 119.8mm.
The autozone piece measured 124.9.
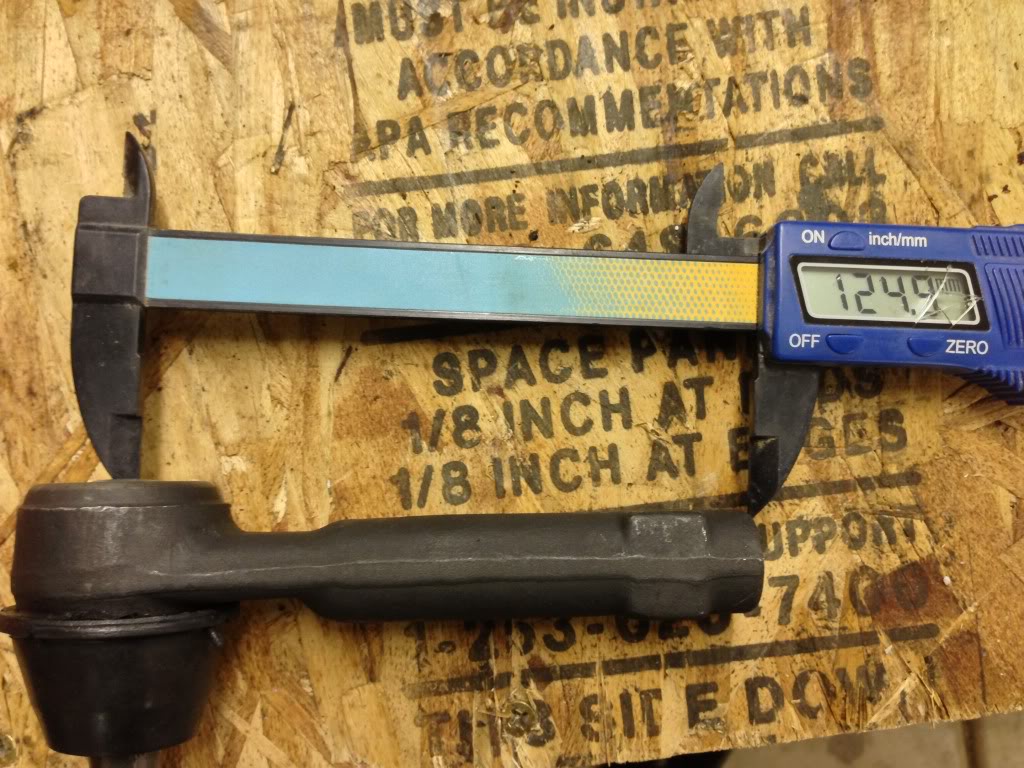
A difference of 5.1mm.
Before I removed the factory tie rod end, I loosened the nut, then hand tightened it back to where it was. This gave me a reference as to where the factory tie rod was located.
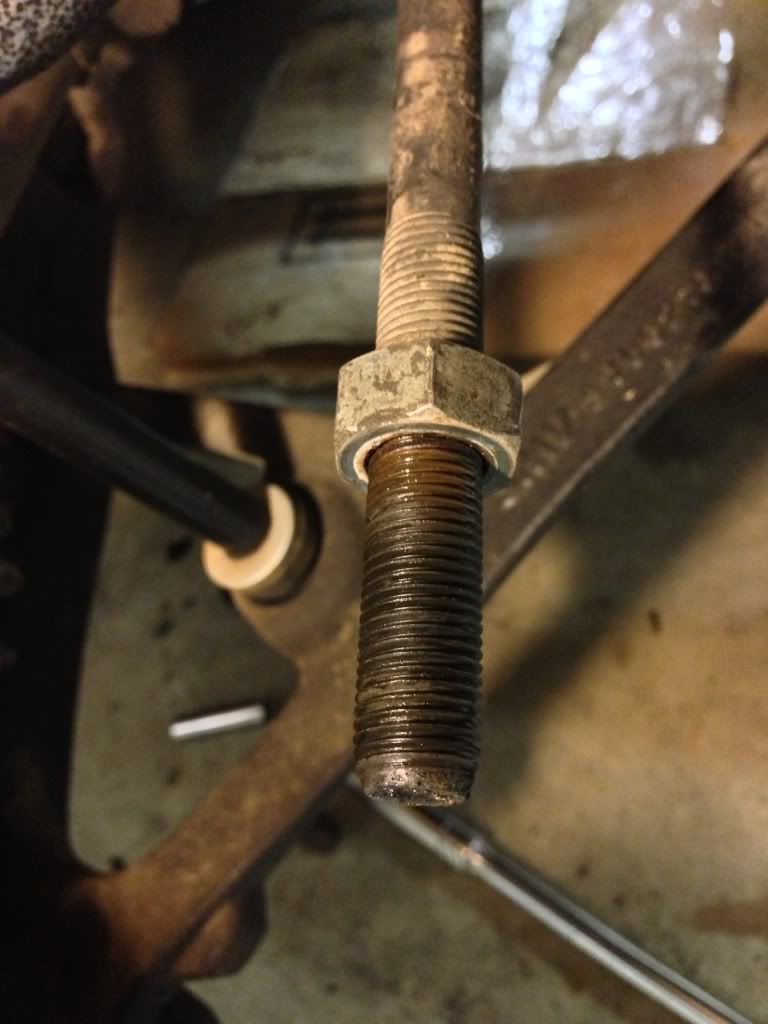
I put the replacement tie rod on and tightened it to the nut. Then I moved the nut 5.1mm farther in.
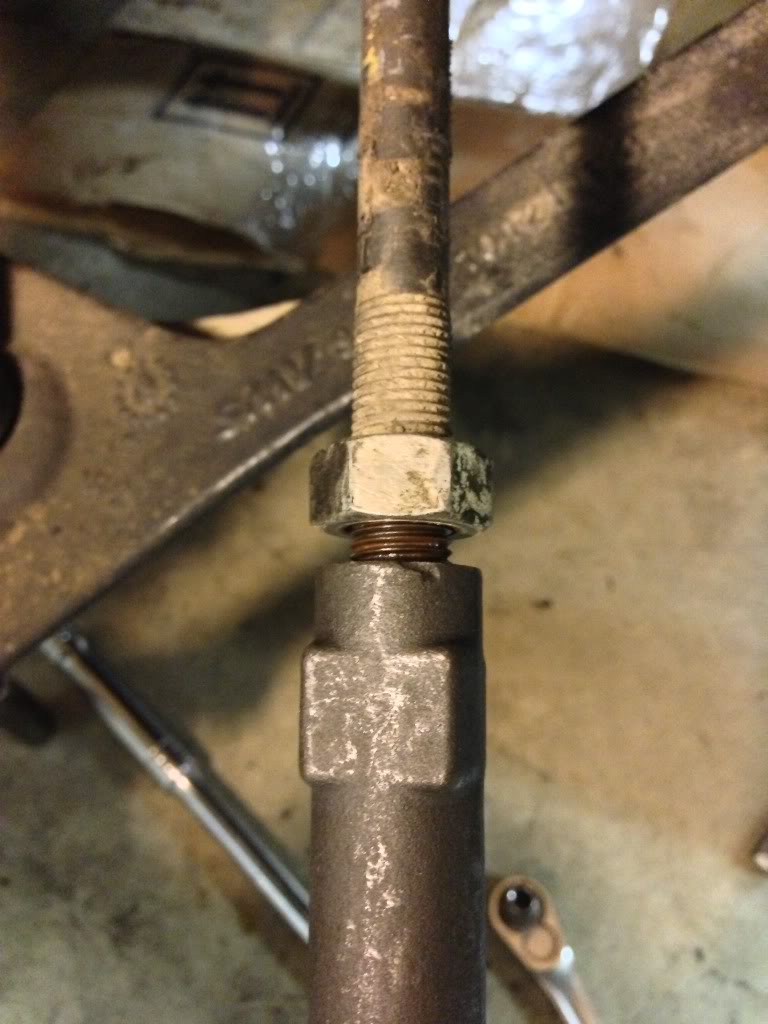
After that, I screwed the tie rod in to meet the nut at the new location. I tightened everything down. Now, I'm within 1/16 of an inch from where the original tie rods were.
Then I greased all the steering parts and installed the pins in the castle nuts.
I also got the front diff installed and torqued down. As well as the front drive shaft and CV's.
I ran out if time with the 4th of July stuff going on, but I'm pretty close to finishing up.
This part goes under the oil pan. It was full if gunk and build up oil. You basically fill it with oil every time you perform an oil change. LOL. I scrubbed it down with a wire brush, a screw driver, paper towels and brake cleaner.
Then I moved on to the tie rods. I don't want to pay for an alignment, so I did some measuring.
So the replacement tie rods from autozone are slightly different. So to get it as close to where it was as possible, I measured the length from the grease zerk. I needed to get as close to the center of the tie rod as possible.
The factory piece measured 119.8mm.
The autozone piece measured 124.9.
A difference of 5.1mm.
Before I removed the factory tie rod end, I loosened the nut, then hand tightened it back to where it was. This gave me a reference as to where the factory tie rod was located.
I put the replacement tie rod on and tightened it to the nut. Then I moved the nut 5.1mm farther in.
After that, I screwed the tie rod in to meet the nut at the new location. I tightened everything down. Now, I'm within 1/16 of an inch from where the original tie rods were.
Then I greased all the steering parts and installed the pins in the castle nuts.
I also got the front diff installed and torqued down. As well as the front drive shaft and CV's.
I ran out if time with the 4th of July stuff going on, but I'm pretty close to finishing up.
Jul 5, 2013 | 09:14 PM
#208
Well, I buttoned everything up and went for a test drive. It drives better than ever. Previously, there was a mild vibration. That went completely away. Awesome!
Now there's a new problem. The air conditioning isn't working. I looked at it for a few minutes and it doesn't appear that the A/C clutch is engaging. The light turns on in the cab though.
I'm wondering what I did. Did I screw something up in the tune? Did I screw something up when I added the electric fans? Is there a problem in the ECU after I added the pins for the 80E? Is the refrigerant pressure low?
Ugh. Where to start. LOL.
Jul 5, 2013 | 09:18 PM
#209
If you have EFI Live you can manually command the compressor to kick in by using the Bi-Di controls.. If you do command it on and it doesn't kick then its probably just a wiring problem. The Bi-Di controls command it to operate even if the refrigerant is low so that can help troubleshooting.. Chances are it's something simple.
Jul 5, 2013 | 09:32 PM
#210
If you have EFI Live you can manually command the compressor to kick in by using the Bi-Di controls.. If you do command it on and it doesn't kick then its probably just a wiring problem. The Bi-Di controls command it to operate even if the refrigerant is low so that can help troubleshooting.. Chances are it's something simple.
Here's a dirty pic of my truck. Repaired! (Sort of, LOL.)


