
AR-15 Pins
 Jan 31, 2013 | 12:44 PM
#1

Thread Starter
TECH Senior Member
iTrader: (10)
Joined: Oct 2004
Posts: 14,068
Likes: 2
From: Crystal Springs, MS
Has anybody ever thought about replacing them pesky Roll Pins with Set screws??
I had a bolt catch pin give me serious fits and ended up screwing it up.
Now i got a couple new pins im really thinking of just running a tap thru there and putting a set screw in it.
I had a bolt catch pin give me serious fits and ended up screwing it up.
Now i got a couple new pins im really thinking of just running a tap thru there and putting a set screw in it.
Jan 31, 2013 | 12:46 PM
#2
Thread Starter
TECH Senior Member
iTrader: (10)
Joined: Oct 2004
Posts: 14,068
Likes: 2
From: Crystal Springs, MS
incase you screw one up and wanna just go to fastenal or somewhere and get a new one...
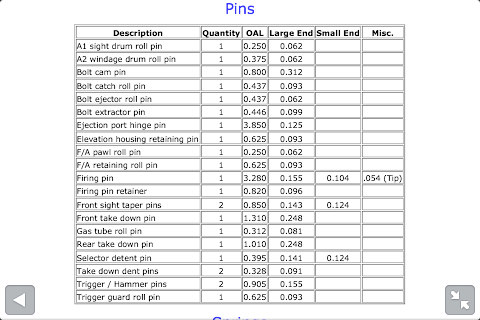
Colt AR-15 Pin Sizes
Colt AR-15 Pin Sizes
Last edited by nonnieselman; Jan 31, 2013 at 12:53 PM.
Jan 31, 2013 | 05:58 PM
#3
I've always thought to myself why they weren't threaded screws in some of those locations. I guess for ease of take-down or not needing a special tool. Not sure. Either way, a tiny Allen wrench would be all you'd need I guess.
 Feb 1, 2013 | 07:24 AM
#5

TECH Fanatic
Joined: Apr 2003
Posts: 1,857
Likes: 0
From: Walker, LA
The bolt catch pin can be a pain. I tape my lowers up and use a brass hammer and brass punch. I had one small nick I had to touch up on my first one. I noticed on the AR10's it is already threaded and has a screw. Wish the 15s were that way.
Feb 1, 2013 | 09:19 AM
#6
Thread Starter
TECH Senior Member
iTrader: (10)
Joined: Oct 2004
Posts: 14,068
Likes: 2
From: Crystal Springs, MS
The Rifle i use the most has a broken tab on the trigger guard.. i was trying to take the factory one off and put a magpul enhanced one in.. broke that dude smooth off. so i used a sharpie to hide it some.
Feb 1, 2013 | 09:41 AM
#7
I don't know how set screws would work in that application due to the catch needing to have a range of motion. but I am a huge fan of using the set screw on the gas tube that comes with Kies Gen II adjustable gas block.
Use a set of plain old pliers, tape up the jaws so you don't scar the the aluminum and just push the roll pin through with the pliers set at the wide jaw position. I learned this from Scott at SD and it works great. Just get it all lined up and start the roll pin and it will push right into place with out any hesitation. using a Hammer and a Punch on the that part is awkward and can cause damage as you have seen...

Use a set of plain old pliers, tape up the jaws so you don't scar the the aluminum and just push the roll pin through with the pliers set at the wide jaw position. I learned this from Scott at SD and it works great. Just get it all lined up and start the roll pin and it will push right into place with out any hesitation. using a Hammer and a Punch on the that part is awkward and can cause damage as you have seen...
Last edited by MPFD; Feb 1, 2013 at 09:49 AM.
Trending Topics
Feb 1, 2013 | 09:57 AM
#8
Thread Starter
TECH Senior Member
iTrader: (10)
Joined: Oct 2004
Posts: 14,068
Likes: 2
From: Crystal Springs, MS
I don't know how set screws would work in that application due to the catch needing to have a range of motion. but I am a huge fan of using the set screw on the gas tube that comes with Kies Gen II adjustable gas block.
Use a set of plain old pliers, tape up the jaws so you don't scar the the aluminum and just push the roll pin through with the pliers set at the wide jaw position. I learned this from Scott at SD and it works great. Just get it all lined up and start the roll pin and it will push right into place with out any hesitation. using a Hammer and a Punch on the that part is awkward and can cause damage as you have seen...
Use a set of plain old pliers, tape up the jaws so you don't scar the the aluminum and just push the roll pin through with the pliers set at the wide jaw position. I learned this from Scott at SD and it works great. Just get it all lined up and start the roll pin and it will push right into place with out any hesitation. using a Hammer and a Punch on the that part is awkward and can cause damage as you have seen...
Good trick right there!! ill try it on this lower thats goofed up
Feb 1, 2013 | 10:06 AM
#9
Might run a small drill bit of the same diameter through the hole to make sure the holes aren't deformed of have any burs that could cause you an issue. But I have used this method for the last 3 years and it makes this operation VERY easy. Just like you said, touch it up with a sharpie and it will look like new...