

Roll Pan Install


 Apr 26, 2009 | 09:03 AM
#102

I've been away from PT for a bit, so it might not help you now, Roger. In an earlier post, you asked about filler. Ideally, you want filler to be no more than 1/8". That means metal work/ fab work that's close. Once I worked on a '70 Malibu that had 1/2" filler in fender!!! Serious.
If using a scuff pad, as stated from earlier, make sure it's evenly scuffed. Use 3M red scuff pad. Personally, I'd wipe w/ a pre-paint cleaner to get rid of contaminates, but that's me. Follow w/ tack rag.
I prefer 400grit wet or dry sand just before paint. I'd rather 400# wet out of those two. You could use a 320# dry to finish up sanding primer, but I still like to follow w/ 400 wet.
Let's back up just a sec. Bare metal/ filler work, start around 80# or coarser if a particular job requires, but going coarser means nasty scratches. Each job, one must access. W/ 80#, the filler can stick to bare metal. Going too fine, filler won't adhere to bare metal. If 80# is needed, follow w/ 180#. Prime as needed. Then 400 wet. Sealer. Base, clear. I think by now you now when to wipe down/ tack off.
As for if that seam sealer is compatible, read back of can.
Serious.If using a scuff pad, as stated from earlier, make sure it's evenly scuffed. Use 3M red scuff pad. Personally, I'd wipe w/ a pre-paint cleaner to get rid of contaminates, but that's me. Follow w/ tack rag.
I prefer 400grit wet or dry sand just before paint. I'd rather 400# wet out of those two. You could use a 320# dry to finish up sanding primer, but I still like to follow w/ 400 wet.
Let's back up just a sec. Bare metal/ filler work, start around 80# or coarser if a particular job requires, but going coarser means nasty scratches. Each job, one must access. W/ 80#, the filler can stick to bare metal. Going too fine, filler won't adhere to bare metal. If 80# is needed, follow w/ 180#. Prime as needed. Then 400 wet. Sealer. Base, clear. I think by now you now when to wipe down/ tack off.
As for if that seam sealer is compatible, read back of can.


 Apr 26, 2009 | 11:13 AM
#104
Thread Starter
TECH Senior Member
iTrader: (7)
Joined: Jun 2004
Posts: 5,446
Likes: 7
From: Central Kentucky
Thanks, feeling pretty good about it myself, but back in the day I've been here. Put some shine to it and anything that isn't right WILL show.
Thanks.
I get that remark regularly, but if it were my job I wouldn't want to do it on my rides. Hats off to the guys that do this for a living. It is hard dirty work.
Thanks, getting there.
Filler is maybe an 1/8 on the one spot of the passenger side, did 80 grit to the metal before the filler. Seam sealer is paintable. Keeping my fingers crossed. Course its great to have it come out and look good, the true test is time. It will suck if it start lifting, rusting in a couple months.
Thank you sir.
Thanks.
I get that remark regularly, but if it were my job I wouldn't want to do it on my rides. Hats off to the guys that do this for a living. It is hard dirty work.
Thanks, getting there.
I've been away from PT for a bit, so it might not help you now, Roger. In an earlier post, you asked about filler. Ideally, you want filler to be no more than 1/8". That means metal work/ fab work that's close. Once I worked on a '70 Malibu that had 1/2" filler in fender!!! Serious.
If using a scuff pad, as stated from earlier, make sure it's evenly scuffed. Use 3M red scuff pad. Personally, I'd wipe w/ a pre-paint cleaner to get rid of contaminates, but that's me. Follow w/ tack rag.
I prefer 400grit wet or dry sand just before paint. I'd rather 400# wet out of those two. You could use a 320# dry to finish up sanding primer, but I still like to follow w/ 400 wet.
Let's back up just a sec. Bare metal/ filler work, start around 80# or coarser if a particular job requires, but going coarser means nasty scratches. Each job, one must access. W/ 80#, the filler can stick to bare metal. Going too fine, filler won't adhere to bare metal. If 80# is needed, follow w/ 180#. Prime as needed. Then 400 wet. Sealer. Base, clear. I think by now you now when to wipe down/ tack off.
As for if that seam sealer is compatible, read back of can.
Serious.If using a scuff pad, as stated from earlier, make sure it's evenly scuffed. Use 3M red scuff pad. Personally, I'd wipe w/ a pre-paint cleaner to get rid of contaminates, but that's me. Follow w/ tack rag.
I prefer 400grit wet or dry sand just before paint. I'd rather 400# wet out of those two. You could use a 320# dry to finish up sanding primer, but I still like to follow w/ 400 wet.
Let's back up just a sec. Bare metal/ filler work, start around 80# or coarser if a particular job requires, but going coarser means nasty scratches. Each job, one must access. W/ 80#, the filler can stick to bare metal. Going too fine, filler won't adhere to bare metal. If 80# is needed, follow w/ 180#. Prime as needed. Then 400 wet. Sealer. Base, clear. I think by now you now when to wipe down/ tack off.
As for if that seam sealer is compatible, read back of can.
Thank you sir.
Apr 26, 2009 | 11:19 AM
#105
Thread Starter
TECH Senior Member
iTrader: (7)
Joined: Jun 2004
Posts: 5,446
Likes: 7
From: Central Kentucky
Sorry if I'm picture whoring, but I take a lot. Haven't washed the truck in couple months. Cleaned it up yesterday and snapped a couple more after getting the pan to where it is.
Can't get over how much shorter the truck appears with the bumper gone.

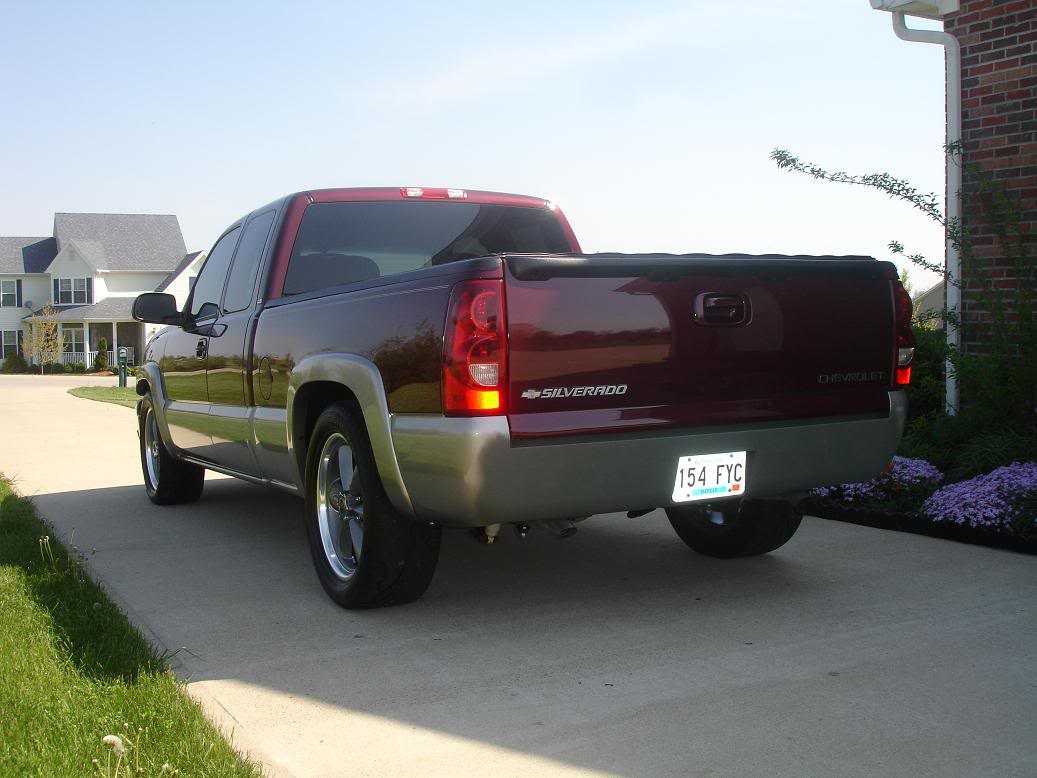
Can't get over how much shorter the truck appears with the bumper gone.

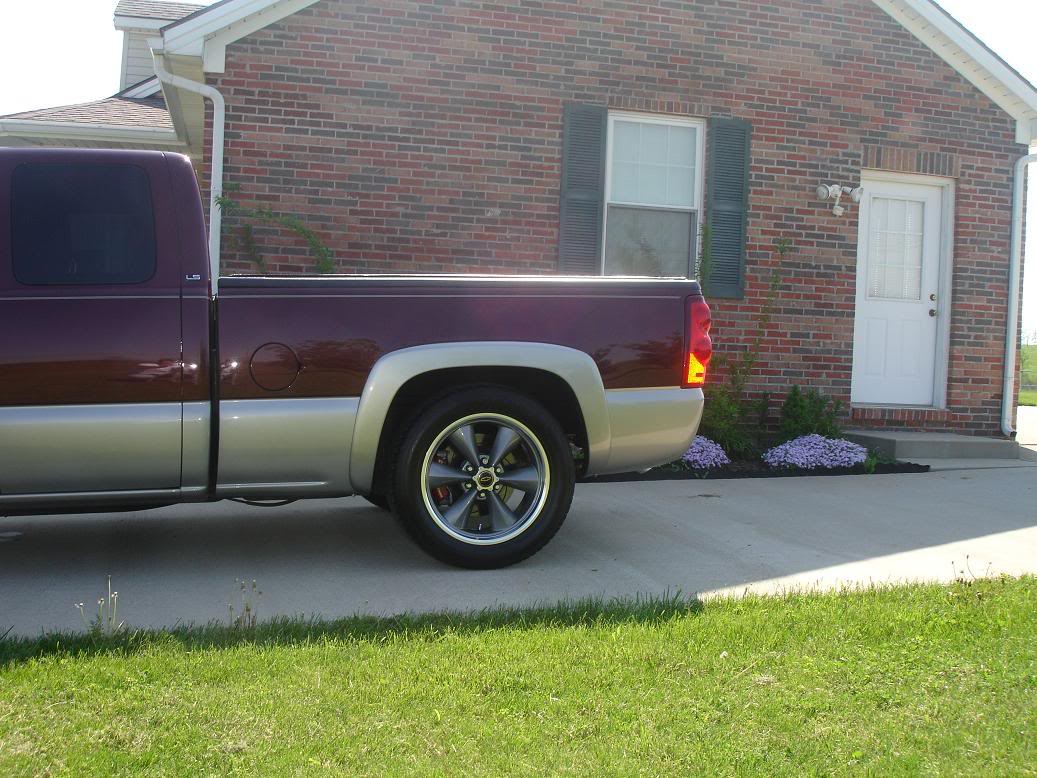
 were you still planning to paint the bottom of the tailgate to match?


