
Ebay/OBX style header install w/plenty of PICS (LONG, but detailed)
 Oct 31, 2009 | 03:17 PM
#1
Thread Starter
11 Second Club
iTrader: (42)
Joined: Nov 2005
Posts: 1,643
Likes: 4
From: Baltimore, MD.
Read about the "OBX style" headers in another thread, and everyone who had them seemed to be happy with them (generally speaking). I had been kicking around the idea for awhile, but wasn't about to pay $1000 or more for a set of headers for my truck/daily driver. At $500+, LPP's were the next ones I looked at, but it seemed the fitment was inconsistent, from what I read.
Vehicle they are going on is 2002 Chevy Silverado, 5.3 litre.
Current "mods": Modified stock airbox, Airaid air tube, Ported throttle body, TB coolant bypass, custom Flowmaster catback (1 into 2), HPTuners tuned by me.
Anyway, got these headers and Y pipe off of Ebay for $320 delivered. It took 4 days to get to me in Maryland, from California, which was nice. Received them yesterday.
I was definitely a bit pissed and concerned when I saw the box, however...
http://www.fquick.com/images/vehicle...1139291153.jpg
http://www.fquick.com/images/vehicle...1139291154.jpg
I was worried for nothing, since once opened up (by me), everything looked great. Welds look good. Quality seemed to be pretty good as well.
http://www.fquick.com/images/vehicle...1139291155.jpg
http://www.fquick.com/images/vehicle...1139291156.jpg
http://www.fquick.com/images/vehicle...1139291157.jpg
http://www.fquick.com/images/vehicle...1139291158.jpg
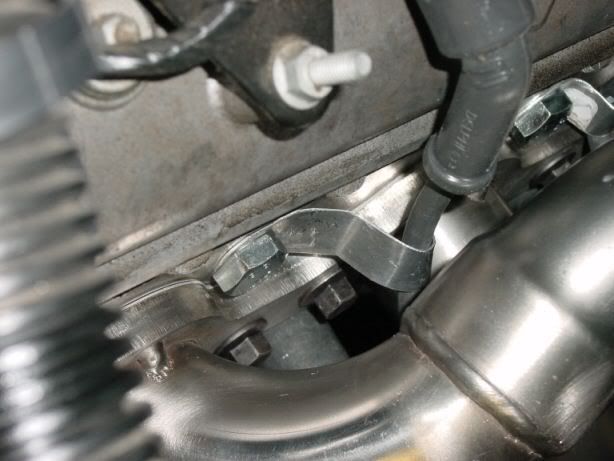
I did the install today. Took 5 hours, but an hour or so was used drilling out a broken manifold to head bolt. First one I went to take out, snapped 1/4" in from the outer edge of threaded hole. I chose to cut the factory Y pipe to ease removal.
http://www.fquick.com/images/vehicle...1139291159.jpg
I did have to slightly clearance the dipstick mounting bracket on the left side.
http://www.fquick.com/images/vehicle...1139291160.jpg
I also had to make a quick, temporary "fix" to the rear 2 spark plug wires on the driver's side. Both are right against the headers, so I "borrowed" some exhaust wrap off of one of my machine's turbocharger downpipe.
UPDATE: As of 4-16-2011 (15 months after install, this "temporary fix is still working great!
http://www.fquick.com/images/vehicle...1139291161.jpg
Here's the driver's side header, installed and with the two "wrapped" plug wires. 2nd pic shows clearance from top. Header slides in easily from underneath.
http://www.fquick.com/images/vehicle...1139291162.jpg
http://www.fquick.com/images/vehicle...1139291165.jpg
Passenger side installed. 2nd pic shows heater box clearance. Header slides in easily from underneath.
http://www.fquick.com/images/vehicle...1139291163.jpg
http://www.fquick.com/images/vehicle...1139291164.jpg
Front driveshaft clearance.
http://www.fquick.com/images/vehicle...1139291166.jpg
Transmission pan clearance. (notice I used "band" clamps rather than the included u-clamps)
Band clamp link: http://www.summitracing.com/parts/SUM-692250/
http://www.fquick.com/images/vehicle...1139291167.jpg
View of passenger side underneath.
http://www.fquick.com/images/vehicle...1139291168.jpg
Driver's side clearance at front of header tubing.
http://www.fquick.com/images/vehicle...1139291169.jpg
Passenger side clearance at front of header tubing.
http://www.fquick.com/images/vehicle...1139291170.jpg
"Y" pipe clearance between crossmember.
http://www.fquick.com/images/vehicle...1139291172.jpg
This is all that you can see from even with bottom of framerails.
http://www.fquick.com/images/vehicle...1139291173.jpg
Reflashing the truck for the deleted rear O2 sensors.
http://www.fquick.com/images/vehicle...1139291174.jpg
Two pics of headers after drive home. Notice pipe plug used to block egr tube on passenger side header. Also notice that truck obviously needs tune tweaked...
http://www.fquick.com/images/vehicle...1139291175.jpg
http://www.fquick.com/images/vehicle...1139291176.jpg
Some details/opinions...
Headers do indeed have 1-3/4" primary tubes!
Collectors and all piping is 2.5"...end of Y pipe is 3" and mates with stock (or ANY stock "style") catback piping perfectly.
Aside from snapping off the first bolt I touched (which was no fault of the headers, lol), I'm VERY pleased with how easily everything went on.
Plenty of clearance everywhere. My fat fingers can fit between exhaust and anything, anywhere on the setup.
I chose to use stainless band clamps instead of the two cheap-o light duty muffler clamps they included. Makes it MUCH easier to disassemble, and looks better too. Permatex ULTRA COPPER lightly spread around where pipes connect will guarantee leak-free connection, but I have zero leaks without it.
Clamps: http://www.summitracing.com/parts/SUM-692250/
I also chose to re-use the stock exhaust manifold to cylinder head gaskets. No leaks!
The ones that were included didn't fit the holes well at all.
I also re-used the stock manifold to head mounting bolts. Perfect length.
I'm not happy with how the two rear spark plug wires on driver's side do not clear the headers, but that's fairly easily resolved.
The stock manifold to Y pipe nuts are TIGHT! I used a 14mm deep socket, 12" extension, and a 1/2" breaker bar to get all six loose. That was probably the most physical part of the whole job, bar none, LOL...
Without question, the truck needs to be re-tuned now, and I'll address that when it isn't raining (hopefully next week).
Truck is a good bit DEEPER toned at all rpm's.
Truck is a good bit LOUDER at WOT.
Feels/Sounds very smooth as rpm's climb in normal cruising.
I think you could actually use the rear O2 sensors if you wanted, because the included resonators would probably allow them to function near stock.
Didn't really need any "special" tools except for a Sawzall to cut the stock Y pipe.
I'm a heavy equipment mechanic by trade, so I had/have access to pretty much any tools or equipment I could have possibly needed, but basic hand tools was all I really used.
Hope this helps anyone who's been considering a header swap.
Any questions, or whatever, please feel free to ask away (or shoot me a PM) and I'll answer them as honestly as I can.
.
.
About 2 weeks after header swap/cat delete, I decided that the existing Flowmaster 40 series muffler'ed catback is/was now too loud for my taste...not to mention it had horrible rasp at light throttle, under load. A sound I truly hate.
I bought an 18" long Summit 3" glasspack bullet muffler for $20 and installed it in the I-pipe using stainless steel band clamps. This gives the exhaust a perfect tone IMHO. It's still plenty loud enough at WOT, but much more bearable at cruise rpm, and as quiet as with cats at idle.
Using my HPTuners, I also re-did the VE and MAF tune to take advantage of the new airflow capabilities of the headers. Took roughly 3 datalogs and reflashes to re-dial in both. Had to add a good bit more fuel at WOT to keep the existing (pre-header) air/fuel ratio.
FWIW, I also found that my modified stock airbox works well as a free cold air kit. IAT's stay 10-12 degrees above ambient at cruise rpm's, drop to 4-5 degrees above ambient at WOT blasts of only 10 seconds or so, and hang at roughly 20 degrees above ambient during extended idling . (53 degree day)
***** LATEST UPDATE: APRIL 16, 2011 *****
After roughly 15 months/10,000 miles of East Coast weather (snow, salt, moisture), Daily driven inside grungy steel mill at least 5 days per week, here are my latest opinions/updates to share:
"Temporary "fix" to spark plug wires is still 100% working.
Headers "look" like what they now are...weathered stainless steel (original "chrome" look is long gone, but my truck is used as a truck...not a show vehicle by any means)
Studs that are used to connect headers to Y pipe are very rusty and should have been swapped out to something better prior to now, lol.
Still 100% of the opinion that these headers are easily the best bang for the buck for mild combos.
Final, final, exhaust (LOL) is as follows:
1. Ebay headers
2. Ebay Y pipe
3. Custom "I" pipe (3" aluminized)
4. Hooker AeroChamber (3" center inlet/center outlet)
5. Dynomax Super Turbo (3" into dual 2.5" so I could retain the custom 2.5" tailpipes and Hooker LS-1 Camaro "dual-dual" tips)
Header collector "donut gasket" is available from Dynomax, through Amazon or whomever you choose...
Walker 31630 Exhaust Gasket : Amazon.com : Automotive
.
.
LATEST UPDATE....here we are 4 years and 4 months later (2/26/2014)...headers still look good, no leaks.
I installed a wideband in the truck yesterday and even having several "bung holes" LOL, I was not able to remove any to place the wideband sensor in one.
I had to drill and weld a new bung for the new sensor.
No biggie...
.
.
.
Vehicle they are going on is 2002 Chevy Silverado, 5.3 litre.
Current "mods": Modified stock airbox, Airaid air tube, Ported throttle body, TB coolant bypass, custom Flowmaster catback (1 into 2), HPTuners tuned by me.
Anyway, got these headers and Y pipe off of Ebay for $320 delivered. It took 4 days to get to me in Maryland, from California, which was nice. Received them yesterday.
I was definitely a bit pissed and concerned when I saw the box, however...
http://www.fquick.com/images/vehicle...1139291153.jpg
http://www.fquick.com/images/vehicle...1139291154.jpg
I was worried for nothing, since once opened up (by me), everything looked great. Welds look good. Quality seemed to be pretty good as well.
http://www.fquick.com/images/vehicle...1139291155.jpg
http://www.fquick.com/images/vehicle...1139291156.jpg
http://www.fquick.com/images/vehicle...1139291157.jpg
http://www.fquick.com/images/vehicle...1139291158.jpg
I did the install today. Took 5 hours, but an hour or so was used drilling out a broken manifold to head bolt. First one I went to take out, snapped 1/4" in from the outer edge of threaded hole.
I chose to cut the factory Y pipe to ease removal.http://www.fquick.com/images/vehicle...1139291159.jpg
I did have to slightly clearance the dipstick mounting bracket on the left side.
http://www.fquick.com/images/vehicle...1139291160.jpg
I also had to make a quick, temporary "fix" to the rear 2 spark plug wires on the driver's side. Both are right against the headers, so I "borrowed" some exhaust wrap off of one of my machine's turbocharger downpipe.
UPDATE: As of 4-16-2011 (15 months after install, this "temporary fix is still working great!
http://www.fquick.com/images/vehicle...1139291161.jpg
Here's the driver's side header, installed and with the two "wrapped" plug wires. 2nd pic shows clearance from top. Header slides in easily from underneath.
http://www.fquick.com/images/vehicle...1139291162.jpg
http://www.fquick.com/images/vehicle...1139291165.jpg
Passenger side installed. 2nd pic shows heater box clearance. Header slides in easily from underneath.
http://www.fquick.com/images/vehicle...1139291163.jpg
http://www.fquick.com/images/vehicle...1139291164.jpg
Front driveshaft clearance.
http://www.fquick.com/images/vehicle...1139291166.jpg
Transmission pan clearance. (notice I used "band" clamps rather than the included u-clamps)
Band clamp link: http://www.summitracing.com/parts/SUM-692250/
http://www.fquick.com/images/vehicle...1139291167.jpg
View of passenger side underneath.
http://www.fquick.com/images/vehicle...1139291168.jpg
Driver's side clearance at front of header tubing.
http://www.fquick.com/images/vehicle...1139291169.jpg
Passenger side clearance at front of header tubing.
http://www.fquick.com/images/vehicle...1139291170.jpg
"Y" pipe clearance between crossmember.
http://www.fquick.com/images/vehicle...1139291172.jpg
This is all that you can see from even with bottom of framerails.
http://www.fquick.com/images/vehicle...1139291173.jpg
Reflashing the truck for the deleted rear O2 sensors.
http://www.fquick.com/images/vehicle...1139291174.jpg
Two pics of headers after drive home. Notice pipe plug used to block egr tube on passenger side header. Also notice that truck obviously needs tune tweaked...
http://www.fquick.com/images/vehicle...1139291175.jpg
http://www.fquick.com/images/vehicle...1139291176.jpg
Some details/opinions...
Headers do indeed have 1-3/4" primary tubes!
Collectors and all piping is 2.5"...end of Y pipe is 3" and mates with stock (or ANY stock "style") catback piping perfectly.
Aside from snapping off the first bolt I touched (which was no fault of the headers, lol), I'm VERY pleased with how easily everything went on.
Plenty of clearance everywhere. My fat fingers can fit between exhaust and anything, anywhere on the setup.
I chose to use stainless band clamps instead of the two cheap-o light duty muffler clamps they included. Makes it MUCH easier to disassemble, and looks better too. Permatex ULTRA COPPER lightly spread around where pipes connect will guarantee leak-free connection, but I have zero leaks without it.
Clamps: http://www.summitracing.com/parts/SUM-692250/
I also chose to re-use the stock exhaust manifold to cylinder head gaskets. No leaks!
The ones that were included didn't fit the holes well at all.
I also re-used the stock manifold to head mounting bolts. Perfect length.
I'm not happy with how the two rear spark plug wires on driver's side do not clear the headers, but that's fairly easily resolved.
The stock manifold to Y pipe nuts are TIGHT! I used a 14mm deep socket, 12" extension, and a 1/2" breaker bar to get all six loose. That was probably the most physical part of the whole job, bar none, LOL...
Without question, the truck needs to be re-tuned now, and I'll address that when it isn't raining (hopefully next week).
Truck is a good bit DEEPER toned at all rpm's.
Truck is a good bit LOUDER at WOT.
Feels/Sounds very smooth as rpm's climb in normal cruising.
I think you could actually use the rear O2 sensors if you wanted, because the included resonators would probably allow them to function near stock.
Didn't really need any "special" tools except for a Sawzall to cut the stock Y pipe.
I'm a heavy equipment mechanic by trade, so I had/have access to pretty much any tools or equipment I could have possibly needed, but basic hand tools was all I really used.
Hope this helps anyone who's been considering a header swap.
Any questions, or whatever, please feel free to ask away (or shoot me a PM) and I'll answer them as honestly as I can.
.
.
***UPDATE***
About 2 weeks after header swap/cat delete, I decided that the existing Flowmaster 40 series muffler'ed catback is/was now too loud for my taste...not to mention it had horrible rasp at light throttle, under load. A sound I truly hate.
I bought an 18" long Summit 3" glasspack bullet muffler for $20 and installed it in the I-pipe using stainless steel band clamps. This gives the exhaust a perfect tone IMHO. It's still plenty loud enough at WOT, but much more bearable at cruise rpm, and as quiet as with cats at idle.
Using my HPTuners, I also re-did the VE and MAF tune to take advantage of the new airflow capabilities of the headers. Took roughly 3 datalogs and reflashes to re-dial in both. Had to add a good bit more fuel at WOT to keep the existing (pre-header) air/fuel ratio.
FWIW, I also found that my modified stock airbox works well as a free cold air kit. IAT's stay 10-12 degrees above ambient at cruise rpm's, drop to 4-5 degrees above ambient at WOT blasts of only 10 seconds or so, and hang at roughly 20 degrees above ambient during extended idling . (53 degree day)
***** LATEST UPDATE: APRIL 16, 2011 *****
After roughly 15 months/10,000 miles of East Coast weather (snow, salt, moisture), Daily driven inside grungy steel mill at least 5 days per week, here are my latest opinions/updates to share:
"Temporary "fix" to spark plug wires is still 100% working.
Headers "look" like what they now are...weathered stainless steel (original "chrome" look is long gone, but my truck is used as a truck...not a show vehicle by any means)
Studs that are used to connect headers to Y pipe are very rusty and should have been swapped out to something better prior to now, lol.
Still 100% of the opinion that these headers are easily the best bang for the buck for mild combos.
Final, final, exhaust (LOL) is as follows:
1. Ebay headers
2. Ebay Y pipe
3. Custom "I" pipe (3" aluminized)
4. Hooker AeroChamber (3" center inlet/center outlet)
5. Dynomax Super Turbo (3" into dual 2.5" so I could retain the custom 2.5" tailpipes and Hooker LS-1 Camaro "dual-dual" tips)
Header collector "donut gasket" is available from Dynomax, through Amazon or whomever you choose...
Walker 31630 Exhaust Gasket : Amazon.com : Automotive
.
.
LATEST UPDATE....here we are 4 years and 4 months later (2/26/2014)...headers still look good, no leaks.
I installed a wideband in the truck yesterday and even having several "bung holes" LOL, I was not able to remove any to place the wideband sensor in one.
I had to drill and weld a new bung for the new sensor.
No biggie...
.
.
.
Last edited by rel3rd; Feb 26, 2014 at 11:07 AM. Reason: updated w/clamp part number link
 Oct 31, 2009 | 04:04 PM
#4
Thread Starter
11 Second Club
iTrader: (42)
Joined: Nov 2005
Posts: 1,643
Likes: 4
From: Baltimore, MD.
I posted links on purpose. Didn't think the powers that be would appreciate me hogging up their bandwidth by posting 23 HD pictures, especially when it's very easy for anyone who wants to see them, to simply click the link and see them.
No, I am guilty of NOT pre-soaking them, but I paid dearly for it, LOL.
I think I jinxed myself last night by reading about someone else's header install and how they snapped a bolt or two off. I never did get mine out, I wound up drilling it, and re-tapping it to a different size.
I think I jinxed myself last night by reading about someone else's header install and how they snapped a bolt or two off. I never did get mine out, I wound up drilling it, and re-tapping it to a different size.
Oct 31, 2009 | 07:51 PM
#6

Staging Lane
Joined: Jan 2009
Posts: 84
Likes: 0
Oct 31, 2009 | 08:19 PM
#7
Thread Starter
11 Second Club
iTrader: (42)
Joined: Nov 2005
Posts: 1,643
Likes: 4
From: Baltimore, MD.
Check these out?http://cgi.ebay.com/ebaymotors/ws/eB...K%3AMEWAX%3AIT
Trending Topics

 Nov 1, 2009 | 11:19 AM
#9
Thread Starter
11 Second Club
iTrader: (42)
Joined: Nov 2005
Posts: 1,643
Likes: 4
From: Baltimore, MD.
I wasn't about to use those cheapo clamps. I use those band clamps on anything I ever install exhaust on. Makes for much easier time of it if the parts ever have to come apart.
Nov 1, 2009 | 12:33 PM
#10
Staging Lane
Joined: Jan 2009
Posts: 84
Likes: 0
Im about to go ahead and order these tonight. Just wondering, The pic in hirdlej's fix looks like it has more clearance to me, yours looks a little tighter, maybe its just the pic. Also do the OBX hit on two wires, I thought it was just the second one. Was the 1 5/8 id or od? Thanks again for the help.