
Returnless Bucket Build
 Jun 11, 2014 | 06:39 AM
#1

Thread Starter
On The Tree
iTrader: (20)
Joined: Aug 2009
Posts: 137
Likes: 1
From: South GA/Piedmont NC
Let me preface this by giving thanks to those who assisted in my decision process on my pump selection and bucket tear down.....Yes, there is a lot of info out here to help with your ideas, however nothing is better than plain ole down and dirty work!
After looking at options on pump replacement, I elected to go with a Walbro 255 for my returnless bucket from APE....I called, emailed Ron several times, always answering the phone, and email...Nice guy with tons of support to offer....
LT1 F-body and B-body fuel pump kit
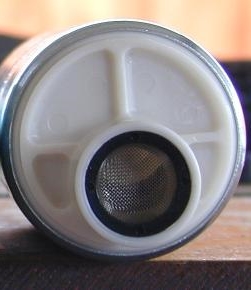
This is the one I decided to install replacing my original that is in the left pix......It is model F20000169...It is actually a little smaller than the original so fitment will not be an issue at all! Also ordered flex hose, and clamps from Ron as well...
This should serve my needs well for awhile since I do not plan to boost right now but you know how that goes lol....
Bucket build this weekend so more to follow! After all, I do have to work a little around here!
After looking at options on pump replacement, I elected to go with a Walbro 255 for my returnless bucket from APE....I called, emailed Ron several times, always answering the phone, and email...Nice guy with tons of support to offer....
LT1 F-body and B-body fuel pump kit


This is the one I decided to install replacing my original that is in the left pix......It is model F20000169...It is actually a little smaller than the original so fitment will not be an issue at all! Also ordered flex hose, and clamps from Ron as well...
This should serve my needs well for awhile since I do not plan to boost right now but you know how that goes lol....
Bucket build this weekend so more to follow! After all, I do have to work a little around here!
Jun 11, 2014 | 04:04 PM
#2

Looks nice man, I just did a walbro 450 in my stock bucket for my Silverado. That flex hose is a BITCH to get on. I went through 2 of them before finally getting one on.
How did you get it on? I ended up having to use a lighter and getting the plastic really soft to get it to expand enough.
How did you get it on? I ended up having to use a lighter and getting the plastic really soft to get it to expand enough.
Jun 11, 2014 | 04:09 PM
#3

The key to getting the flex hose on is the proper amount of heat. I use a heat gun. Too little heat and it will never go on. Too much heat and the hose will deform when you try pushing it and then it's ruined. The perfect amount seemed to be right when the plastic started turning clear and not a smidgen more. I always bought extras just in case though since they're only about $3-4 each.
Jun 11, 2014 | 07:43 PM
#4
Thread Starter
On The Tree
iTrader: (20)
Joined: Aug 2009
Posts: 137
Likes: 1
From: South GA/Piedmont NC
Thanks for the input...it's greatly appreciated! I actually used a heat gun to soften the old hose to pull them off so i will be careful on the install of the new hose...
Yes, i have 2 xtra hoses just in case! I usually overthink and over engineer everything so it takes me longer to get anything finished...Oh well personal satisfaction goes a long way!
Wait for my head and cam install lol.....
Yes, i have 2 xtra hoses just in case! I usually overthink and over engineer everything so it takes me longer to get anything finished...Oh well personal satisfaction goes a long way!
Wait for my head and cam install lol.....
Jun 11, 2014 | 11:30 PM
#5
The key to getting the flex hose on is the proper amount of heat. I use a heat gun. Too little heat and it will never go on. Too much heat and the hose will deform when you try pushing it and then it's ruined. The perfect amount seemed to be right when the plastic started turning clear and not a smidgen more. I always bought extras just in case though since they're only about $3-4 each.


 Jun 12, 2014 | 06:29 AM
#7
Thread Starter
On The Tree
iTrader: (20)
Joined: Aug 2009
Posts: 137
Likes: 1
From: South GA/Piedmont NC
I do appreciate your insight in the pump rebuild....
Trending Topics
 Jul 1, 2014 | 01:21 PM
#9
Thread Starter
On The Tree
iTrader: (20)
Joined: Aug 2009
Posts: 137
Likes: 1
From: South GA/Piedmont NC
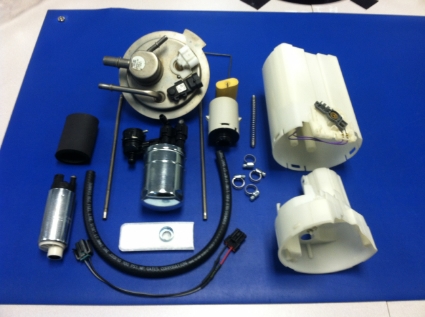
Well...Here are all the bits and goodies for my bucket build all in one pix! I soldered the connections together for the power and used fuel safe heat shrink to cover the wires.
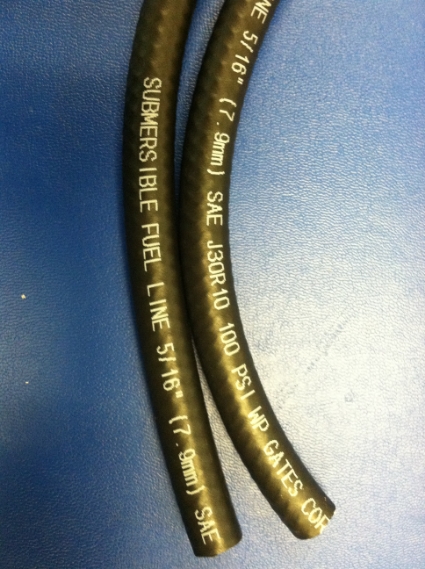
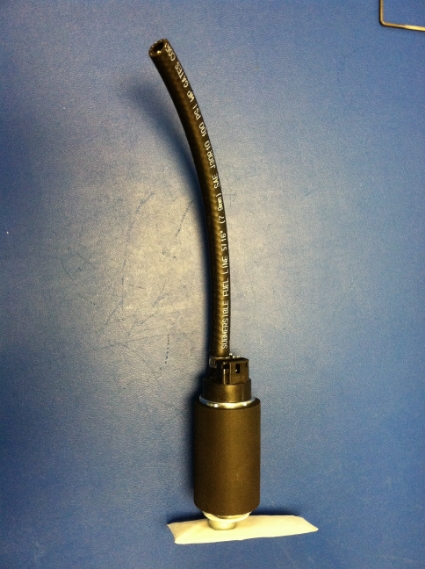
I decided to use the "good" submersible fuel line to connect the pump, filter, and to the top of the outlet to the rails...I had trouble getting the flexi hose on the connections..I tried a heat gun(too much heat) and petrolum jelly as suggested....There is a trick to it I know..Maybe next time!
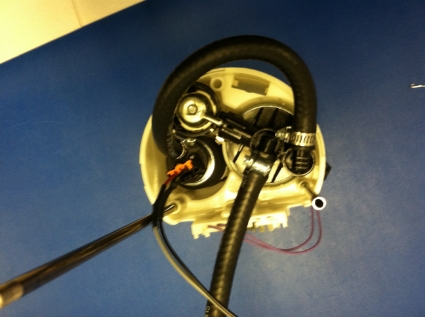
Walbro 255 with his sock, fuel line, and sleve installed....Are we having fun yet?!
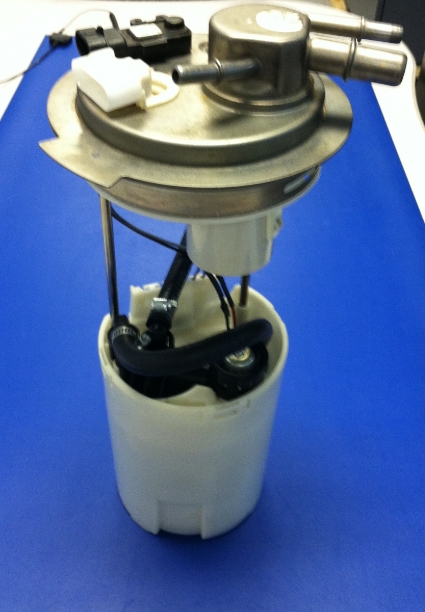
I then installed the pump w/sock into the inner bucket...It was a match made for trucks! Sock is just the right size, and is at the bottom of the bucket where there are 2 one way rubber seals...

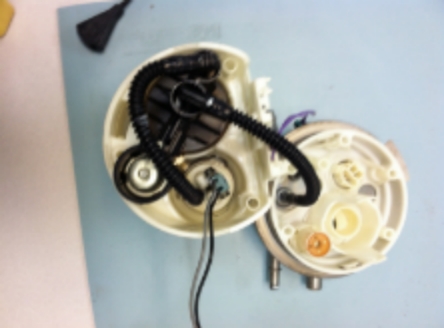
Next comes the filter and fpr into the inner bucket(at least that is what I call it) and lines connected accordingly...

The inner bucket inside the outer bucket...I also had only 1 spring that the top slides up and down on the shafts...
Here it is...Back in one piece! Hope it works!!
I do not have many posts here, however that does not mean I do not do my research. The info is here, and other places on the interweb. This is my first major, well for me, write up so if I went to far, or anything else, please let me know...It was also a learning experience w/Photobucket as well...Time consuming for me until I learn the shortcuts there. I always seem to over-engineer everything, making it harder than it actually is....
Thanks to the senior members that assisted me behind the scenes! May need more help in the future!

I decided to use the "good" submersible fuel line to connect the pump, filter, and to the top of the outlet to the rails...I had trouble getting the flexi hose on the connections..I tried a heat gun(too much heat) and petrolum jelly as suggested....There is a trick to it I know..Maybe next time!

Walbro 255 with his sock, fuel line, and sleve installed....Are we having fun yet?!

I then installed the pump w/sock into the inner bucket...It was a match made for trucks! Sock is just the right size, and is at the bottom of the bucket where there are 2 one way rubber seals...

Next comes the filter and fpr into the inner bucket(at least that is what I call it) and lines connected accordingly...

The inner bucket inside the outer bucket...I also had only 1 spring that the top slides up and down on the shafts...

Here it is...Back in one piece! Hope it works!!

I do not have many posts here, however that does not mean I do not do my research. The info is here, and other places on the interweb. This is my first major, well for me, write up so if I went to far, or anything else, please let me know...It was also a learning experience w/Photobucket as well...Time consuming for me until I learn the shortcuts there. I always seem to over-engineer everything, making it harder than it actually is....
Thanks to the senior members that assisted me behind the scenes! May need more help in the future!
Jul 3, 2014 | 04:30 PM
#10

Nice writeup! This will be helpful.
One question...
I see alot of posts on here about when using a different pump in the bucket, you can no longer run it to E without fear of going lean? Why is this? Looks as if it would function the same as stock to me?
One question...
I see alot of posts on here about when using a different pump in the bucket, you can no longer run it to E without fear of going lean? Why is this? Looks as if it would function the same as stock to me?