
8 Rib Install / Pictures
 Sep 30, 2012 | 05:12 PM
#1

Well as many have seen I switched over to a 8 Rib setup from Joe at LeftCoast 32
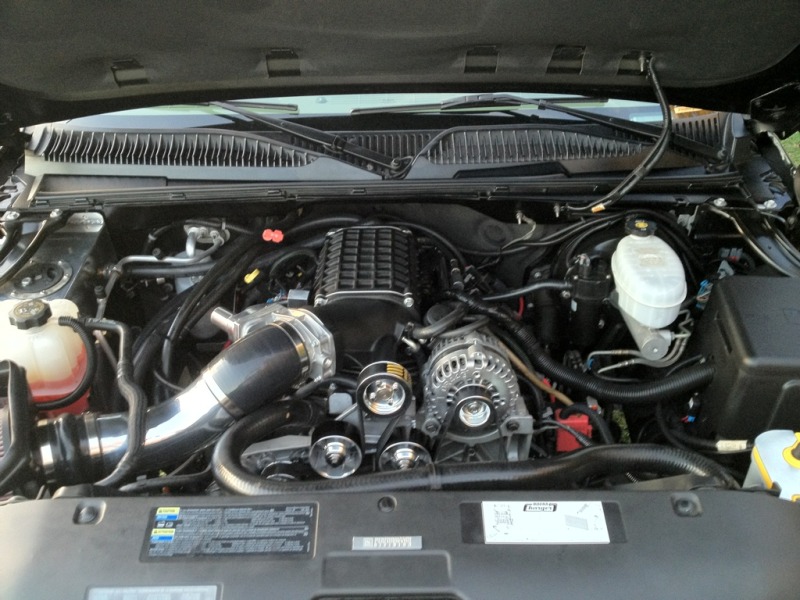
I already had a OD crank pulley and some Metco idlers so I only needed the power steering, alternator, blower and offset tensioner pulley. Installation of everything is pretty straight forward. Here are some pics and a bit of info for anyone that is going to do the swap or just wondering.
Blower Pulley- Joe has shim kits to get the alignment perfect, I ended up using the middle thinkness shim. I don’t recall the thinkness of it.

Alternator pulley- Straight forward install, just remove the stock nut and install the new pulley. Leave the belt on to loosen the stock nut as to keep the pulley from spinning.

Power Steering pulley- You will need a puller puller to remove the stock pulley and a pulley installer to press on the new hub. There are various ways to properly set the depth of the pulley, myself before I removed the stock pulley I used a set of calipers and measured the distance between the power steering bracket and a given groove in the pulley to determine depth. If you have a IW crank pulley you can just straight edge between the crank and power steering pulley. When installing the power steering pulley be sure you have at a minimum of .010" clearance between the power steering hub and the housing where the shaft enters the pump. Do not try to install the pulley until the shaft and the pulley are flush, you will mess up the power steering pump if you do so. There are two different style power steering pumps on the trucks, Joe and I worked together and the hubs should be compatible with all of the pumps now.


Tensioner pulley- Fairly straight forward, just note that the HD tensioner bolt is REVERSE thread. The tensioner pulley that Joe offers is made so that it has a different offset depending on which way you mount it. I needed to mount mine as to bring the pulley a bit further forward to the radiator.


Water pump pulley nut- This is cosmetic, when doing a 8 Rib setup you must weld the waterpump pulley on as the belt is known to walk the pulley off of the shaft. This anodized nut just cleans things up nicely.

Here are a couple pics showing what I mean by straight edging the pulleys to check alignment.


That’s about it in a nutshell, if you are looking into a 8 rib setup then checkout what Joe has. His service after the sale is awesome, you will be hard pressed to find a more helpful guy.
I already had a OD crank pulley and some Metco idlers so I only needed the power steering, alternator, blower and offset tensioner pulley. Installation of everything is pretty straight forward. Here are some pics and a bit of info for anyone that is going to do the swap or just wondering.
Blower Pulley- Joe has shim kits to get the alignment perfect, I ended up using the middle thinkness shim. I don’t recall the thinkness of it.
Alternator pulley- Straight forward install, just remove the stock nut and install the new pulley. Leave the belt on to loosen the stock nut as to keep the pulley from spinning.
Power Steering pulley- You will need a puller puller to remove the stock pulley and a pulley installer to press on the new hub. There are various ways to properly set the depth of the pulley, myself before I removed the stock pulley I used a set of calipers and measured the distance between the power steering bracket and a given groove in the pulley to determine depth. If you have a IW crank pulley you can just straight edge between the crank and power steering pulley. When installing the power steering pulley be sure you have at a minimum of .010" clearance between the power steering hub and the housing where the shaft enters the pump. Do not try to install the pulley until the shaft and the pulley are flush, you will mess up the power steering pump if you do so. There are two different style power steering pumps on the trucks, Joe and I worked together and the hubs should be compatible with all of the pumps now.
Tensioner pulley- Fairly straight forward, just note that the HD tensioner bolt is REVERSE thread. The tensioner pulley that Joe offers is made so that it has a different offset depending on which way you mount it. I needed to mount mine as to bring the pulley a bit further forward to the radiator.
Water pump pulley nut- This is cosmetic, when doing a 8 Rib setup you must weld the waterpump pulley on as the belt is known to walk the pulley off of the shaft. This anodized nut just cleans things up nicely.
Here are a couple pics showing what I mean by straight edging the pulleys to check alignment.
That’s about it in a nutshell, if you are looking into a 8 rib setup then checkout what Joe has. His service after the sale is awesome, you will be hard pressed to find a more helpful guy.
Last edited by 03sierraslt; Oct 1, 2012 at 10:02 AM.


 Sep 30, 2012 | 05:38 PM
#3


 Oct 1, 2012 | 08:57 AM
#7
Looks great Pat!
I will add a little on the installation of the power steering pulley. Evidently there are two power steering pumps for our trucks. A long shaft version and a short shaft version. I guess my truck has the short shaft version and the offset is a little different from the other pump which Joe originally cut these pulleys for. I ended up pulling the shaft out of the pump trying to get it to line up. Worked with Joe and got a correct hub for the pulley and everything has been working great for nearly a year. So take Pat's advice and take some measurements prior to removing the stock pulley and keep an eye on the new hub while installing it. Contrary to popular belief, the power steering pulley/hub does not necessary install flush with the shaft.
I will add a little on the installation of the power steering pulley. Evidently there are two power steering pumps for our trucks. A long shaft version and a short shaft version. I guess my truck has the short shaft version and the offset is a little different from the other pump which Joe originally cut these pulleys for. I ended up pulling the shaft out of the pump trying to get it to line up. Worked with Joe and got a correct hub for the pulley and everything has been working great for nearly a year. So take Pat's advice and take some measurements prior to removing the stock pulley and keep an eye on the new hub while installing it. Contrary to popular belief, the power steering pulley/hub does not necessary install flush with the shaft.
Trending Topics
Oct 1, 2012 | 09:08 AM
#8

Thanks so much for the detailed pictures and great information. Much appreciated for taking the time to dial in the kit with us, it is never easy when we are on opposite sides of the states. You attention to the details are outstanding, everything looks great!
Oct 1, 2012 | 09:58 AM
#9
Looks great Pat!
I will add a little on the installation of the power steering pulley. Evidently there are two power steering pumps for our trucks. A long shaft version and a short shaft version. I guess my truck has the short shaft version and the offset is a little different from the other pump which Joe originally cut these pulleys for. I ended up pulling the shaft out of the pump trying to get it to line up. Worked with Joe and got a correct hub for the pulley and everything has been working great for nearly a year. So take Pat's advice and take some measurements prior to removing the stock pulley and keep an eye on the new hub while installing it. Contrary to popular belief, the power steering pulley/hub does not necessary install flush with the shaft.
I will add a little on the installation of the power steering pulley. Evidently there are two power steering pumps for our trucks. A long shaft version and a short shaft version. I guess my truck has the short shaft version and the offset is a little different from the other pump which Joe originally cut these pulleys for. I ended up pulling the shaft out of the pump trying to get it to line up. Worked with Joe and got a correct hub for the pulley and everything has been working great for nearly a year. So take Pat's advice and take some measurements prior to removing the stock pulley and keep an eye on the new hub while installing it. Contrary to popular belief, the power steering pulley/hub does not necessary install flush with the shaft.
Oct 1, 2012 | 10:04 AM
#10
Thanks man, got some miles on her now and all is well.