
my first attempt at body work
 Feb 2, 2015 | 08:52 PM
#1


I have 10 holes like this on my s10. for the record, I am not a body man, I have never tried it, and I don't claim to know what I'm doing. this is just what worked for me. I'm thrilled with the results! I have always been deathly afraid of body work. never even put sand paper to paint...that's how noobie I am to it lol.
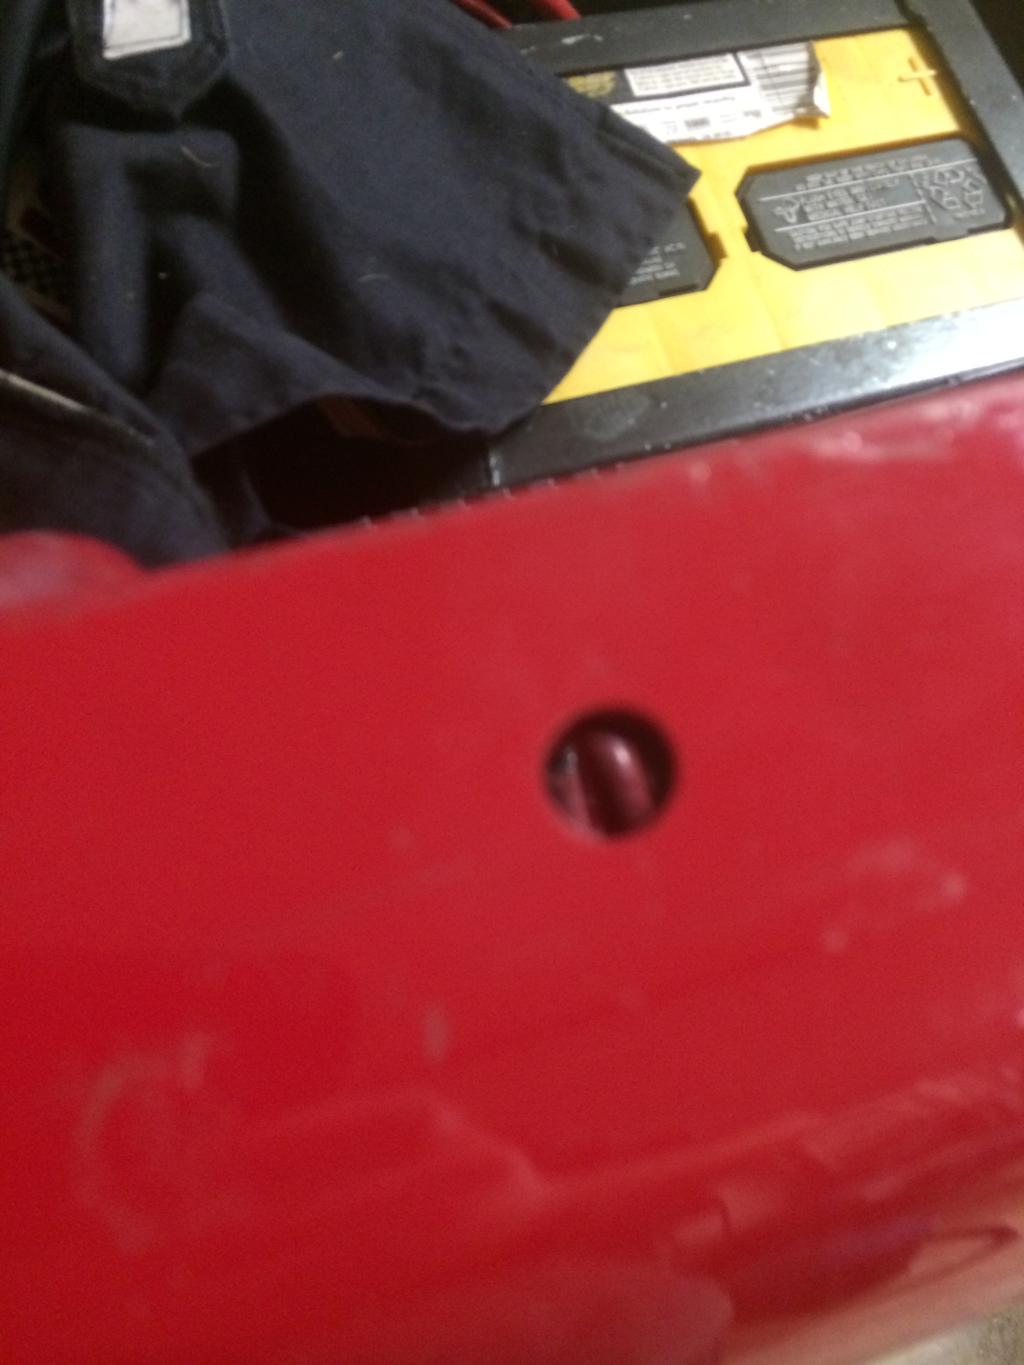
anyways. here are the holes I'm filling. I've only done one because I wasn't sure.
step 1: remove paint down to metal with 120 grit flapper disk on a 4" grinder. don't put any real pressure to the grinder.

step 2: weld the hole shut. tack welds, and work slowly. I hear if you heat the metal too much it will warp the metal. it took me about 10 minutes to weld it shut using a wet rag between tacks. I forgot to take pictures of the weld
step 3: grind flush with the same 120 grit flapper. again I forgot to take pics but just imagine what a welded shut hole looks like lol.
step 4: bondo. forgot to shoot pic. read the can and spread it thin. I used a da sander with 80 grit paper to knock the heavy stuff off, then moved to 400 grit to remove the sand marks.
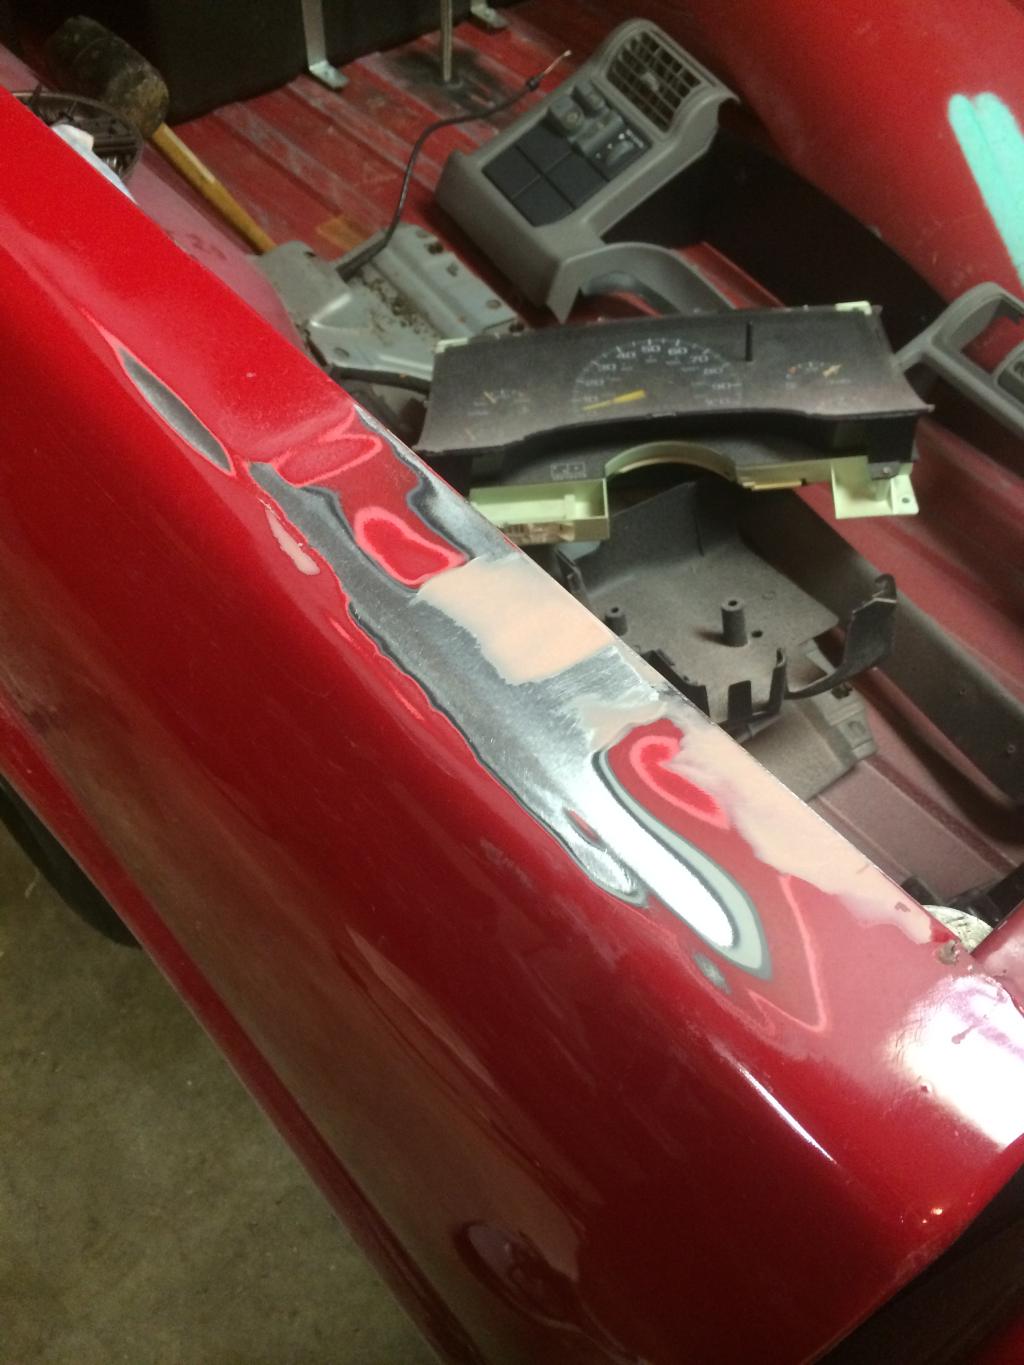
3 coats of high build primer on top waiting to be hit with a wet round of 400 grit paper.

I'm happy with the results! 1 step closer to being ready to plastidip the entire truck.
anyways. here are the holes I'm filling. I've only done one because I wasn't sure.

step 1: remove paint down to metal with 120 grit flapper disk on a 4" grinder. don't put any real pressure to the grinder.

step 2: weld the hole shut. tack welds, and work slowly. I hear if you heat the metal too much it will warp the metal. it took me about 10 minutes to weld it shut using a wet rag between tacks. I forgot to take pictures of the weld
step 3: grind flush with the same 120 grit flapper. again I forgot to take pics but just imagine what a welded shut hole looks like lol.
step 4: bondo. forgot to shoot pic. read the can and spread it thin. I used a da sander with 80 grit paper to knock the heavy stuff off, then moved to 400 grit to remove the sand marks.

3 coats of high build primer on top waiting to be hit with a wet round of 400 grit paper.

I'm happy with the results! 1 step closer to being ready to plastidip the entire truck.

 Feb 2, 2015 | 09:40 PM
#4
it really wasn't bad at all. the worst part was putting a grinder to my paint. after that, the worst thing that could happen was I end up paying someone to fix my screw up. I was quoted 200-250 to fill the holes...but they were just going to bondo the holes shut. I didn't like that. I spent around $65 in materials including the DA sander and get to learn something new.
Feb 2, 2015 | 10:55 PM
#5


I will tell you this.
Don't tape off your areas like that when you apply primer. It will leave a hard edge and will be nearly impossible to blend into the existing paint.
Tape off a much larger area. Apply the First coat of primer to the bondo only. The bondo is going to soak up the primer like a sponge any way. Next coat a little larger and slowly work your way out.
When you tape up some thing like this, use a technique called back taping. This will not let the over spray leave a hard edge. It will be easier to block and feather over the existing paint so you don't get a hard line. With a hard line, 1 of 2 things usually happens.
1. You over sand trying to feather out the area and create a low spot that shows up in your finished product.
2. You don't sand enough and the hard lines show up in your finished worked.
Feb 2, 2015 | 11:28 PM
#6
I will tell you this.
Don't tape off your areas like that when you apply primer. It will leave a hard edge and will be nearly impossible to blend into the existing paint.
Tape off a much larger area. Apply the First coat of primer to the bondo only. The bondo is going to soak up the primer like a sponge any way. Next coat a little larger and slowly work your way out.
When you tape up some thing like this, use a technique called back taping. This will not let the over spray leave a hard edge. It will be easier to block and feather over the existing paint so you don't get a hard line. With a hard line, 1 of 2 things usually happens.
1. You over sand trying to feather out the area and create a low spot that shows up in your finished product.
2. You don't sand enough and the hard lines show up in your finished worked.
Don't tape off your areas like that when you apply primer. It will leave a hard edge and will be nearly impossible to blend into the existing paint.
Tape off a much larger area. Apply the First coat of primer to the bondo only. The bondo is going to soak up the primer like a sponge any way. Next coat a little larger and slowly work your way out.
When you tape up some thing like this, use a technique called back taping. This will not let the over spray leave a hard edge. It will be easier to block and feather over the existing paint so you don't get a hard line. With a hard line, 1 of 2 things usually happens.
1. You over sand trying to feather out the area and create a low spot that shows up in your finished product.
2. You don't sand enough and the hard lines show up in your finished worked.
thanks for the tip. i'll keep it in mind for the remaining 9 holes. do I have to use tape? is 400 grit too light to sand the primer? the DA sander gets work done FAST! i don't plan to use the grinder on the rest of the truck. 80 grit on the DA should do plenty fine.
Feb 2, 2015 | 11:33 PM
#7
Let me see if I can paint you a mental picture.
place paper over area to get primed. Let it overhang past by at least 8-10 inches. Tape lower edge. Now fold paper back over itself in a cylindrical fashion and tape it down.
This will create enough of a void to allow overspray to fly into a pocket without leaving a hard edge. Let me see if i can find a reference for you.
Trending Topics
Feb 2, 2015 | 11:49 PM
#8
This old school book explains it and has a generic picture. see "Reverse Masking" https://books.google.com/books?id=qv...asking&f=false
Feb 2, 2015 | 11:59 PM
#9

TECH Apprentice
Joined: Feb 2011
Posts: 396
Likes: 1
From: North Texas
I will tell you this.
Don't tape off your areas like that when you apply primer. It will leave a hard edge and will be nearly impossible to blend into the existing paint.
Tape off a much larger area. Apply the First coat of primer to the bondo only. The bondo is going to soak up the primer like a sponge any way. Next coat a little larger and slowly work your way out.
When you tape up some thing like this, use a technique called back taping. This will not let the over spray leave a hard edge. It will be easier to block and feather over the existing paint so you don't get a hard line. With a hard line, 1 of 2 things usually happens.
1. You over sand trying to feather out the area and create a low spot that shows up in your finished product.
2. You don't sand enough and the hard lines show up in your finished worked.
Don't tape off your areas like that when you apply primer. It will leave a hard edge and will be nearly impossible to blend into the existing paint.
Tape off a much larger area. Apply the First coat of primer to the bondo only. The bondo is going to soak up the primer like a sponge any way. Next coat a little larger and slowly work your way out.
When you tape up some thing like this, use a technique called back taping. This will not let the over spray leave a hard edge. It will be easier to block and feather over the existing paint so you don't get a hard line. With a hard line, 1 of 2 things usually happens.
1. You over sand trying to feather out the area and create a low spot that shows up in your finished product.
2. You don't sand enough and the hard lines show up in your finished worked.
Feb 3, 2015 | 12:19 AM
#10

My turn. For body filler (bondo is a brand btw) use a minumum of 80 grit to prep the surface before aplying the body filler. Body filler uses a mechanical adhesion and basically needs those scratches to "stick to the material underneath it. 36 grit cuts fastest then follow it with 80 then finish it with 180. Above that a "glaze" wich is basically a thin, thin coating of body filler is used to cover minor imperfections like pinholes. Then finish that using 180 and if you want at least 320. What fastbrick is saying is correct on the back masking, saves alot of time. To sand primer use a "guide" coat. Any kind of rattlecan paint wil do (black in color preferably), spray very light coats and as you sand start with 320/400 and as the scratches/sandmarks/orangepeel starts to dissapear switch to 600. Also i see no mention of a sanding block. A DA is great but if you want straight use the longest and stiffest (hey) block you can "use" for that repair. Exmpl: if the repair area is 3" round a 6" block may be best to make sure your repair is even with the rest of the body. Also sand in a X formation (or crosshatch) it blends the filler into the paint alot easier. It sounds like alot of work and unfortunately it is alot but you might as wel do it once and do it right. Once you get the hang of it its easy, especially when you do it for a living lol. I might have missed sumthin but its 12:18 am as i type this and shouldve been asleep 2 hrs ago lol.
When you prep the rest of the "good" paint, a good wet sand with 600 is all that is needed before paint since you mentioned hitting the rest of the truck with 80 grit. Also use a block when prepping or you will end up with wavy paint. A DA is used to knock of the rough stuff only. At least this is what i was taught. In the end have fun doing it and when its done (if it looks good lol) you can say "i did it" Wish you were closer as id help ya out lol.
When you prep the rest of the "good" paint, a good wet sand with 600 is all that is needed before paint since you mentioned hitting the rest of the truck with 80 grit. Also use a block when prepping or you will end up with wavy paint. A DA is used to knock of the rough stuff only. At least this is what i was taught. In the end have fun doing it and when its done (if it looks good lol) you can say "i did it" Wish you were closer as id help ya out lol.
Last edited by RS/SS 4.8; Feb 3, 2015 at 12:37 AM. Reason: i remembered something lol