

Pics of the AC Controls in Blue
 Feb 19, 2006 | 06:10 PM
#1
Here's the pics 
I found that this was easy and only took about 2-3 hours.
On the center part where it shows the red color I had to use two White LED's for the red to show red and not violet, as it would with only the Blue LED's.
The camera always makes it looks like there are dead spots but there isn't any. It is nice and pure blue.
Feb 19, 2006 | 06:14 PM
#2
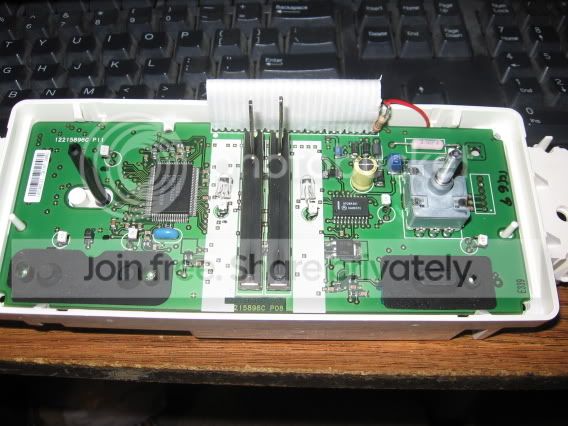
The blue part in the temp controls is split because that's where the ***** were blocking the light.
The circuit was already laid out nice in groups of 2 lamps. So it made it easy to place the LED's. All I needed to do was place a 220ohm resistor where the power came in. You can see it in the first pic(far right ribbon). Just make sure that you orient the anode and cathode right(+ and- ). You can see where I used a marker to mark some of the - spots.
The circuit was already laid out nice in groups of 2 lamps. So it made it easy to place the LED's. All I needed to do was place a 220ohm resistor where the power came in. You can see it in the first pic(far right ribbon). Just make sure that you orient the anode and cathode right(+ and- ). You can see where I used a marker to mark some of the - spots.


Trending Topics
Feb 19, 2006 | 08:12 PM
#8

Hey, nice work on the AC, but I couldn't pick out where you put the resistors or where the actual led's were? Are the lights where all those little squares (6 + the 2 white LED's + 3 blue lights for the indicators)?
Feb 19, 2006 | 09:34 PM
#9
There is only one resistor due to the LED's are laid out in series groups of two. With the LED's in series I only need one 220ohm resistor. Then all of the Series branches were in parallel.
The stock indicator orange LED's were not changed, I could have But I wanted to make sure I see them. And I may Lower the resistance or the 220ohm resistor due to a slight brightness difference between it and the radio. But other that that I am very happy with the outcome.
I changed the pic below to show where the parts are.
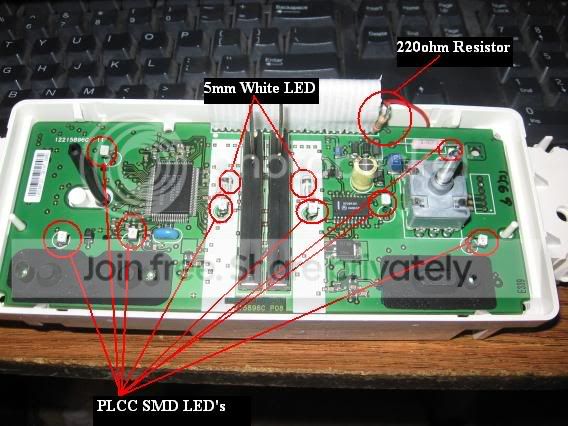
