
Getting closer to painting the hood

 07-03-2008, 10:28 PM
#22

A couple of tips for when you paint in a garage,
Mop the floor before you paint, then wet the floor down right before you
paint, make sure the floor stays wet. The reason behind this is because dust will cling to the wet floor and make it stick to the ground. That way it cuts down on the dust flying around... Don't go nuts with the water thou cause paint does not like a humid enviroment...
Completely empty out your compressor before you paint to make sure it is moisture free..
Since your painting a hood, make sure that the metal is grounded to the floor of your garage somehow... Spraying can build up a small amount of static electricity the part being grounded prohibits this... Static electricity will attract dust and trash. I used to wrap a chain around the axle of cars I was painting and lay it on the ground..
I have sprayed several cars in my parent garage doing it this way and had pretty good results...
Cardboard is good for test shots. I used tape a piece of wrapping paper (white) to the a big box and practice on it...
Start your spray off the panel then move the stream onto the panel and stop spraying after the panel... Never start spraying in the middle of the panel.... Move your body with the gun not just your arm to keep the distance between the gun and panel uniform... Never break your wrist (arch swinging)
If you get a little trash in the paint or a run, don't worry to much about it, cause you can fix it afterwards when you color sand.
Good luck
 I think it would make a big difference. looking good so far.
 07-04-2008, 05:11 AM
#25
Teching In

Join Date: Dec 2007
Location: Lexington, Kentucky
Posts: 40
Likes: 0
Received 0 Likes
on
0 Posts
Hey Roger, If you need a hand this weekend, I'm off. Give me a buzz. I have an extra Chevelle deck lid or 2 laying around you can test your skills against if you need something to practice on. Later.
07-04-2008, 06:53 AM
#26
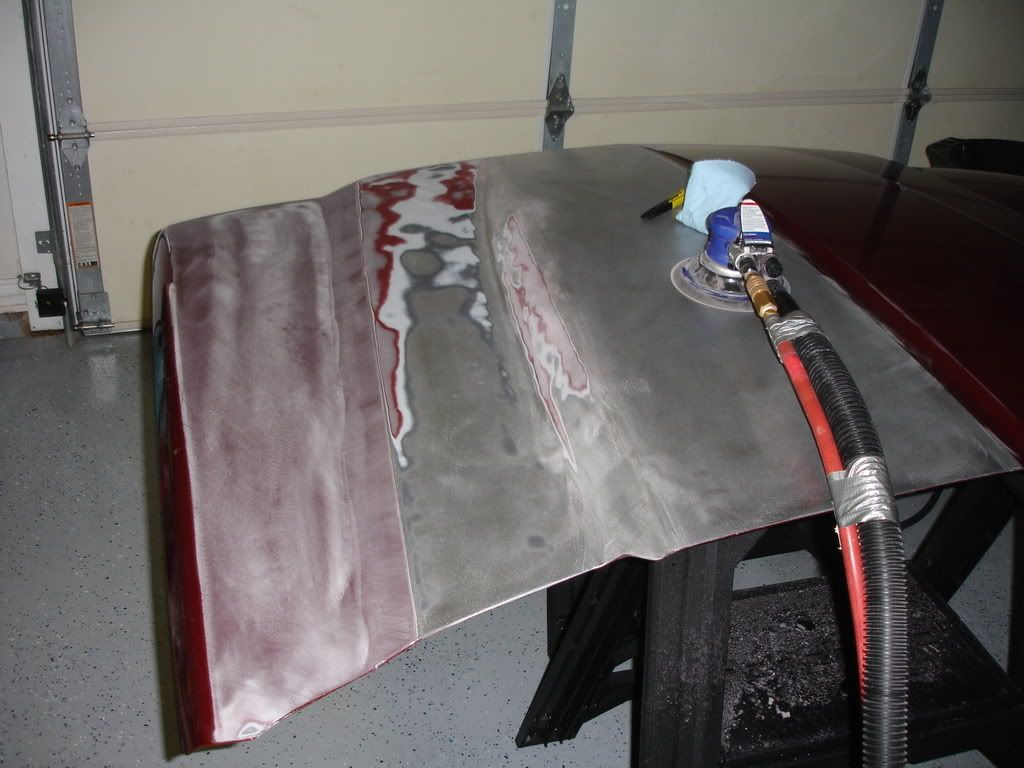
Wow, I've already under estimated the sanding. 3-4 hours in about 1/3 of the hood down to metal. I had the wrong grit paper to start. Hitting it with 100 and 220. I went and got some 80. The damn clear is TOUGH. Once you get through it it goes a little easier.
I AM SORE this morning.
Thanks again for the solid advice and tips. Grounding the hood is a good idea  If I screw it up no biggie. I'll drive it like it is for awhile and try again. Its the only way to learn.
Yep they are on the list. I still remember you photo shopping them for me. They are going to be the lower color. I would have already done it but ran into trouble getting the bumper cap off. I've been trying to find another one in case I screw up the cap.
Nothing ventured nothing gained. I've never been afraid of trying anything at least once. It's gotten me in trouble a couple times. 
Come on down. I'm here alone all weekend. We'll get your codes ironed out. Have a couple beers shoot the **** and depending on where I'm at sand, build a paint booth, or spray some chemicals Thanks for offering up some panels I think I'll just kill some cardboard.
I AM SORE this morning.
A couple of tips for when you paint in a garage,
Mop the floor before you paint, then wet the floor down right before you
paint, make sure the floor stays wet. The reason behind this is because dust will cling to the wet floor and make it stick to the ground. That way it cuts down on the dust flying around... Don't go nuts with the water thou cause paint does not like a humid enviroment...
Completely empty out your compressor before you paint to make sure it is moisture free..
Since your painting a hood, make sure that the metal is grounded to the floor of your garage somehow... Spraying can build up a small amount of static electricity the part being grounded prohibits this... Static electricity will attract dust and trash. I used to wrap a chain around the axle of cars I was painting and lay it on the ground..
I have sprayed several cars in my parent garage doing it this way and had pretty good results...
Cardboard is good for test shots. I used tape a piece of wrapping paper (white) to the a big box and practice on it...
Start your spray off the panel then move the stream onto the panel and stop spraying after the panel... Never start spraying in the middle of the panel.... Move your body with the gun not just your arm to keep the distance between the gun and panel uniform... Never break your wrist (arch swinging)
If you get a little trash in the paint or a run, don't worry to much about it, cause you can fix it afterwards when you color sand.
Good luck
Mop the floor before you paint, then wet the floor down right before you
paint, make sure the floor stays wet. The reason behind this is because dust will cling to the wet floor and make it stick to the ground. That way it cuts down on the dust flying around... Don't go nuts with the water thou cause paint does not like a humid enviroment...
Completely empty out your compressor before you paint to make sure it is moisture free..
Since your painting a hood, make sure that the metal is grounded to the floor of your garage somehow... Spraying can build up a small amount of static electricity the part being grounded prohibits this... Static electricity will attract dust and trash. I used to wrap a chain around the axle of cars I was painting and lay it on the ground..
I have sprayed several cars in my parent garage doing it this way and had pretty good results...
Cardboard is good for test shots. I used tape a piece of wrapping paper (white) to the a big box and practice on it...
Start your spray off the panel then move the stream onto the panel and stop spraying after the panel... Never start spraying in the middle of the panel.... Move your body with the gun not just your arm to keep the distance between the gun and panel uniform... Never break your wrist (arch swinging)
If you get a little trash in the paint or a run, don't worry to much about it, cause you can fix it afterwards when you color sand.
Good luck
If I screw it up no biggie. I'll drive it like it is for awhile and try again. Its the only way to learn. Thanks for offering up some panels I think I'll just kill some cardboard.
07-04-2008, 07:24 AM
#27


I'm not familiar w/ 2k primer. But Black GMC gave great advice. A self etching primer like Variprime or similiar, can't recall PPG p/n#. That will adhere to bare metal. The primers need some bite to hold to bare metal, so don't use too fine a grit paper. When u start wetsanding, keep a spray bottle to keep surface wet or hose w/ adjustable nozzle works too. Groundin w/ a chain was a tip that I don't remember doin, but is another sound idea to prevent static, hence dust.
07-04-2008, 12:30 PM
#28
I went out this morning and picked up some Nason Ful-Seal 422-23. Had to drive 30 miles to get it. Paint jobbers are few and far between here. A ready to spray sealer. The 2K I have on top of it.
Found a couple of block sanders and borrowed another camera from work.
Goal is to get it sanded down today. Start setting up the booth tonight. It's raining on and off so I have to come up with something to cover the engine bay of the truck to set it outside.
This is gonna get scary when I put the fluids in the gun
 07-04-2008, 02:19 PM
#30
Notorious BIG
iTrader: (6)

Join Date: Aug 2005
Location: Pittsburgh, PA
Posts: 1,744
Likes: 0
Received 0 Likes
on
0 Posts
cool project, i admire you willingness to learn. just one question though, you said you could not afford to pay a shop to paint it, but you spent a grand in tools to do this? I'm sure though the spray guns, compressor, etc will come in handy again in the future.