When you click on links to various merchants on this site and make a purchase, this can result in this site earning a commission. Affiliate programs and affiliations include, but are not limited to, the eBay Partner Network.
Got the pushrods in the mail yesterday, so I got those installed along with the rockers. Also got the crank pulley installed, pinned it, and then got the flywheel reinstalled with ARP hardware also. Last time I did it with an impact, but to make it look a bit nicer I actually torqued it to the 235 ft-lb they recommended.
I also test fit the PRW water pump and it looks like it needs to either have some of the bolt heads on the back (for the access to the pump for rebuilds) shaved or get some hex countersunk screws swapped on in order to clear the front cover.
Before I put it away for the night I got the engine mounts on and the AC compressor bracket back on, so I just need to get the water pump sorted before I drop it back in, but it is real close.
I am out of town for the weekend, so it'll be sometime next week and I should have it dropped in and fired off.
Long time with no update, but I got the converter installed when it came in:
And tonight, I got the bolts on the back of the water pump swapped out:
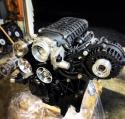
When I fit it up, I decided to keep going and make sure everything was going to play nice. I am glad I did, because the water pump outlet needed to be rotated and the idler bracket had to be clearanced to make it work:
Once I got that all on, I checked the machine work to space the idler. Looks like it may be one rib too far out, but not bad. This shows how I had to have the LC32 spacer machined to work with the Roush blower:
With all that on, I also test fit the PCM of NC tensioner arrangement and it looks like it will work great. Here is a shot from behind the bracket showing the range of adjustability:
And here it is from the front:
And here was how it all looked together before I stripped the accessories and lower manifold off to be ready to set the engine back in:
Hopefully by Thursday I'll have it back in the chassis!


 Jun 16, 2016 | 06:42 AM