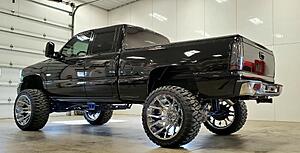
2004 Sierra 1500 - An *accidental* restoration.
 Mar 25, 2021 | 12:47 PM
#1
Thread Starter
Teching In


Joined: Feb 2021
Posts: 31
Likes: 18
From: Central IL
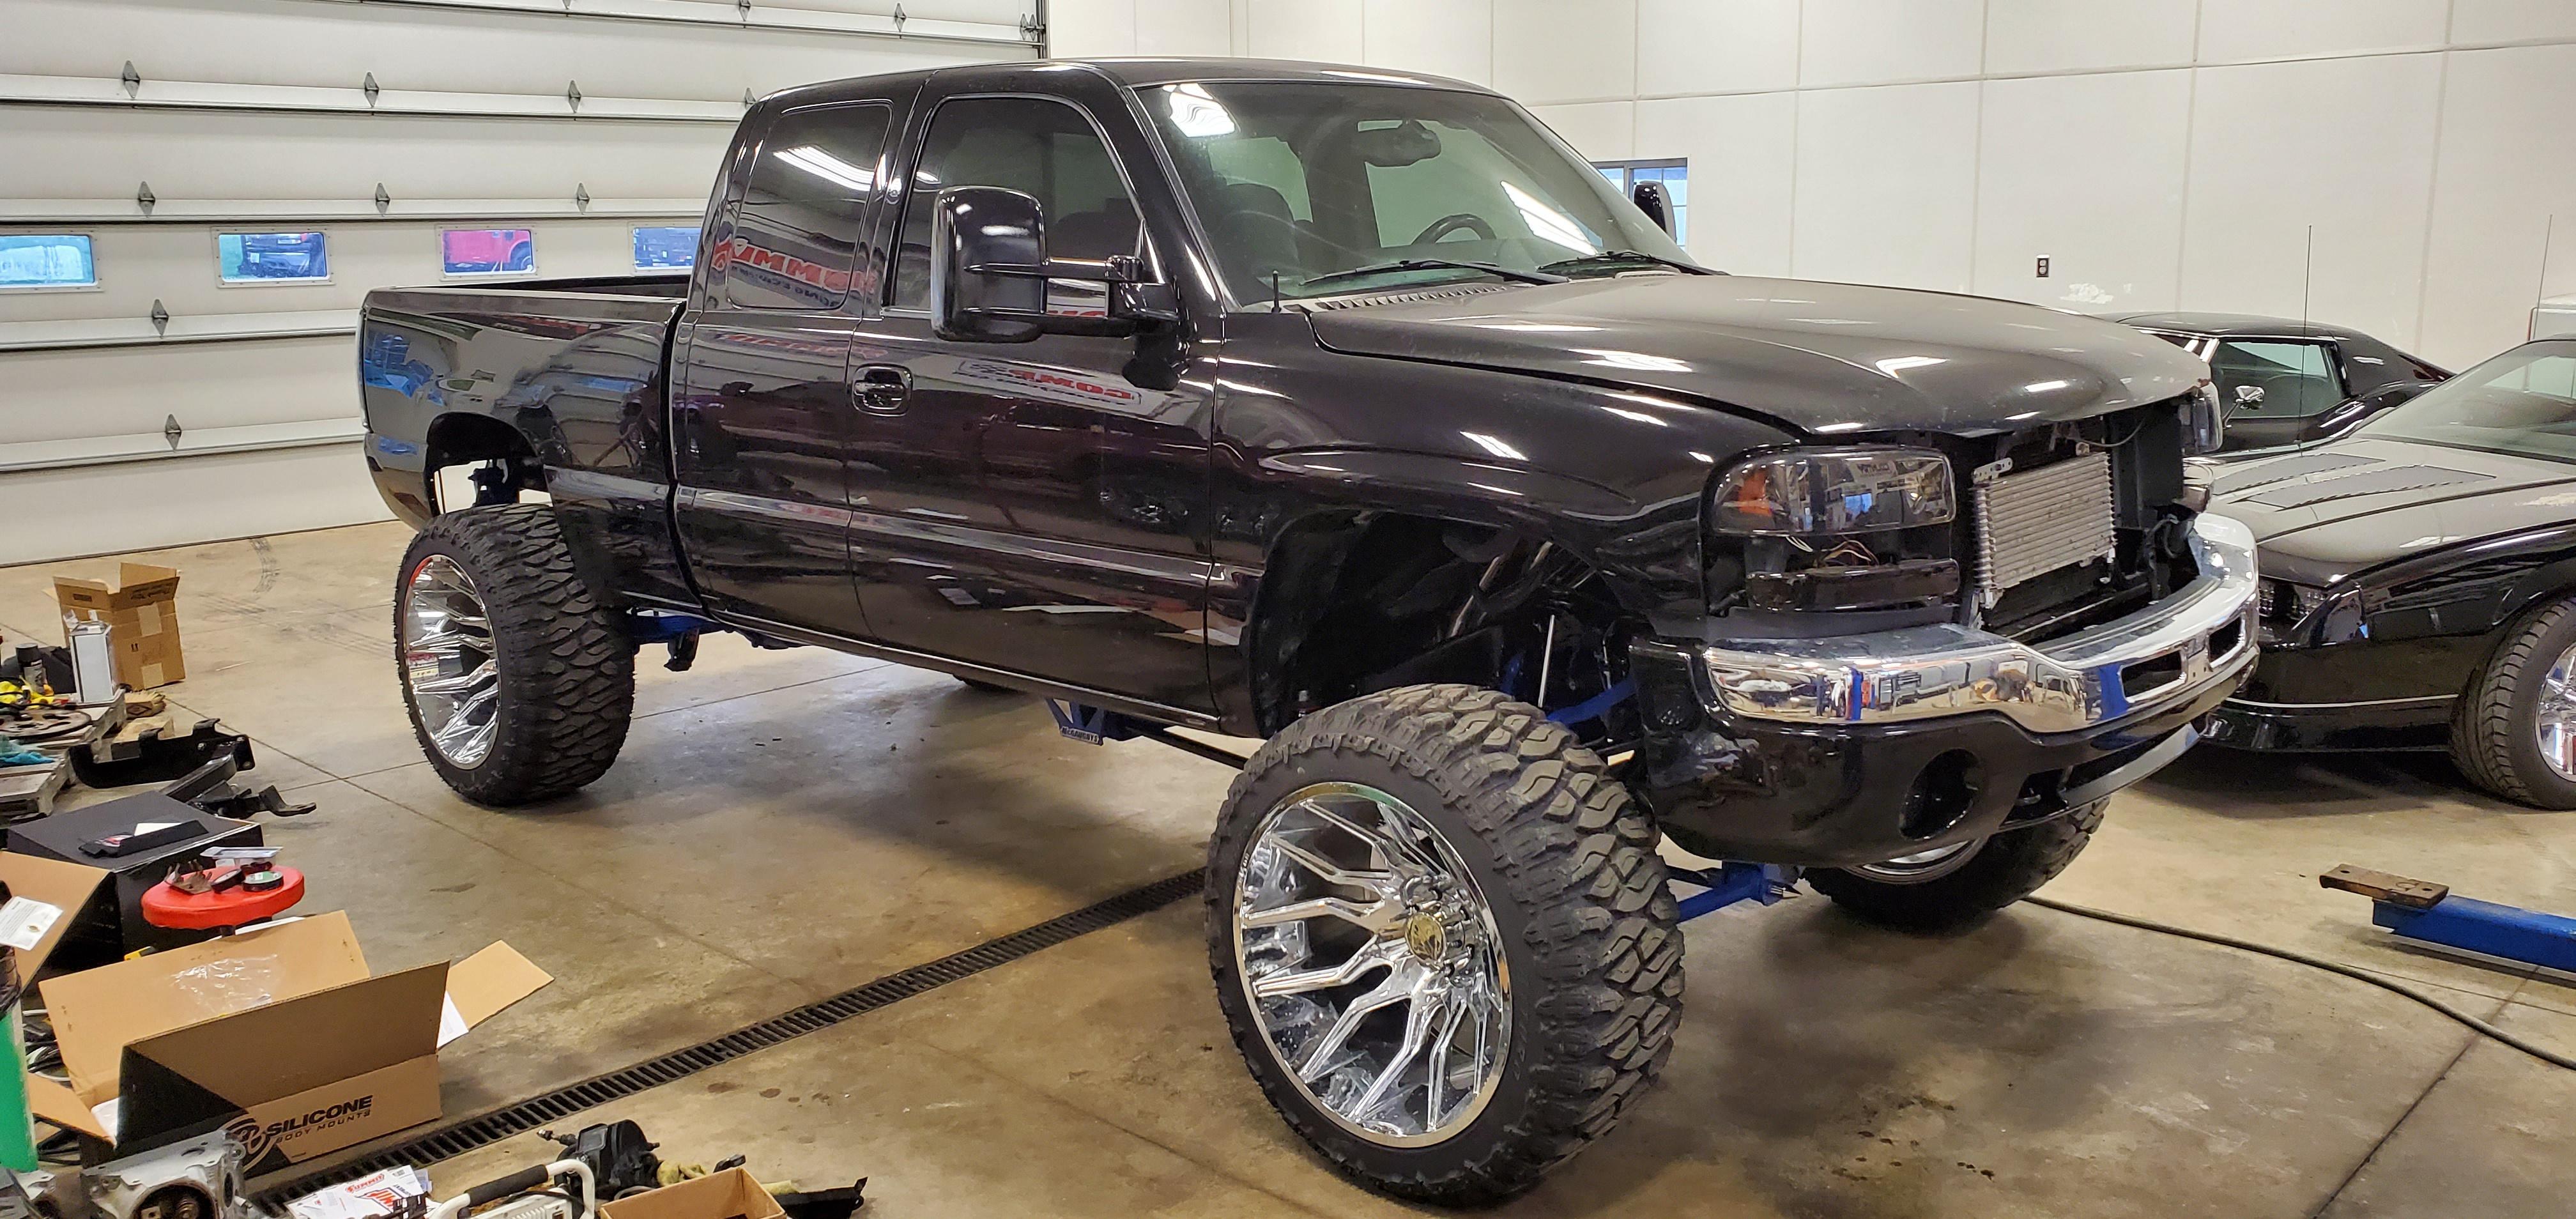
Short history of truck: I bought the truck in 2015. It had 125k miles and was in pretty good shape.

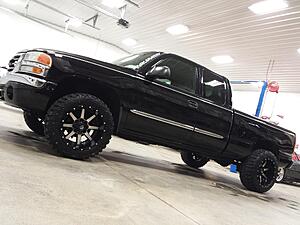
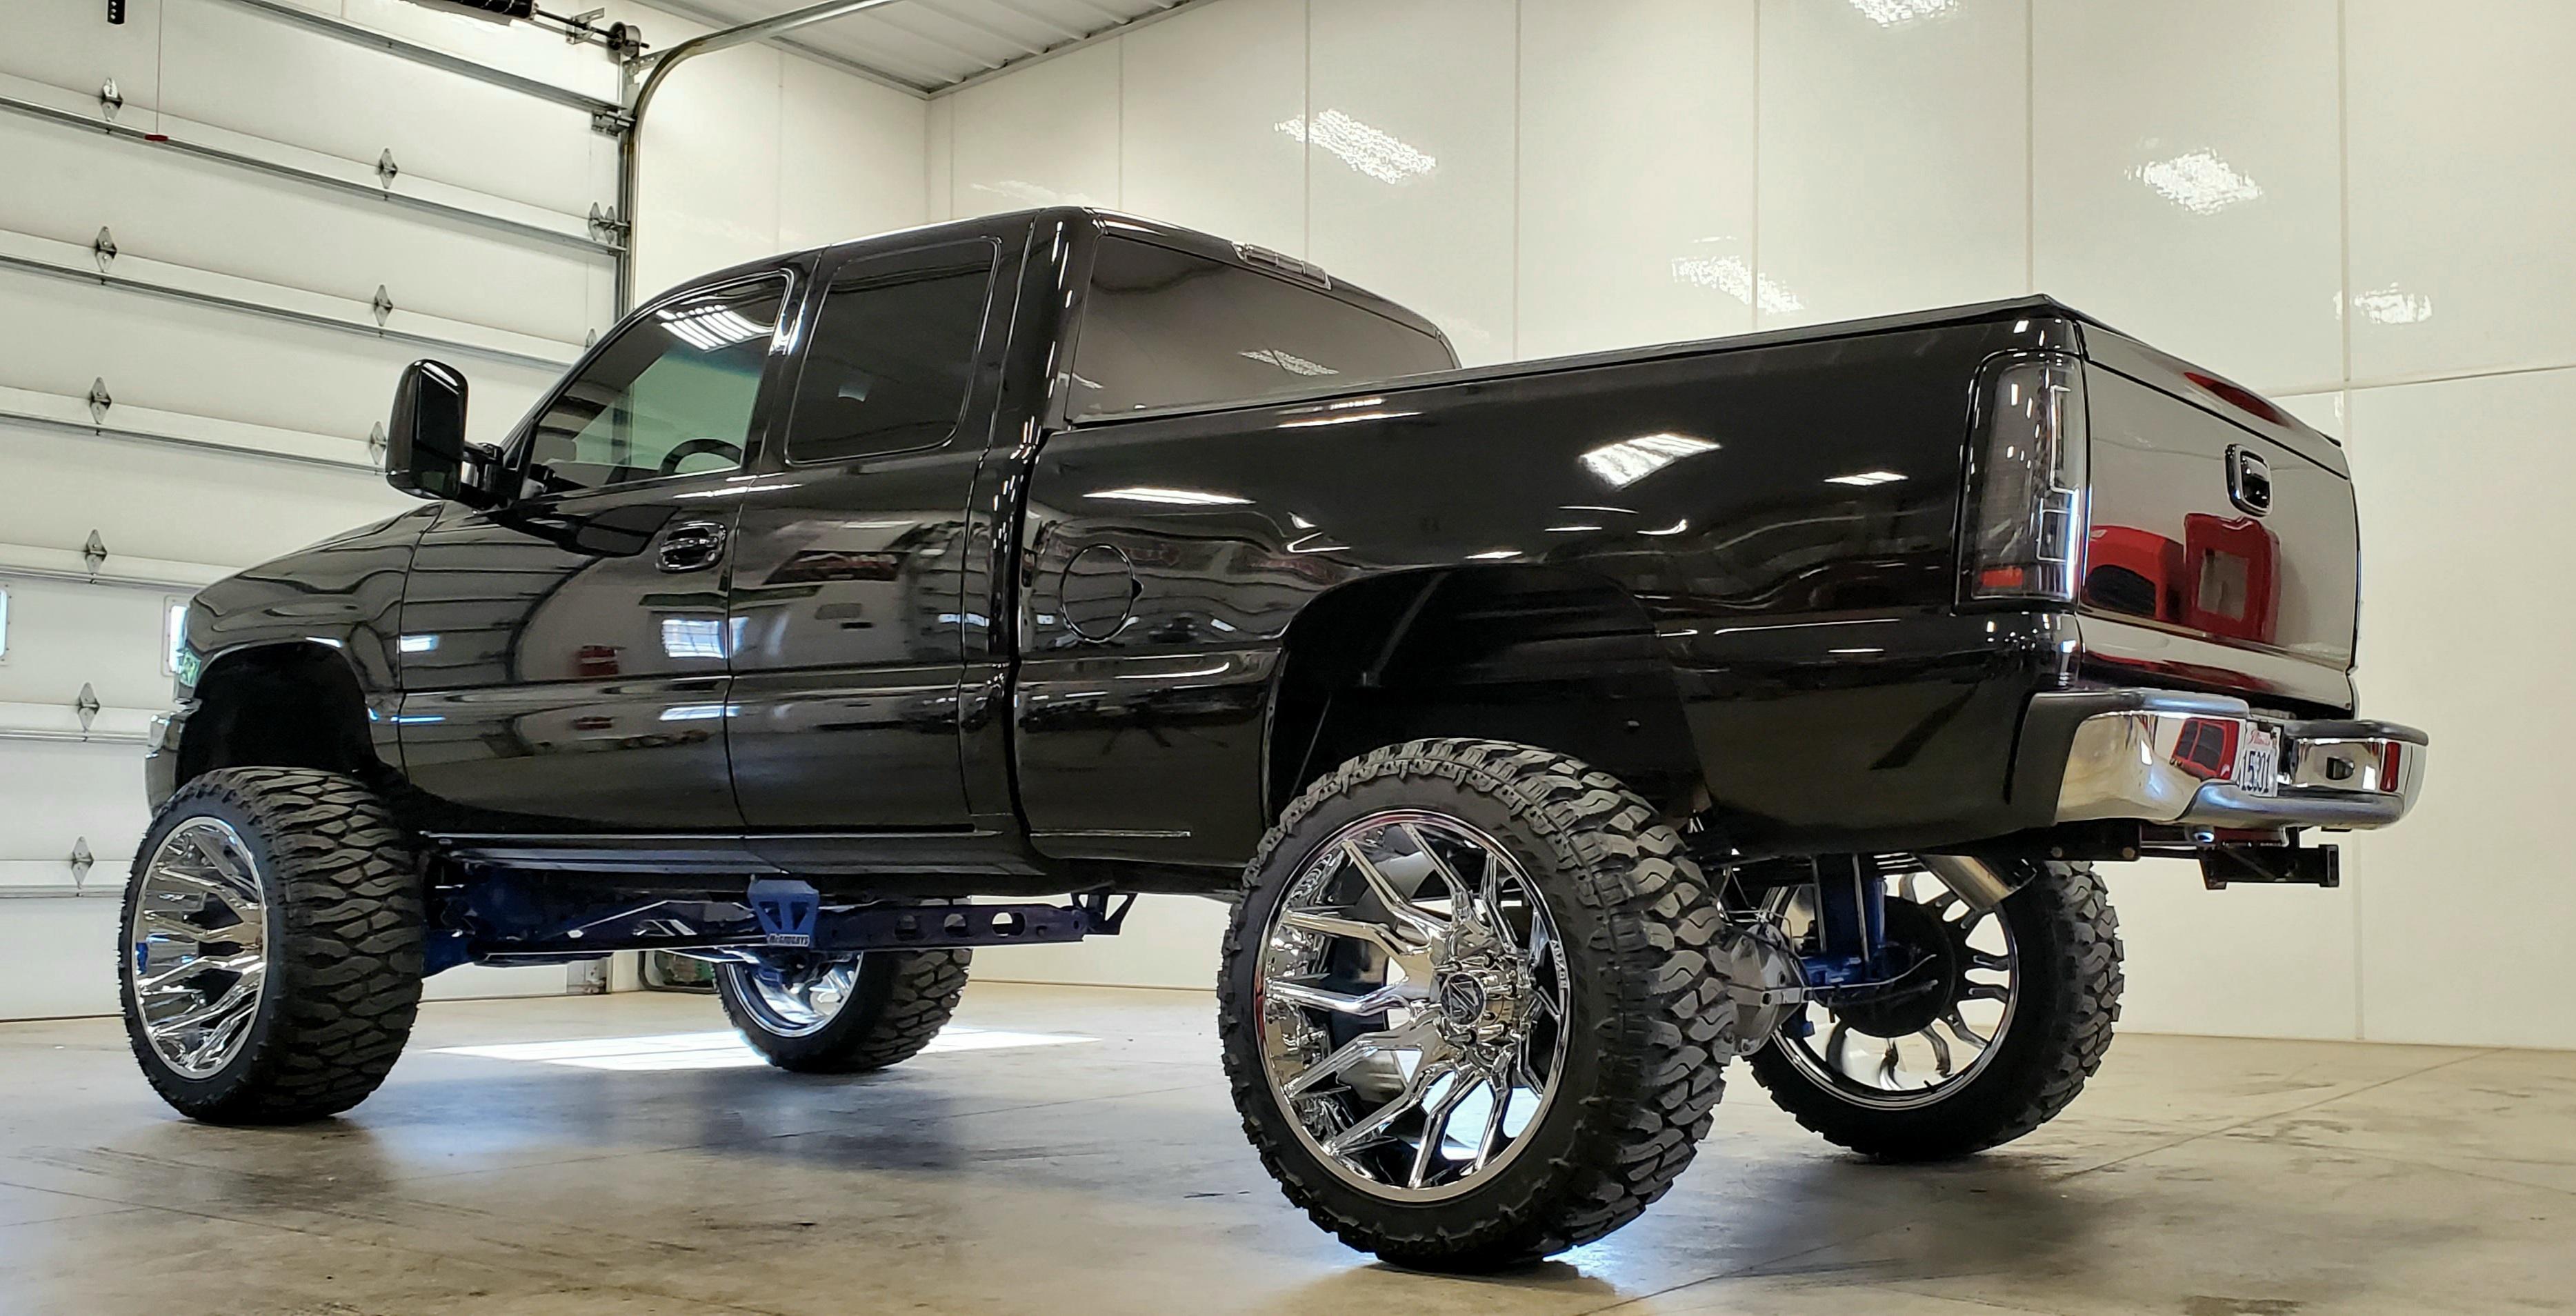
I immediately swapped out the wheels and tires to 20x12s with 33s and put keys in it.
Eventually had to put flares on it due to rust on the bed starting to show. Also pulled the pinstripes off.
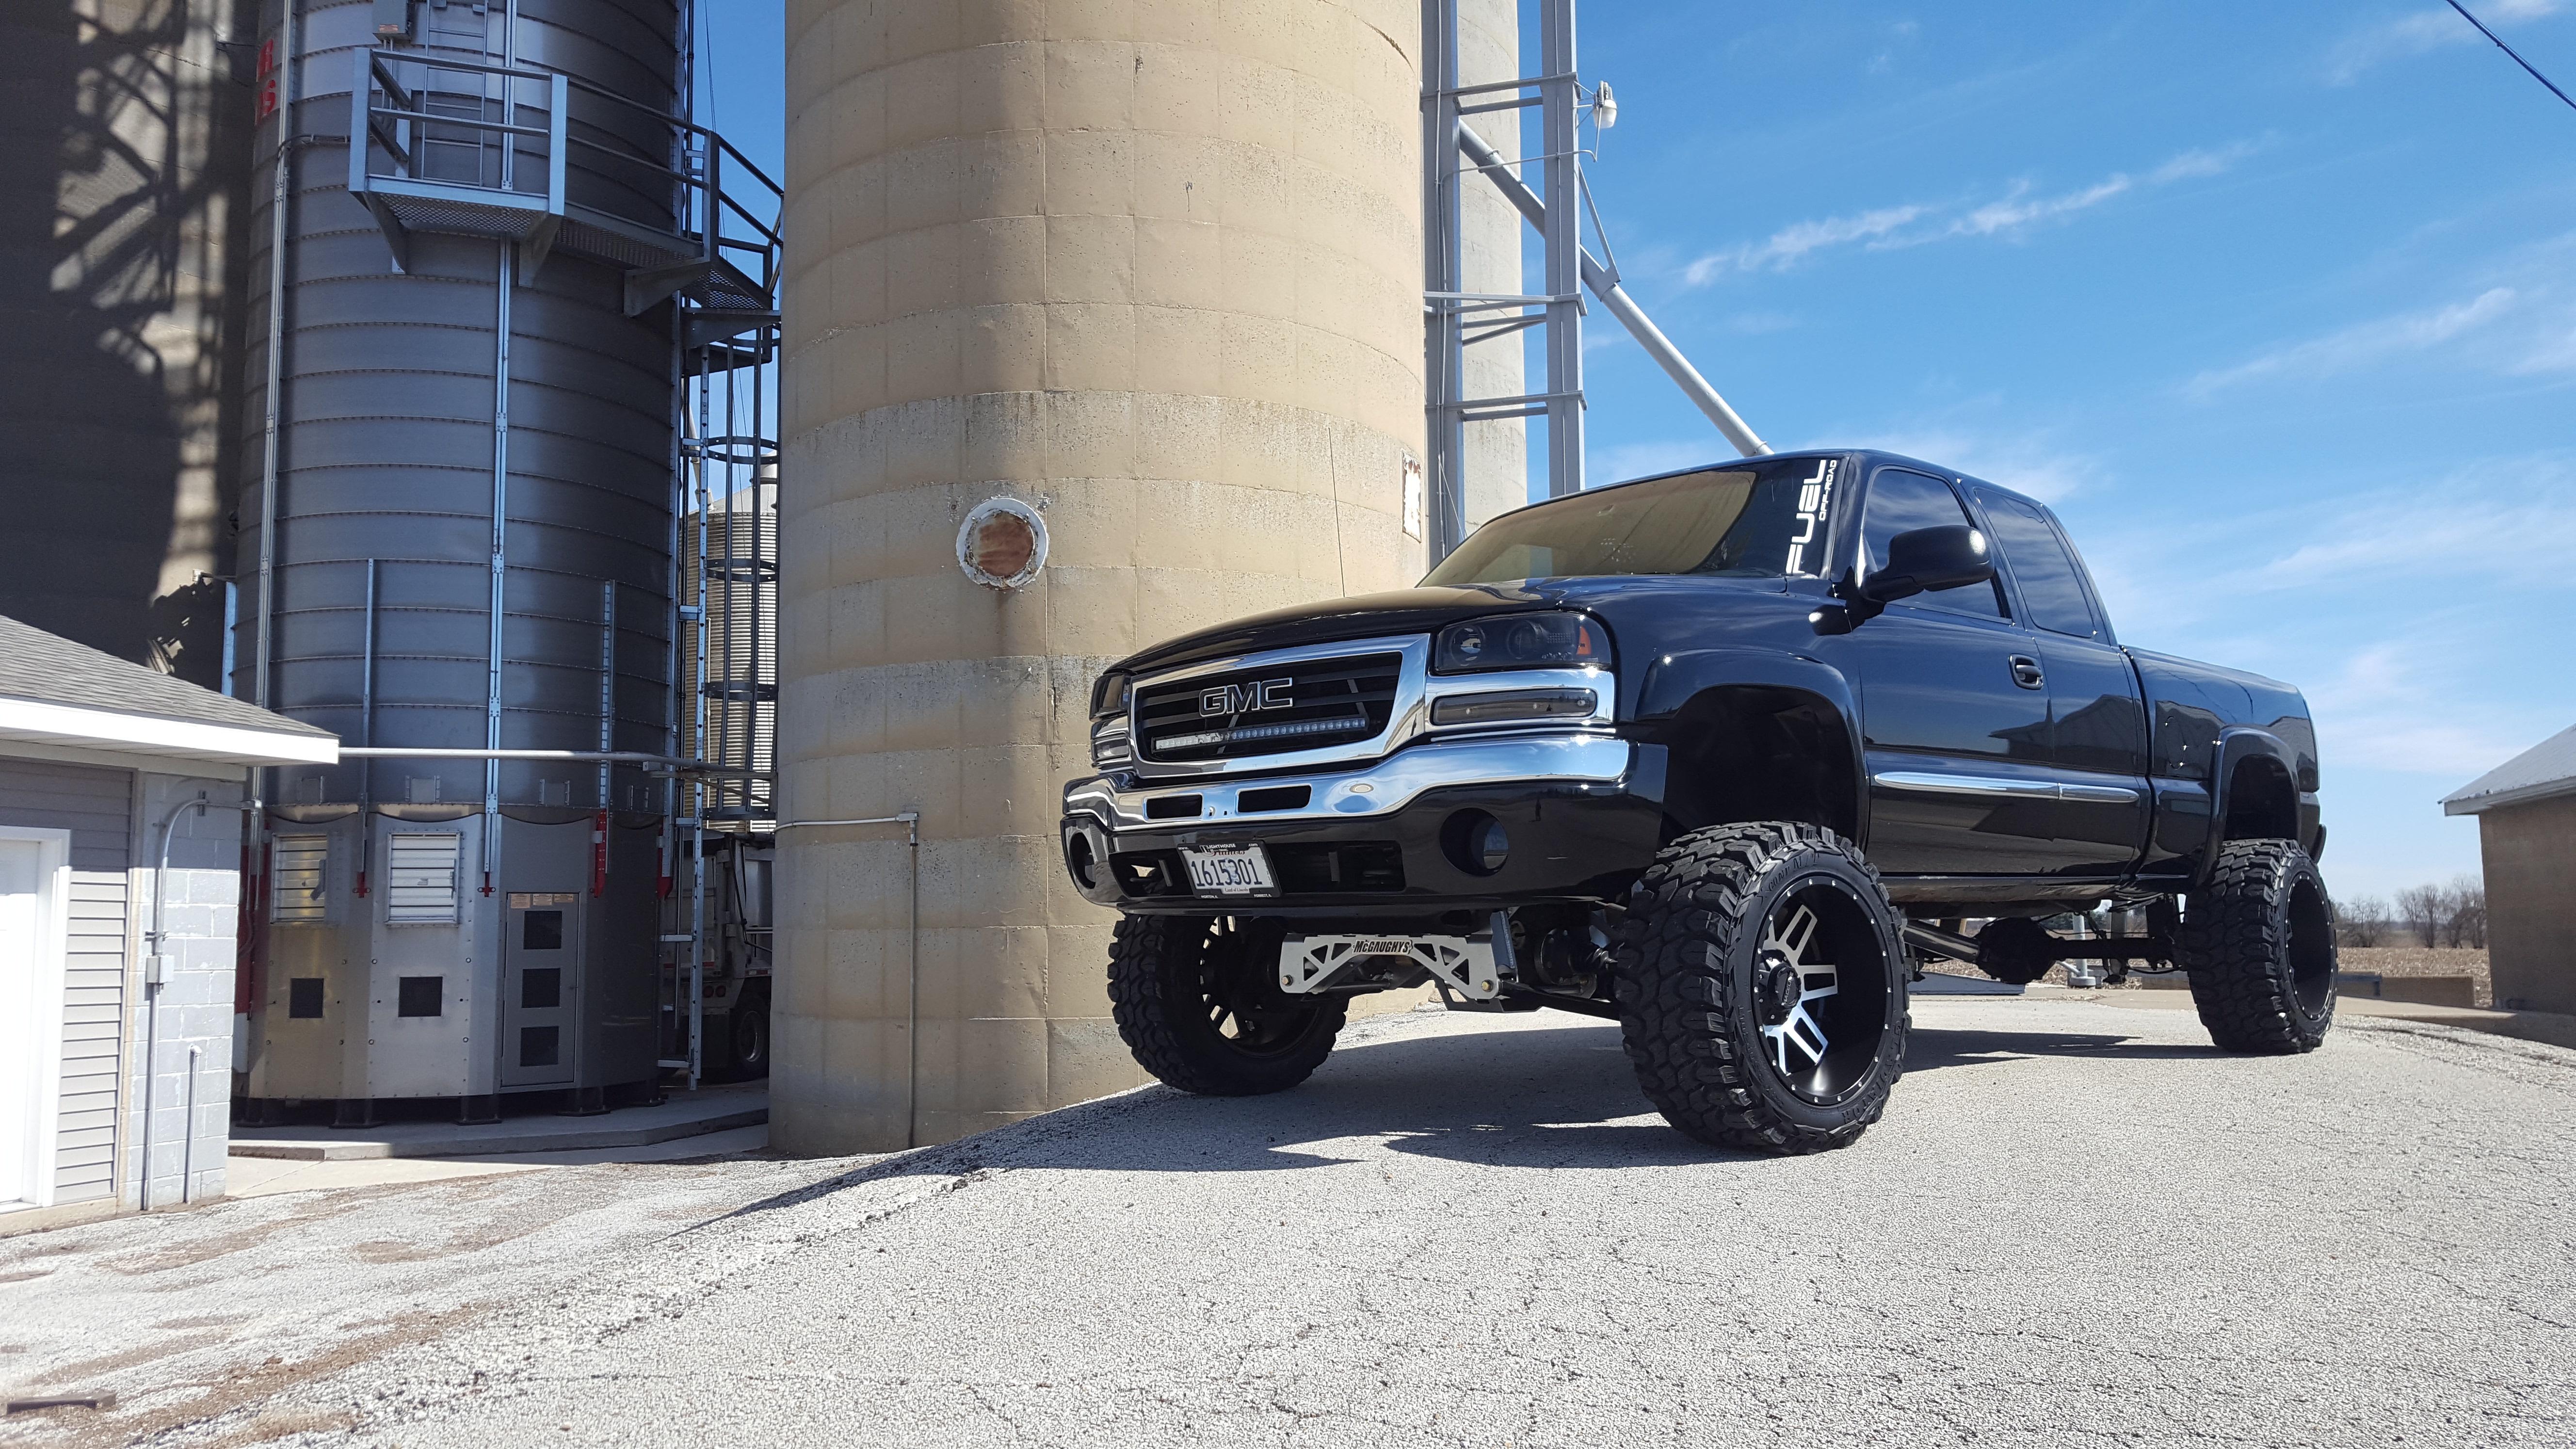
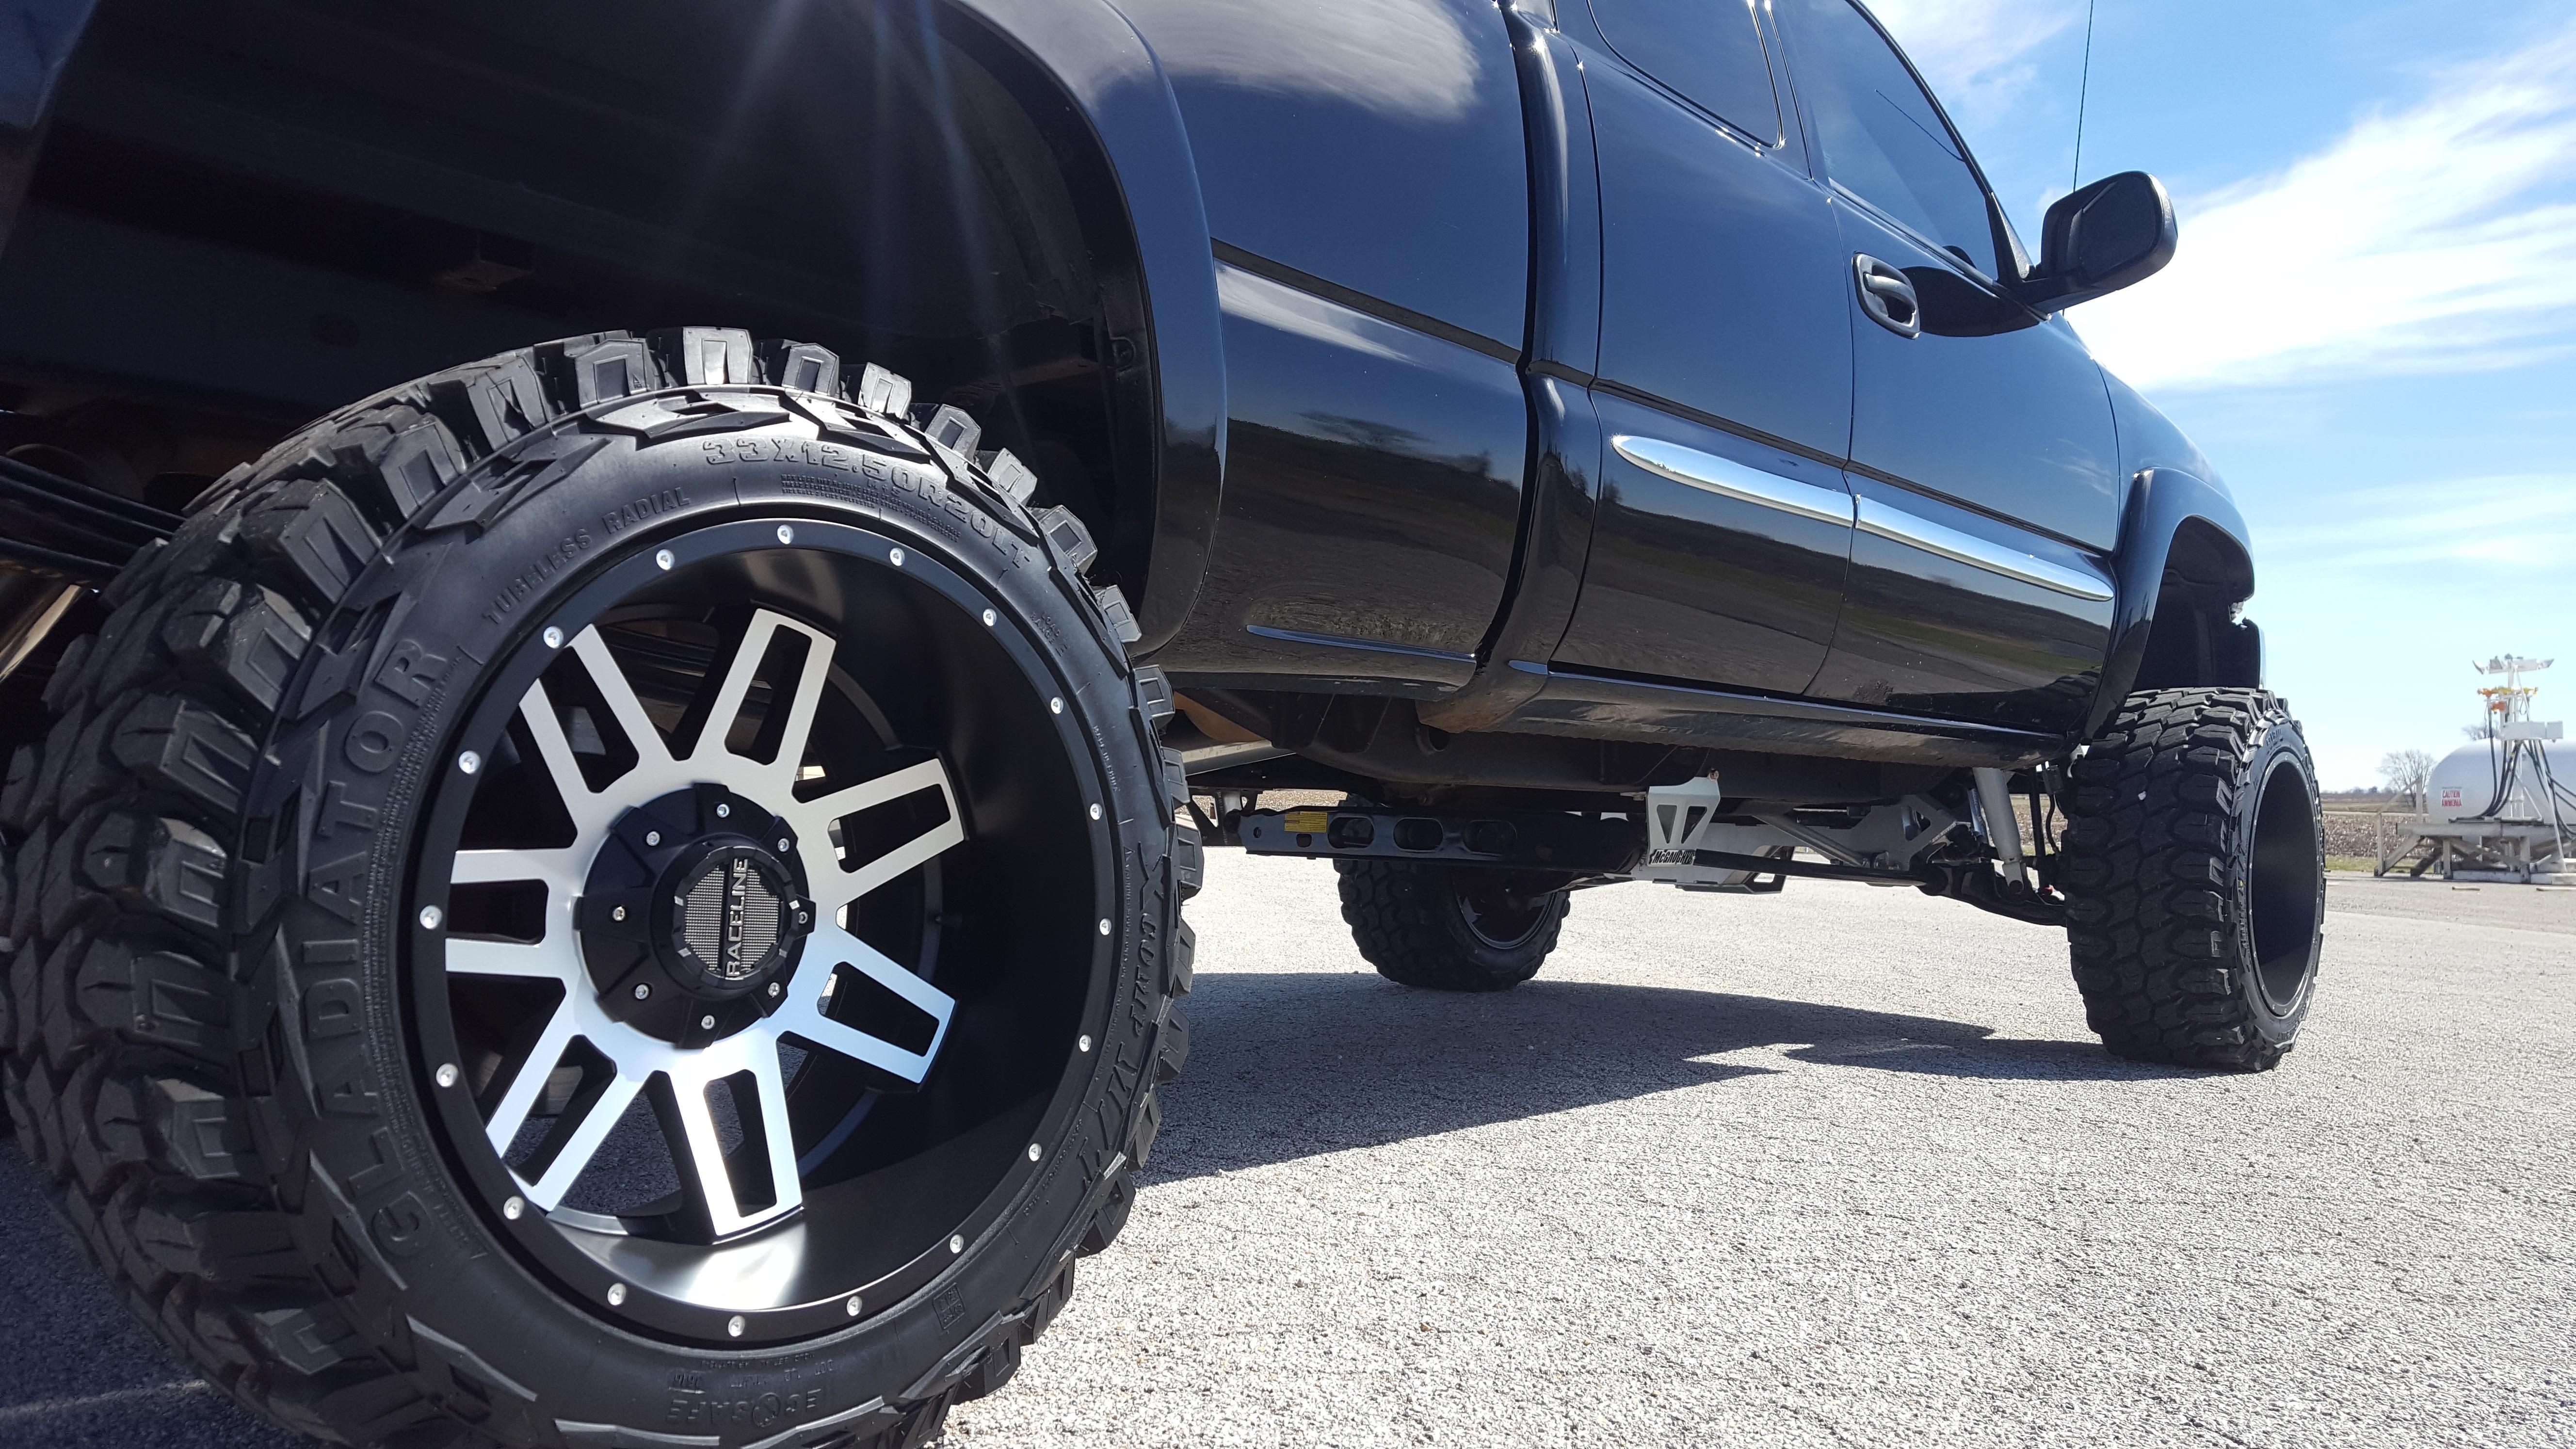
Drove the truck for a while and hated the cranked front end. It rode rough, blew through front end parts, you know, the usual for that type of leveling kit. Next step was a 9" McGaughys lift kit. Also different 20x12s and 33s. At some point after all this was done I did 4.11 gears as well.
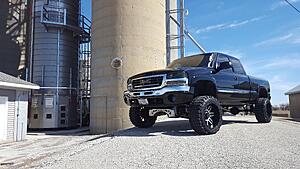
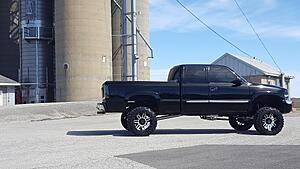

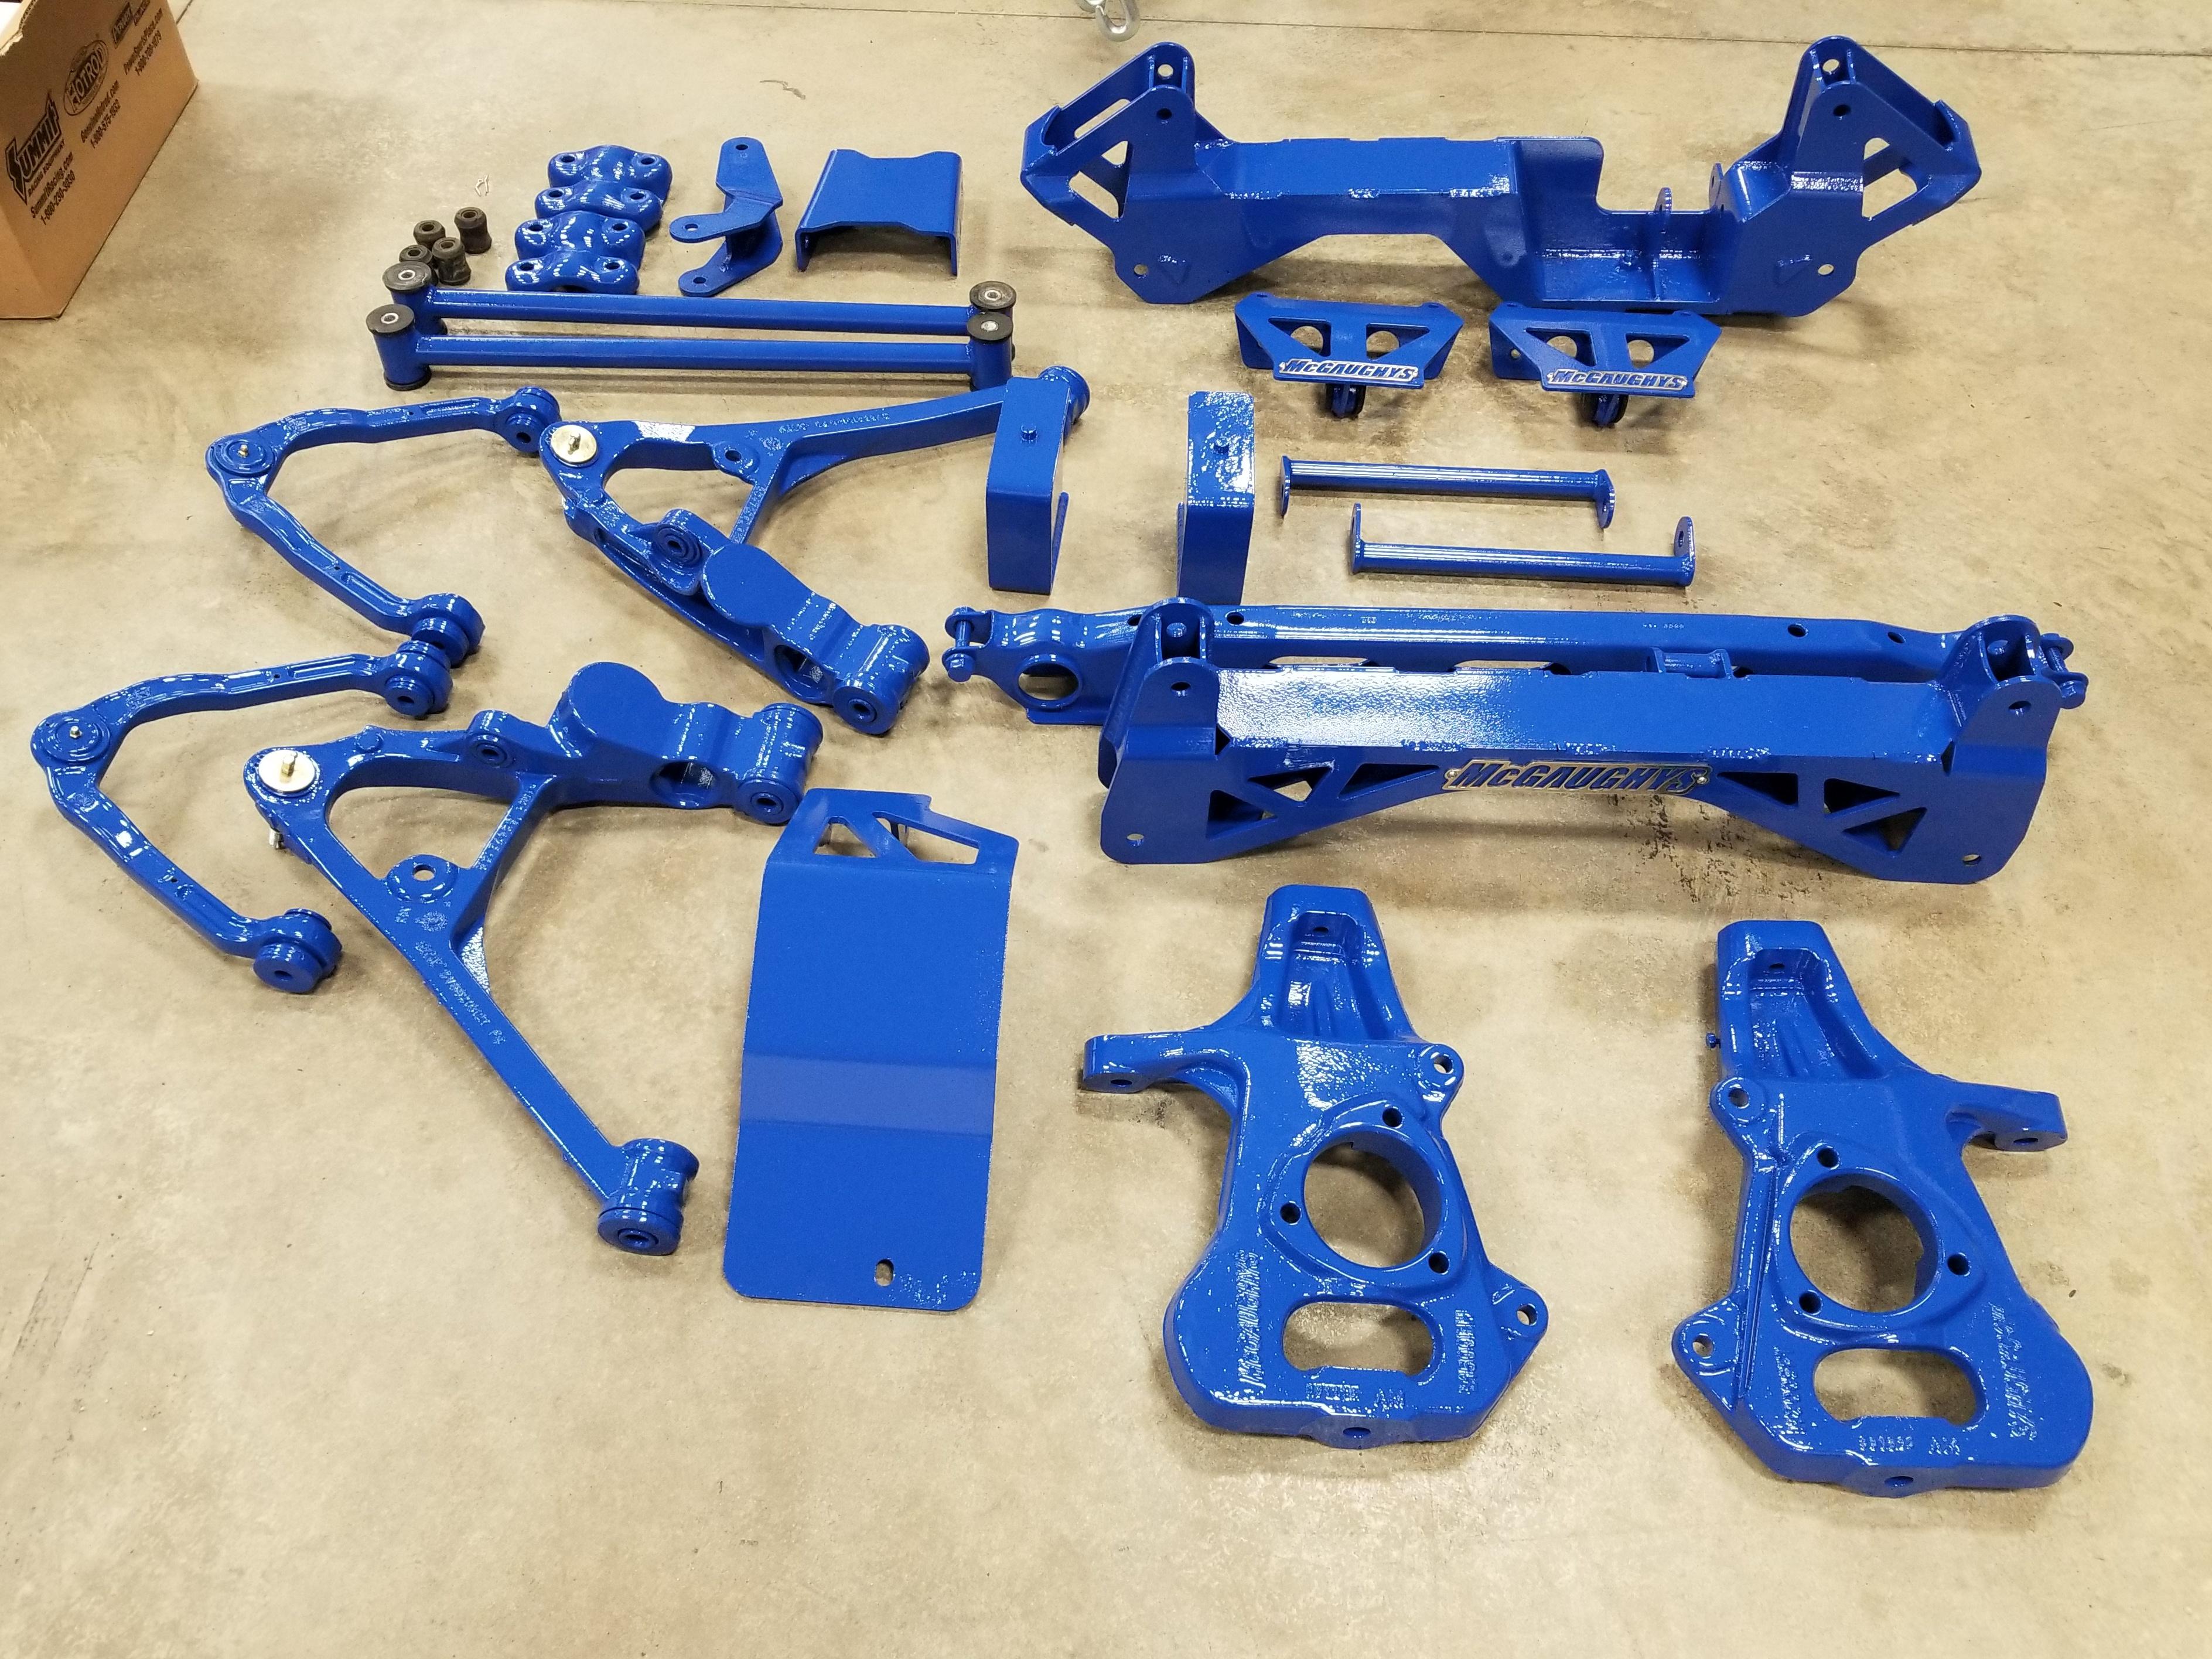
After barely a year, the lift kit powder coat was chipping and peeling bad, starting to rust and everything. Apparently McGaughys has had issues with powder coat not lasting (this has since been fixed I am told), so the whole kit was stripped back off the truck and blasted to bare metal. The whole kit as well as control arms, rear differential and other parts got done in blue. The blue is a color that was mixed custom for me, and is an epoxy with epoxy primer underneath. Shot all the parts myself. Turned out pretty good and has been way more durable than the powder coating was.

At this point the rust on the truck had started to get bad. The bed was trash, both front fenders had rust as well, and the passenger side door was rusting through on the bottom. Rust free bed found, new gm fenders and door. Still need to do cab corners and rockers, but short term I threw some paint matched Bushwacker rocker covers on. I had got some worn out 35's to see how I liked the bigger tire so those are on now too.


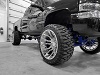
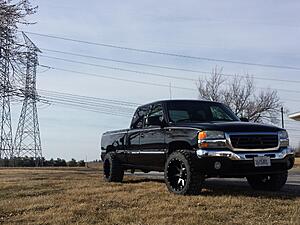
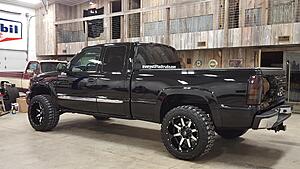
About a year ago, I swapped to 24x14s with 36" tires. a little later in the summer last year I did painted tow mirrors and handles.

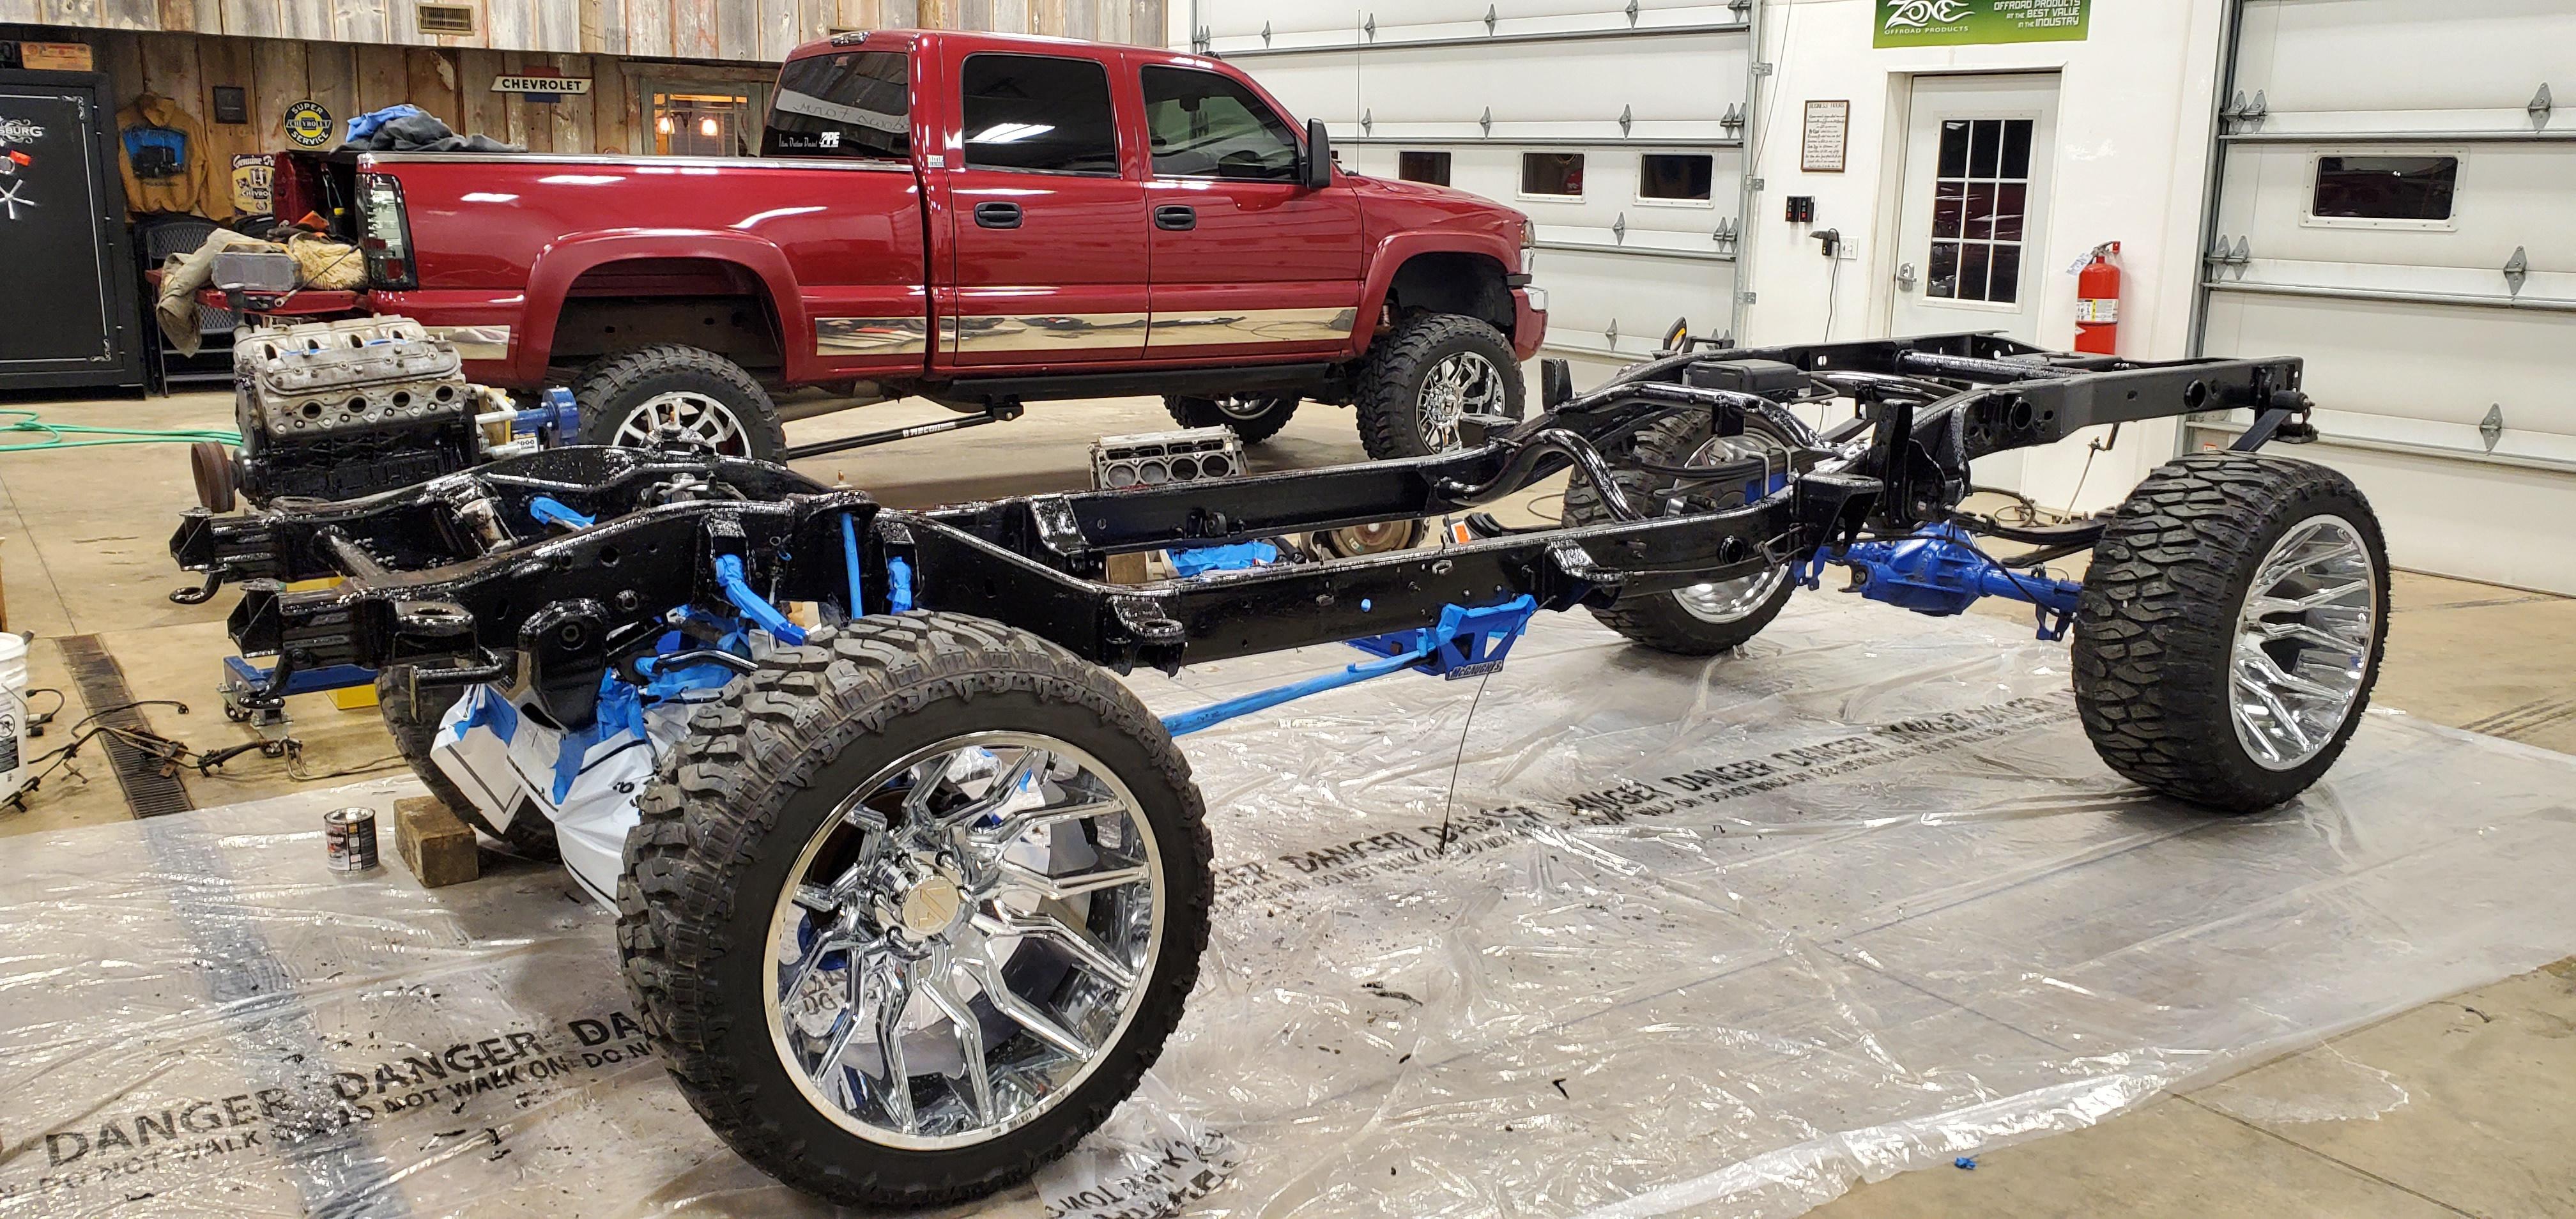
And that brings us pretty much up to date. There is way more to say than just that, but hopefully the photos sort of tell the story of the truck so far themselves.
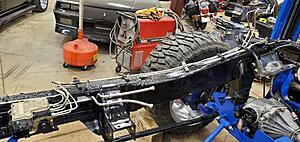
Ok so on to the reason I am doing what I am now. Last year the 5.3 started drinking coolant. Bad head gaskets. the truck is currently sitting at 215k miles, and not a single one of the last 100k has the truck been babied. It pulls my 20' Crownline every weekend in the summer when we go boating, and with the 9" kit and 36's, the 5.3 is being overworked like crazy. The 4.11 gears are not enough either, if I had know I was going to be running this big of a tire back when I did the gears, I would have done 4.56s or 4.88s. The trans and t-case also haven't been touched other than fluid changes. The whole drivetrain on this truck is tired.
I very briefly looked into rebuilding the 5.3 and 4l60, but since I tow and also like to party sometimes, I decided a 6.0 is a no brainer at this point, and the 4l80 just makes sense if I plan to beat on it and continue to play with the 6.0.
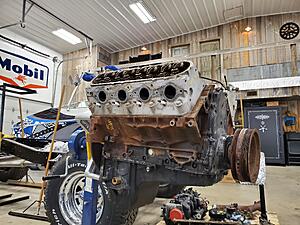
So, I picked up an LQ4 out of a 2005 hummer at a salvage yard. The hummer had like 300k on it, but it is obvious that this motor was not the original. Painted oil pan/front and rear covers, as well as how clean everything looks under the valve covers as well as in the valley. So unknown miles, but it really looks to be in pretty good shape.
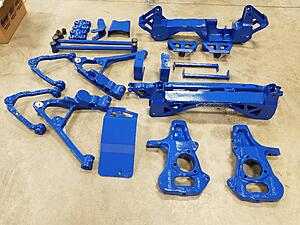
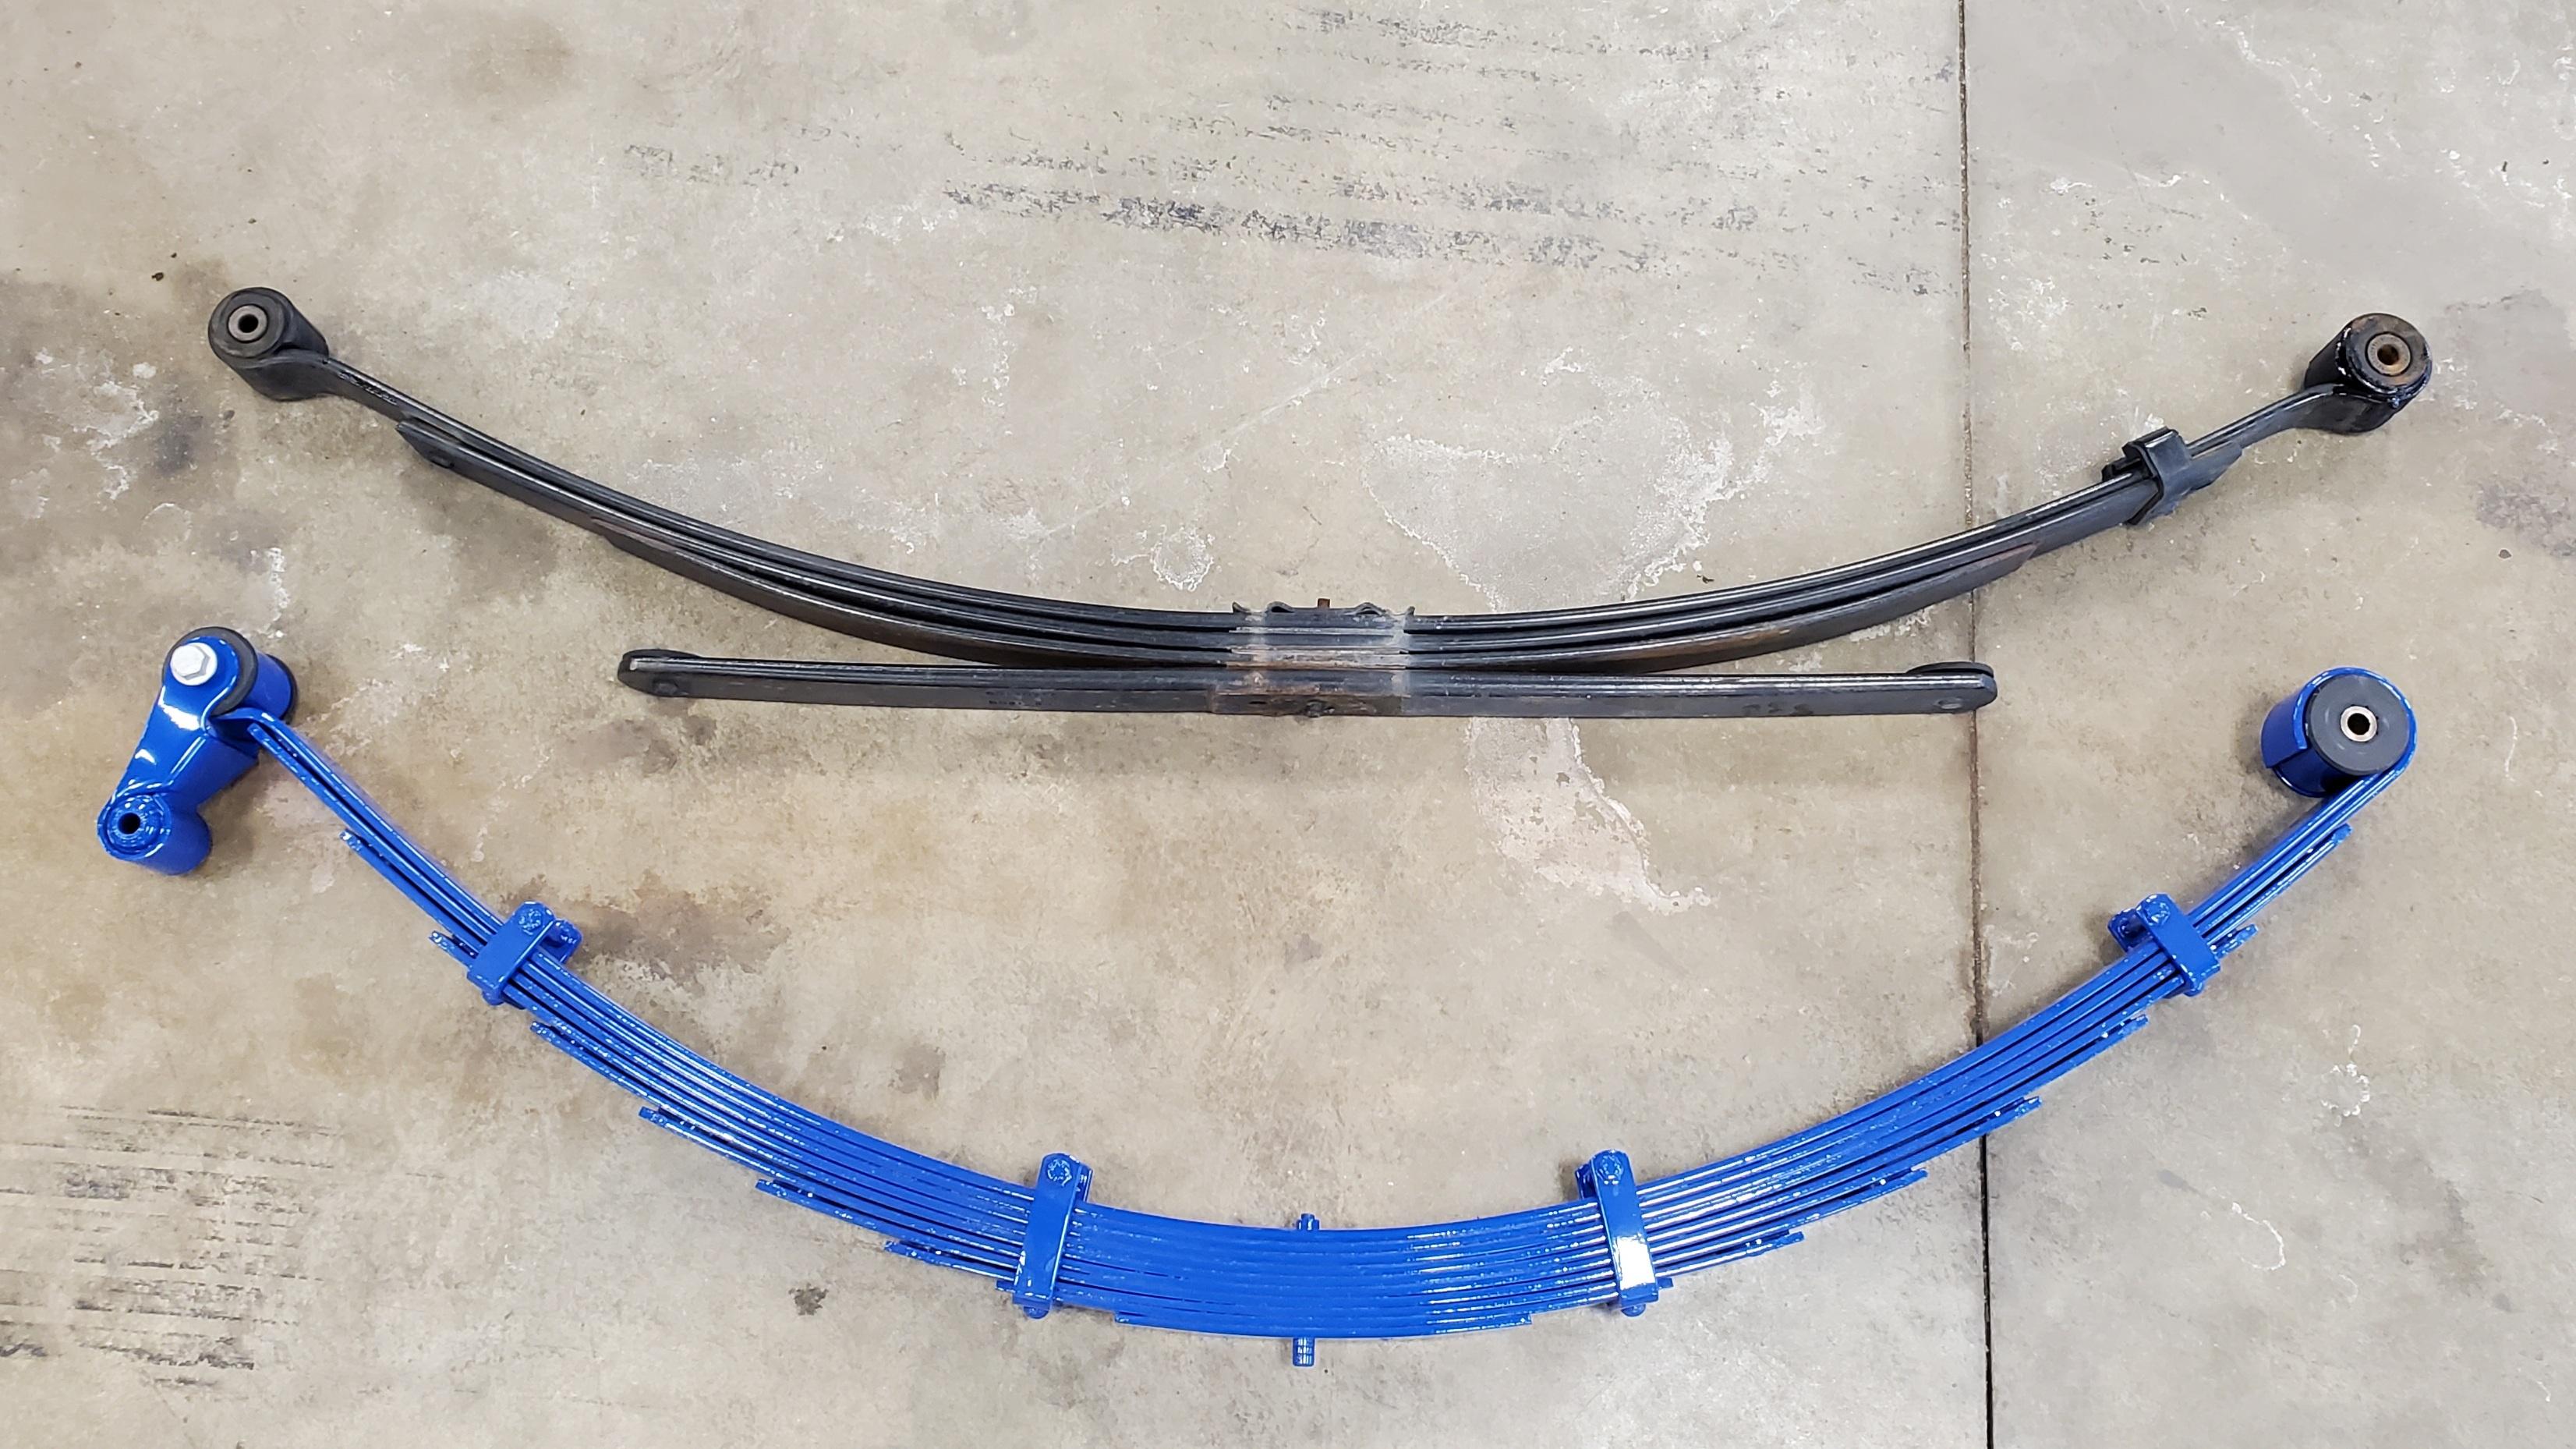
Quick sidetrack here. I got Deaver 8" rear leaf springs to replace the factory leafs/add a leaf/block in the back.

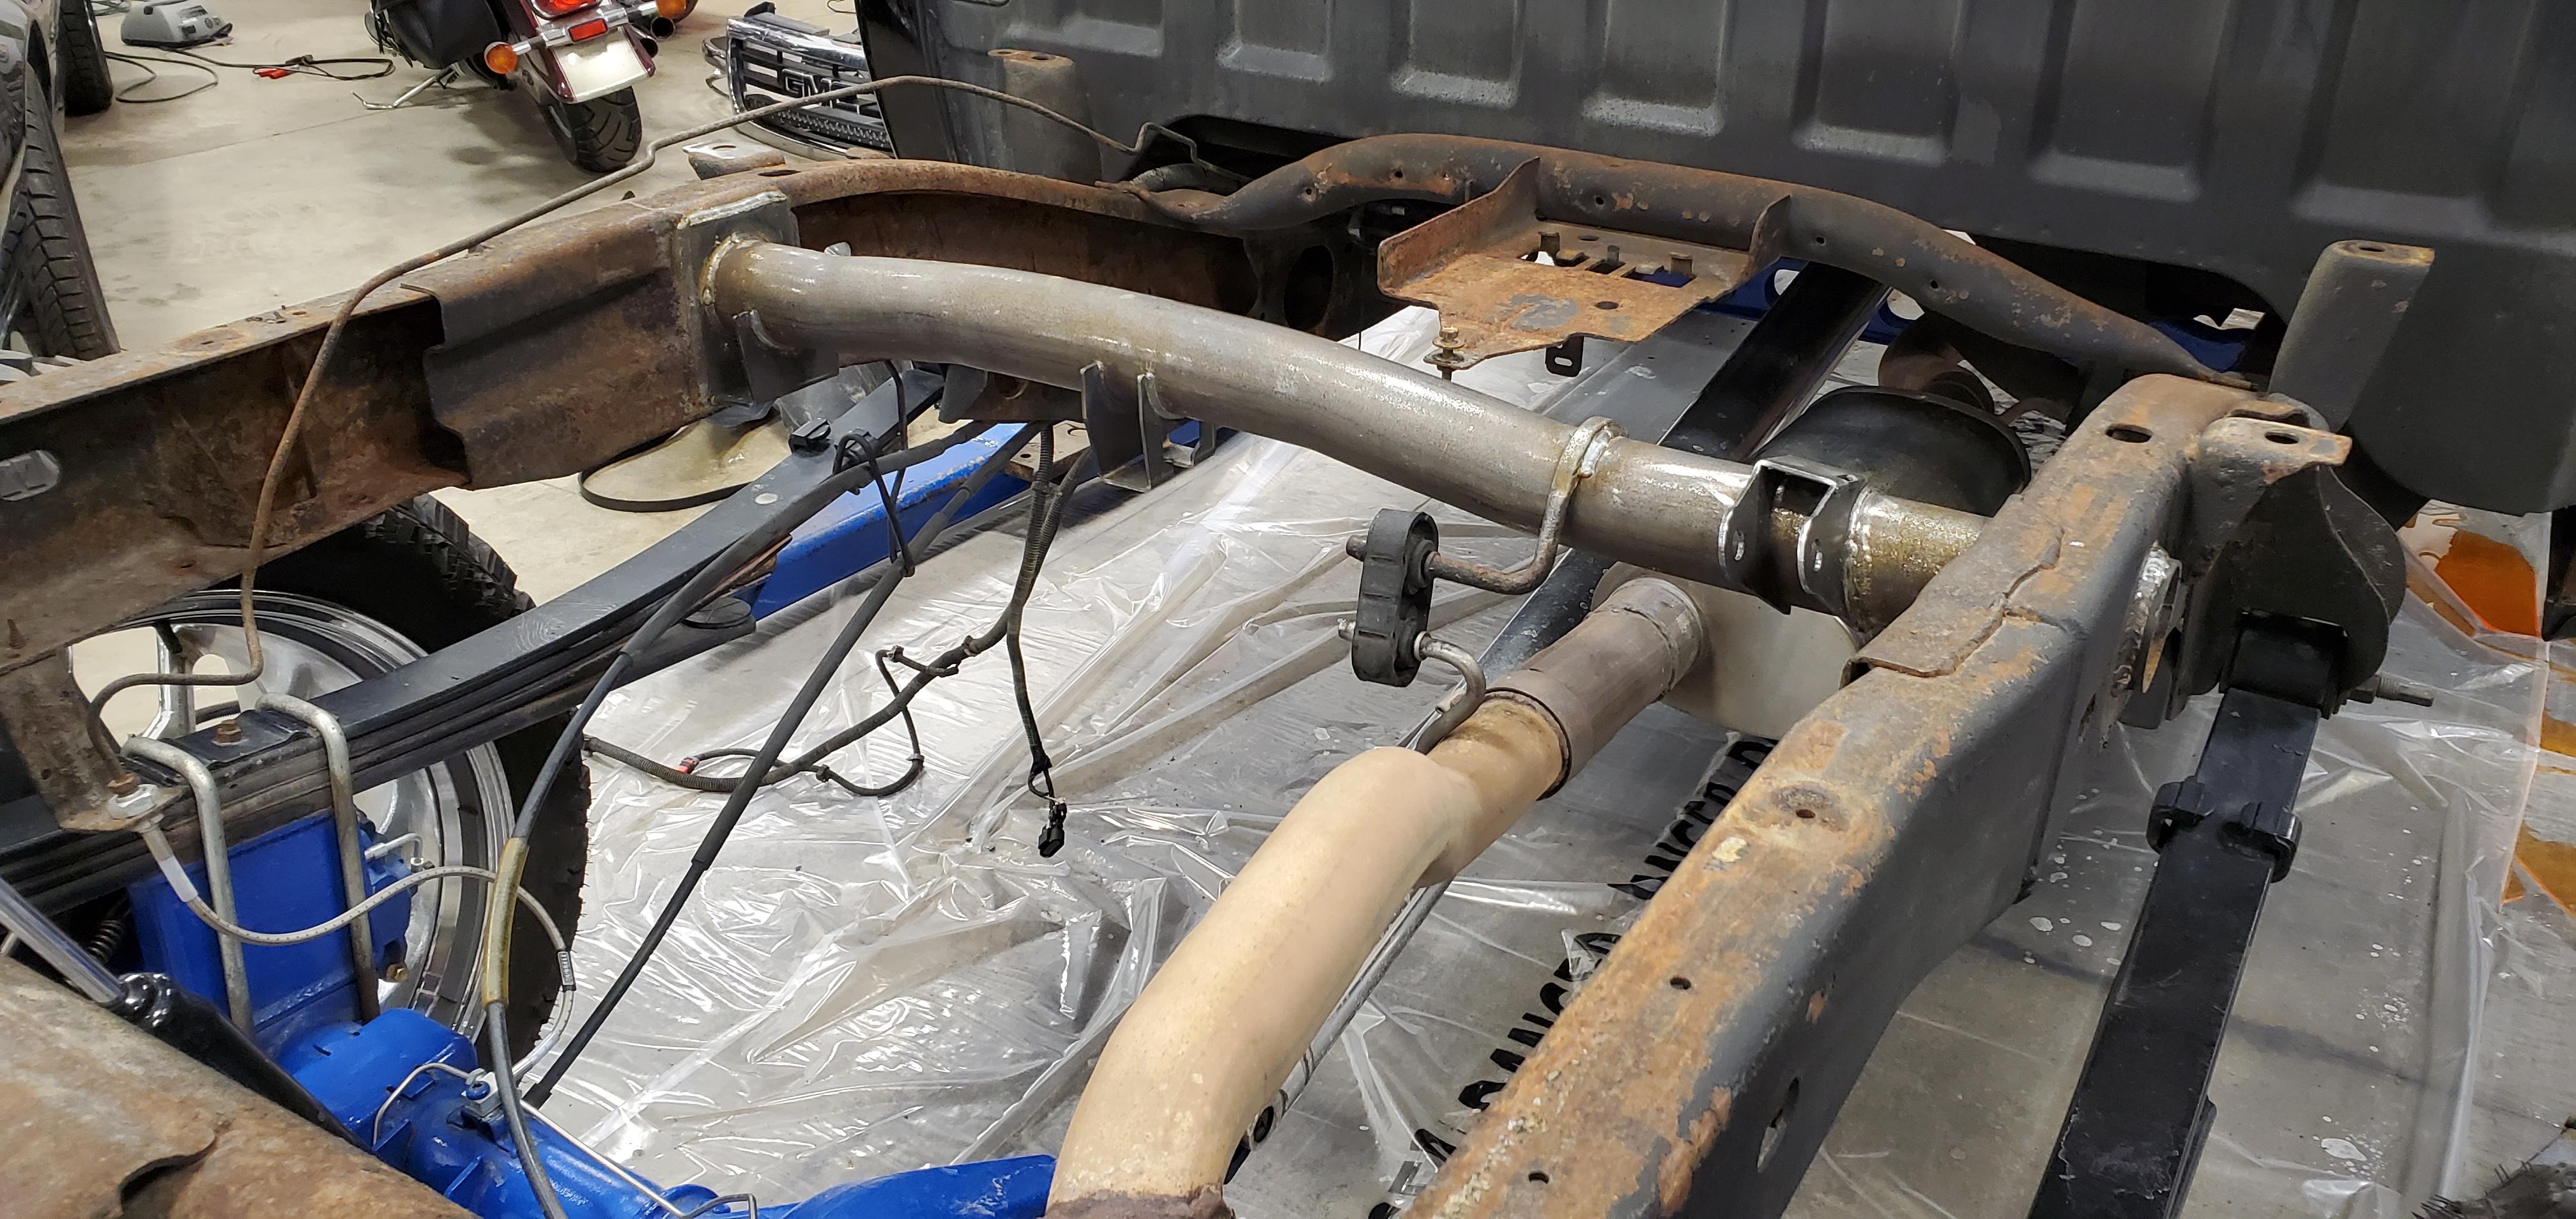
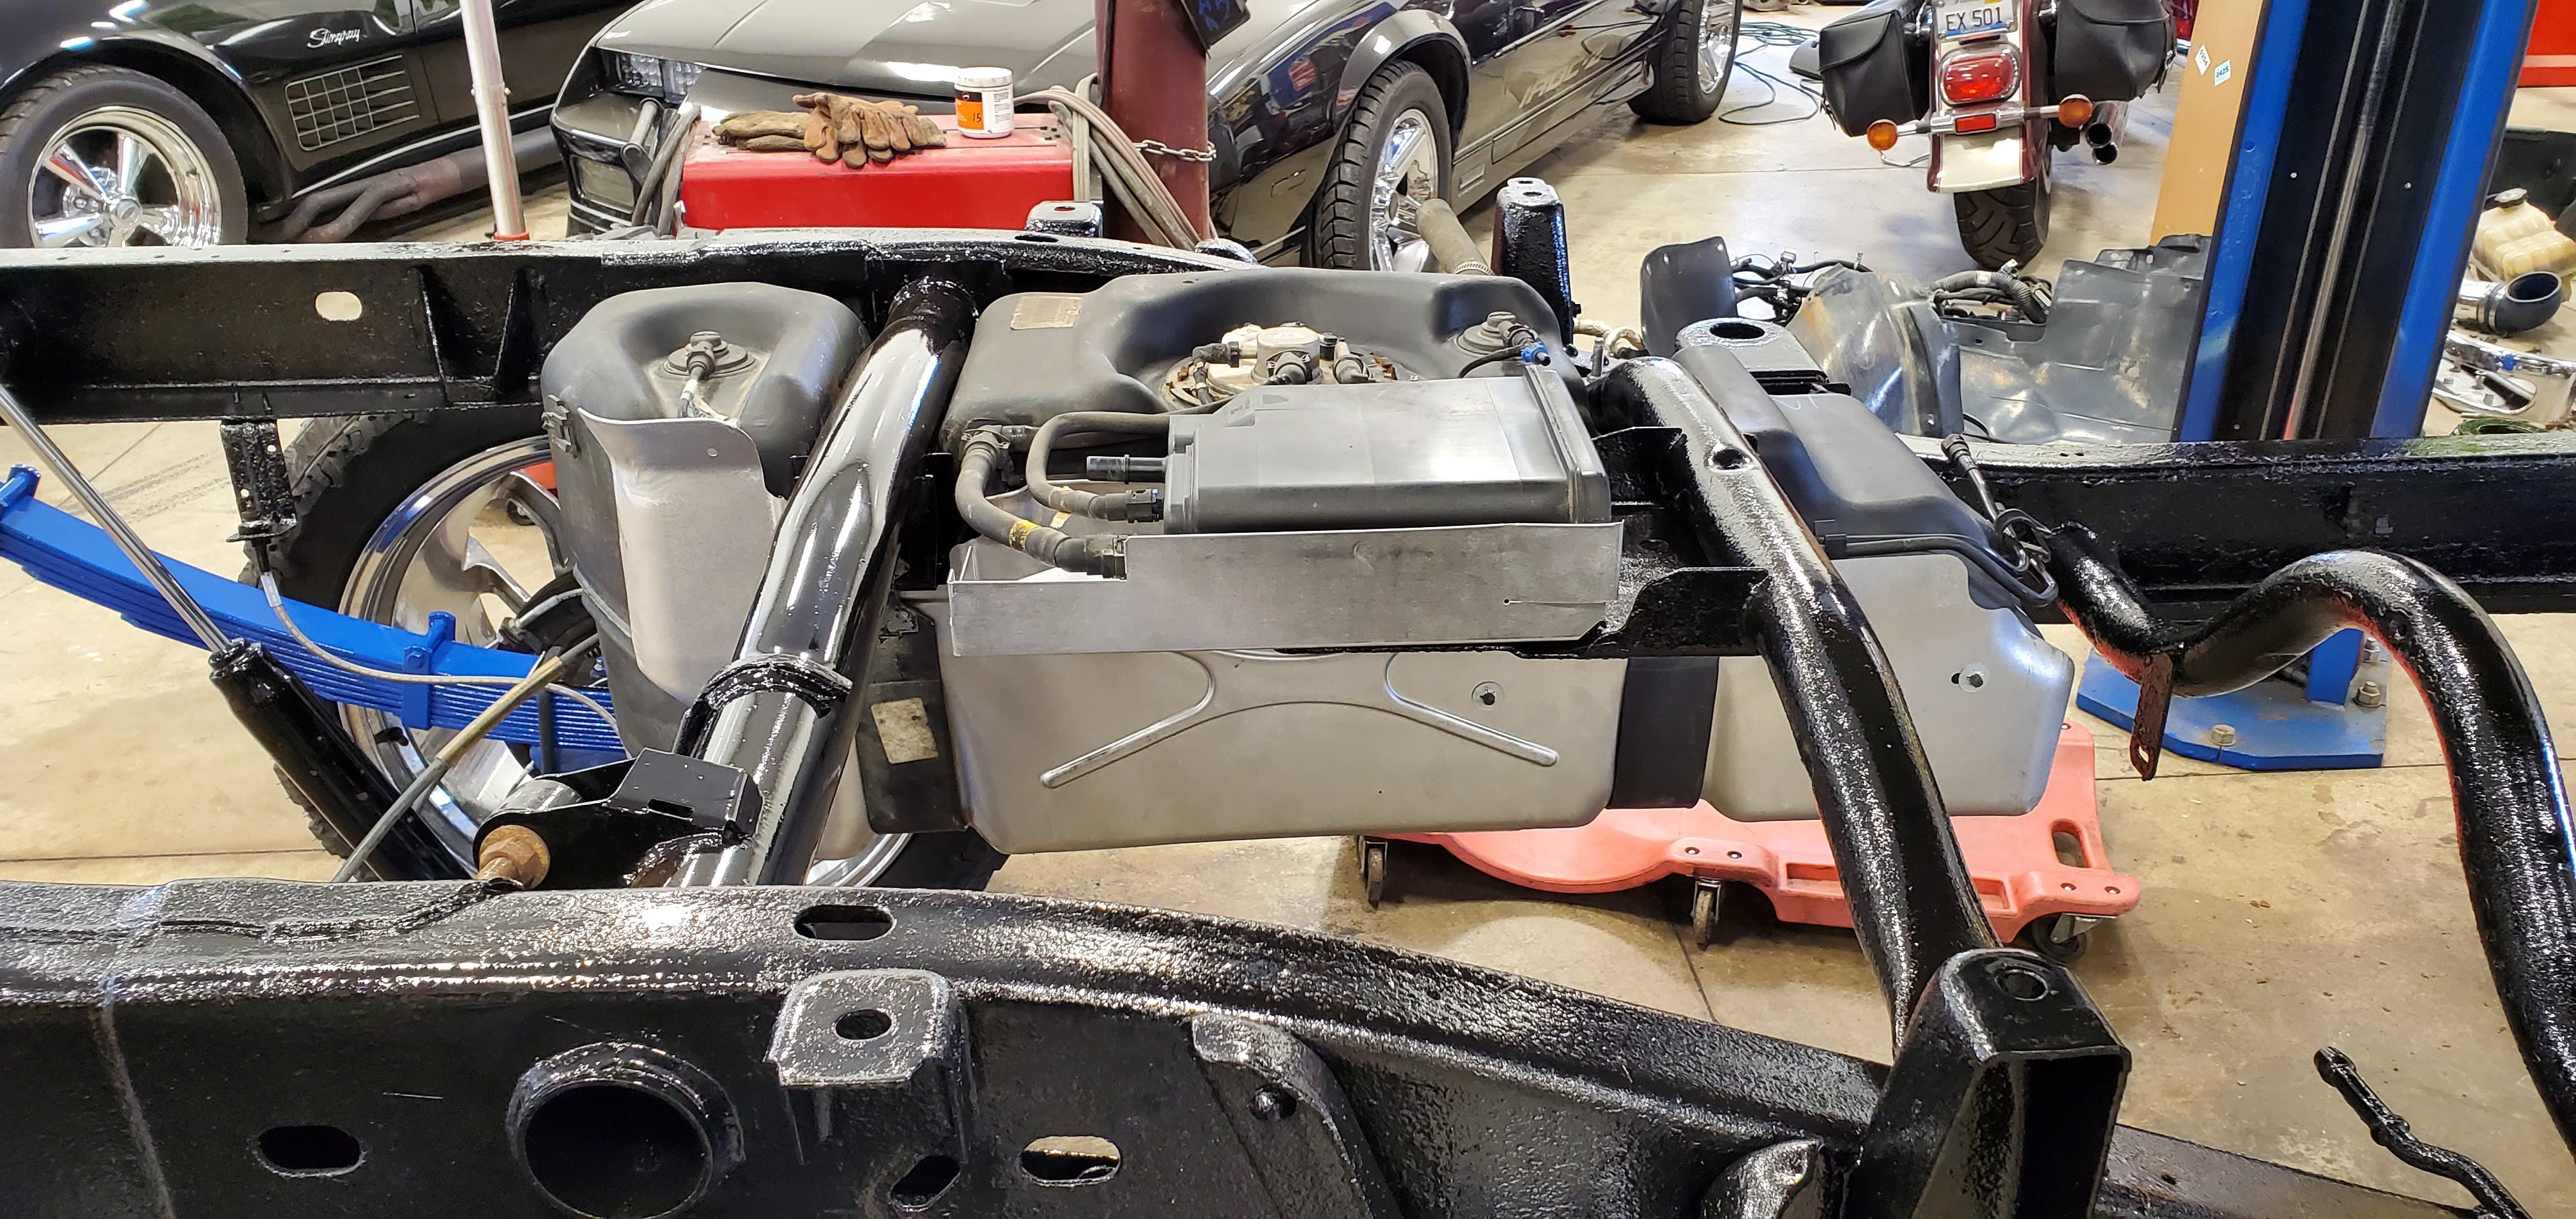
When I pulled the fuel tank to get to the front bolt on the driver side leaf spring, I found this.

Yay. Pulled the bed and welded in a new crossmember.
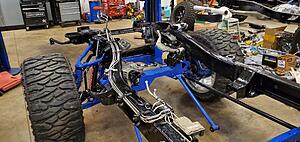
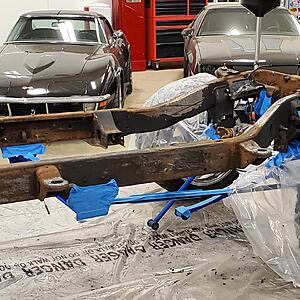
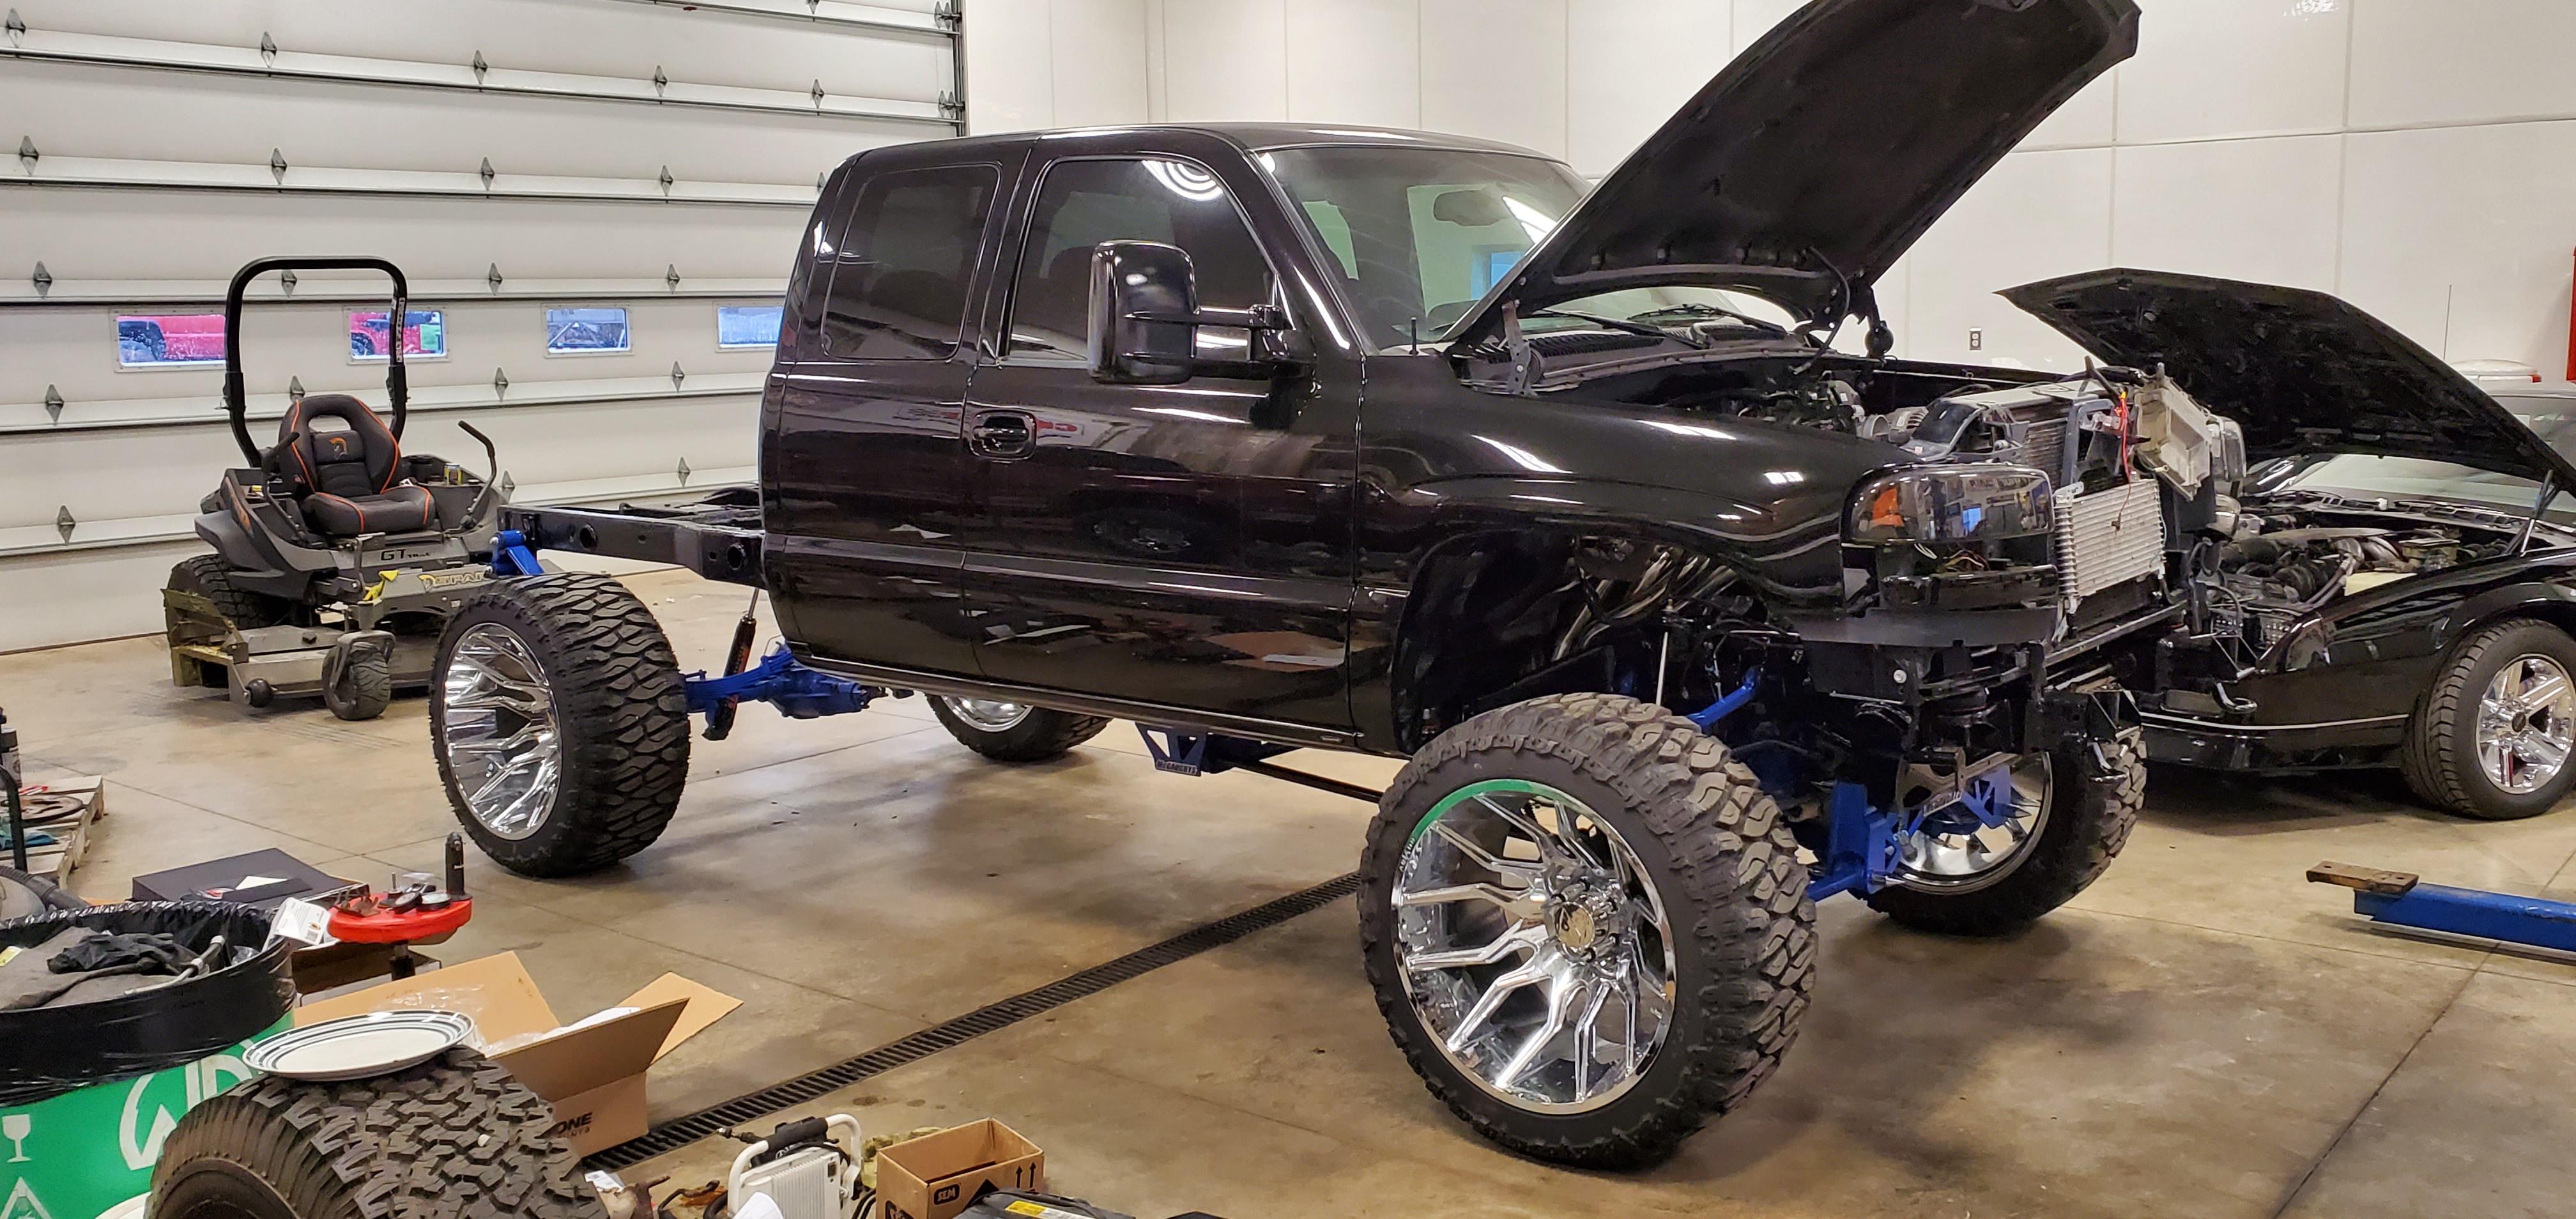
At this point, I said screw it, I'm pulling the cab and cleaning the frame up since I'm doing the engine/trans swap. (sorry the only pic I have is a snapchat)

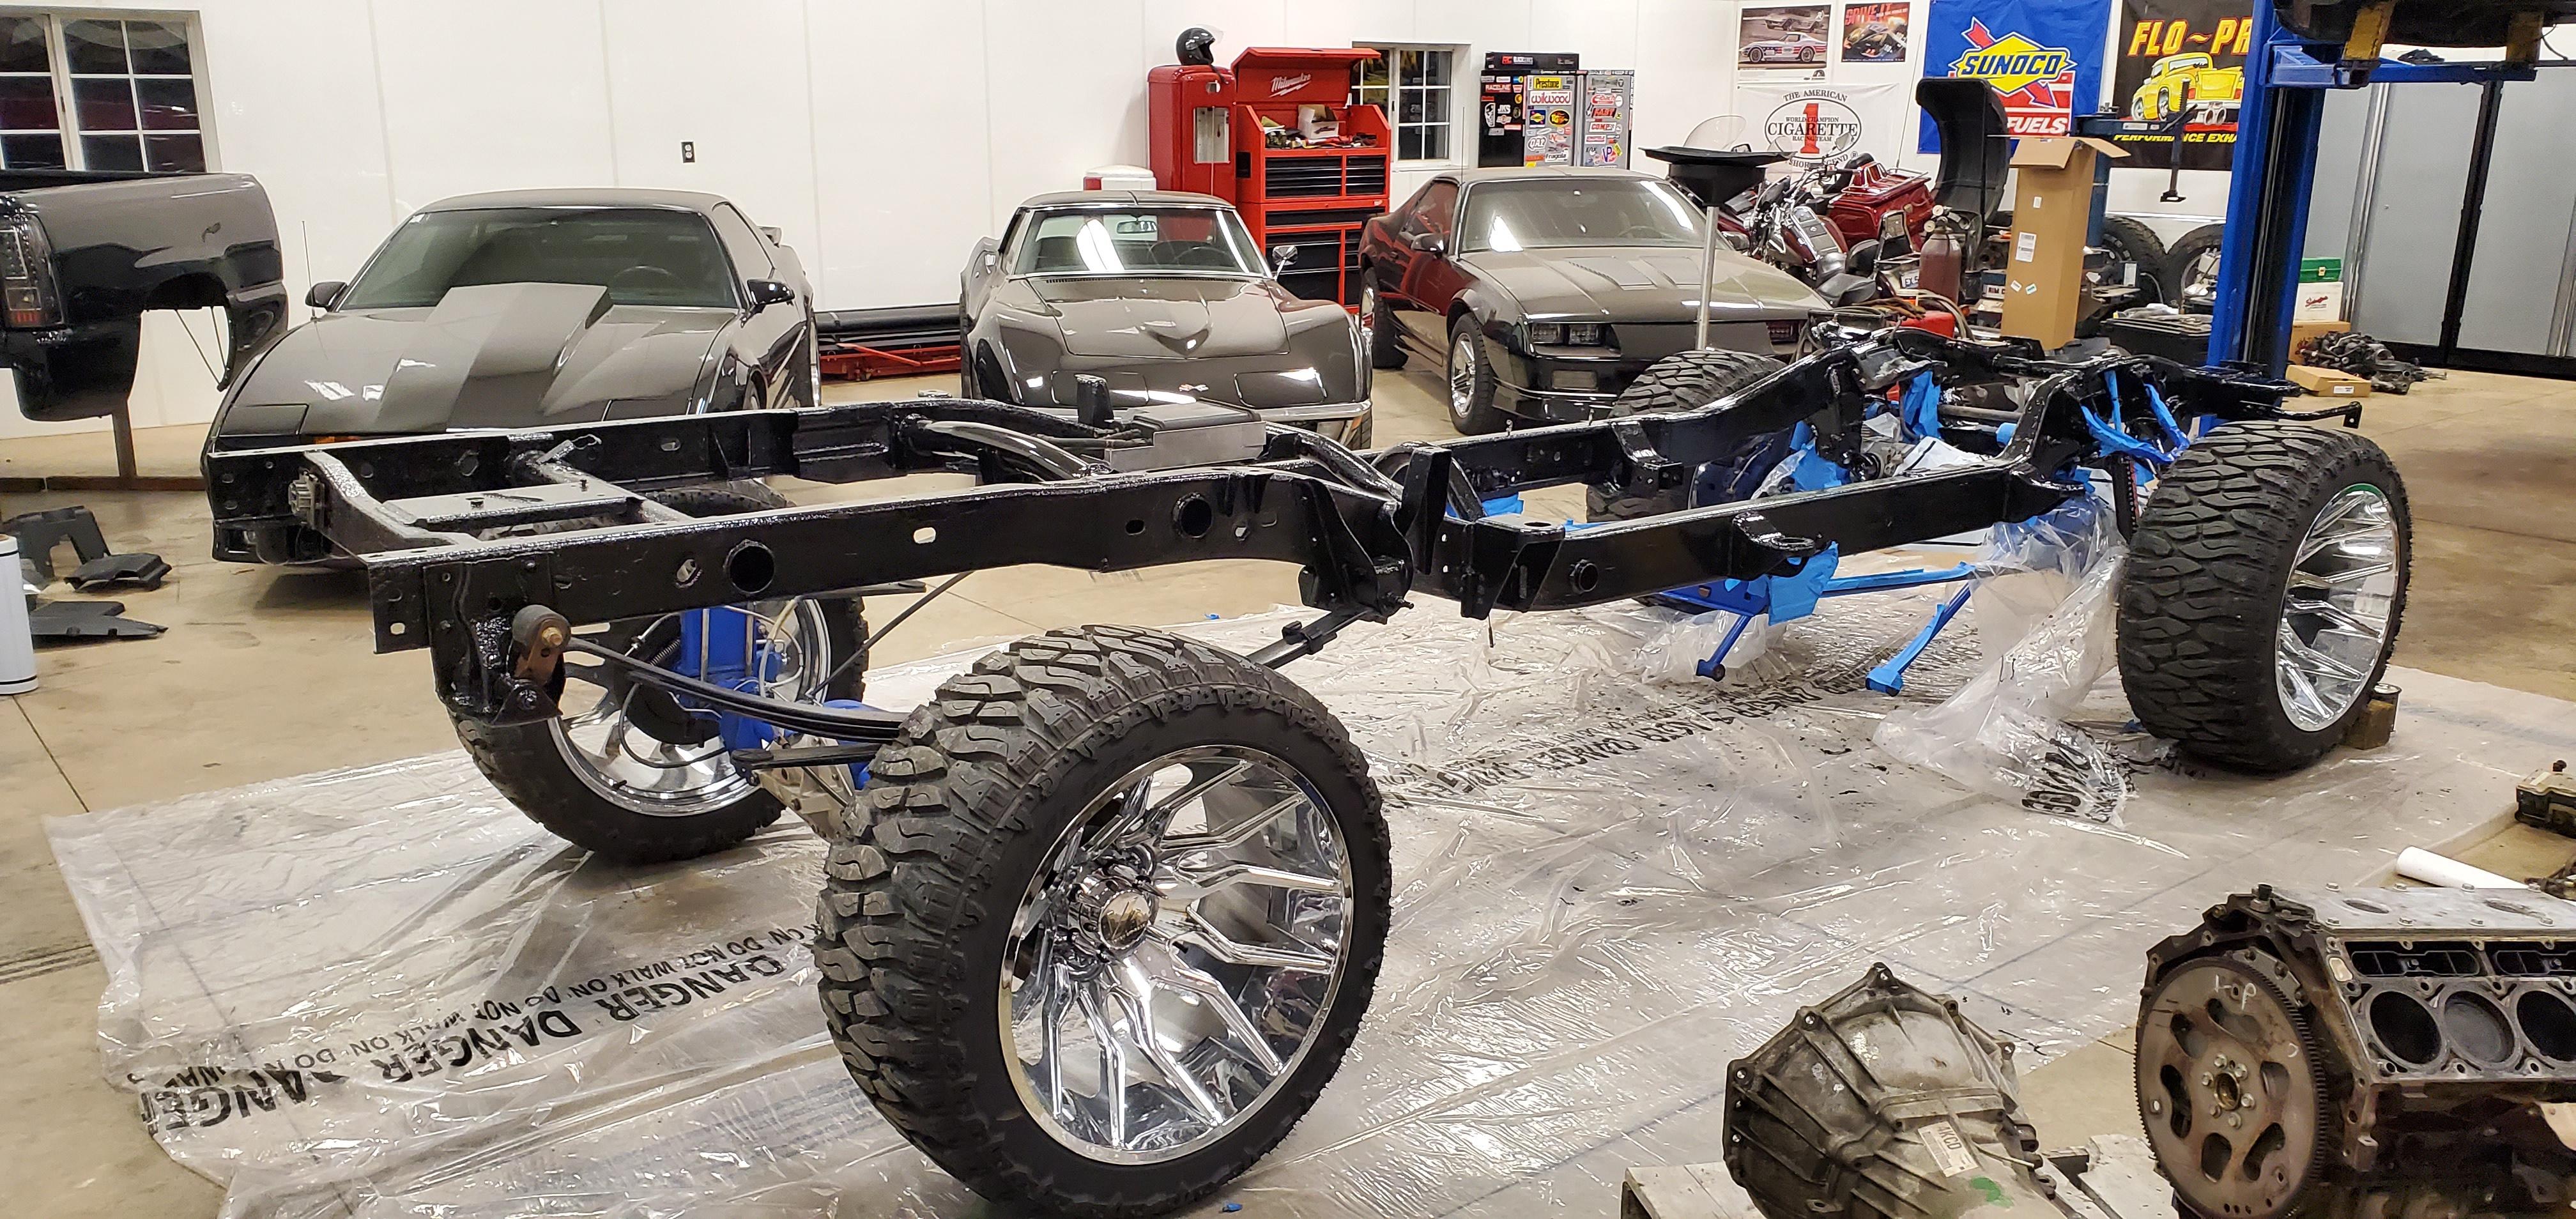
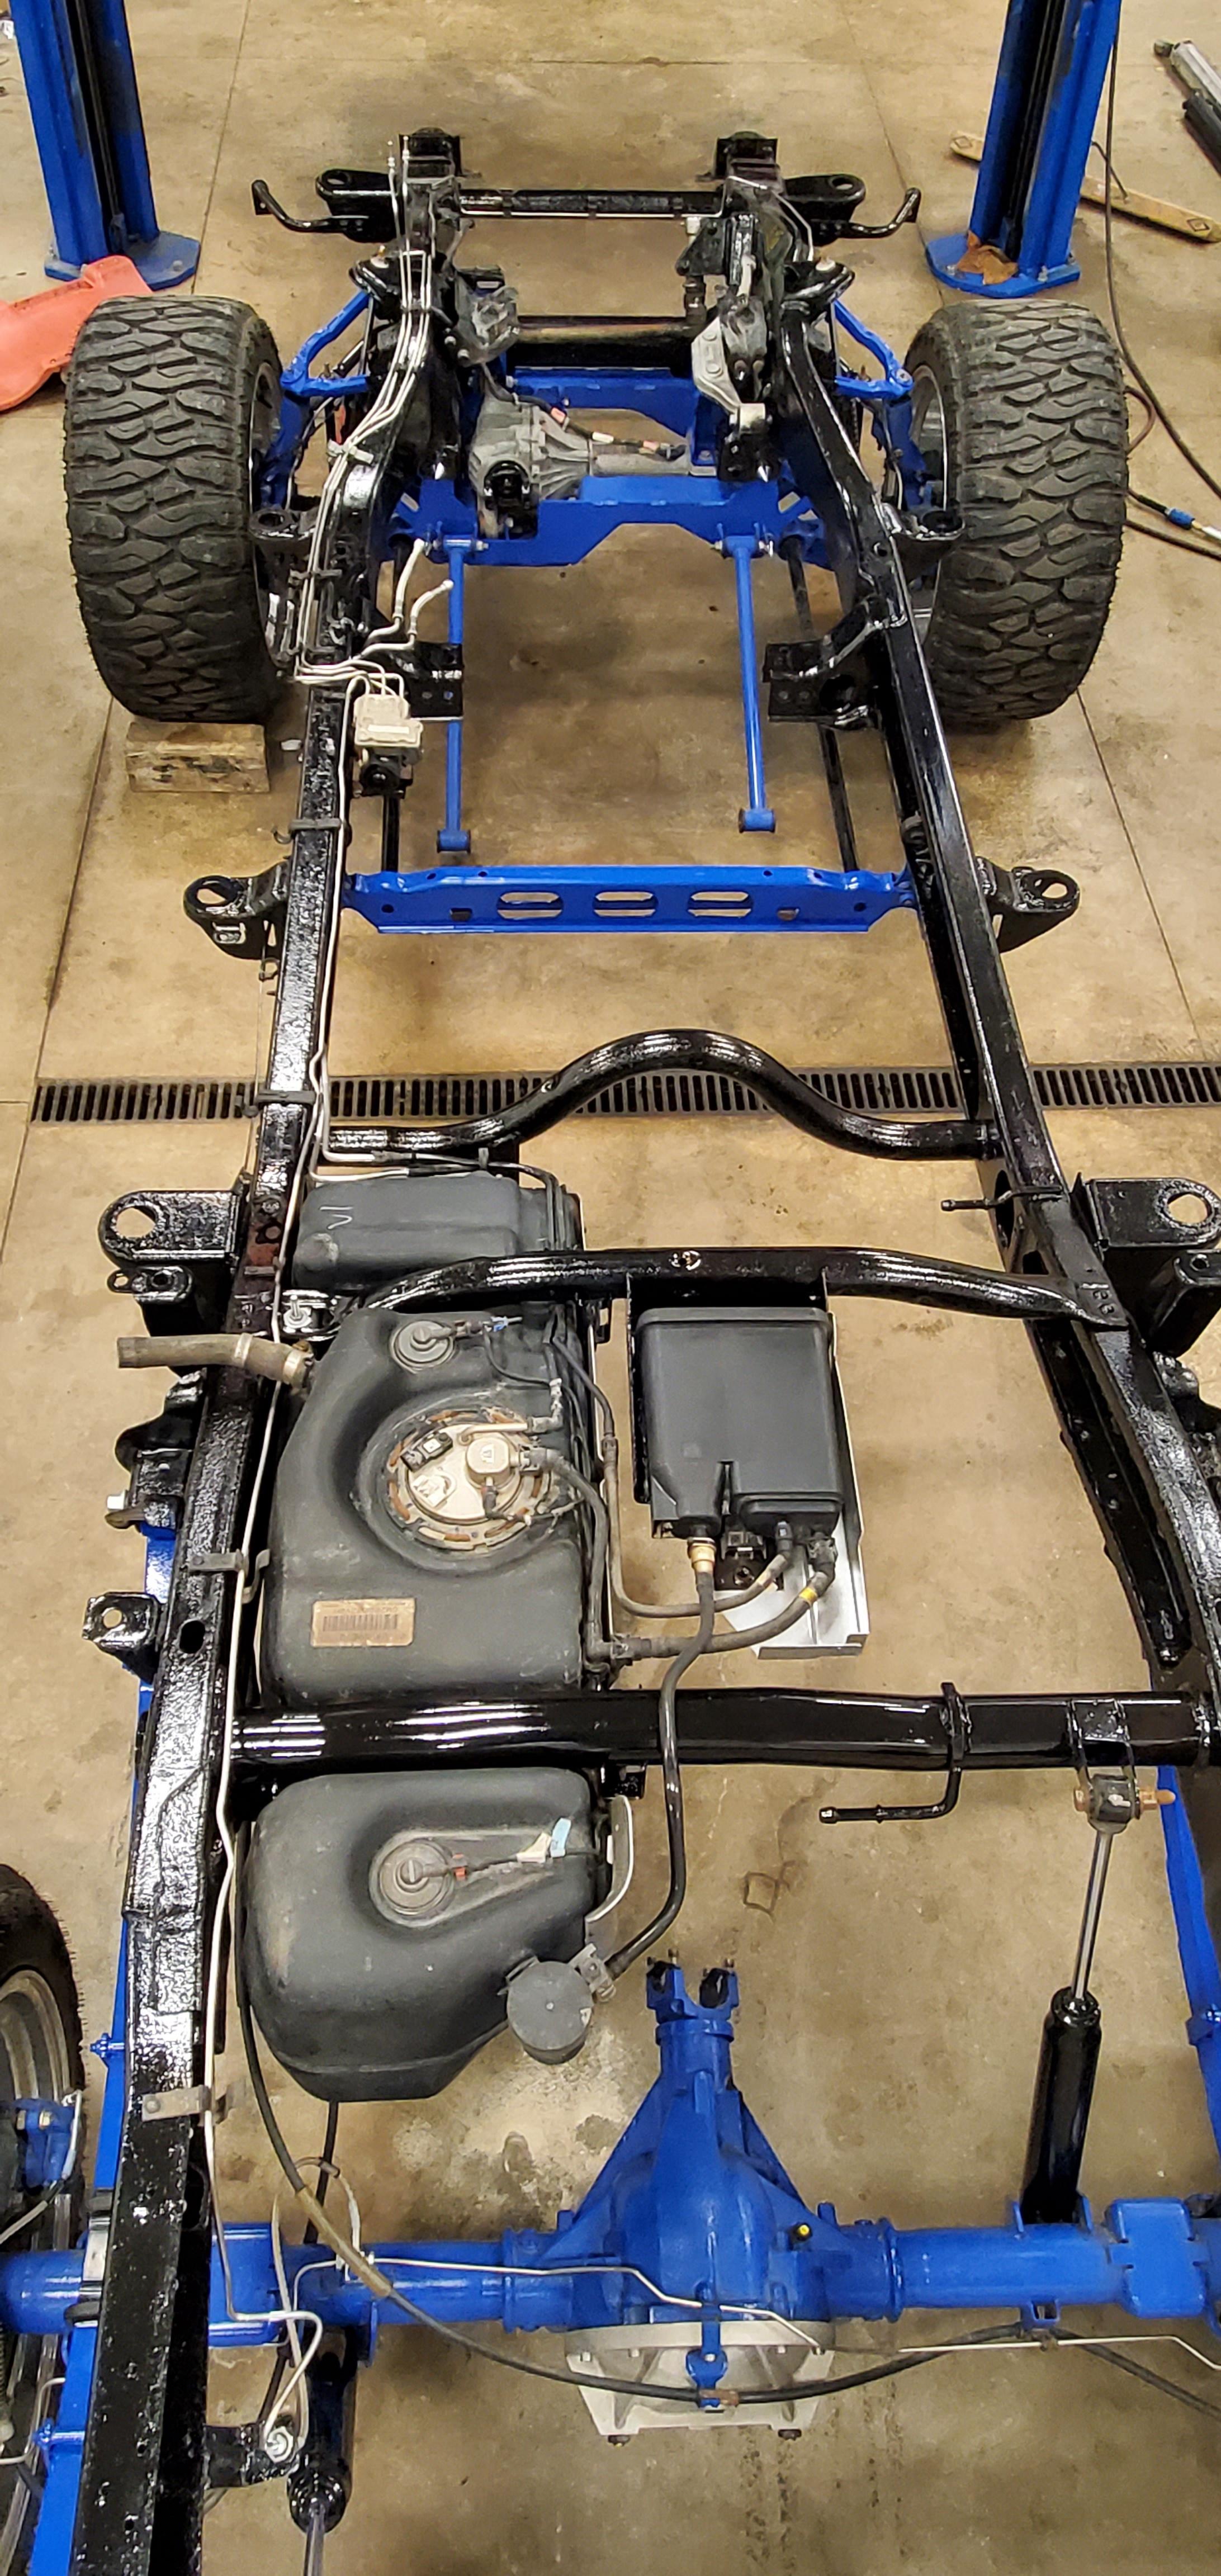
Now the 5.3/4l60 is pulled, the engine and chassis harness's are both off, brake lines and fuel line pulled, and I degreased and hot water pressure washed the frame. got it pretty dang clean. I am in the middle of doing the whole frame with gloss black chassis saver. I will update soon with pictures of that done.

I immediately swapped out the wheels and tires to 20x12s with 33s and put keys in it.


Eventually had to put flares on it due to rust on the bed starting to show. Also pulled the pinstripes off.

Drove the truck for a while and hated the cranked front end. It rode rough, blew through front end parts, you know, the usual for that type of leveling kit. Next step was a 9" McGaughys lift kit. Also different 20x12s and 33s. At some point after all this was done I did 4.11 gears as well.

After barely a year, the lift kit powder coat was chipping and peeling bad, starting to rust and everything. Apparently McGaughys has had issues with powder coat not lasting (this has since been fixed I am told), so the whole kit was stripped back off the truck and blasted to bare metal. The whole kit as well as control arms, rear differential and other parts got done in blue. The blue is a color that was mixed custom for me, and is an epoxy with epoxy primer underneath. Shot all the parts myself. Turned out pretty good and has been way more durable than the powder coating was.


At this point the rust on the truck had started to get bad. The bed was trash, both front fenders had rust as well, and the passenger side door was rusting through on the bottom. Rust free bed found, new gm fenders and door. Still need to do cab corners and rockers, but short term I threw some paint matched Bushwacker rocker covers on. I had got some worn out 35's to see how I liked the bigger tire so those are on now too.

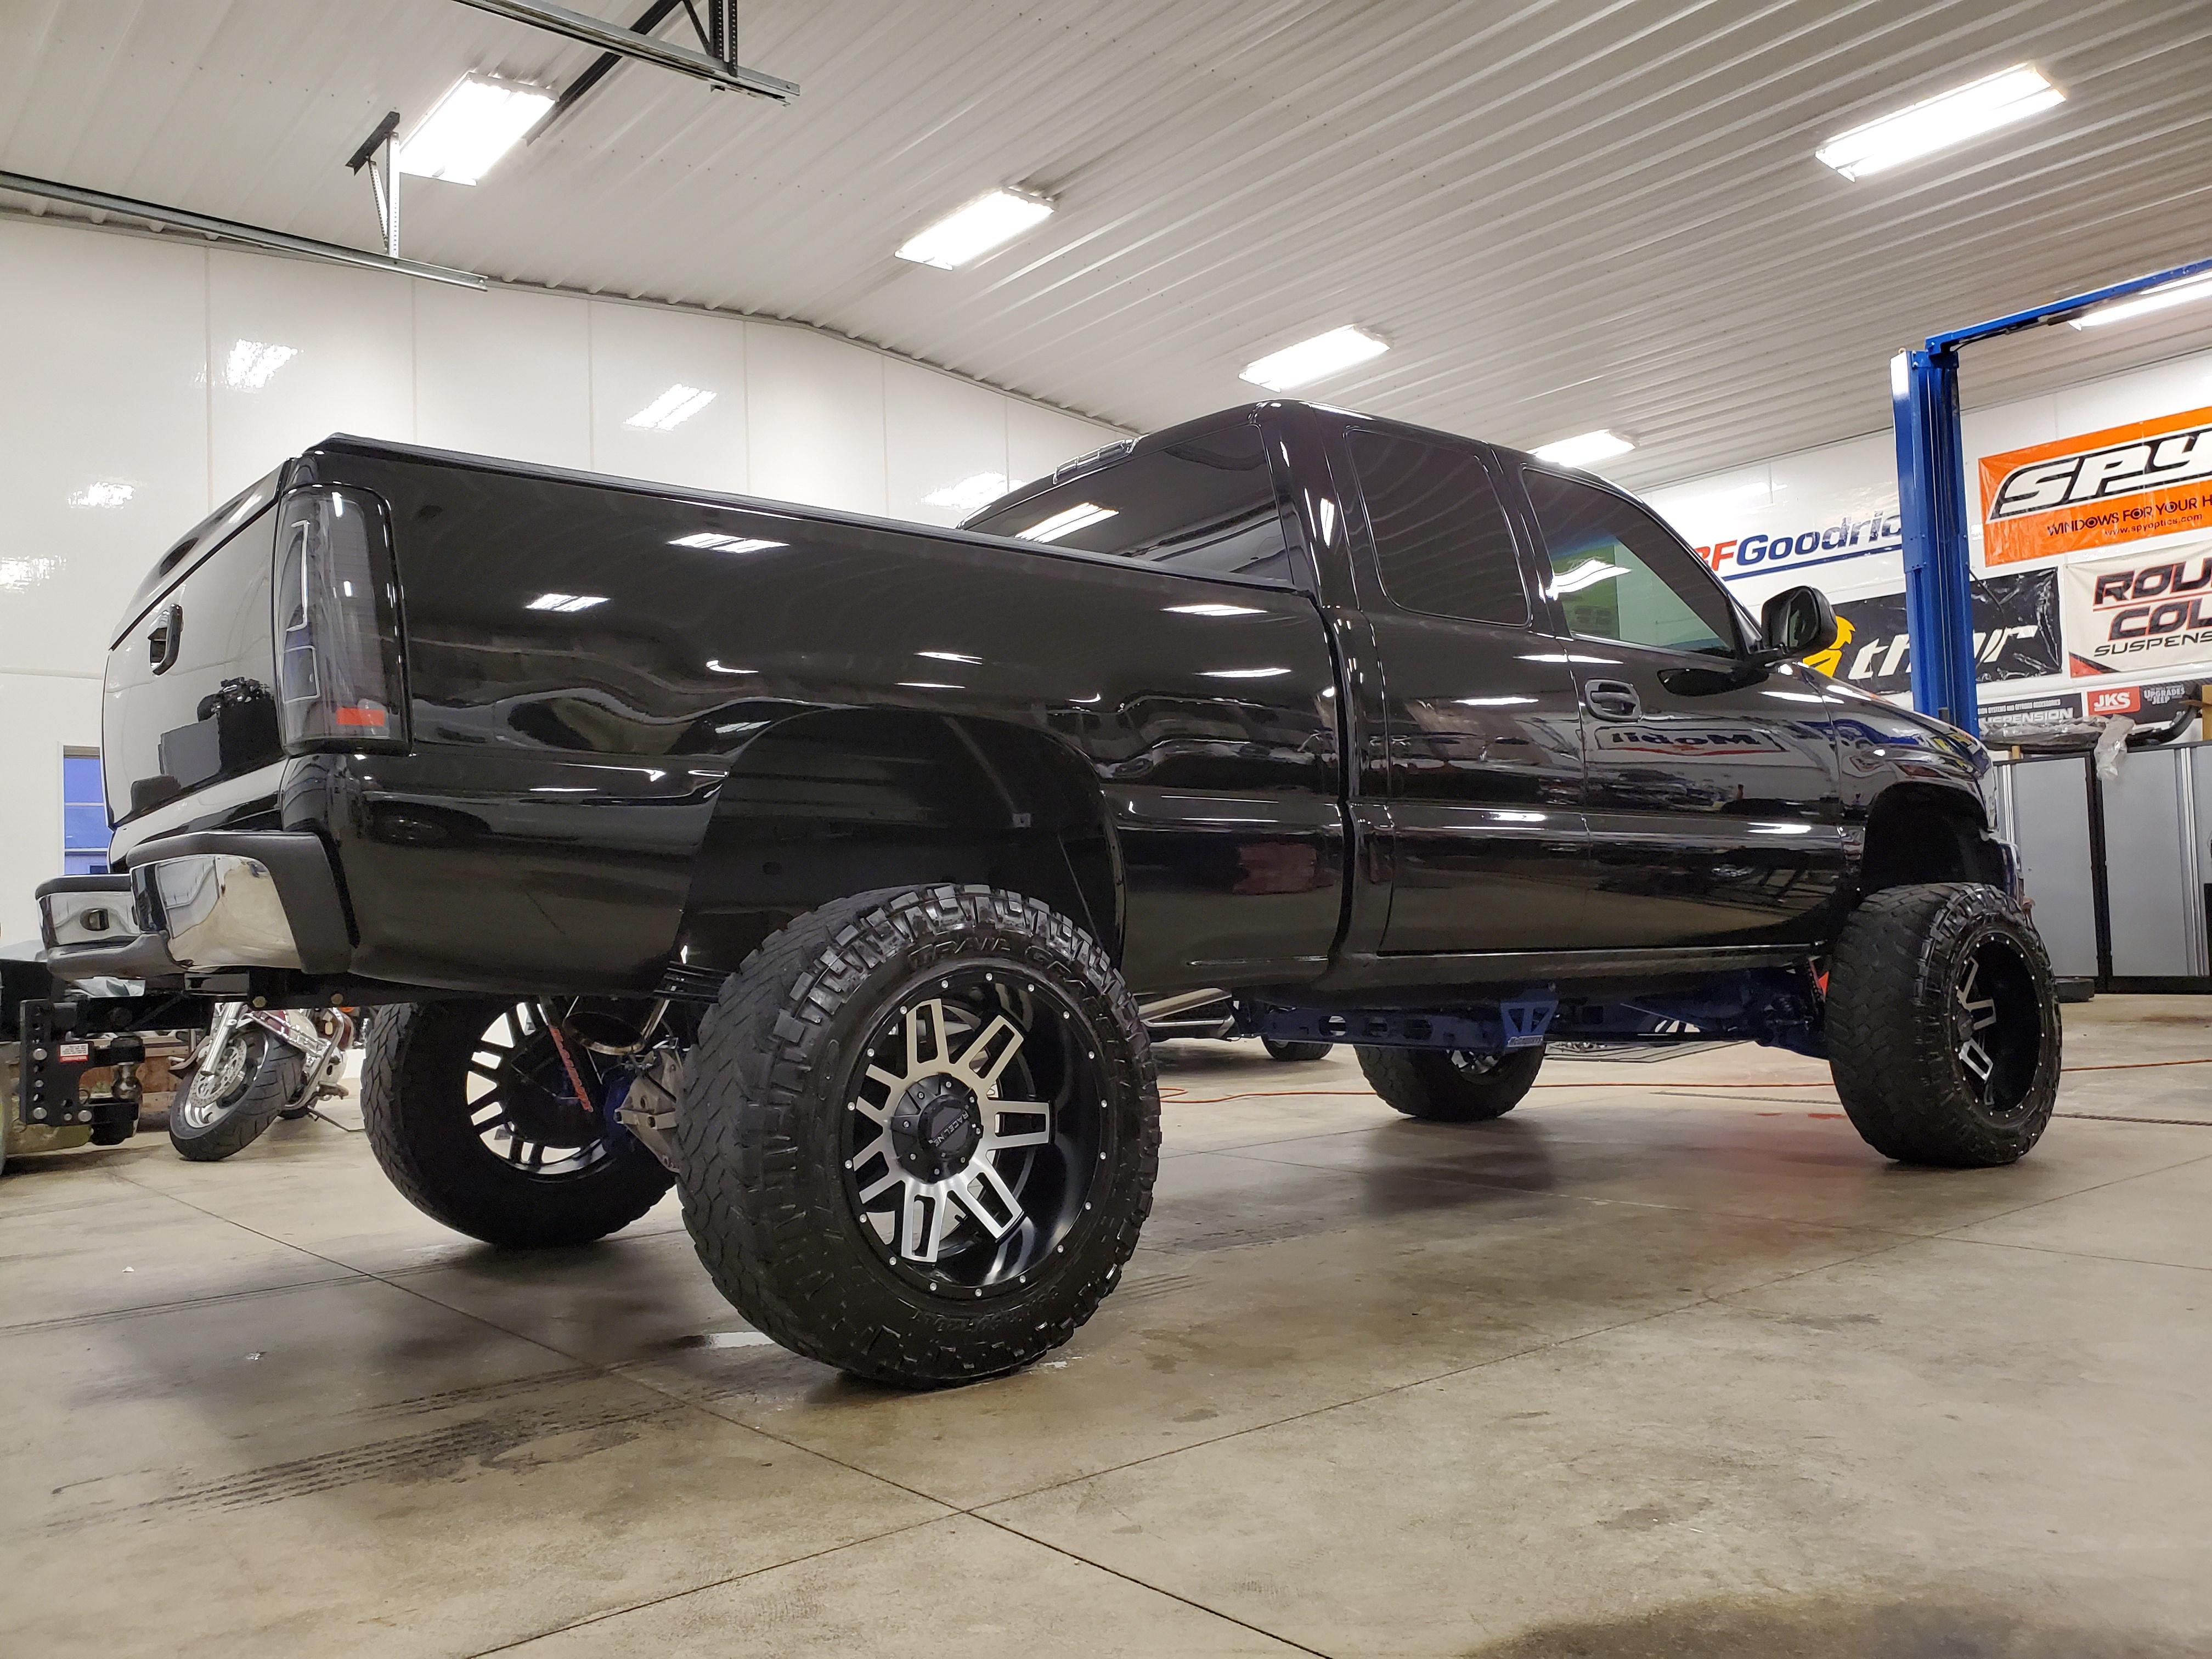
About a year ago, I swapped to 24x14s with 36" tires. a little later in the summer last year I did painted tow mirrors and handles.

And that brings us pretty much up to date. There is way more to say than just that, but hopefully the photos sort of tell the story of the truck so far themselves.
Ok so on to the reason I am doing what I am now. Last year the 5.3 started drinking coolant. Bad head gaskets. the truck is currently sitting at 215k miles, and not a single one of the last 100k has the truck been babied. It pulls my 20' Crownline every weekend in the summer when we go boating, and with the 9" kit and 36's, the 5.3 is being overworked like crazy. The 4.11 gears are not enough either, if I had know I was going to be running this big of a tire back when I did the gears, I would have done 4.56s or 4.88s. The trans and t-case also haven't been touched other than fluid changes. The whole drivetrain on this truck is tired.
I very briefly looked into rebuilding the 5.3 and 4l60, but since I tow and also like to party sometimes, I decided a 6.0 is a no brainer at this point, and the 4l80 just makes sense if I plan to beat on it and continue to play with the 6.0.
So, I picked up an LQ4 out of a 2005 hummer at a salvage yard. The hummer had like 300k on it, but it is obvious that this motor was not the original. Painted oil pan/front and rear covers, as well as how clean everything looks under the valve covers as well as in the valley. So unknown miles, but it really looks to be in pretty good shape.

Quick sidetrack here. I got Deaver 8" rear leaf springs to replace the factory leafs/add a leaf/block in the back.

When I pulled the fuel tank to get to the front bolt on the driver side leaf spring, I found this.

Yay. Pulled the bed and welded in a new crossmember.

At this point, I said screw it, I'm pulling the cab and cleaning the frame up since I'm doing the engine/trans swap. (sorry the only pic I have is a snapchat)

Now the 5.3/4l60 is pulled, the engine and chassis harness's are both off, brake lines and fuel line pulled, and I degreased and hot water pressure washed the frame. got it pretty dang clean. I am in the middle of doing the whole frame with gloss black chassis saver. I will update soon with pictures of that done.
Nov 22, 2021 | 12:54 PM
#2
Thread Starter
Teching In
Joined: Feb 2021
Posts: 31
Likes: 18
From: Central IL
It has been an entire year since I initially tried to post this thread. I was a new member and for some reason it took over 3 months for the thread to finally go live. I didn't even realize it was live for another month after that. I was so over it and had lost all motivation to go back and and go through the entire build process in this thread. But here we are, the nice weather is gone and I actually have some free time.
So buckle up people, there is way more information and pictures than any sane person would ever care to see of my stupid truck coming your way.
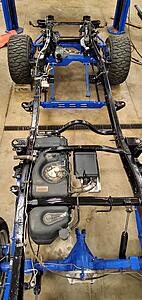
When I left off, I had the truck stripped down to the running gear, about to start coating the frame. Well with the help of my awesome wife, that went relatively well. All done in gloss black chassis saver.


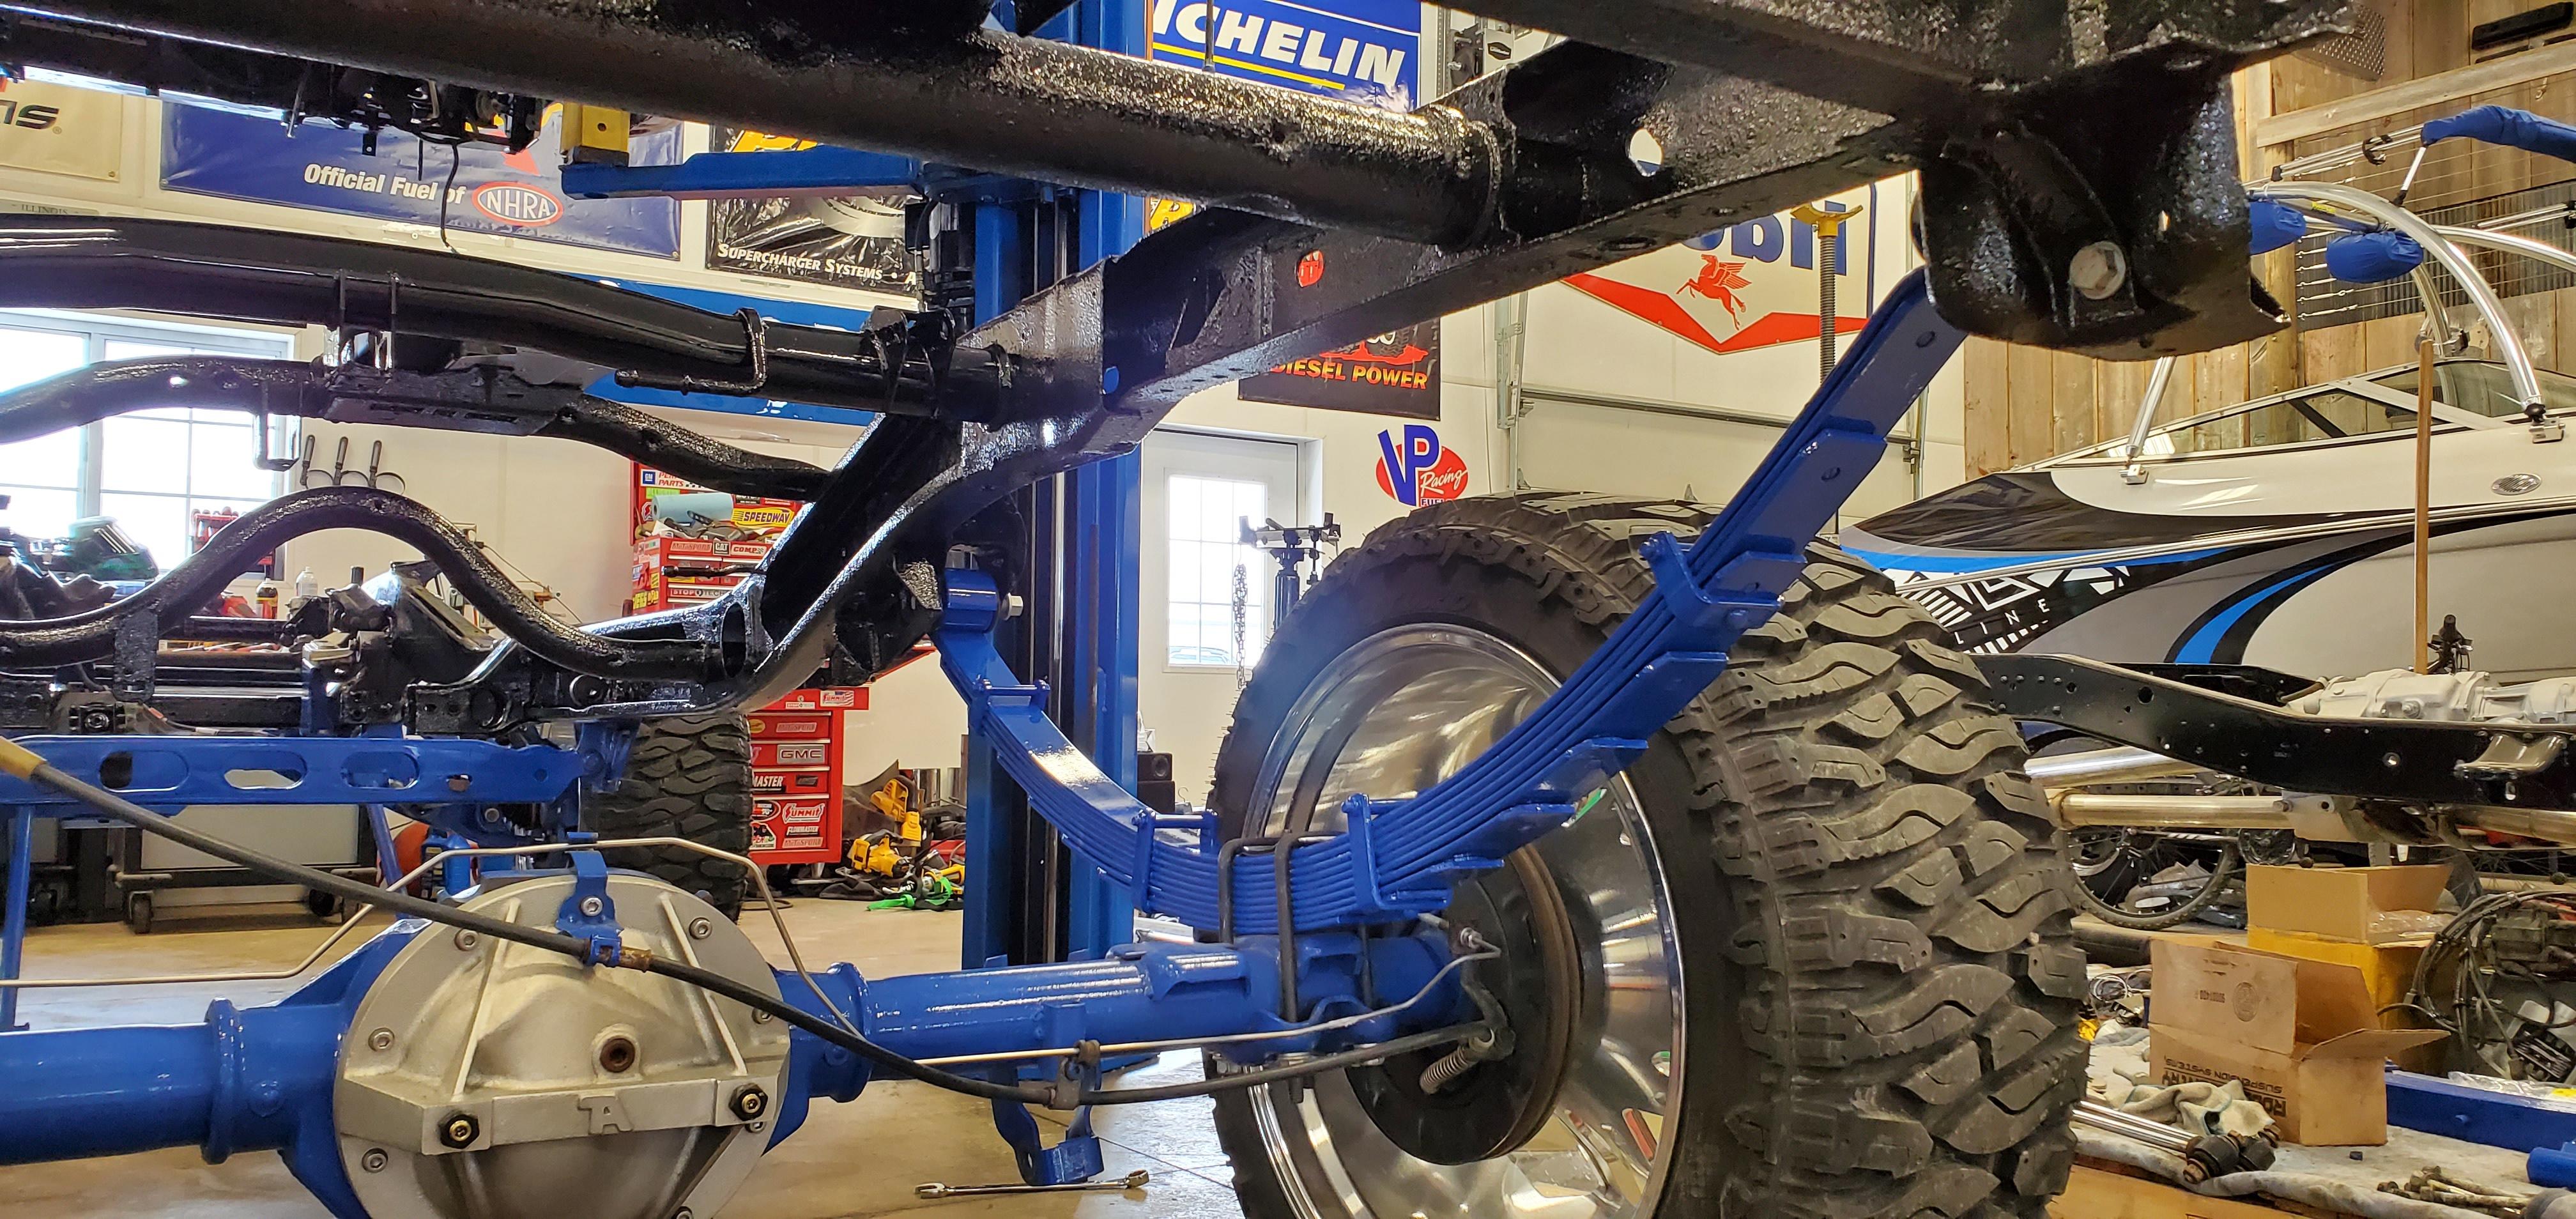
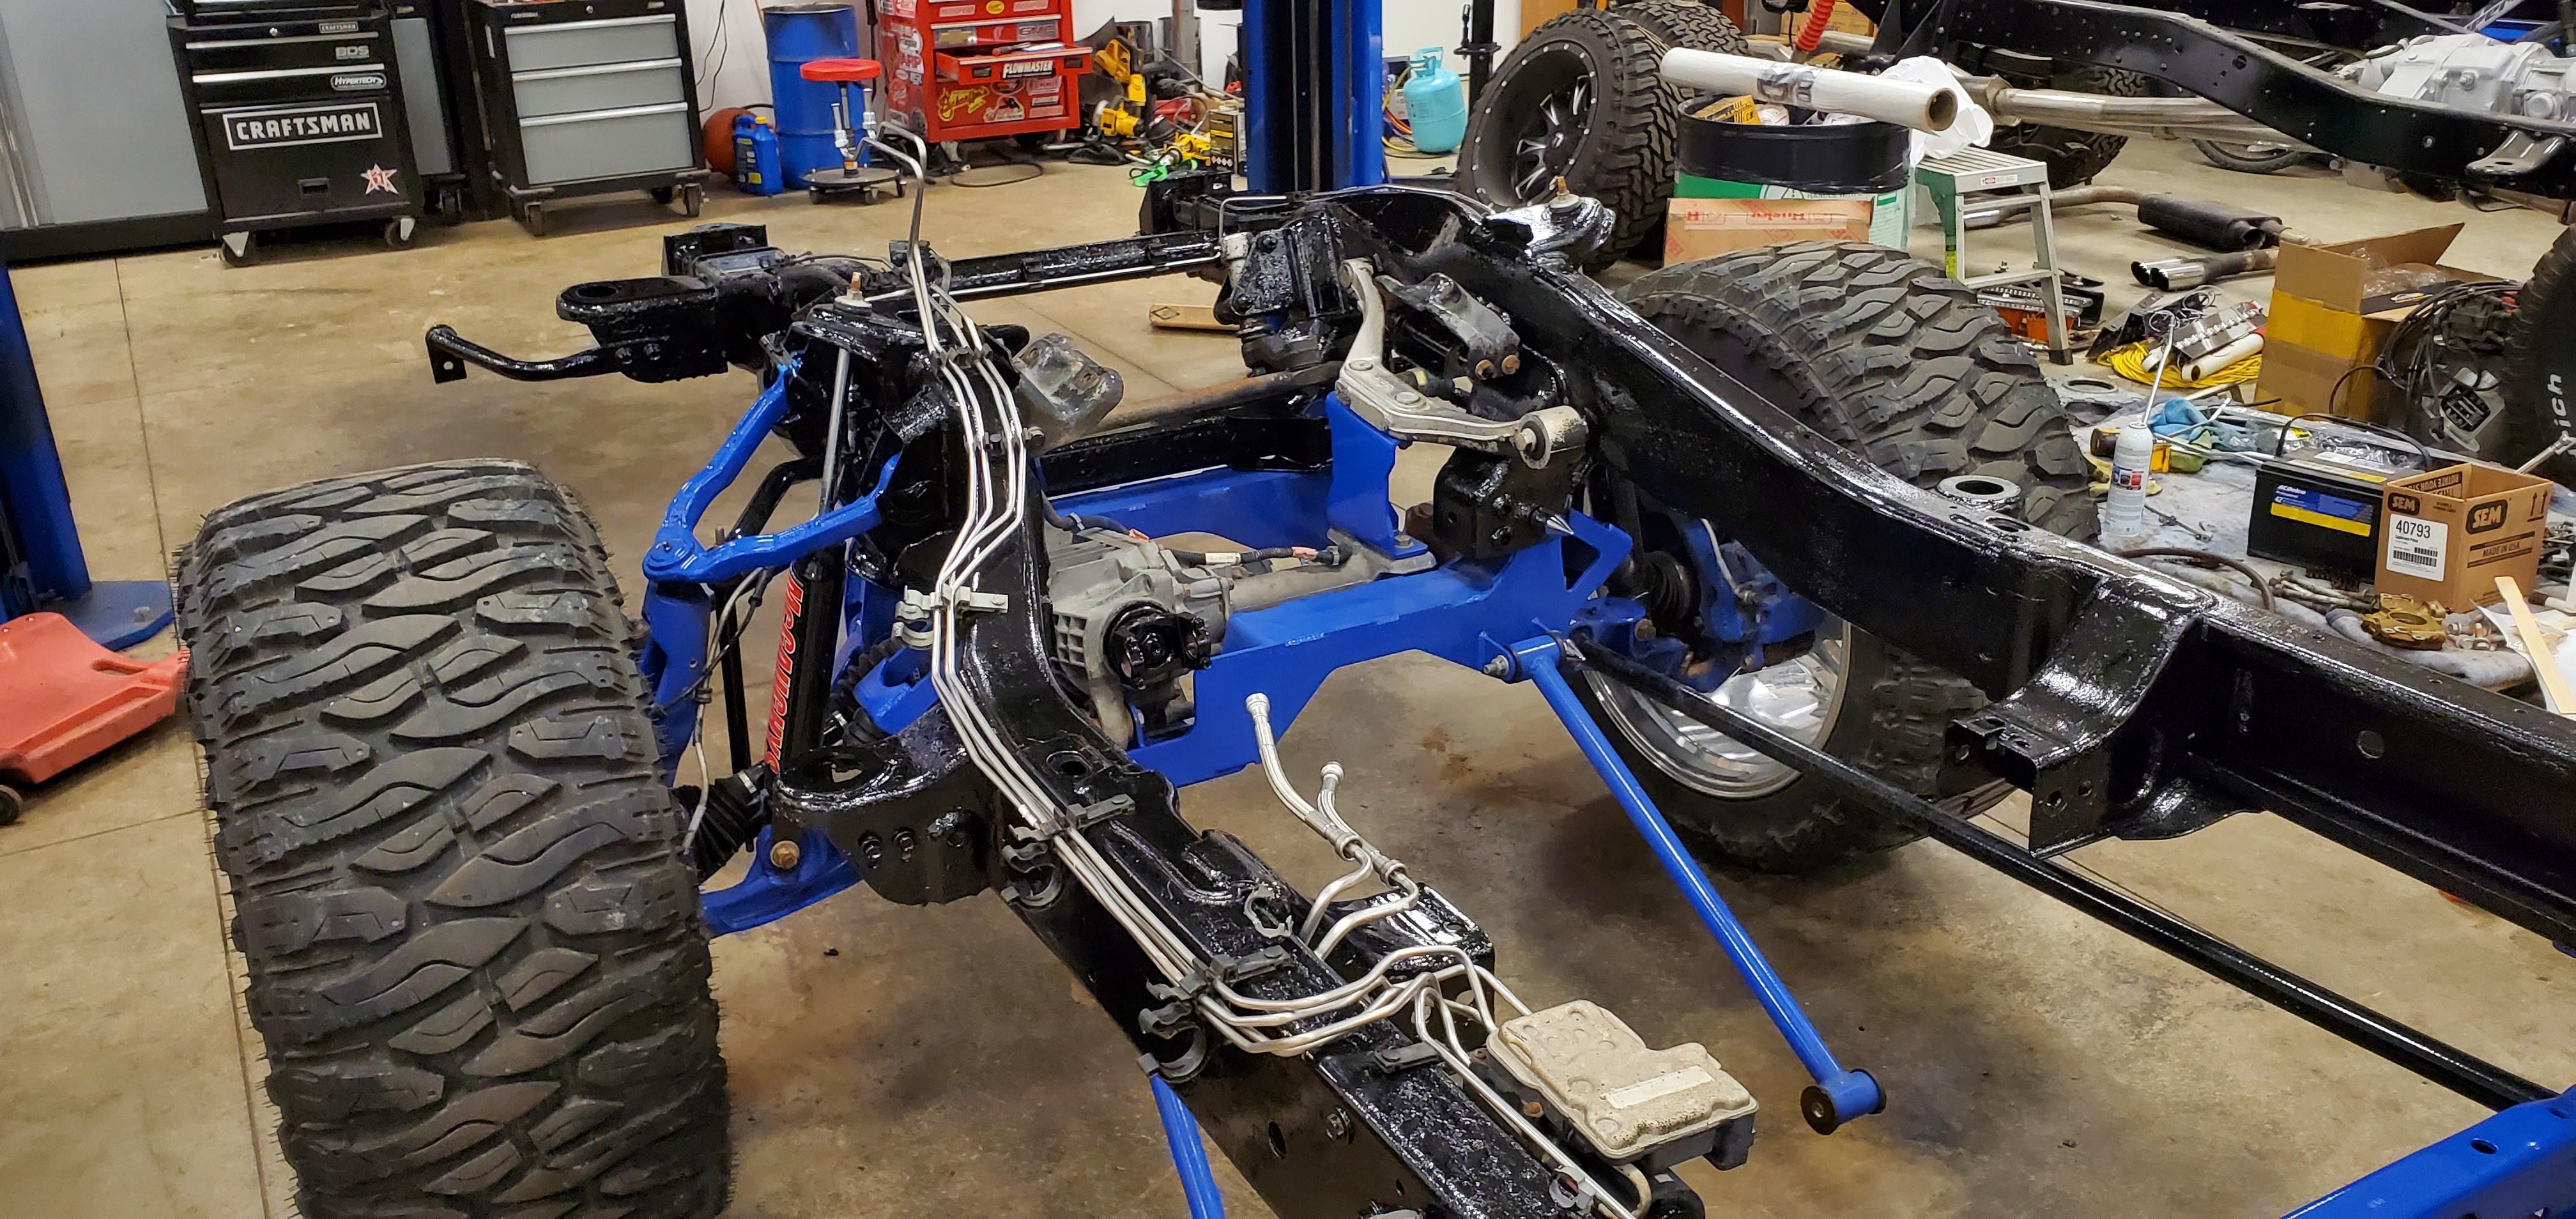
Now that I have the frame coated, the next step is replacing the leaf springs with the Deaver 8" leafs. Easy.


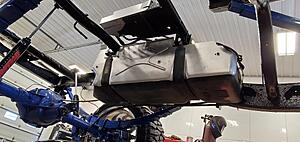
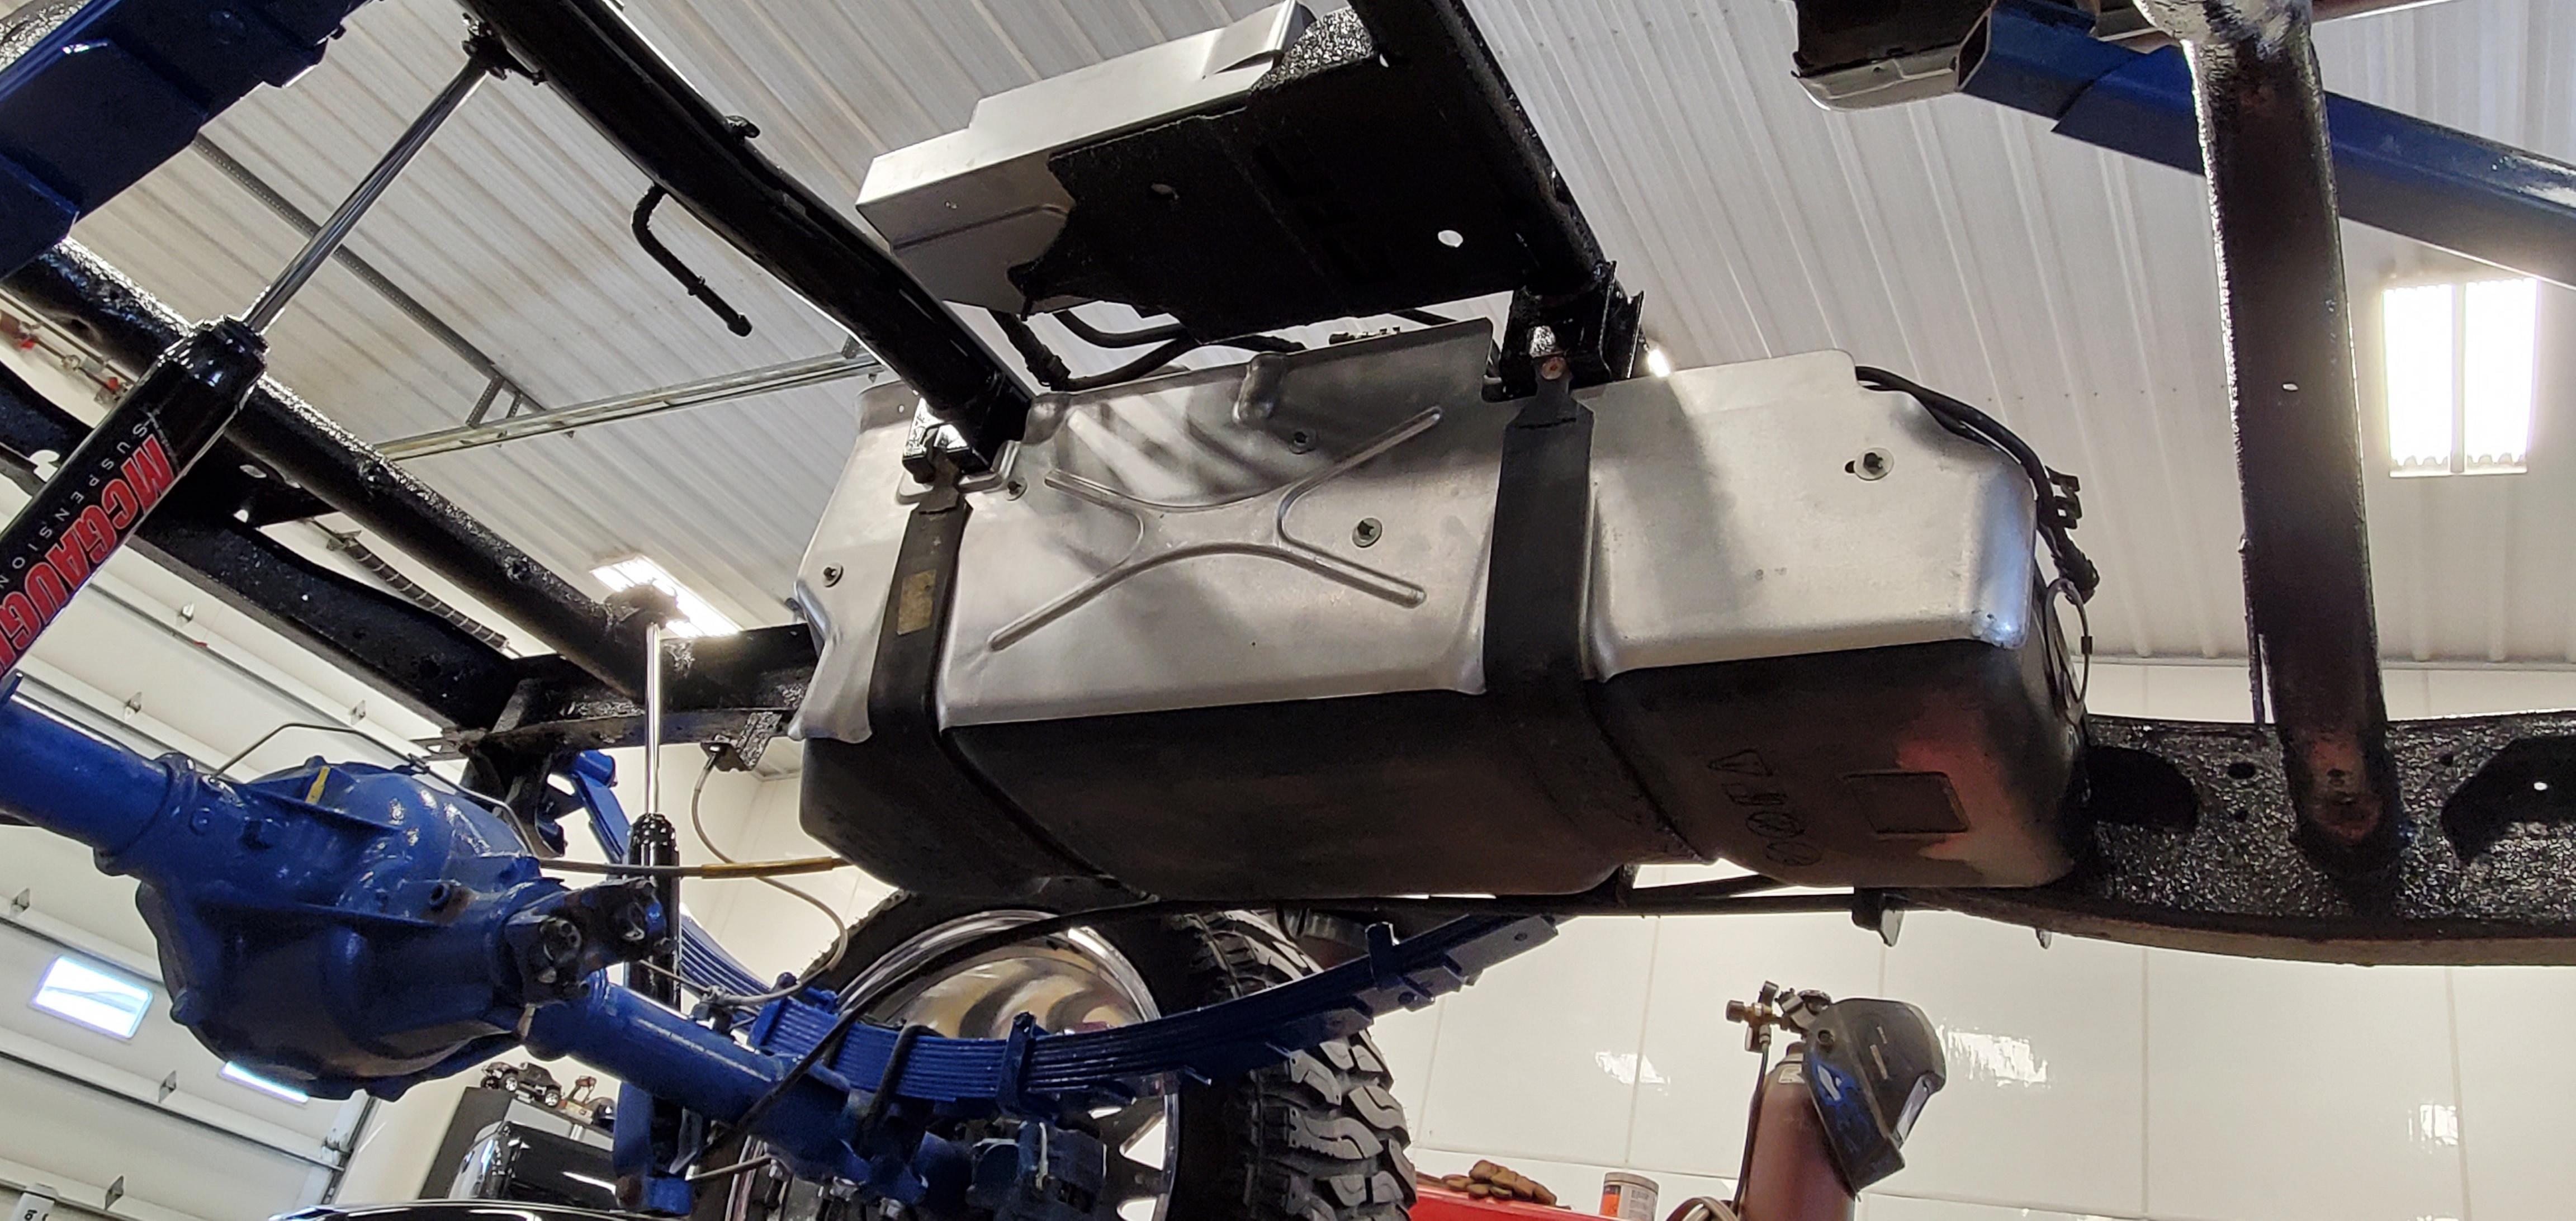
Next is the fuel tank. Fresh heat shield because the old one was rusty.

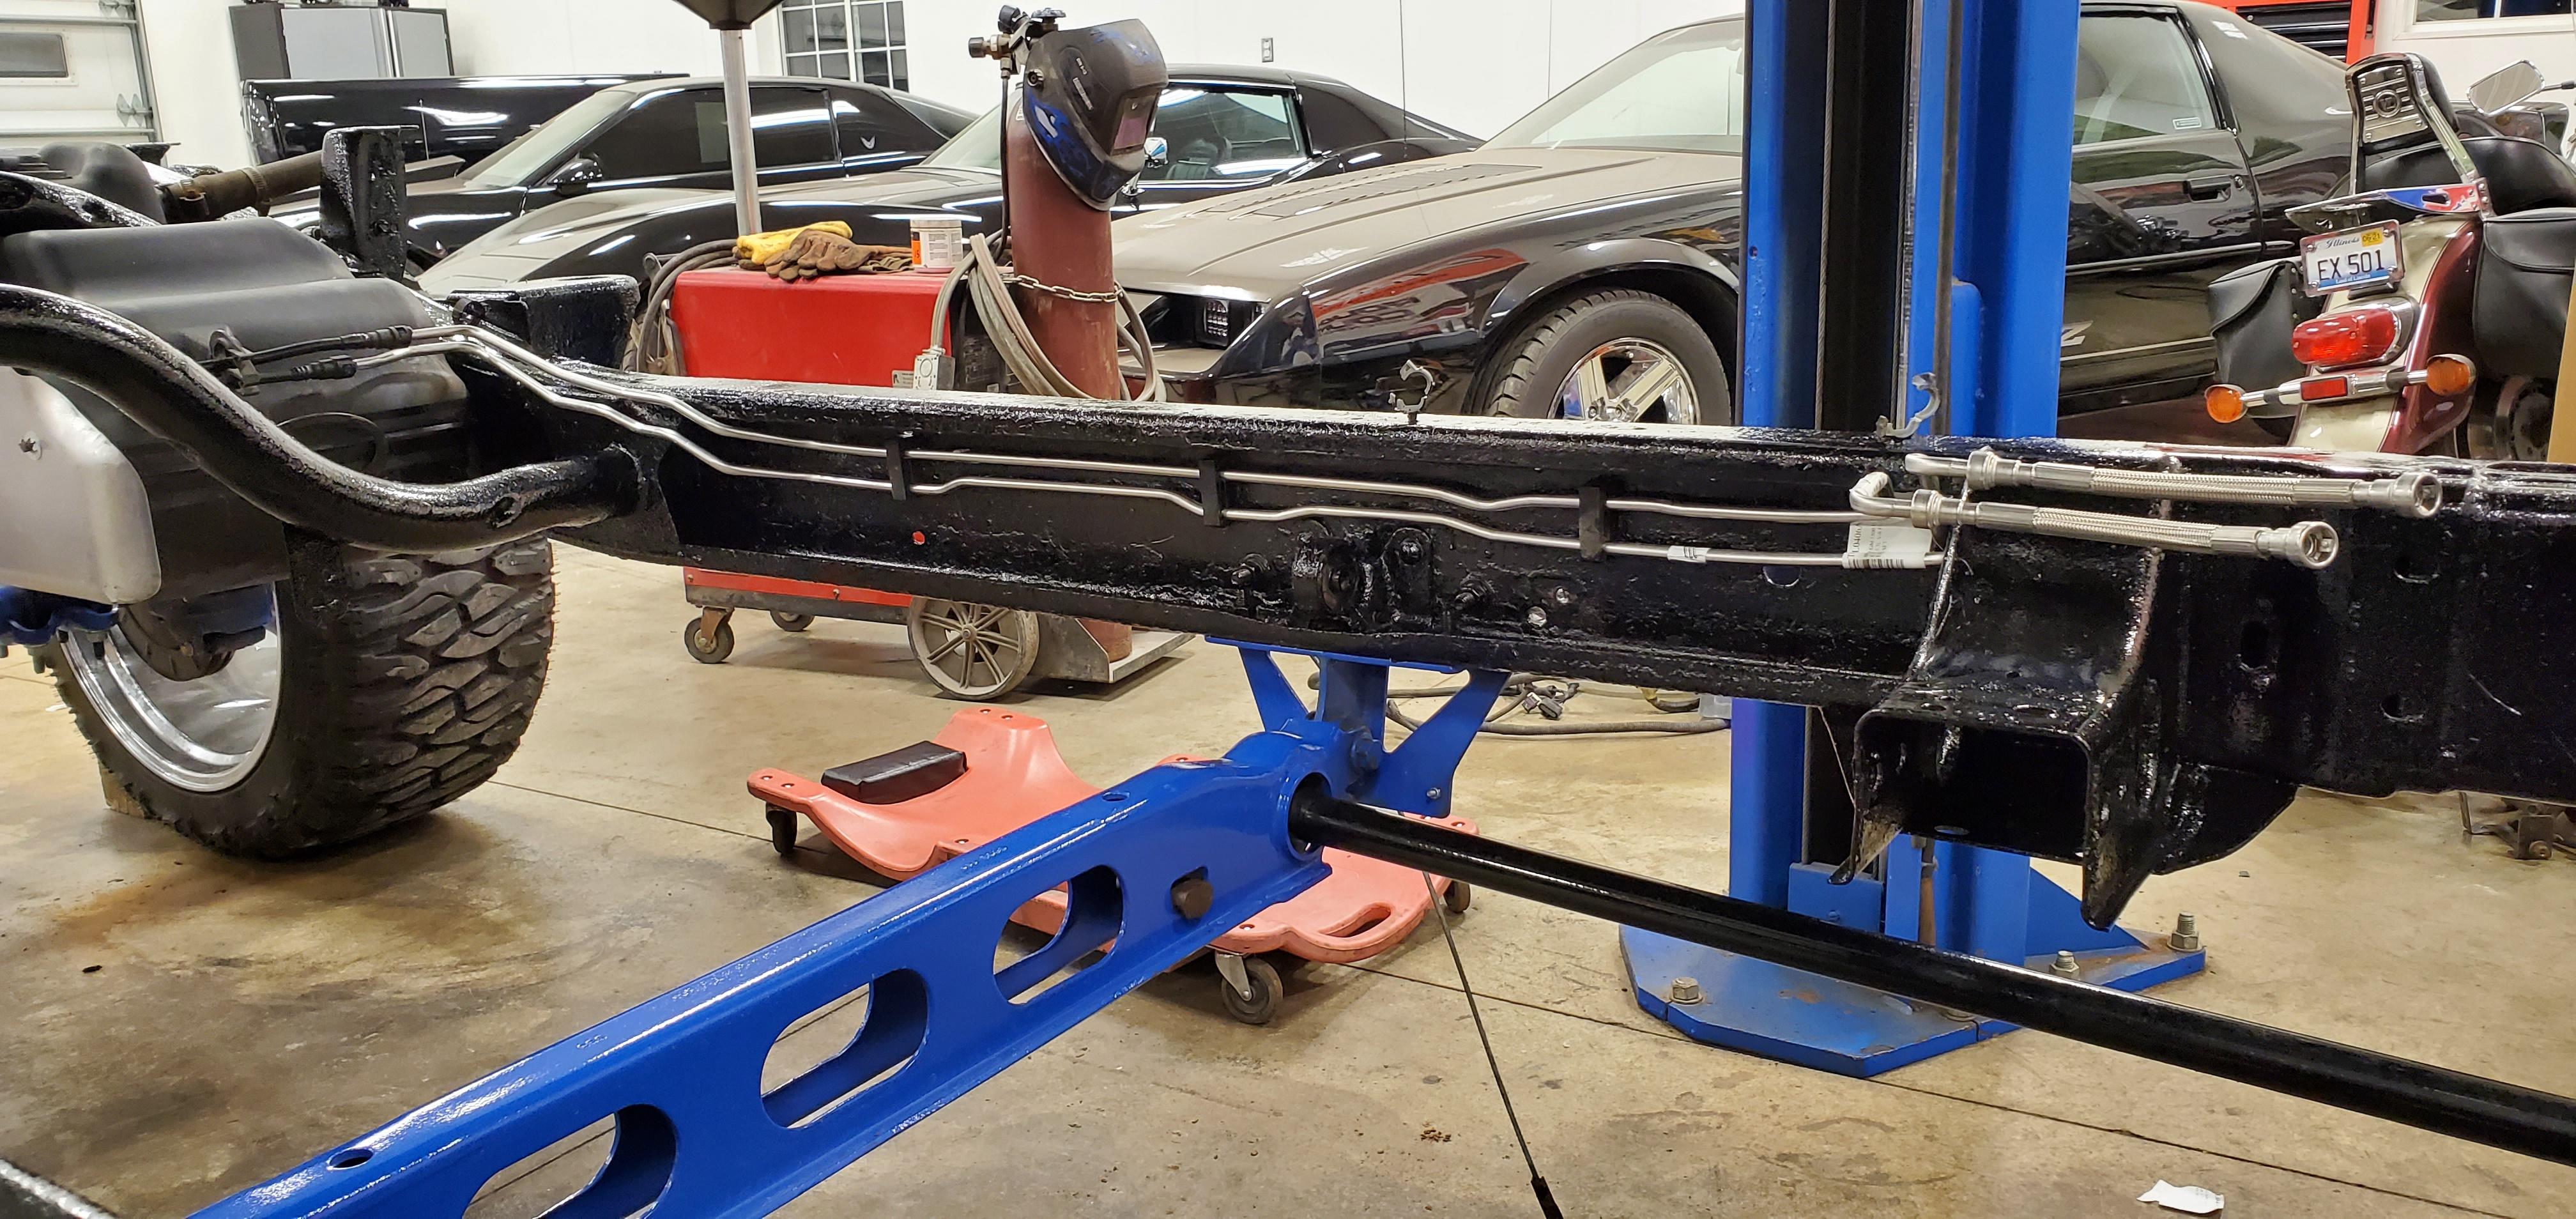
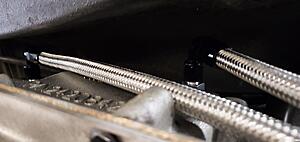
All new stainless brake and fuel lines went on next. Took my time and got them to look pretty dang close to factory fitment.

Some of my plastics were starting to look pretty chalky and gross under the hood. I got some Eastwood Plastic Restorer and couldn't be any more impressed with the result. Plastics look brand new afterward. Especially after buying new stickers for the radiator cover.

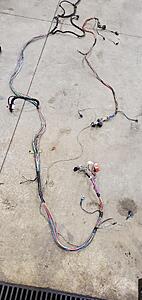
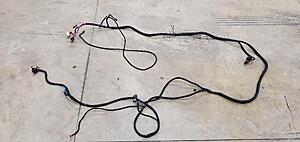
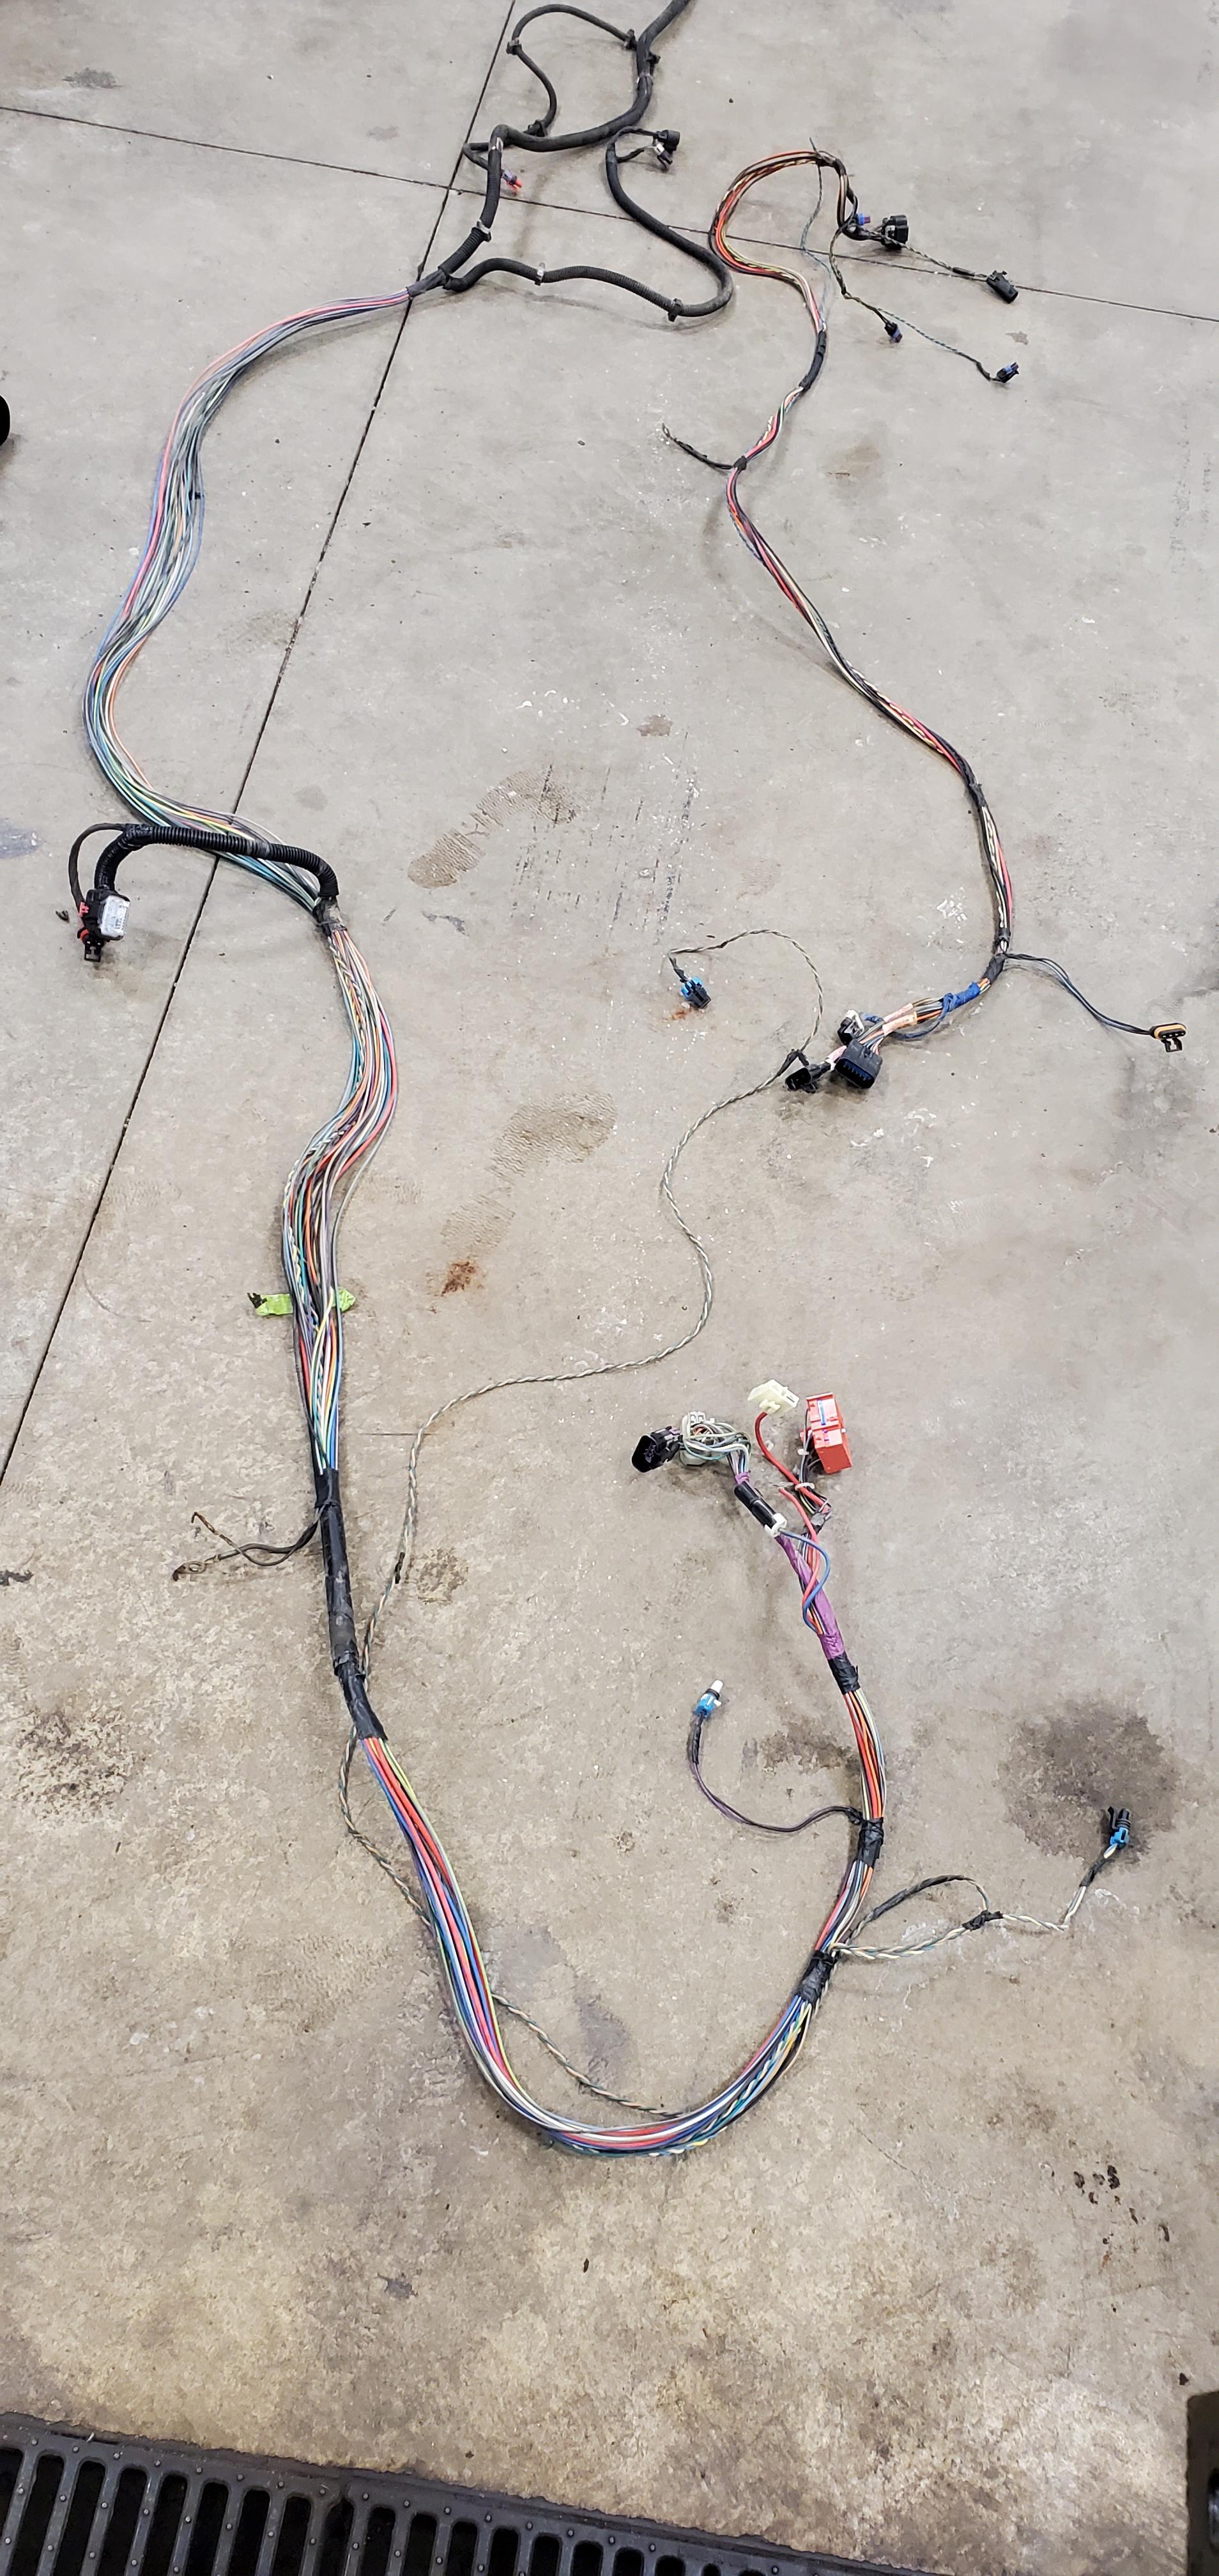
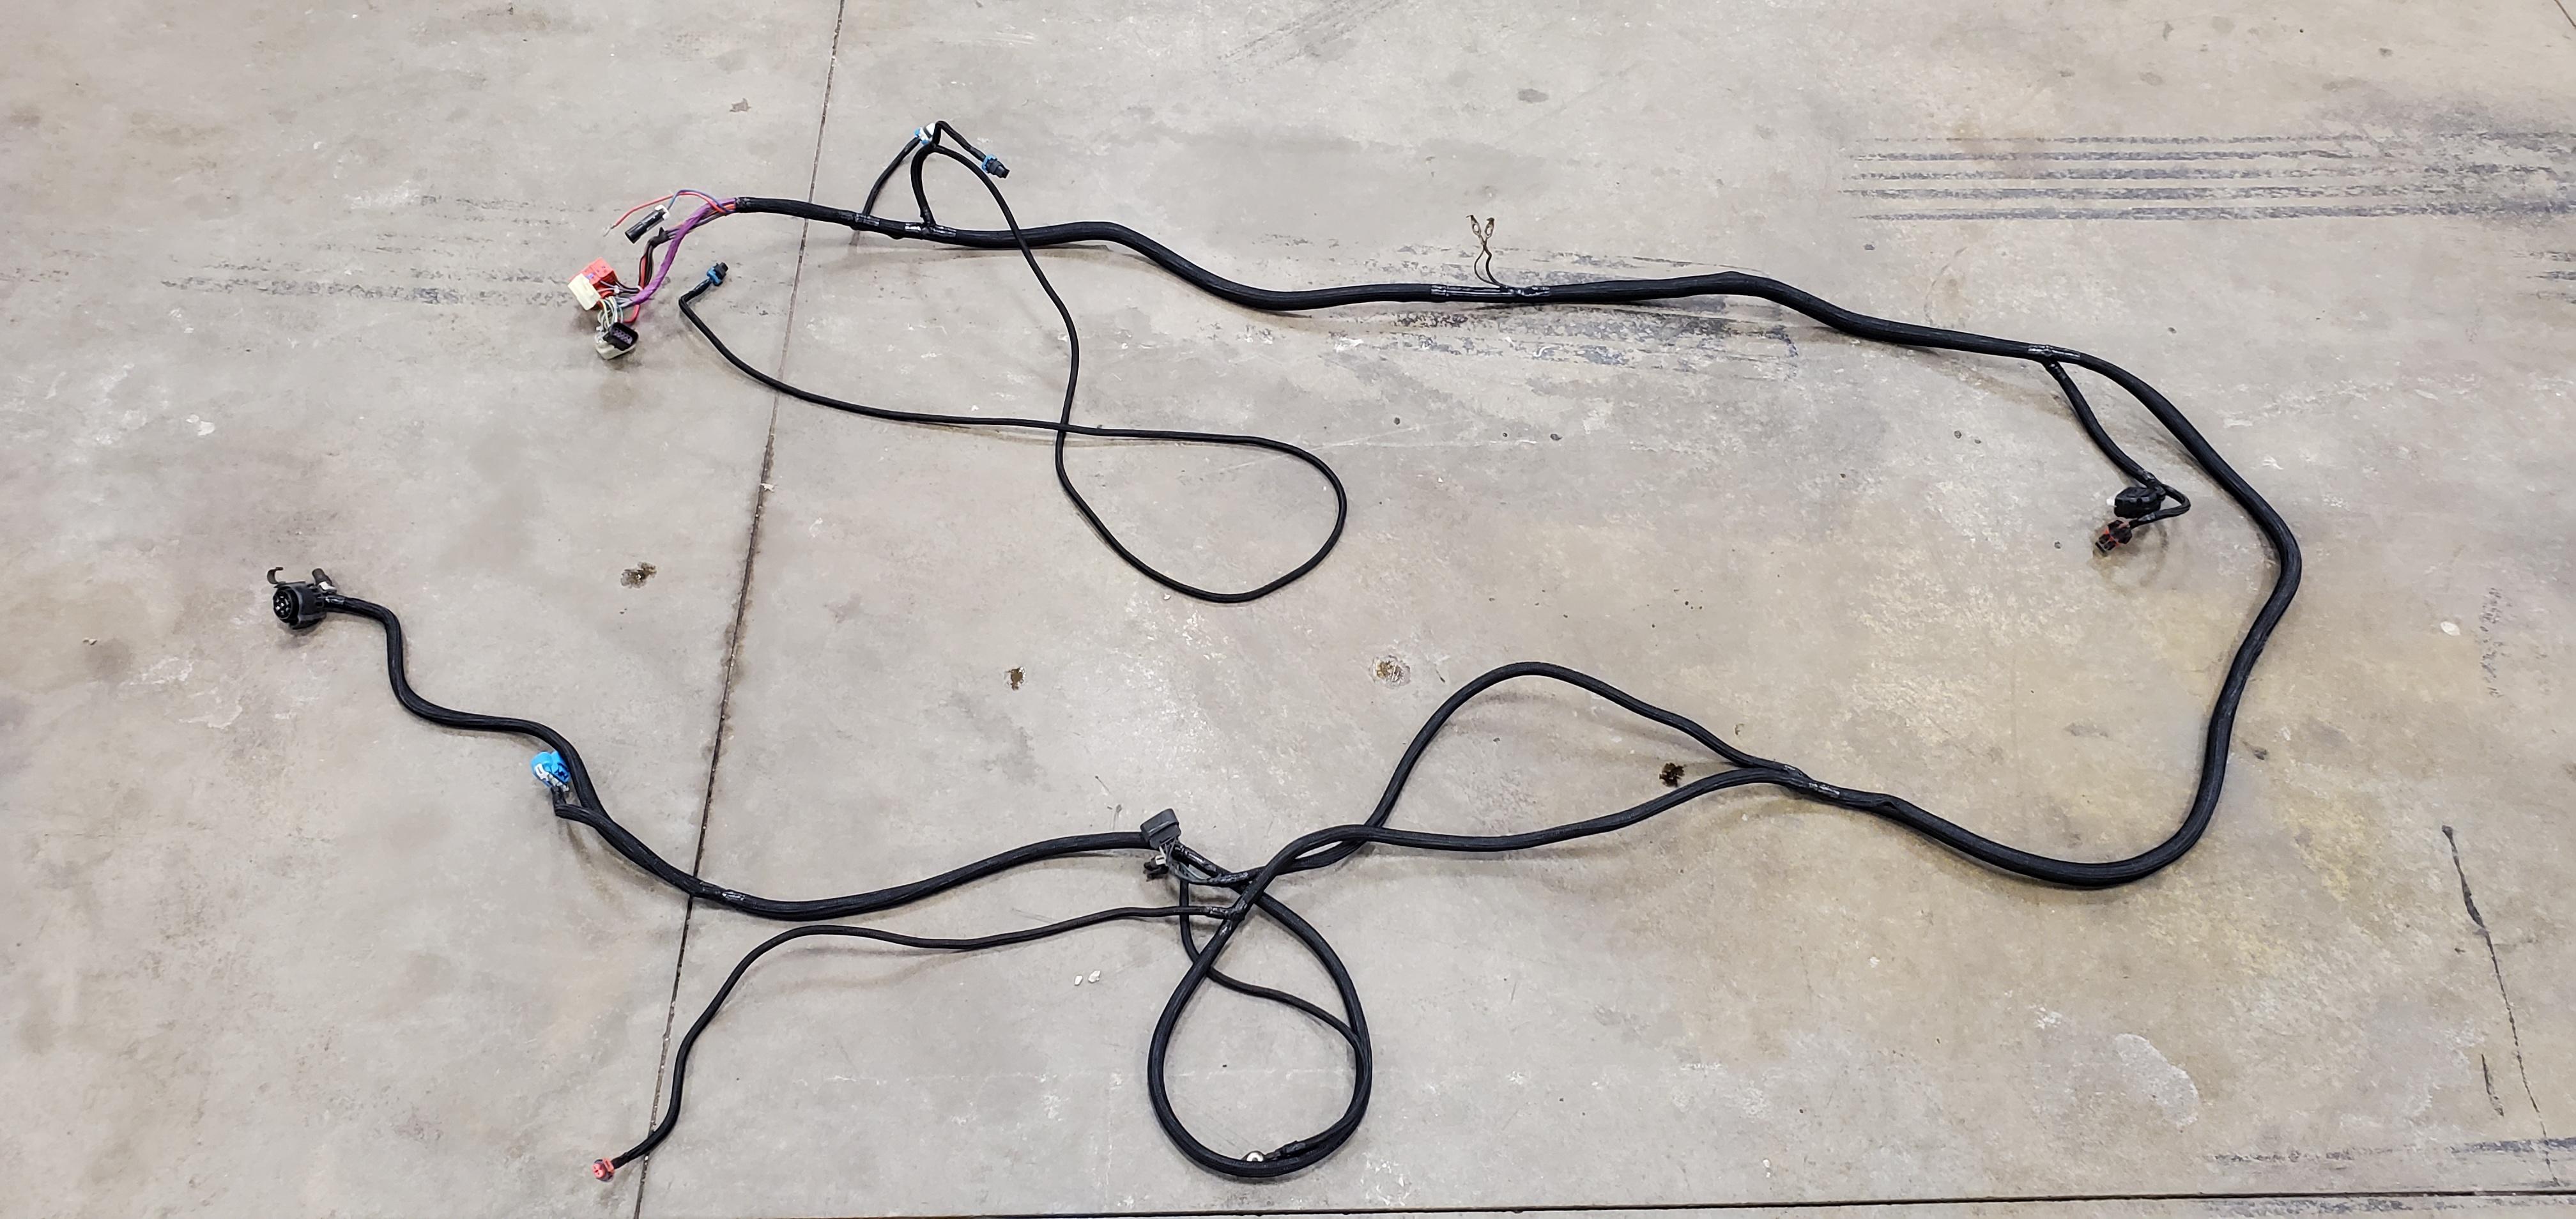
This next part was a pain. My chassis and engine harness both were needing some help. The wire loom was falling apart in places and had bare wire exposed. So I ordered a bunch of braided wire loom from summit racing and hated my life for a couple nights. But I guess they turned out pretty good.
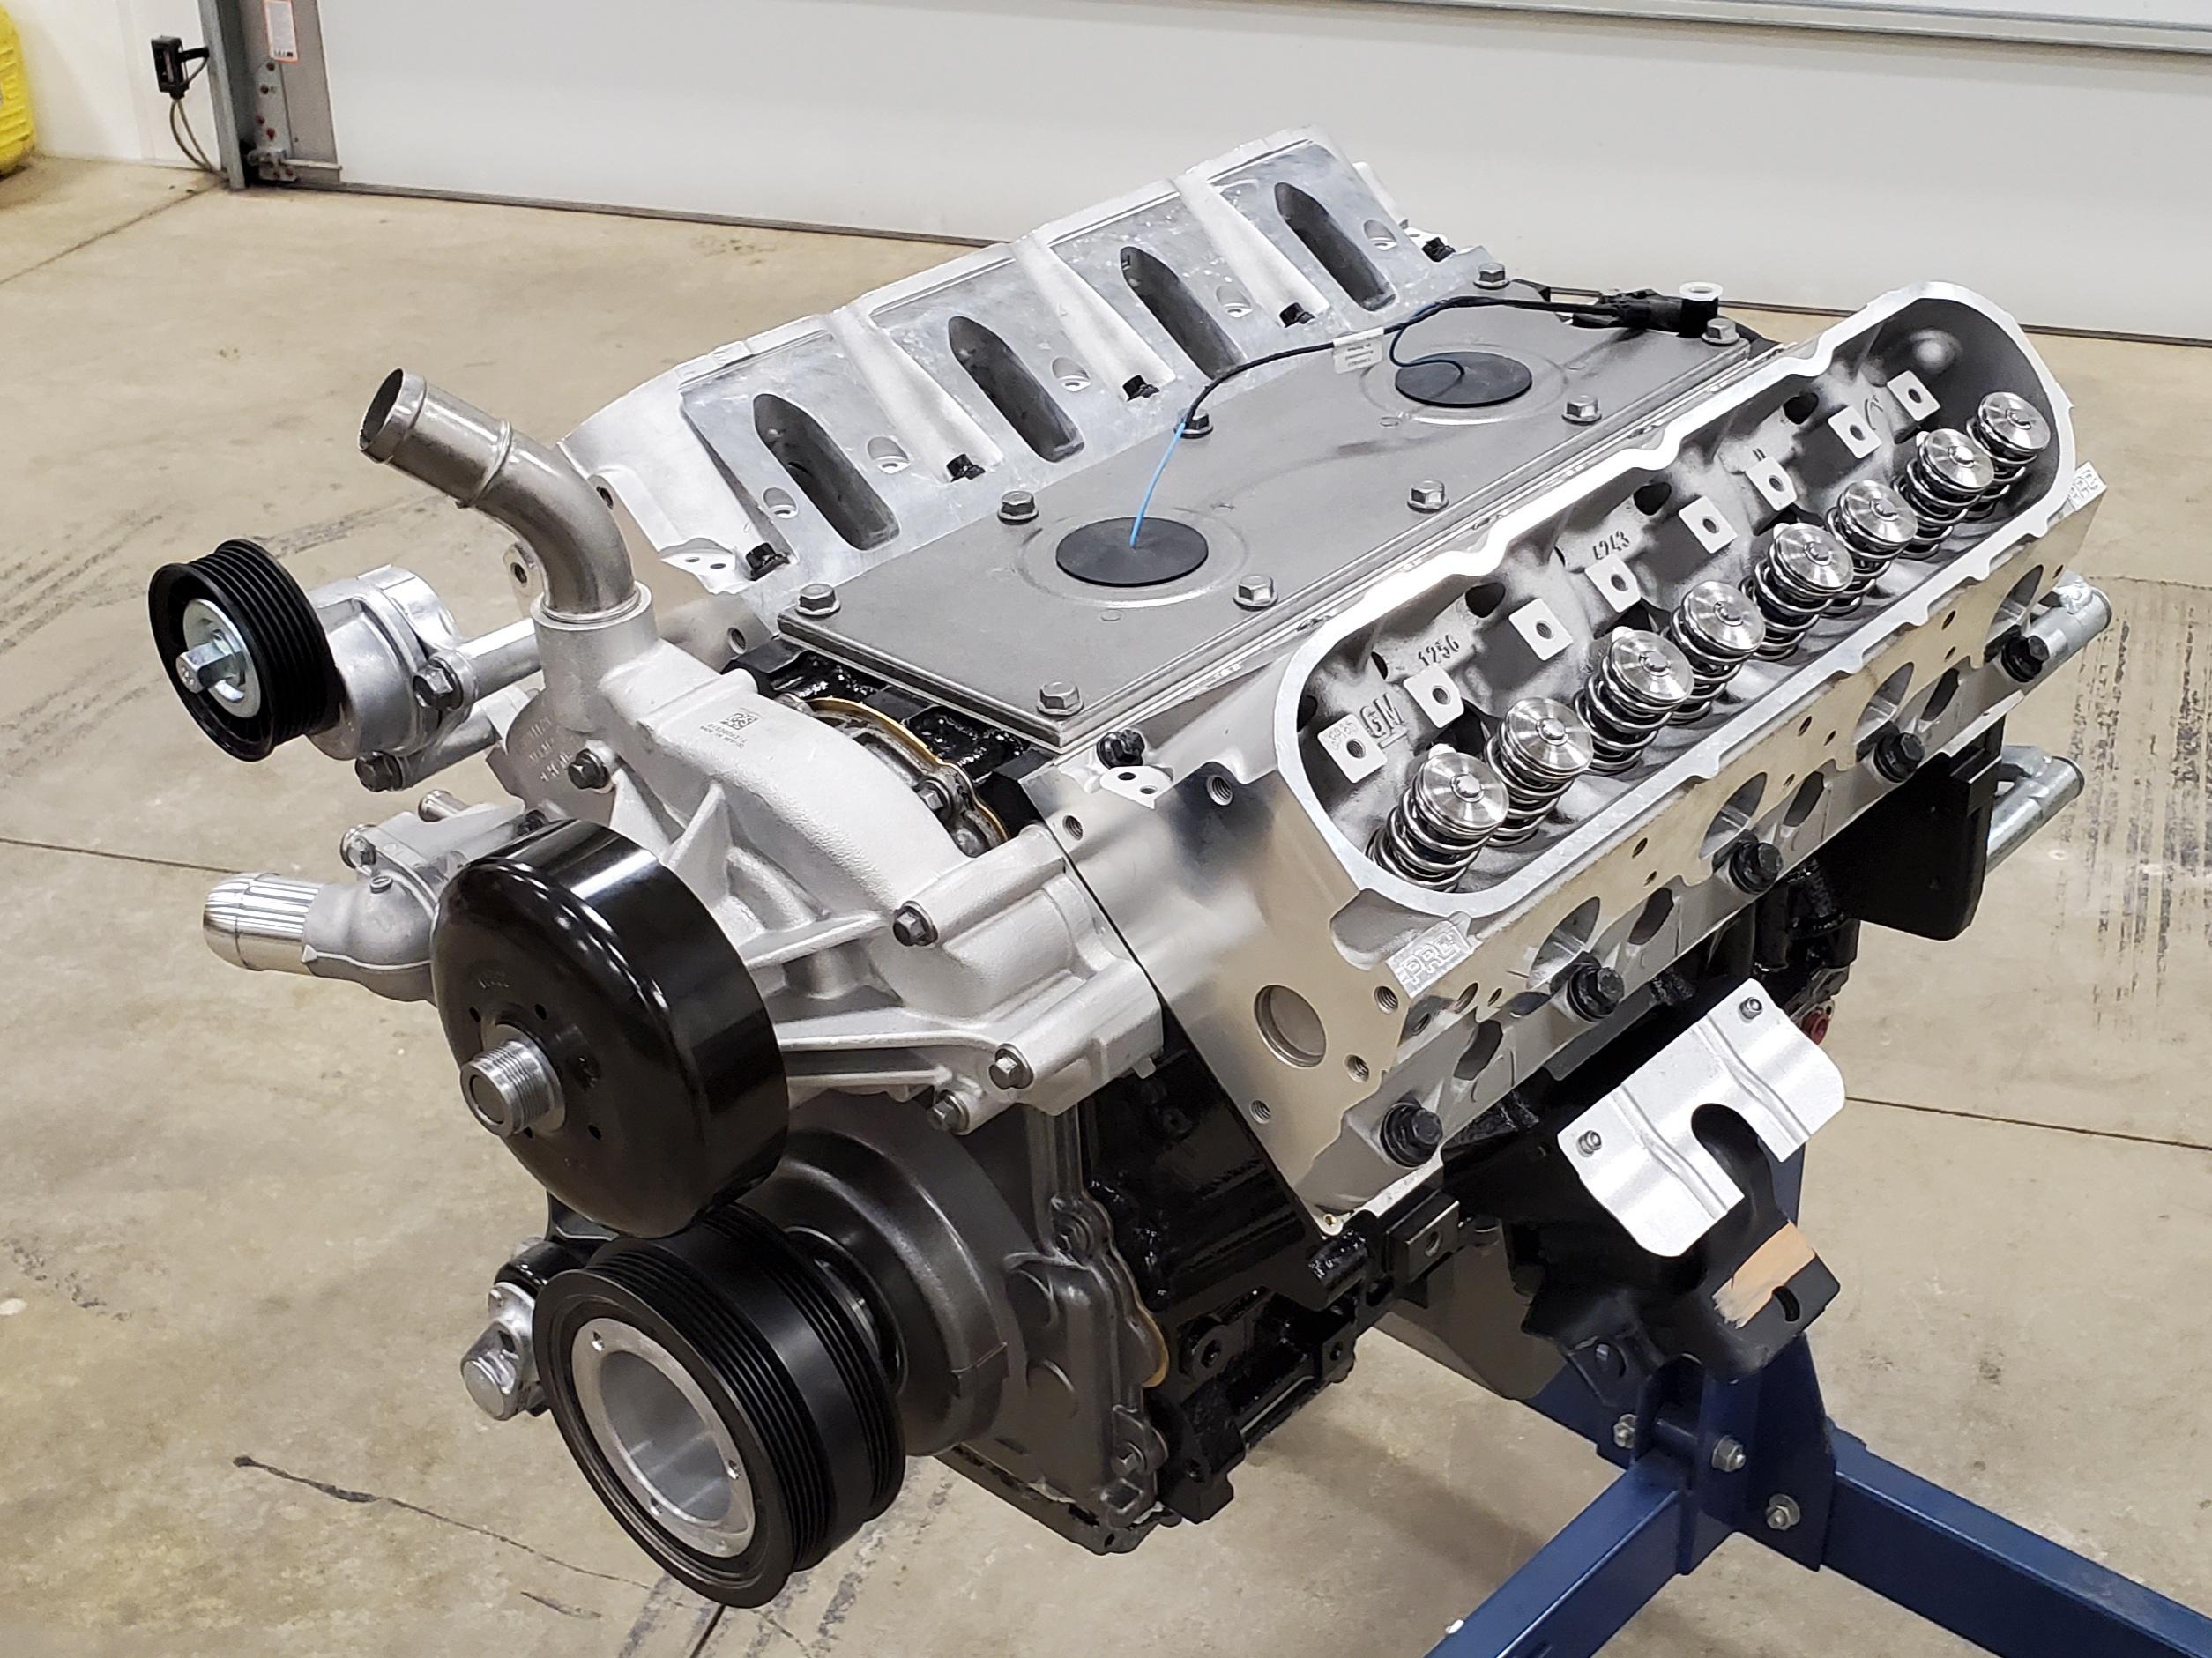
During all of that mess, I had been working on the 6.0 as well. One of the first things I did was decide that I wanted to bump the compression and get rid of the 317 heads that came on it. I figured that the 706 heads would give me the compression, and I decided to send them to Texas Speed (PRC) to get their stage 2.5 CNC porting done along with bigger valves, .660 springs etc. I picked out the Stage 4 High Lift truck cam at the same time after considering about 20 options over about a 3 week period. Also FIC 42lb injectors, TSP hardened pushrods, etc. Well I sent my heads in, and a few weeks later I got them back.
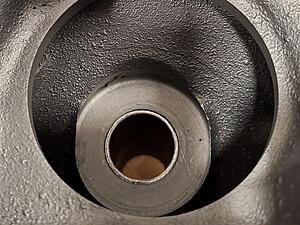
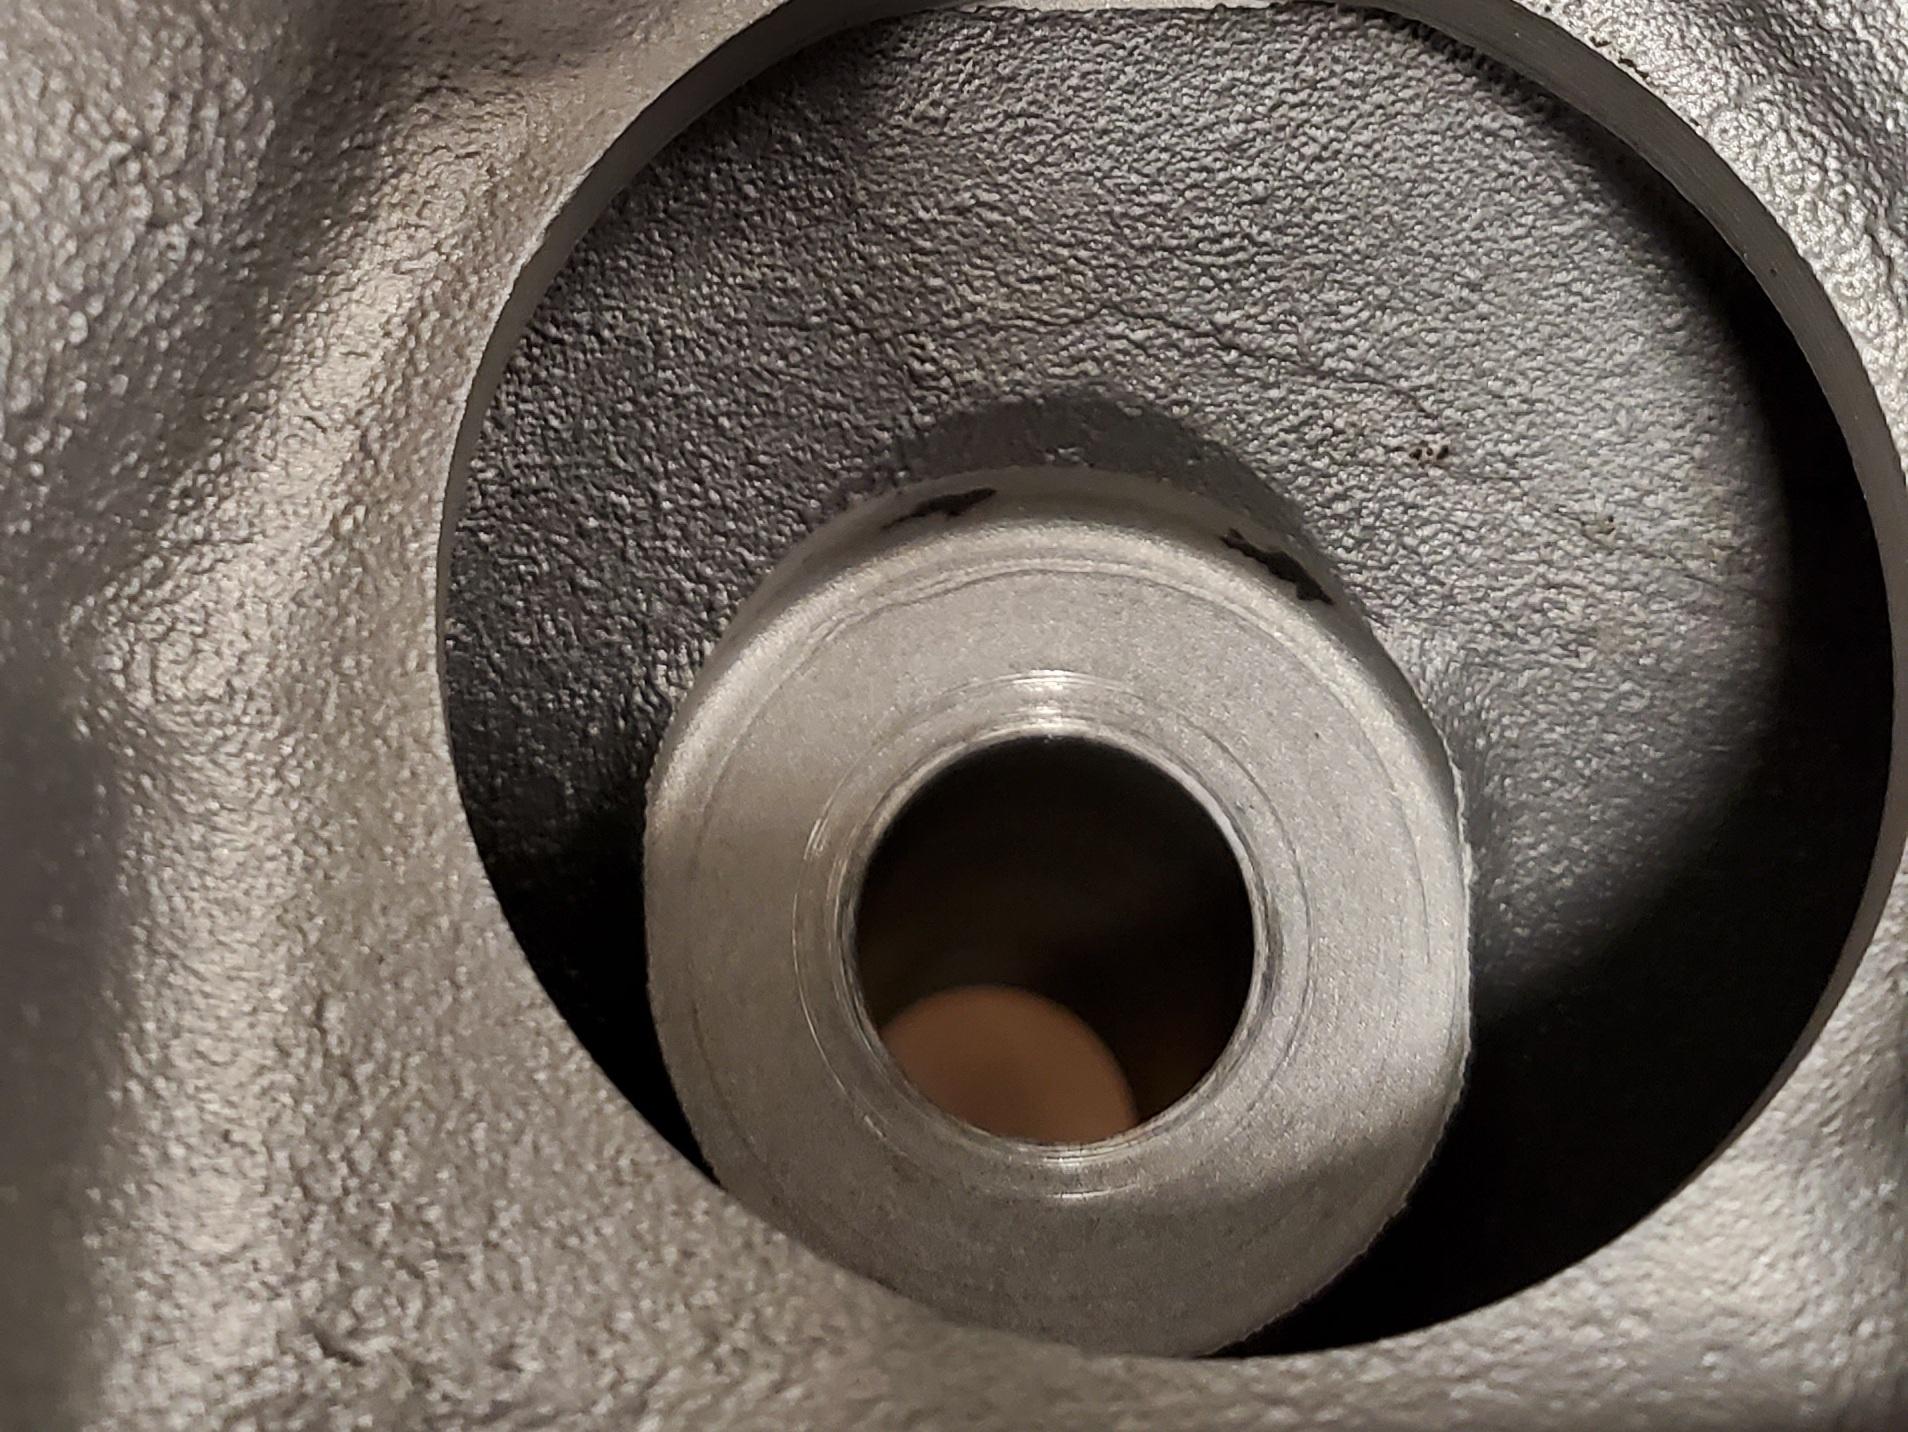
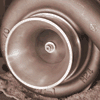
The 706's looked great! Porting was great, valves and springs and everything looked great. Except for the head that had two cracks in it. So that was why the 5.3 was eating coolant. Neat. I knew the 706s had problems with the Castech castings and this was obviously one of them. You can see the cracks right above the bolt holes. Apparently they do not check the heads out when you send them in to get work done. I was pretty shocked, but maybe I shouldn't have been? I am not sure if it is normal for the customer to have the heads checked before sending them to the place that is getting paid to do a bunch of work to them? I honestly thought that would just be standard procedure to make sure the castings were good before CNC machining them. Not to mention that someone completely assembled this head and set it all up without noticing that it was cracked in two places. Regardless, after a couple phone calls, the guys from Texas Speed and I agreed that I would send the 706 heads back and just pay the difference for PRC Stage 2.5 LS6 heads they had in stock. After all the dust settled I felt they treated me fair and I have a great set of heads. Props to Texas Speed, you will continue to get my business.
Pictures of the 706's

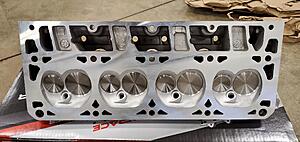
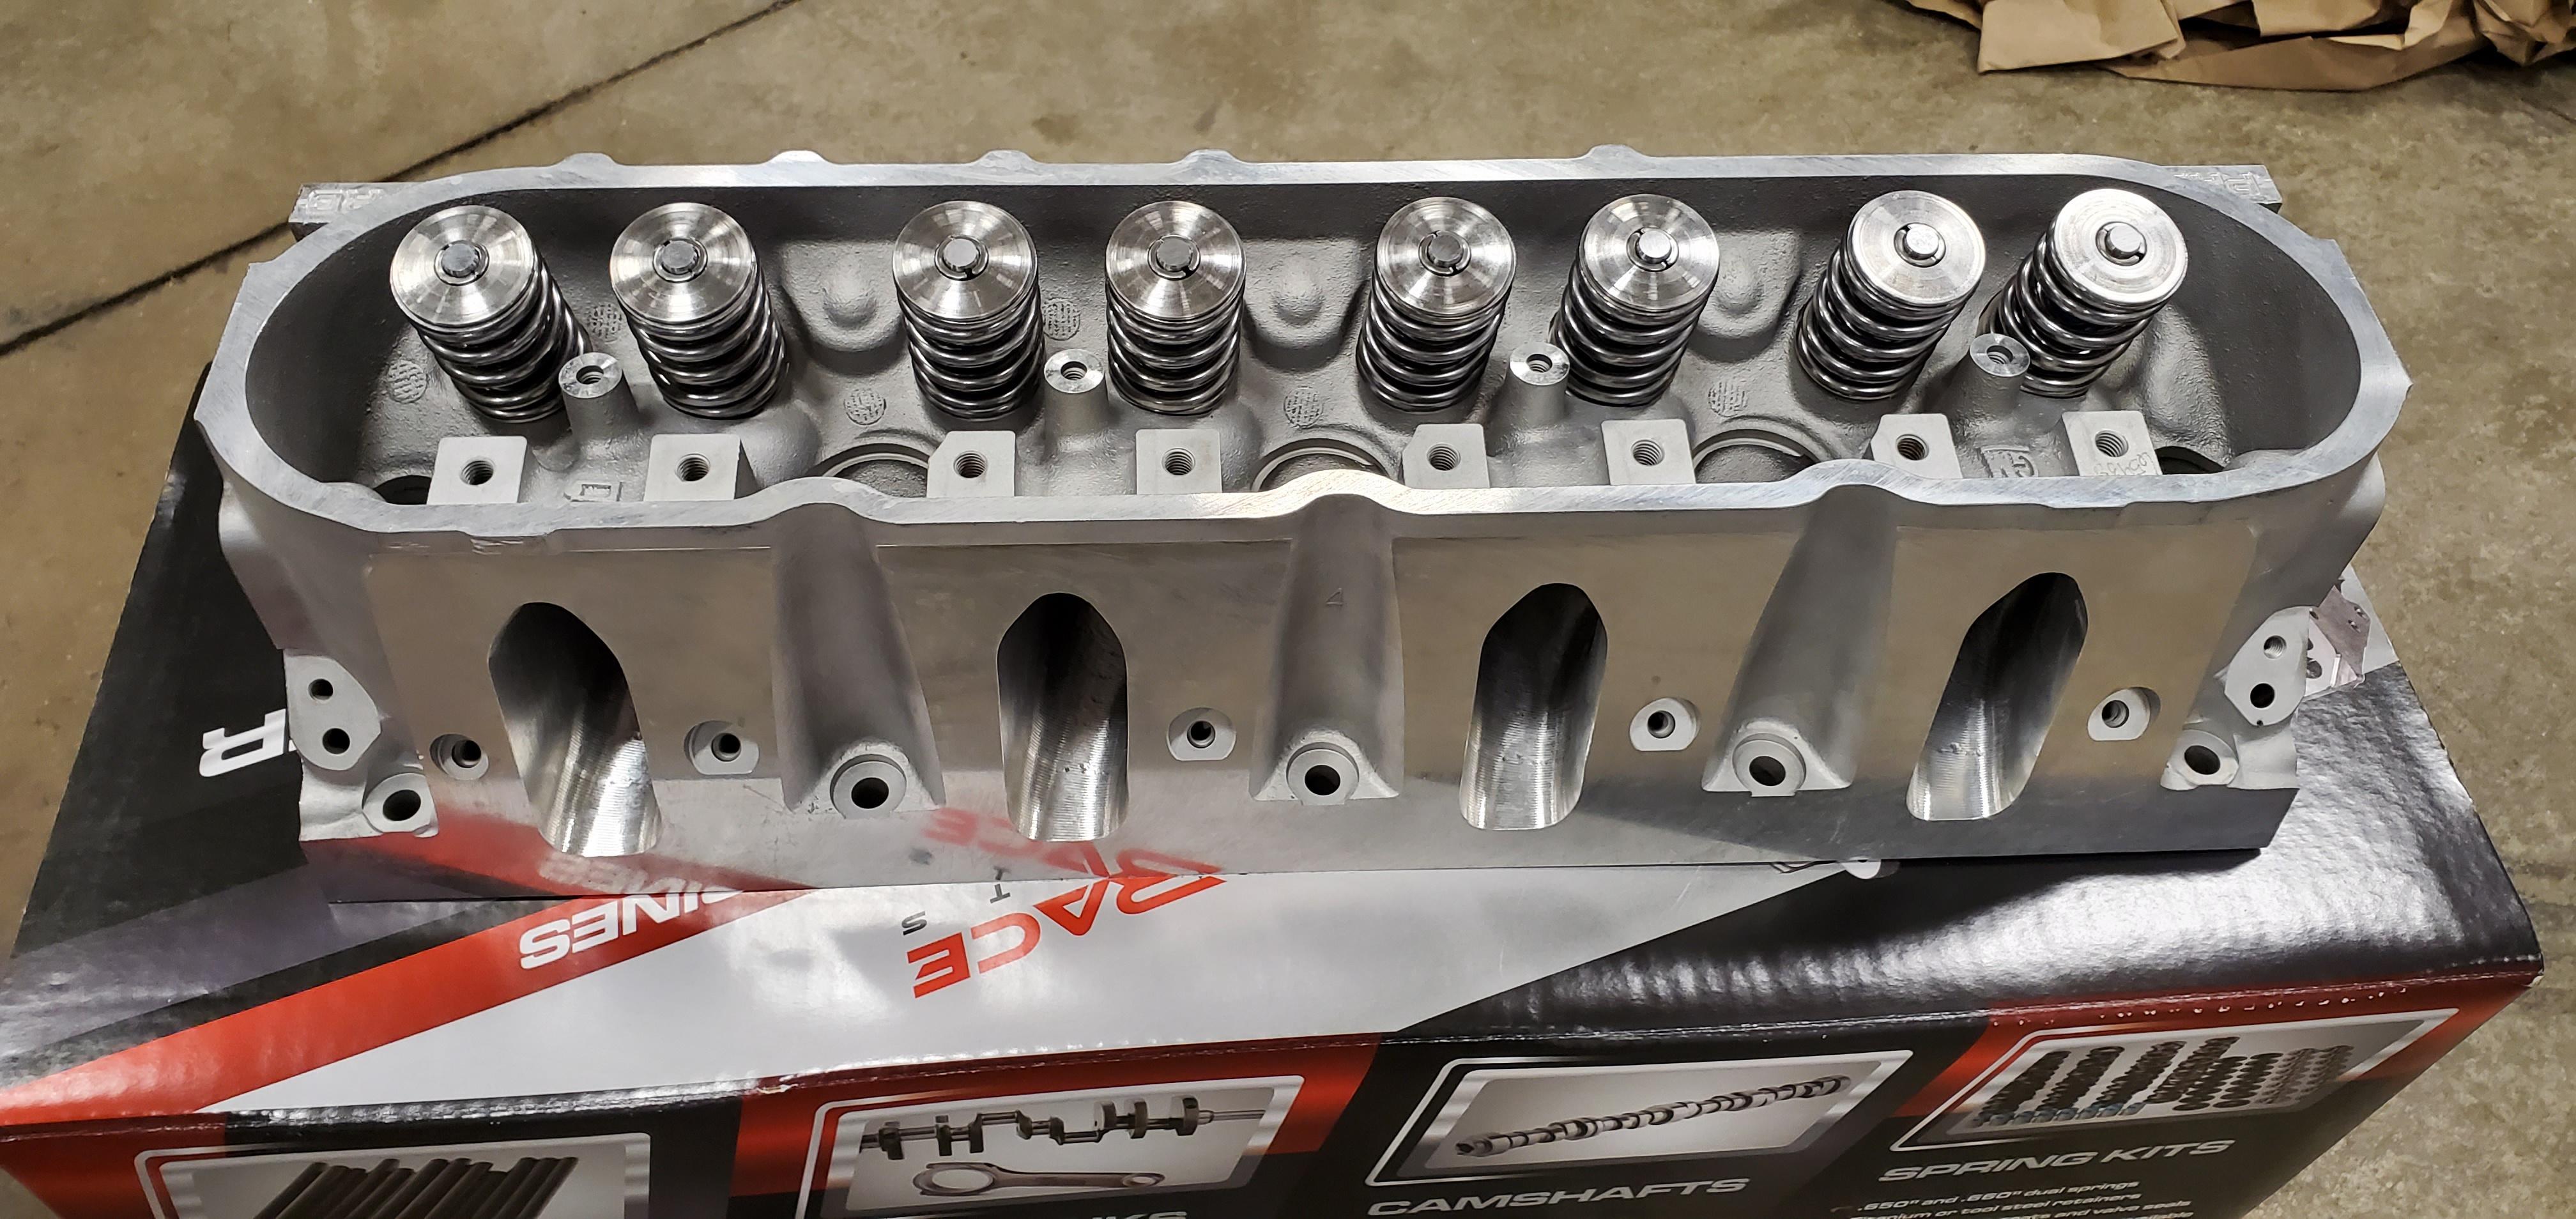
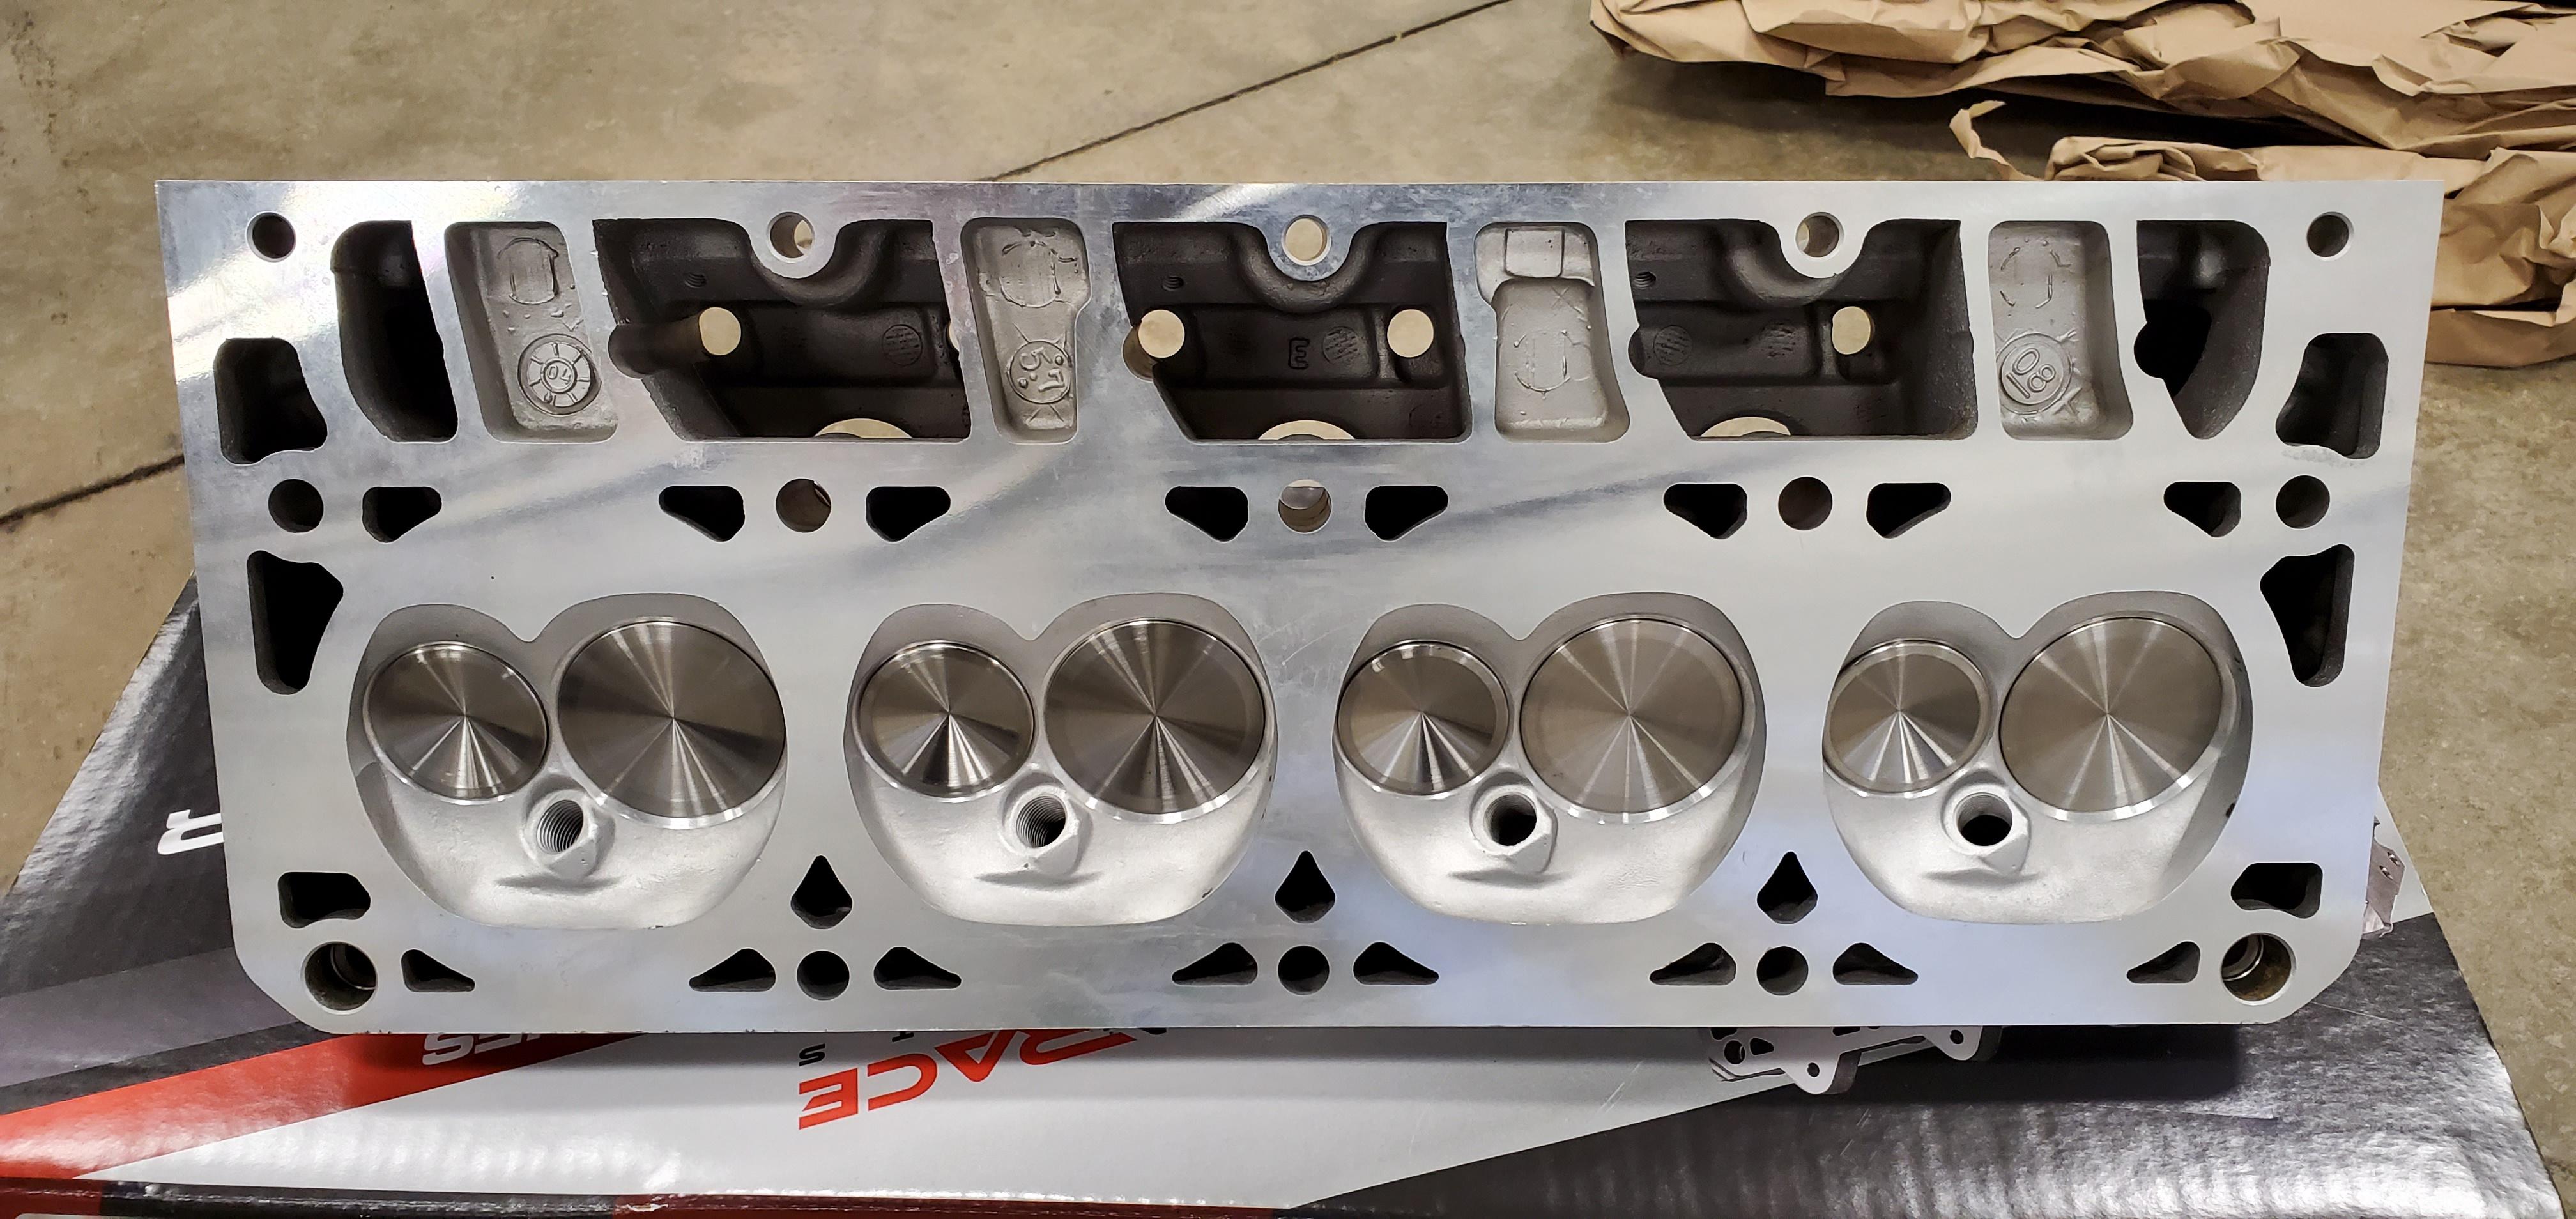
PRC Stage 2.5 LS6 heads (243's)

So buckle up people, there is way more information and pictures than any sane person would ever care to see of my stupid truck coming your way.
When I left off, I had the truck stripped down to the running gear, about to start coating the frame. Well with the help of my awesome wife, that went relatively well. All done in gloss black chassis saver.
Now that I have the frame coated, the next step is replacing the leaf springs with the Deaver 8" leafs. Easy.

Next is the fuel tank. Fresh heat shield because the old one was rusty.
All new stainless brake and fuel lines went on next. Took my time and got them to look pretty dang close to factory fitment.

Some of my plastics were starting to look pretty chalky and gross under the hood. I got some Eastwood Plastic Restorer and couldn't be any more impressed with the result. Plastics look brand new afterward. Especially after buying new stickers for the radiator cover.

This next part was a pain. My chassis and engine harness both were needing some help. The wire loom was falling apart in places and had bare wire exposed. So I ordered a bunch of braided wire loom from summit racing and hated my life for a couple nights. But I guess they turned out pretty good.
During all of that mess, I had been working on the 6.0 as well. One of the first things I did was decide that I wanted to bump the compression and get rid of the 317 heads that came on it. I figured that the 706 heads would give me the compression, and I decided to send them to Texas Speed (PRC) to get their stage 2.5 CNC porting done along with bigger valves, .660 springs etc. I picked out the Stage 4 High Lift truck cam at the same time after considering about 20 options over about a 3 week period. Also FIC 42lb injectors, TSP hardened pushrods, etc. Well I sent my heads in, and a few weeks later I got them back.
The 706's looked great! Porting was great, valves and springs and everything looked great. Except for the head that had two cracks in it. So that was why the 5.3 was eating coolant. Neat. I knew the 706s had problems with the Castech castings and this was obviously one of them. You can see the cracks right above the bolt holes. Apparently they do not check the heads out when you send them in to get work done. I was pretty shocked, but maybe I shouldn't have been? I am not sure if it is normal for the customer to have the heads checked before sending them to the place that is getting paid to do a bunch of work to them? I honestly thought that would just be standard procedure to make sure the castings were good before CNC machining them. Not to mention that someone completely assembled this head and set it all up without noticing that it was cracked in two places. Regardless, after a couple phone calls, the guys from Texas Speed and I agreed that I would send the 706 heads back and just pay the difference for PRC Stage 2.5 LS6 heads they had in stock. After all the dust settled I felt they treated me fair and I have a great set of heads. Props to Texas Speed, you will continue to get my business.
Pictures of the 706's

PRC Stage 2.5 LS6 heads (243's)
 Nov 24, 2021 | 12:22 PM
#3
Thread Starter
Teching In
Joined: Feb 2021
Posts: 31
Likes: 18
From: Central IL
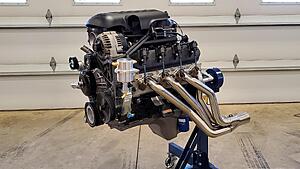
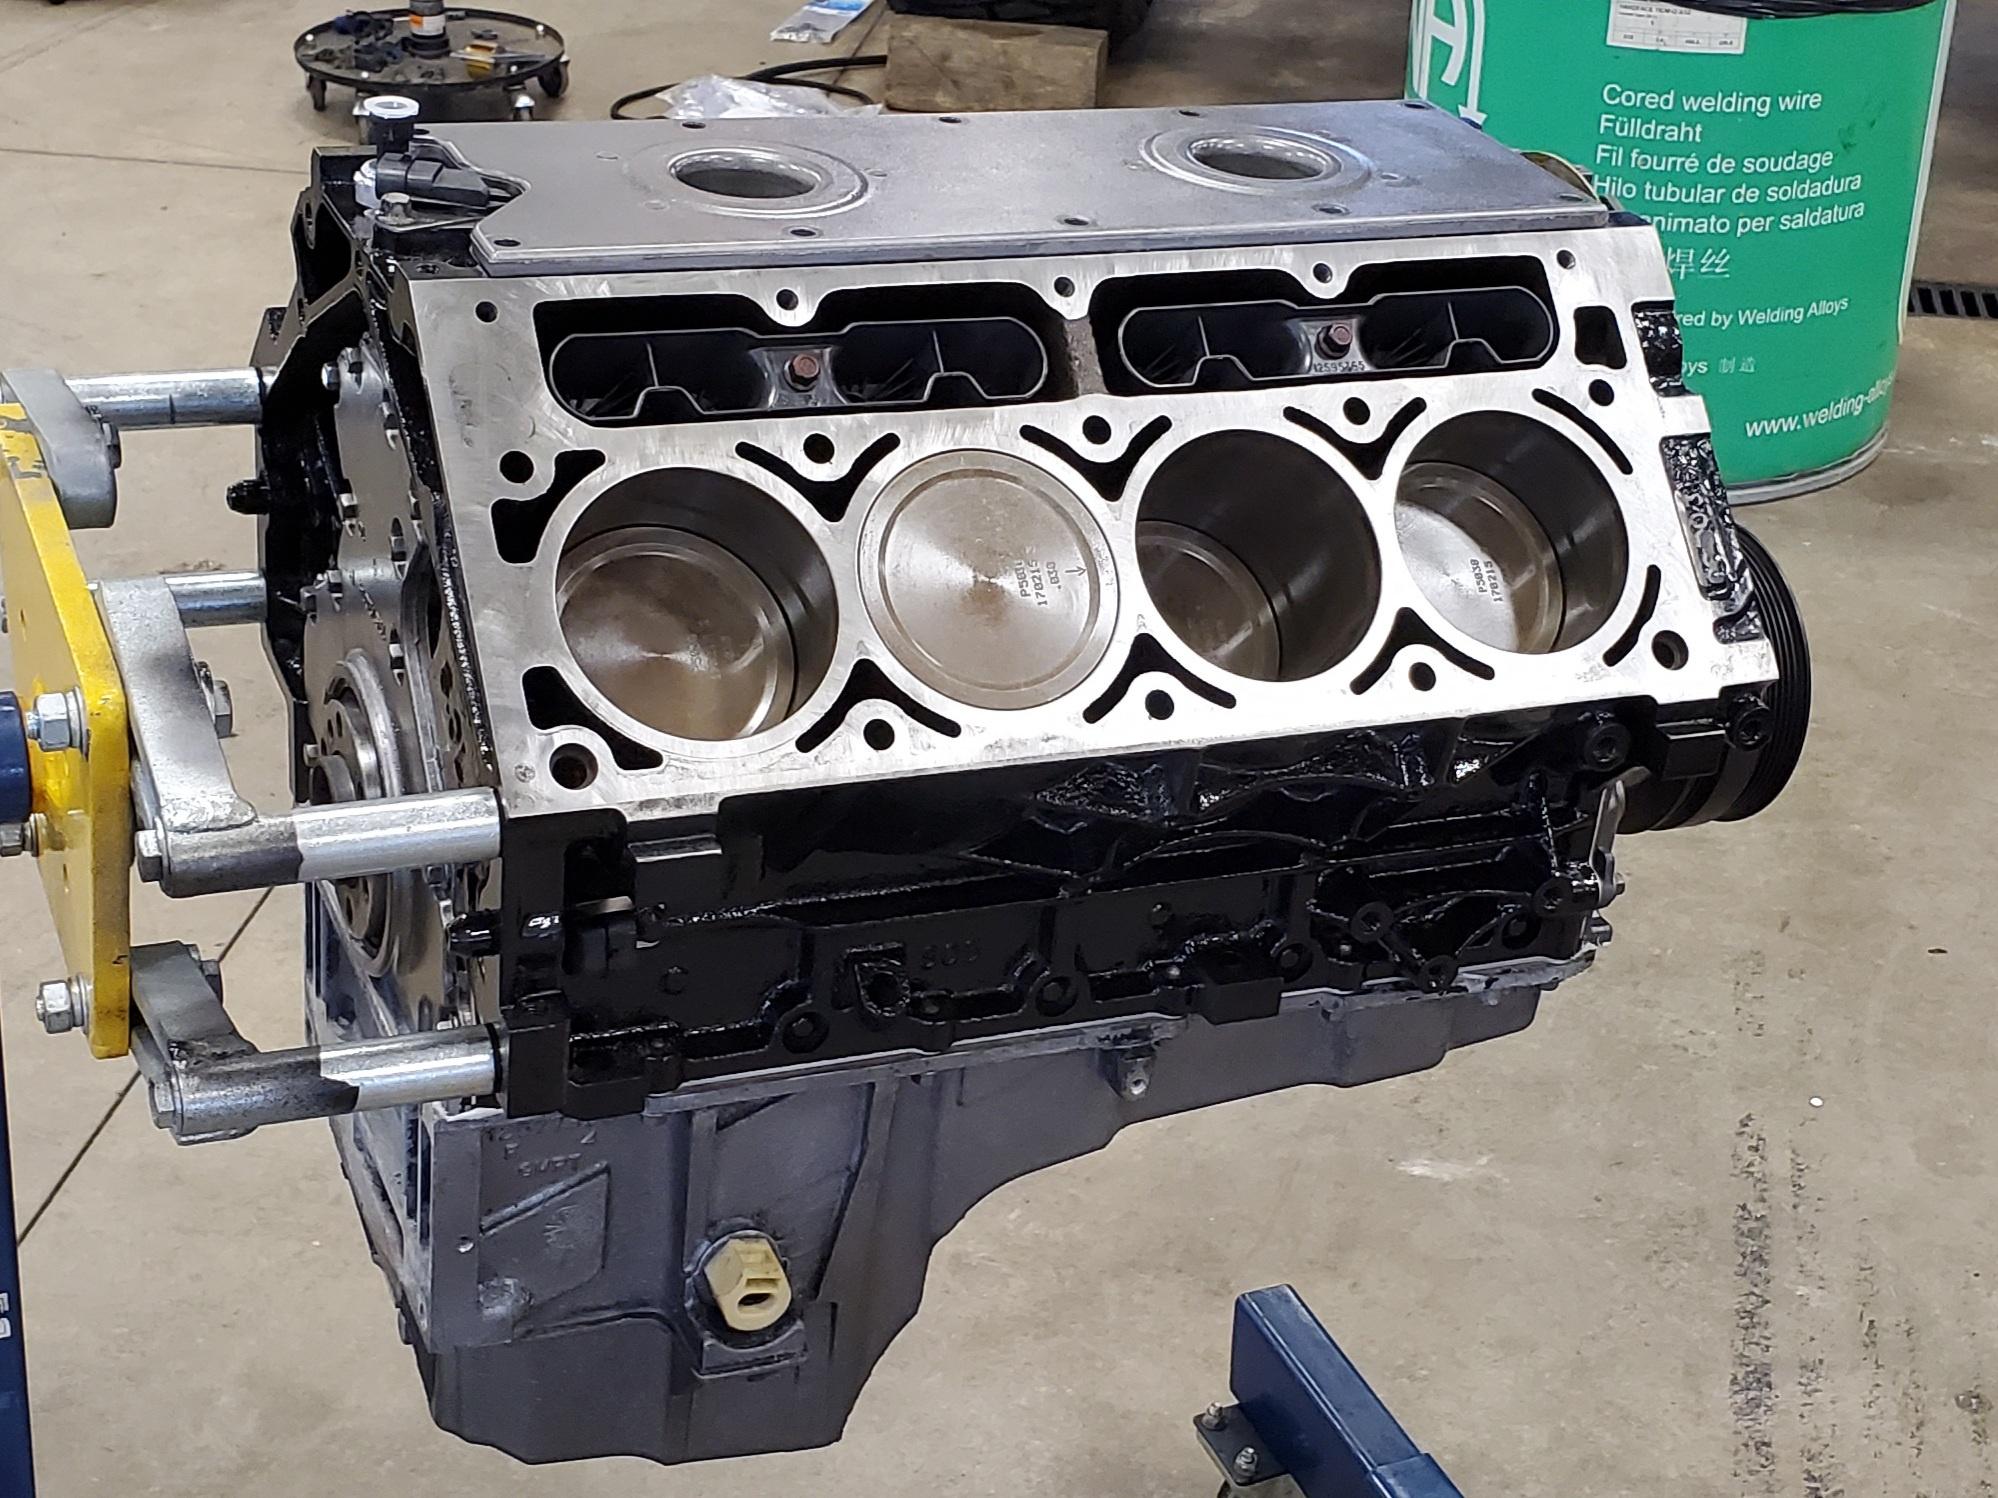
Okay, I will be going through much more about the drivetrain in this post. The junkyard LQ4 looked surprisingly clean inside and in great shape. It is a reman engine just like I suspected. I didn't even pull the main/rod bearing caps off. The engine clearly isn't high mileage, and there was no evidence of any abuse from everything I could see. Cam bearings looked perfectly fine as well. Just gonna send it. Sprayed a nice coat of paint on the motor and I was ready to start going back together.

New gaskets, seals, oil pump, and timing chain done. Stabbed the cam in and dropped in fresh lifters. Also I had purchased an ASP underdrive pulley kit with the overdrive alt pulley.

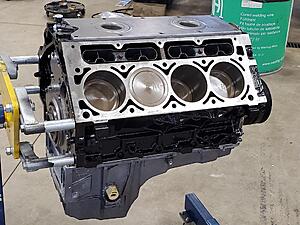

I measured the piston to deck clearance and it was .001-.005 out of the hole if I am remembering correctly. I couldn't track down my notes but with the .051 gaskets I was right at 10.5:1 compression. Heads went on with ARP bolts. I did do the Comp Cams trunnion upgrade kit, and the little install tool that they send with the kit was nice. Checked pushrod length and they came right out to 7.4. Easy. TSP's hardened pushrods were installed. New knock sensors and harness, water pump, power steering pump, idler pulleys, and Summit brand tall valve covers with the integrated coil mounts went on as well.
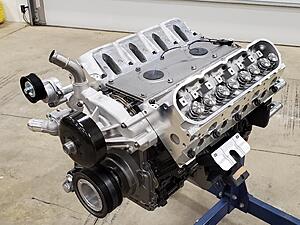


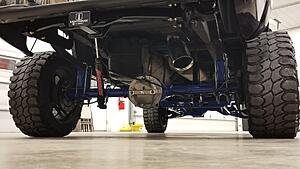
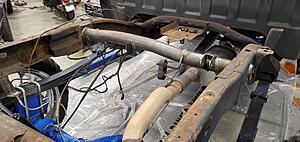
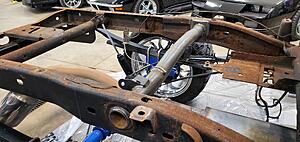
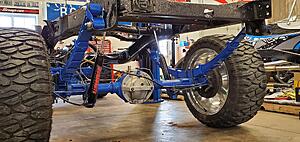
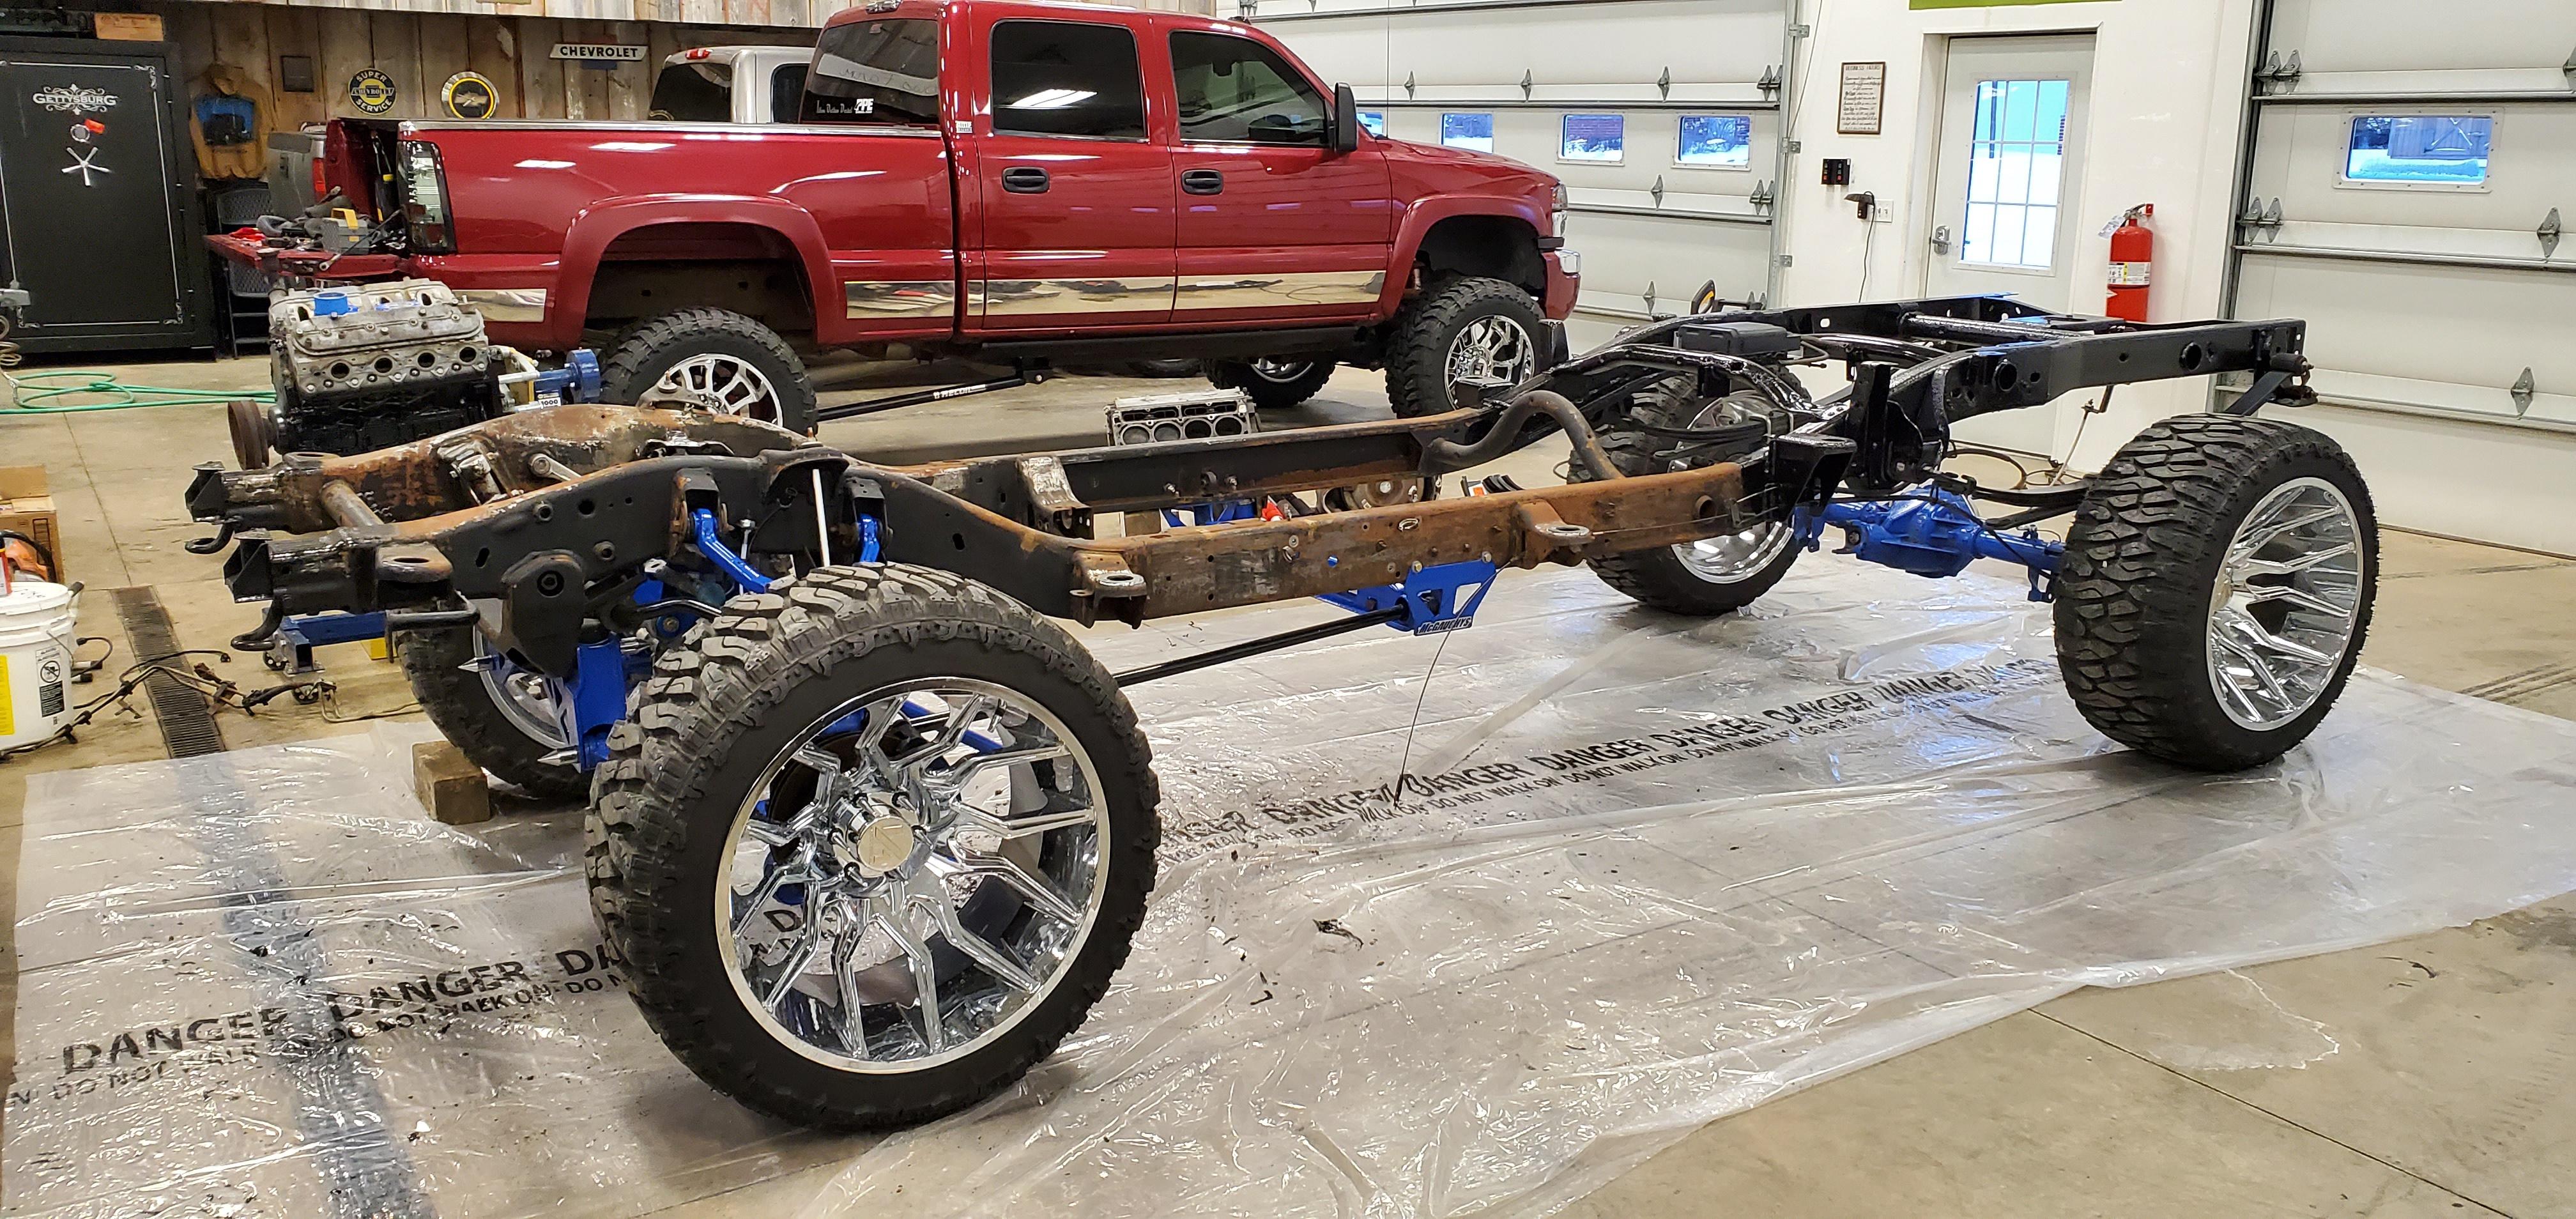
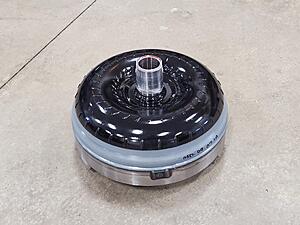
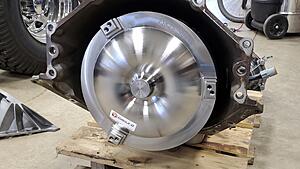
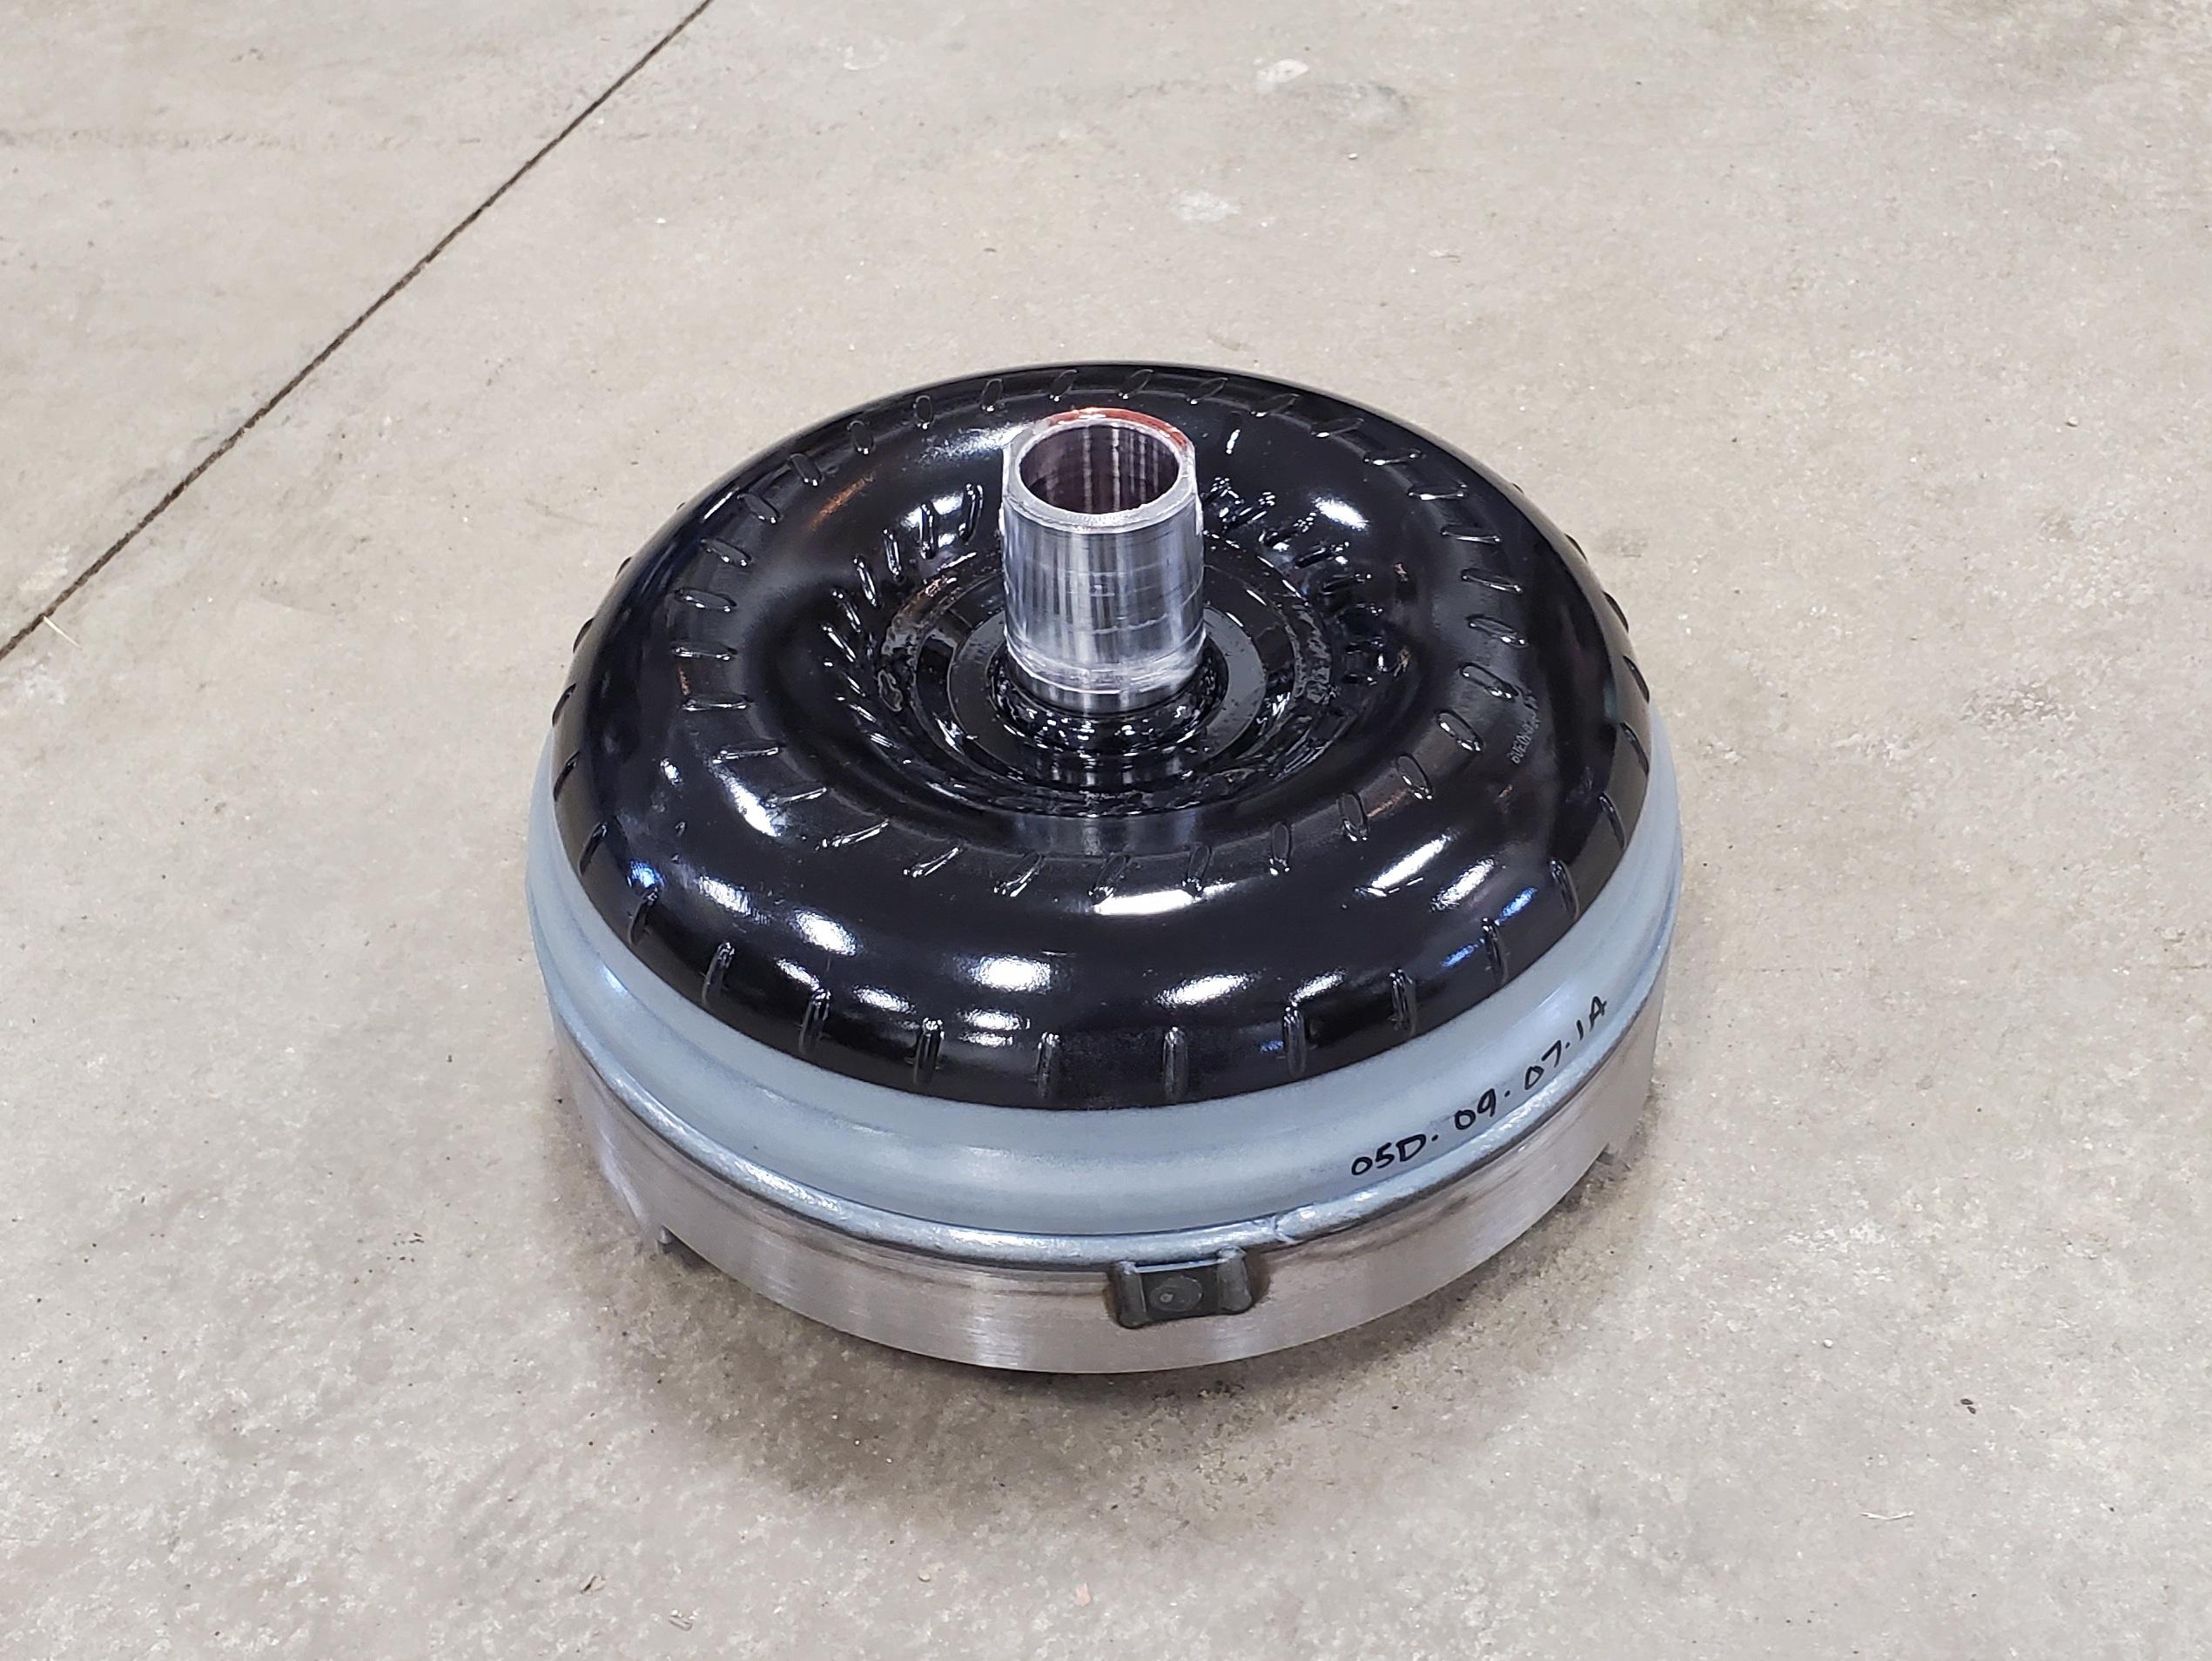
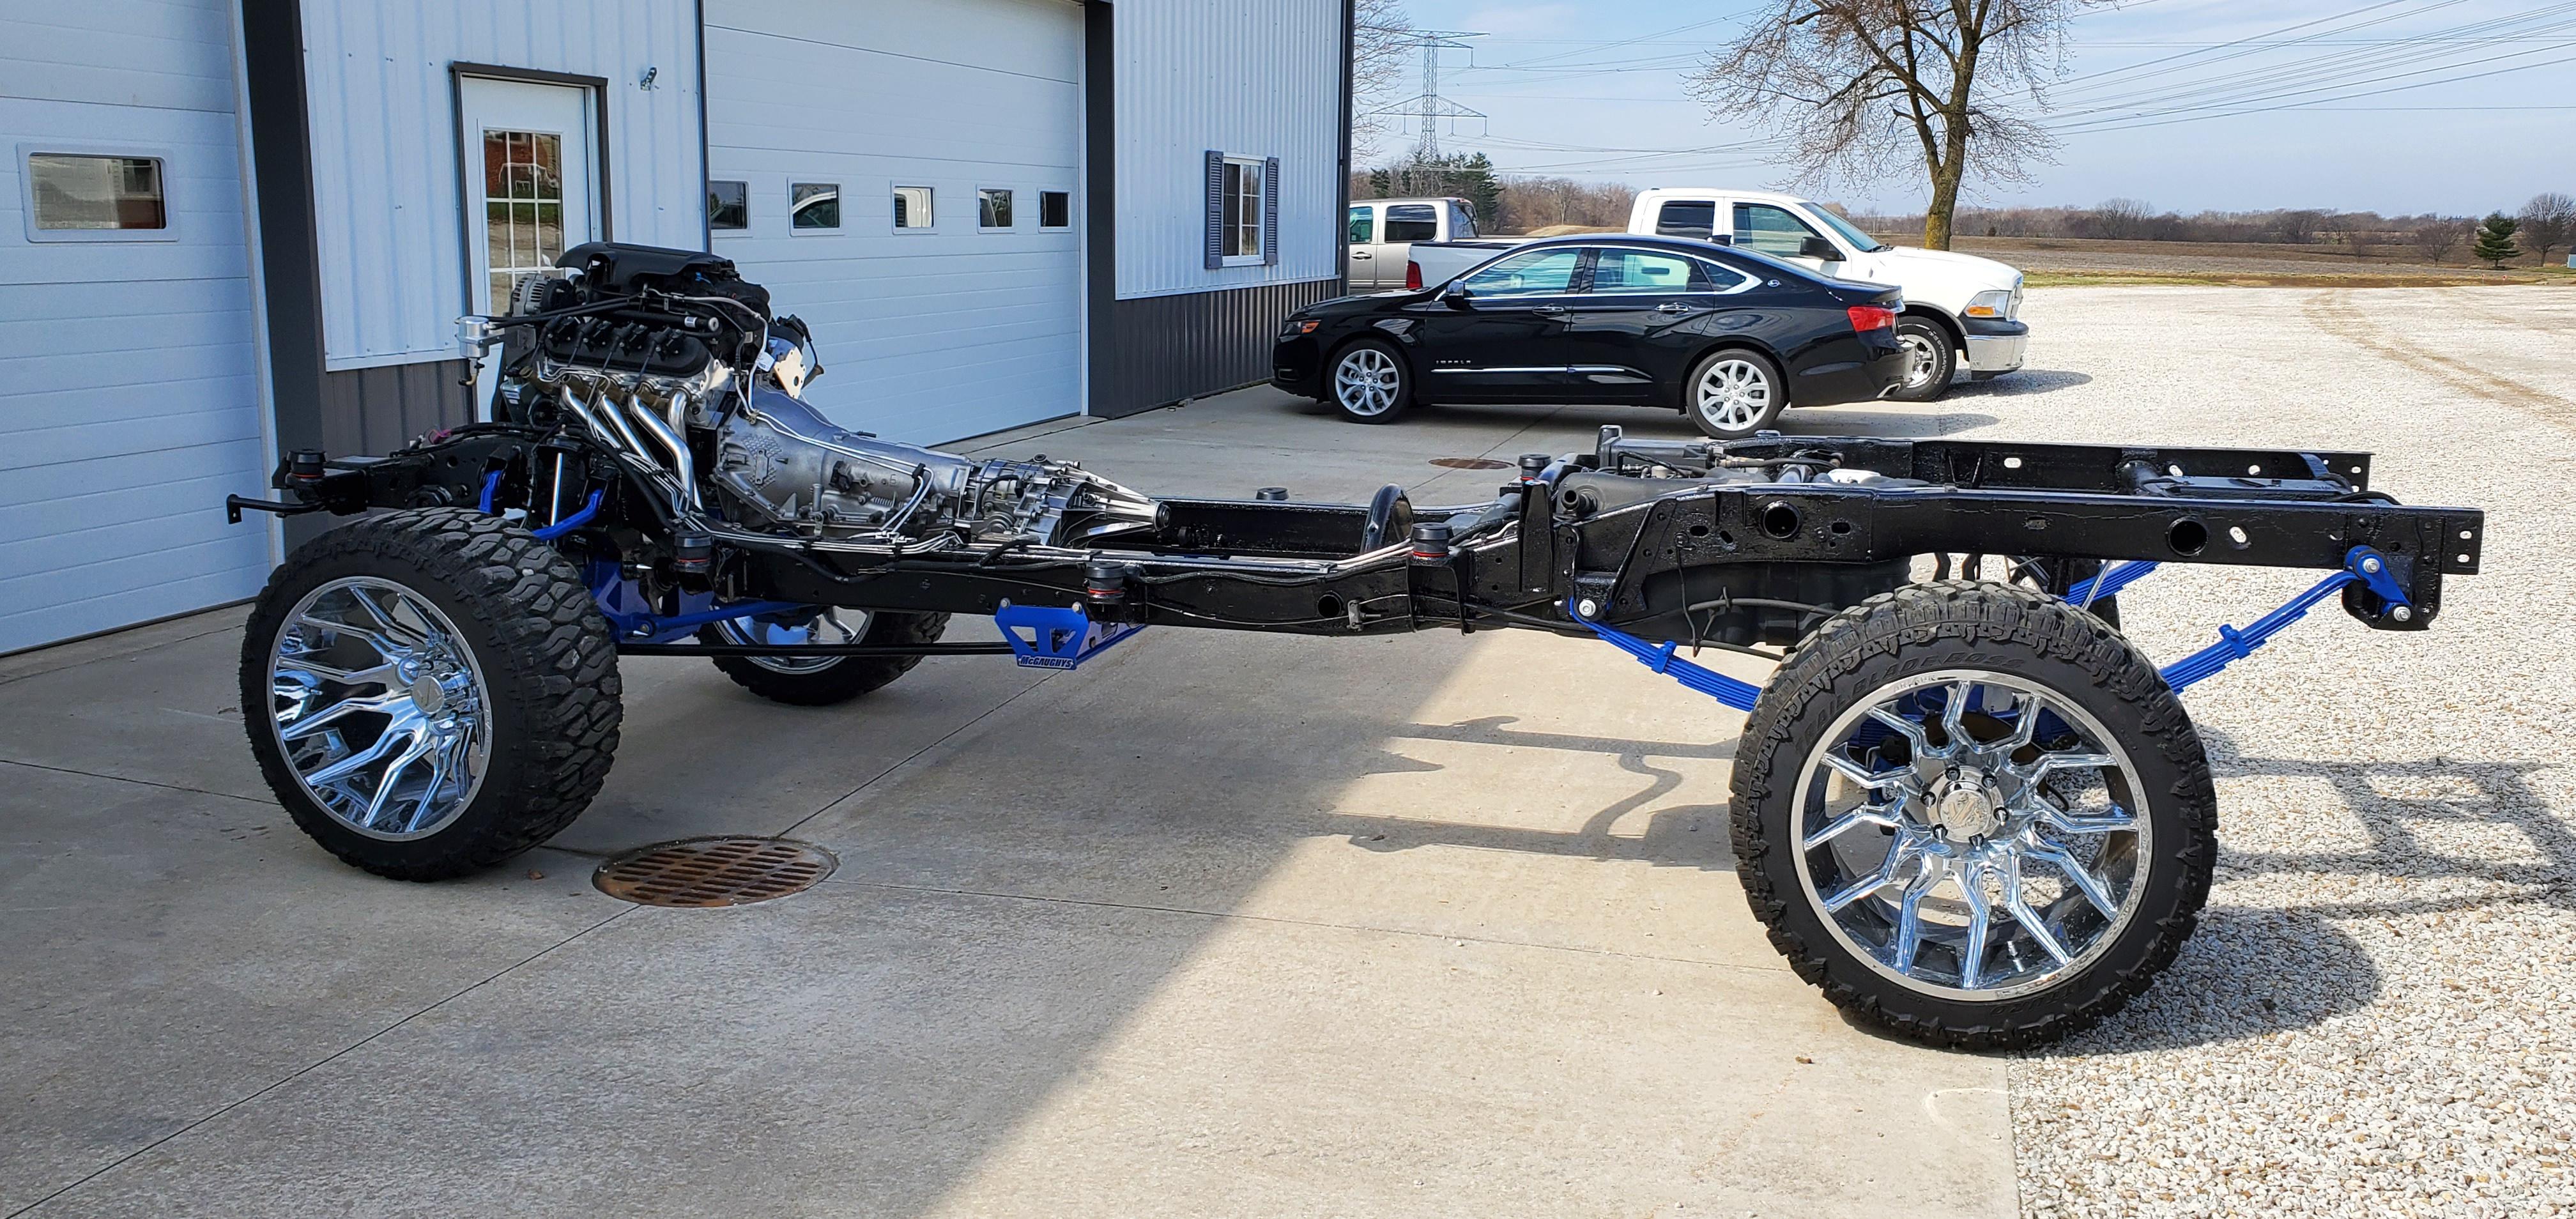
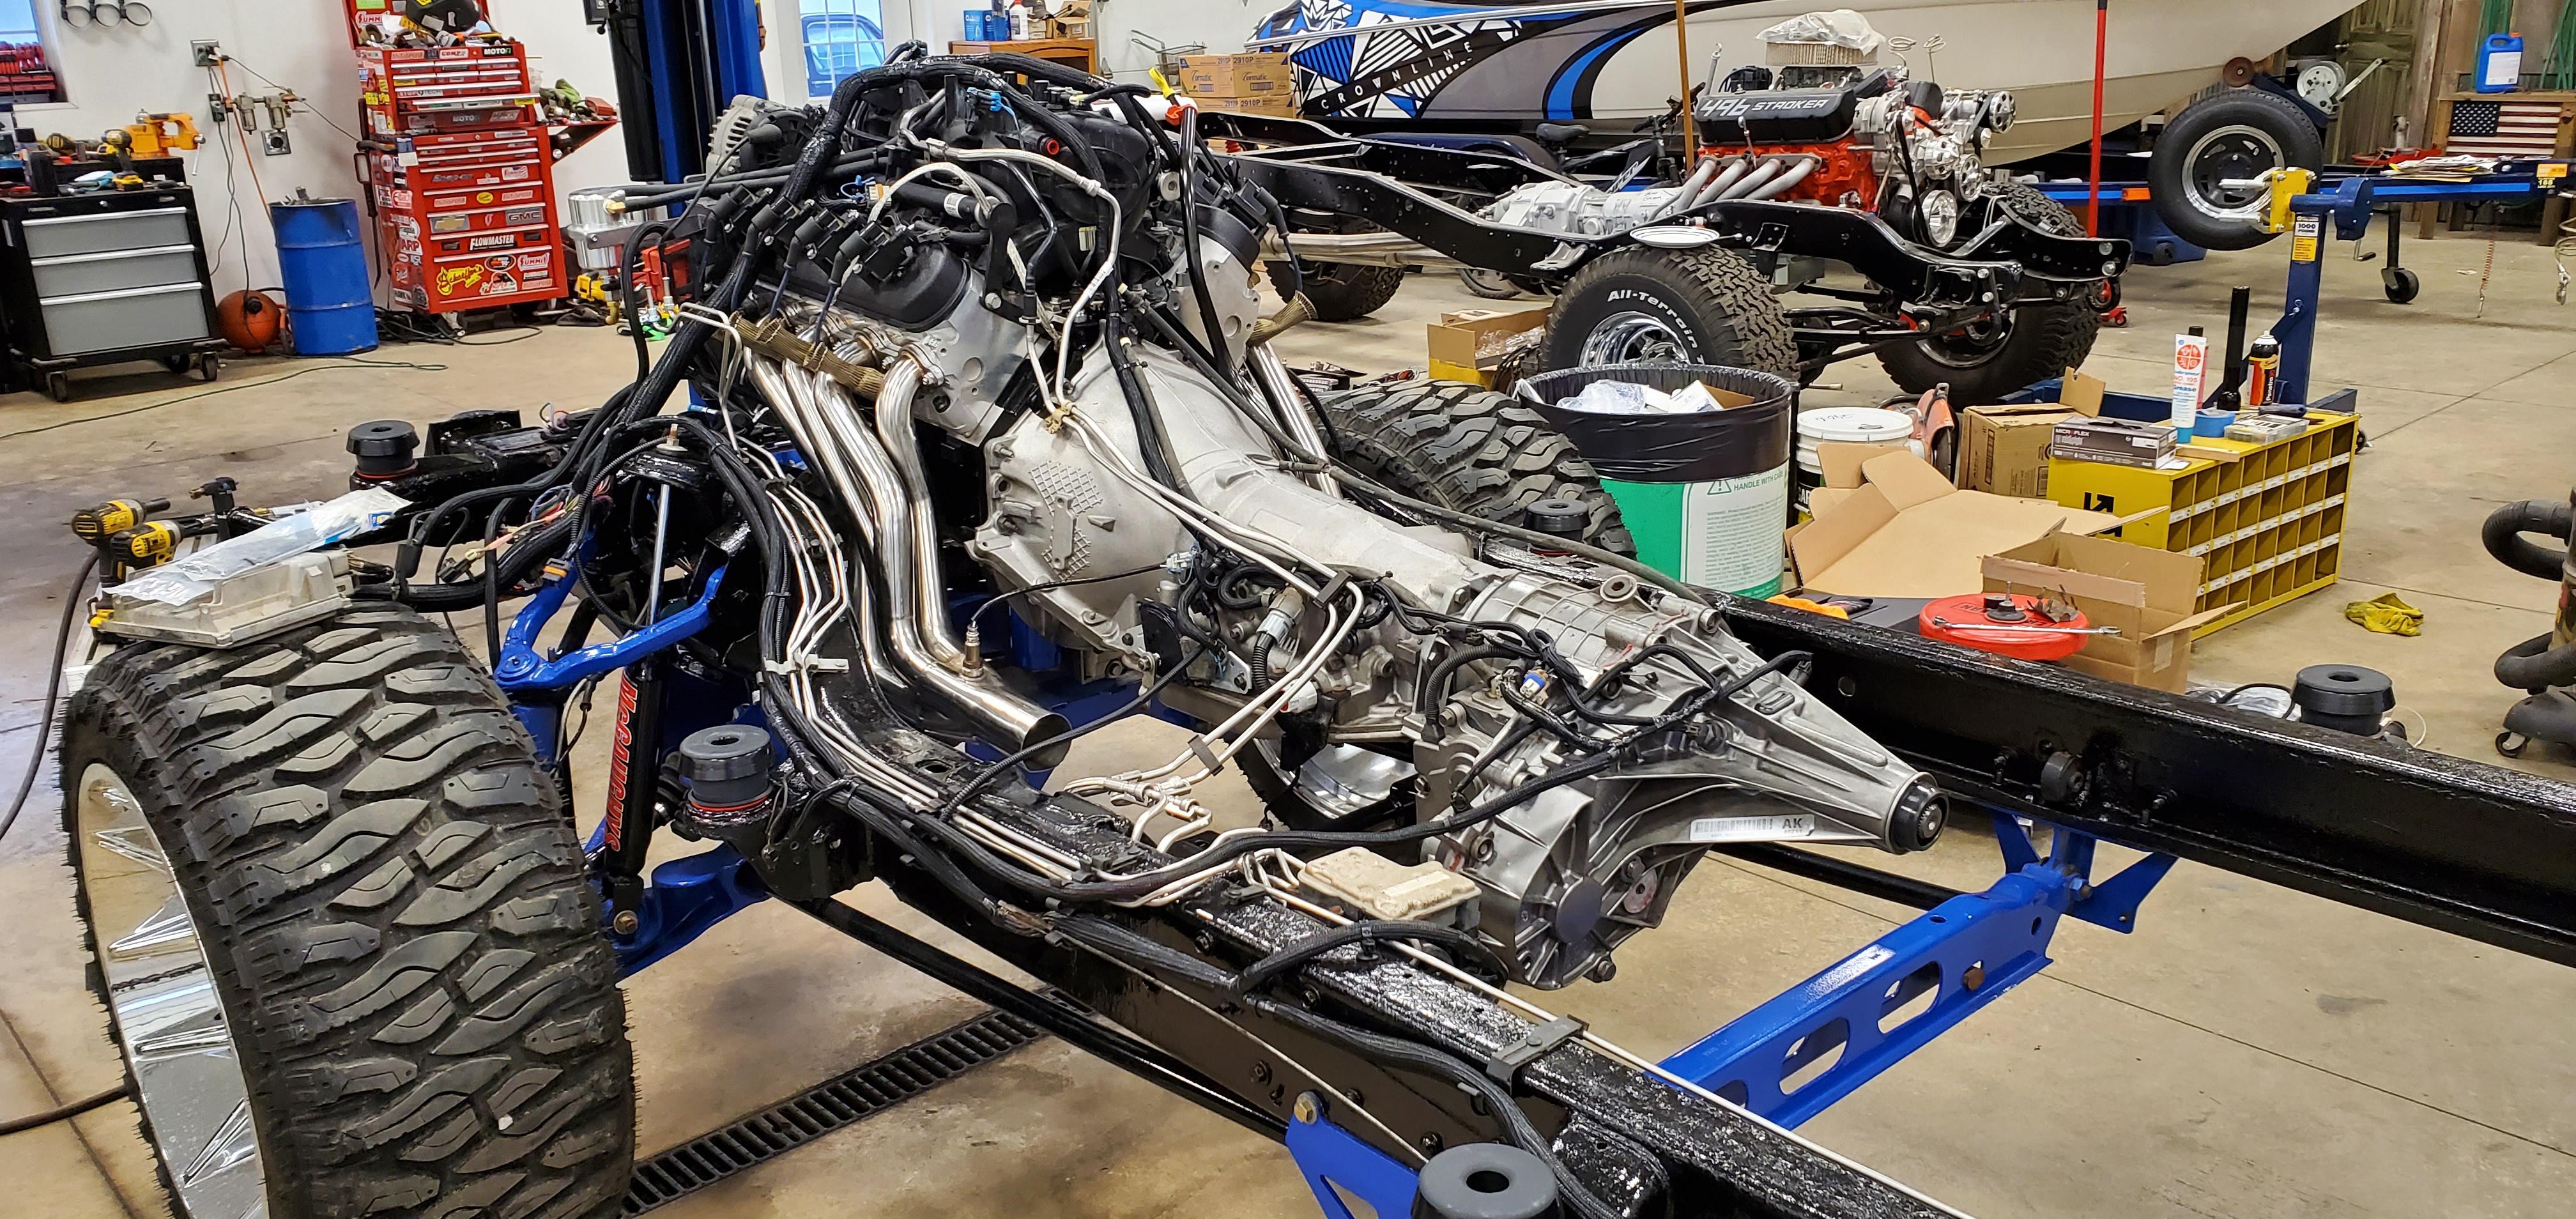
Now for the transmission. I sourced a 4l80 from a junkyard, it is a rear lube 4wd unit. Gave the trans and my 215k mile transfer case to my trans builder. Trans got a full rebuild, TransGo shift kit, Alto Red Eagle clutches, updated band/sprag/drum/pump. Talked with Circle D and ordered a 2600-2800 converter with the billet front. I ordered the 4l80 conversion harness from Nelson Performance also to get the ECM pinned for the new trans. Speed Engineering 4l80 conversion trans crossmember and a set of their headers ordered as well (more on the exhaust in a later post) The transfer case also got a complete rebuild as well as a 32 spline input shaft installed so it will mate to the 4l80. Got them back and hooked them together. Not having a body on the frame sure is nice, we pretty much assembled everything out of the truck and just set it in the frame. Makes it all pretty fun. Like really expensive LEGOs.


This was one of my favorite stages in the build. IDK why but it just was cool seeing the truck like this.


New gaskets, seals, oil pump, and timing chain done. Stabbed the cam in and dropped in fresh lifters. Also I had purchased an ASP underdrive pulley kit with the overdrive alt pulley.


I measured the piston to deck clearance and it was .001-.005 out of the hole if I am remembering correctly. I couldn't track down my notes but with the .051 gaskets I was right at 10.5:1 compression. Heads went on with ARP bolts. I did do the Comp Cams trunnion upgrade kit, and the little install tool that they send with the kit was nice. Checked pushrod length and they came right out to 7.4. Easy. TSP's hardened pushrods were installed. New knock sensors and harness, water pump, power steering pump, idler pulleys, and Summit brand tall valve covers with the integrated coil mounts went on as well.


Now for the transmission. I sourced a 4l80 from a junkyard, it is a rear lube 4wd unit. Gave the trans and my 215k mile transfer case to my trans builder. Trans got a full rebuild, TransGo shift kit, Alto Red Eagle clutches, updated band/sprag/drum/pump. Talked with Circle D and ordered a 2600-2800 converter with the billet front. I ordered the 4l80 conversion harness from Nelson Performance also to get the ECM pinned for the new trans. Speed Engineering 4l80 conversion trans crossmember and a set of their headers ordered as well (more on the exhaust in a later post) The transfer case also got a complete rebuild as well as a 32 spline input shaft installed so it will mate to the 4l80. Got them back and hooked them together. Not having a body on the frame sure is nice, we pretty much assembled everything out of the truck and just set it in the frame. Makes it all pretty fun. Like really expensive LEGOs.


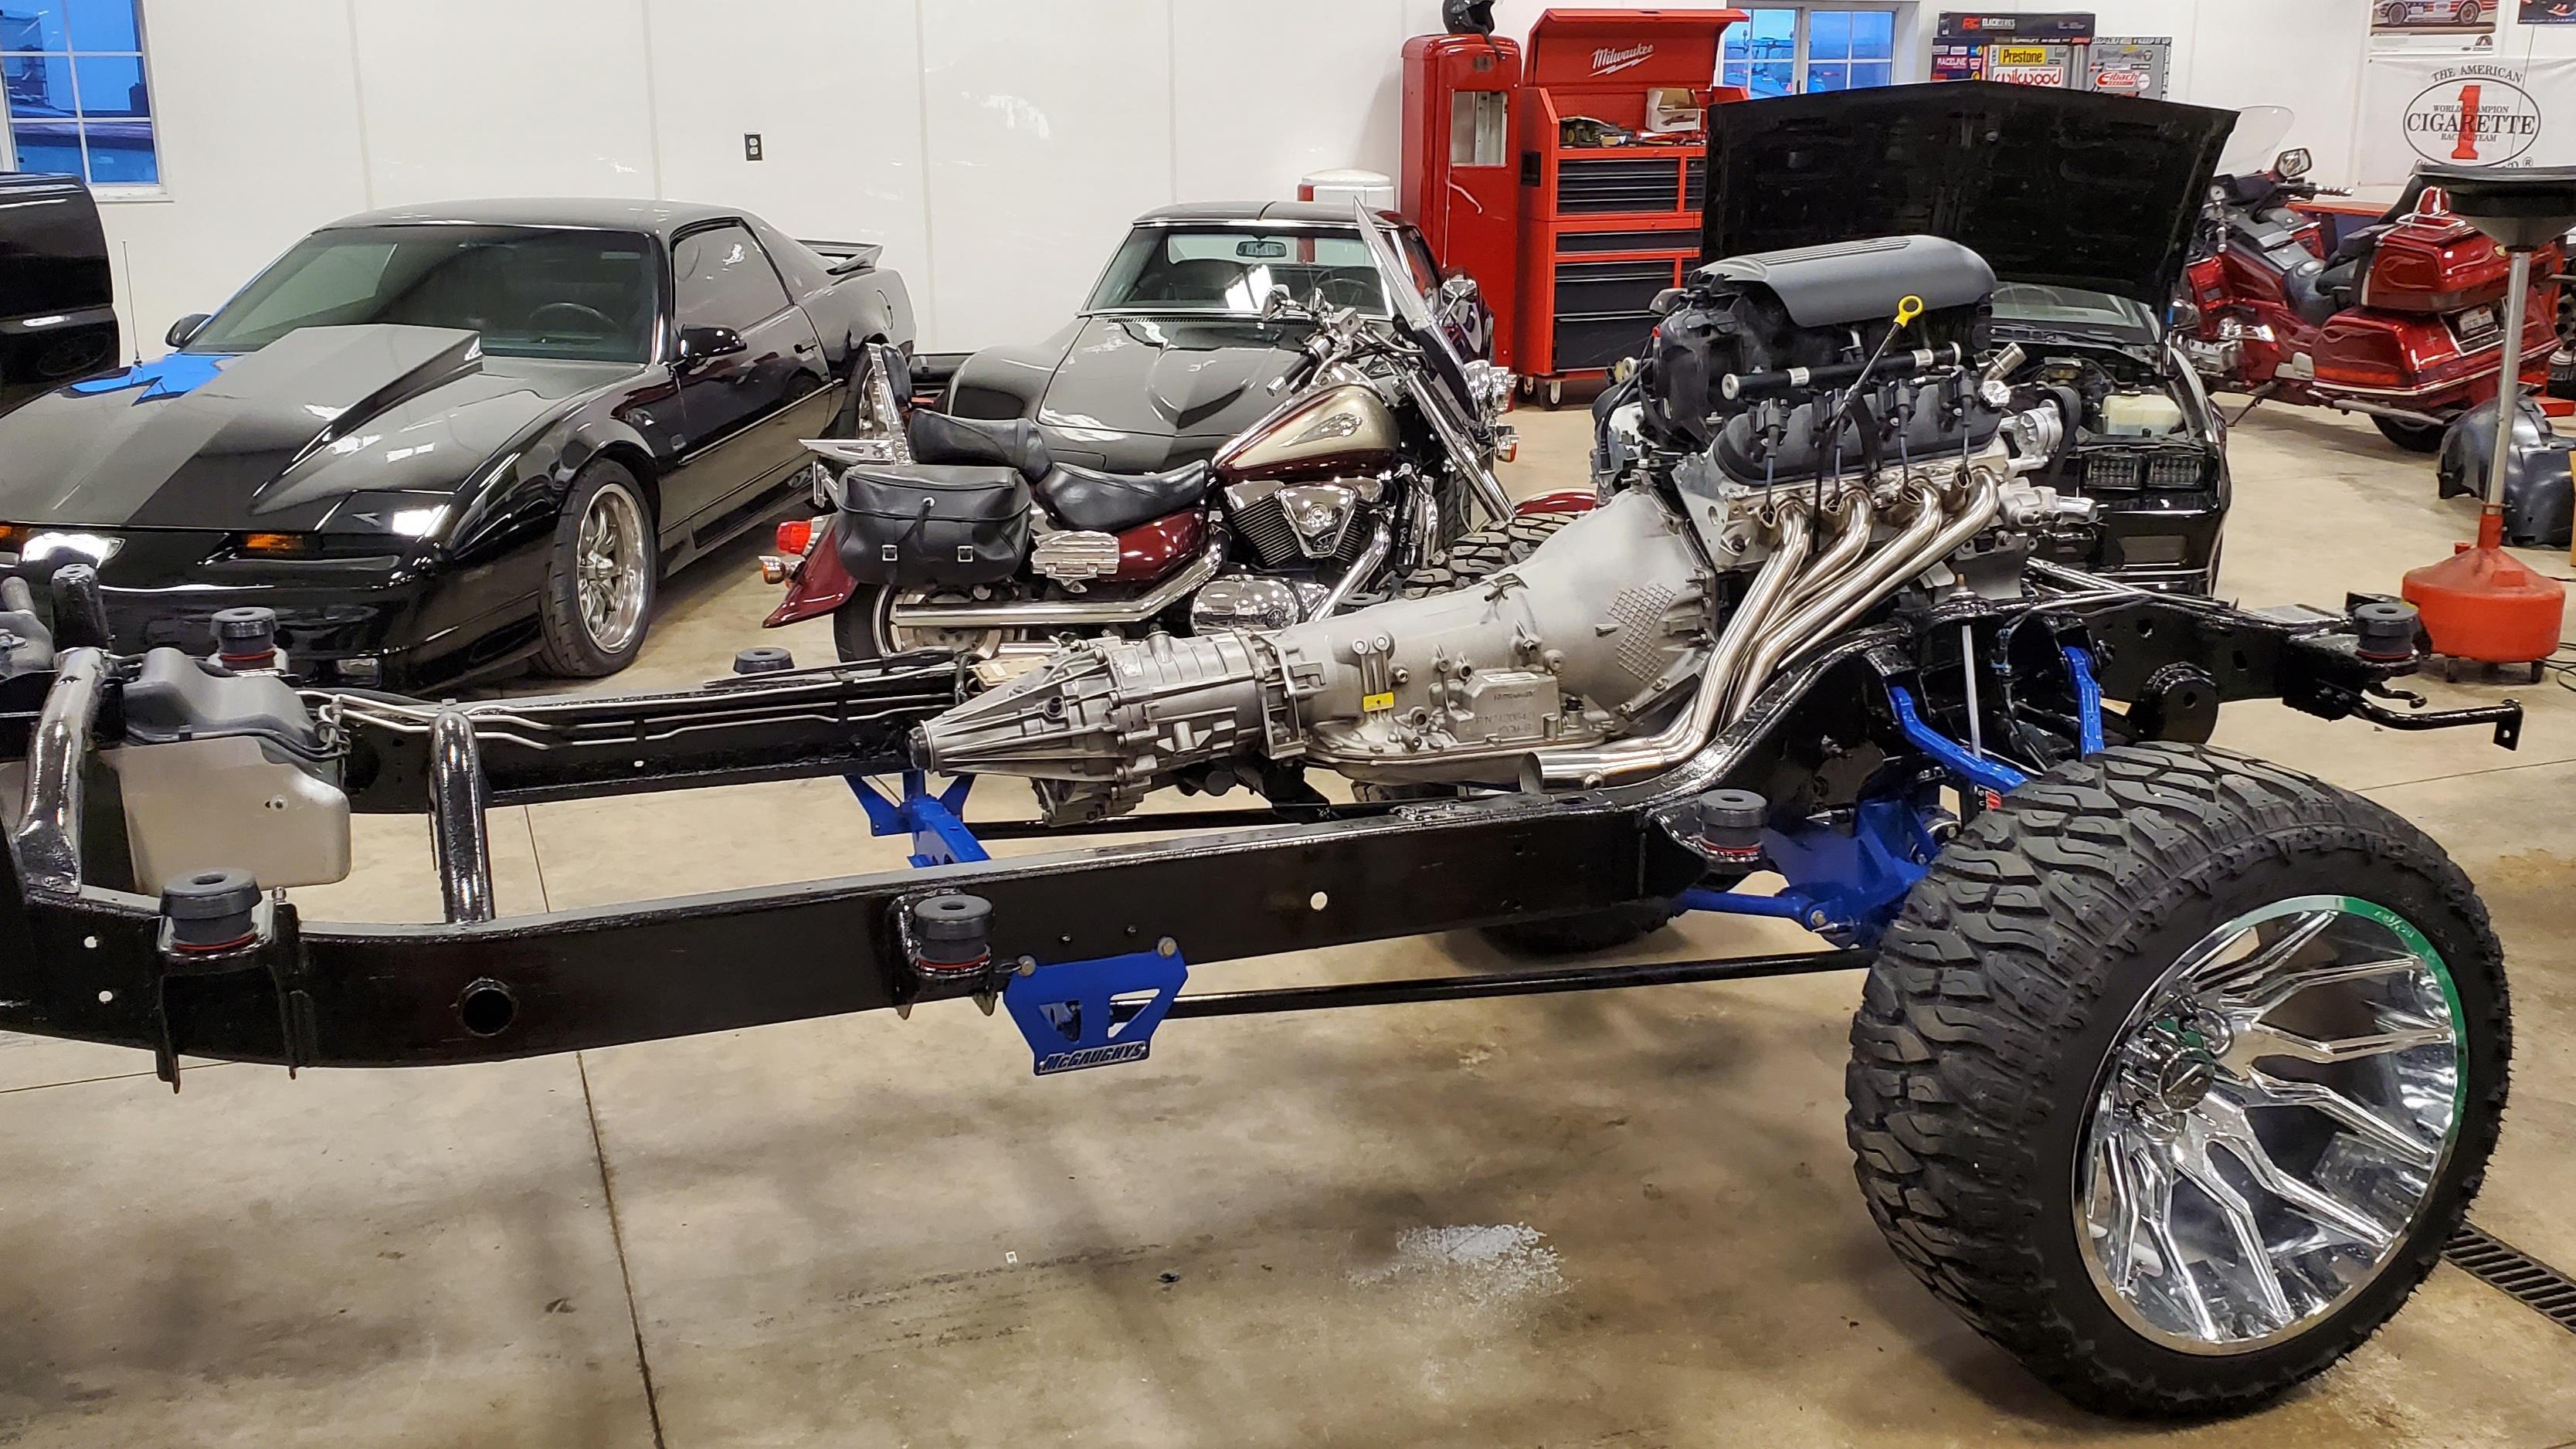

This was one of my favorite stages in the build. IDK why but it just was cool seeing the truck like this.


Trending Topics
Nov 24, 2021 | 05:22 PM
#8
Thread Starter
Teching In
Joined: Feb 2021
Posts: 31
Likes: 18
From: Central IL
Thanks, it's our shop that my dad brother and I went in together on and had done for our own personal stuff. Its on my parents property about 10 min from my house. There is always someone making a mess in there. (usually me)
Nov 24, 2021 | 05:58 PM
#9
Thread Starter
Teching In
Joined: Feb 2021
Posts: 31
Likes: 18
From: Central IL
Next step was to lay the harnesses in place. Since all the loom was fresh, it took a little massaging to get everything to lay where it needed to be, but overall it was pretty straightforward. I got the cab set back on and bolted down with fresh silicone cab mounts from S&B. The cab mount kit from S&B is top notch btw. I would highly recommend the kit to anyone who is needing to replace old rusty/crusty ones like mine were.


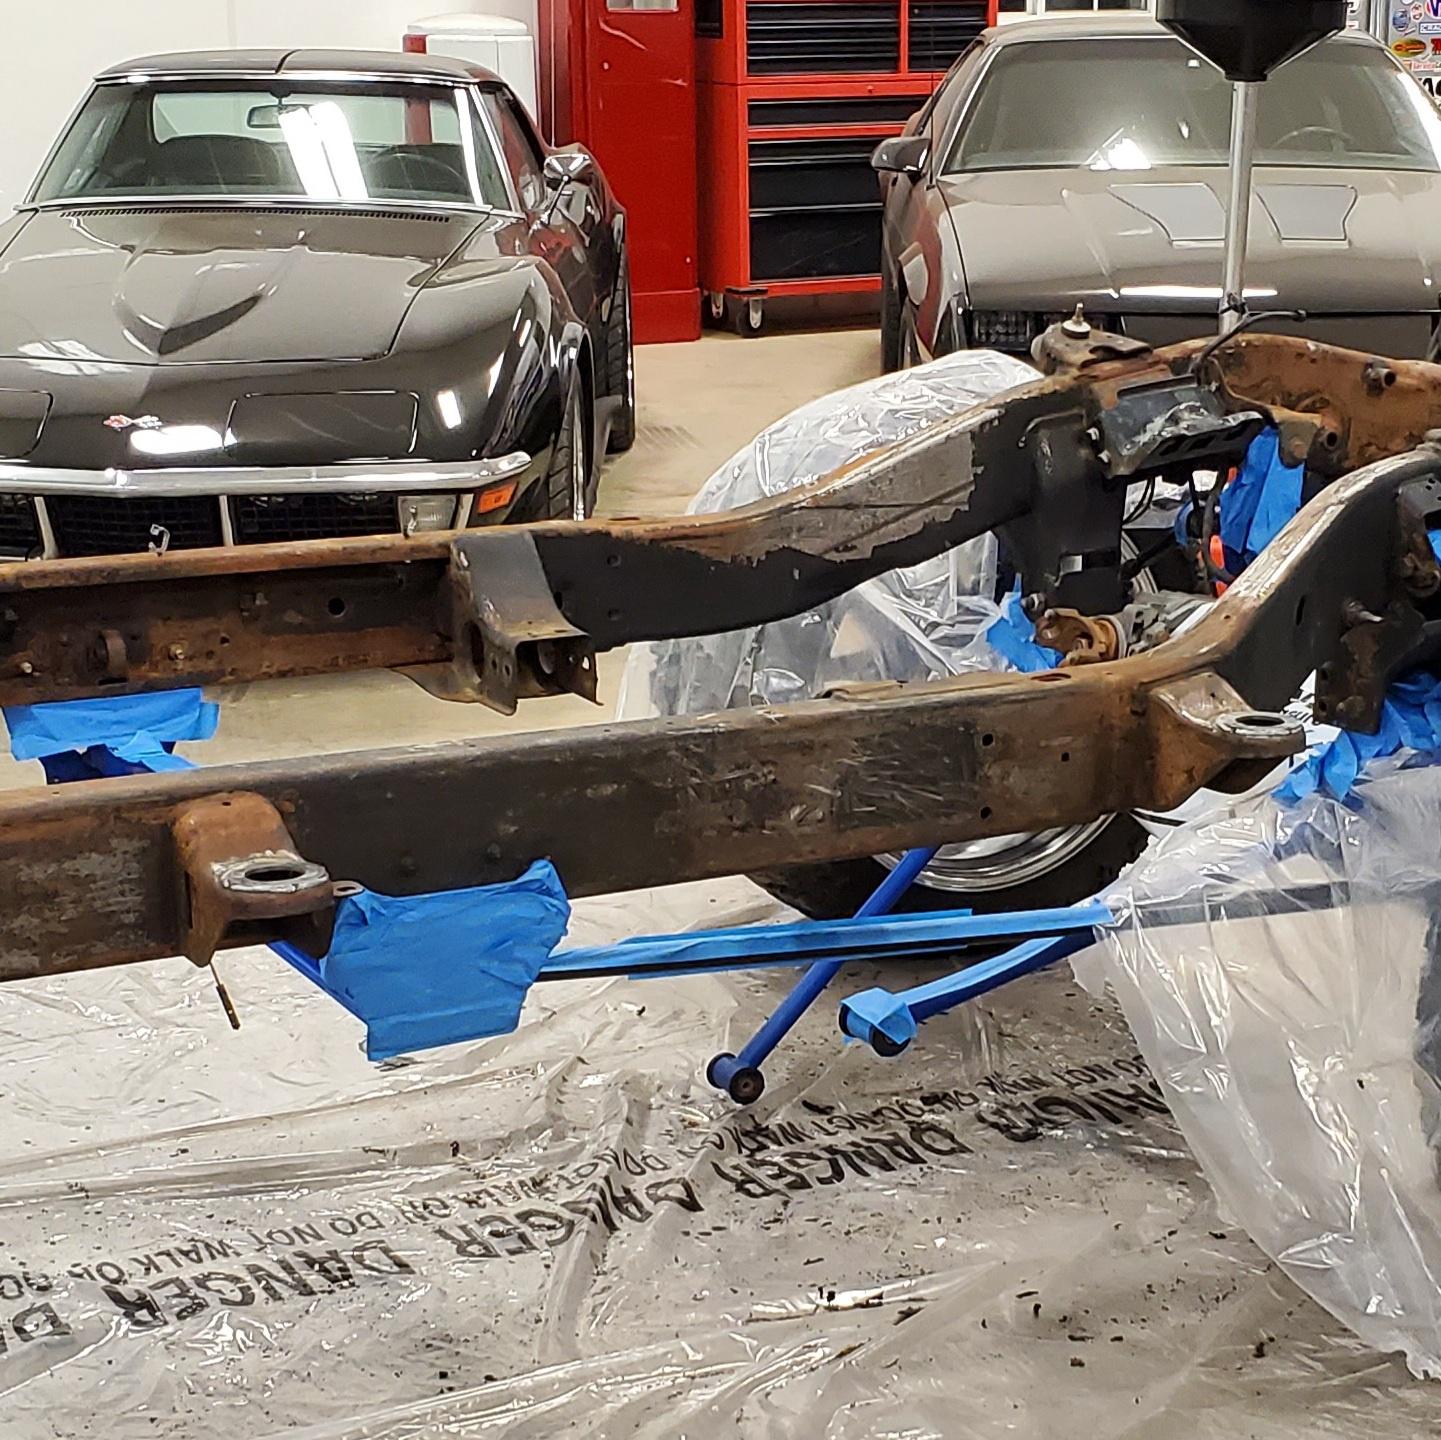
Which reminds me of something I completely forgot to mention. Along with the rusted out crossmember I had to fix on the frame, when I pulled the cab off, all 4 center cab mounts on the frame were very badly rusted out. With the help of a friend who does fab work and is a much better welder than I am, we cut out some replacement mounting plates and welded those to the frame. I'll insert the best picture I have of them after we welded them in, I was preoccupied that night and took zero pictures of that process. Oops.
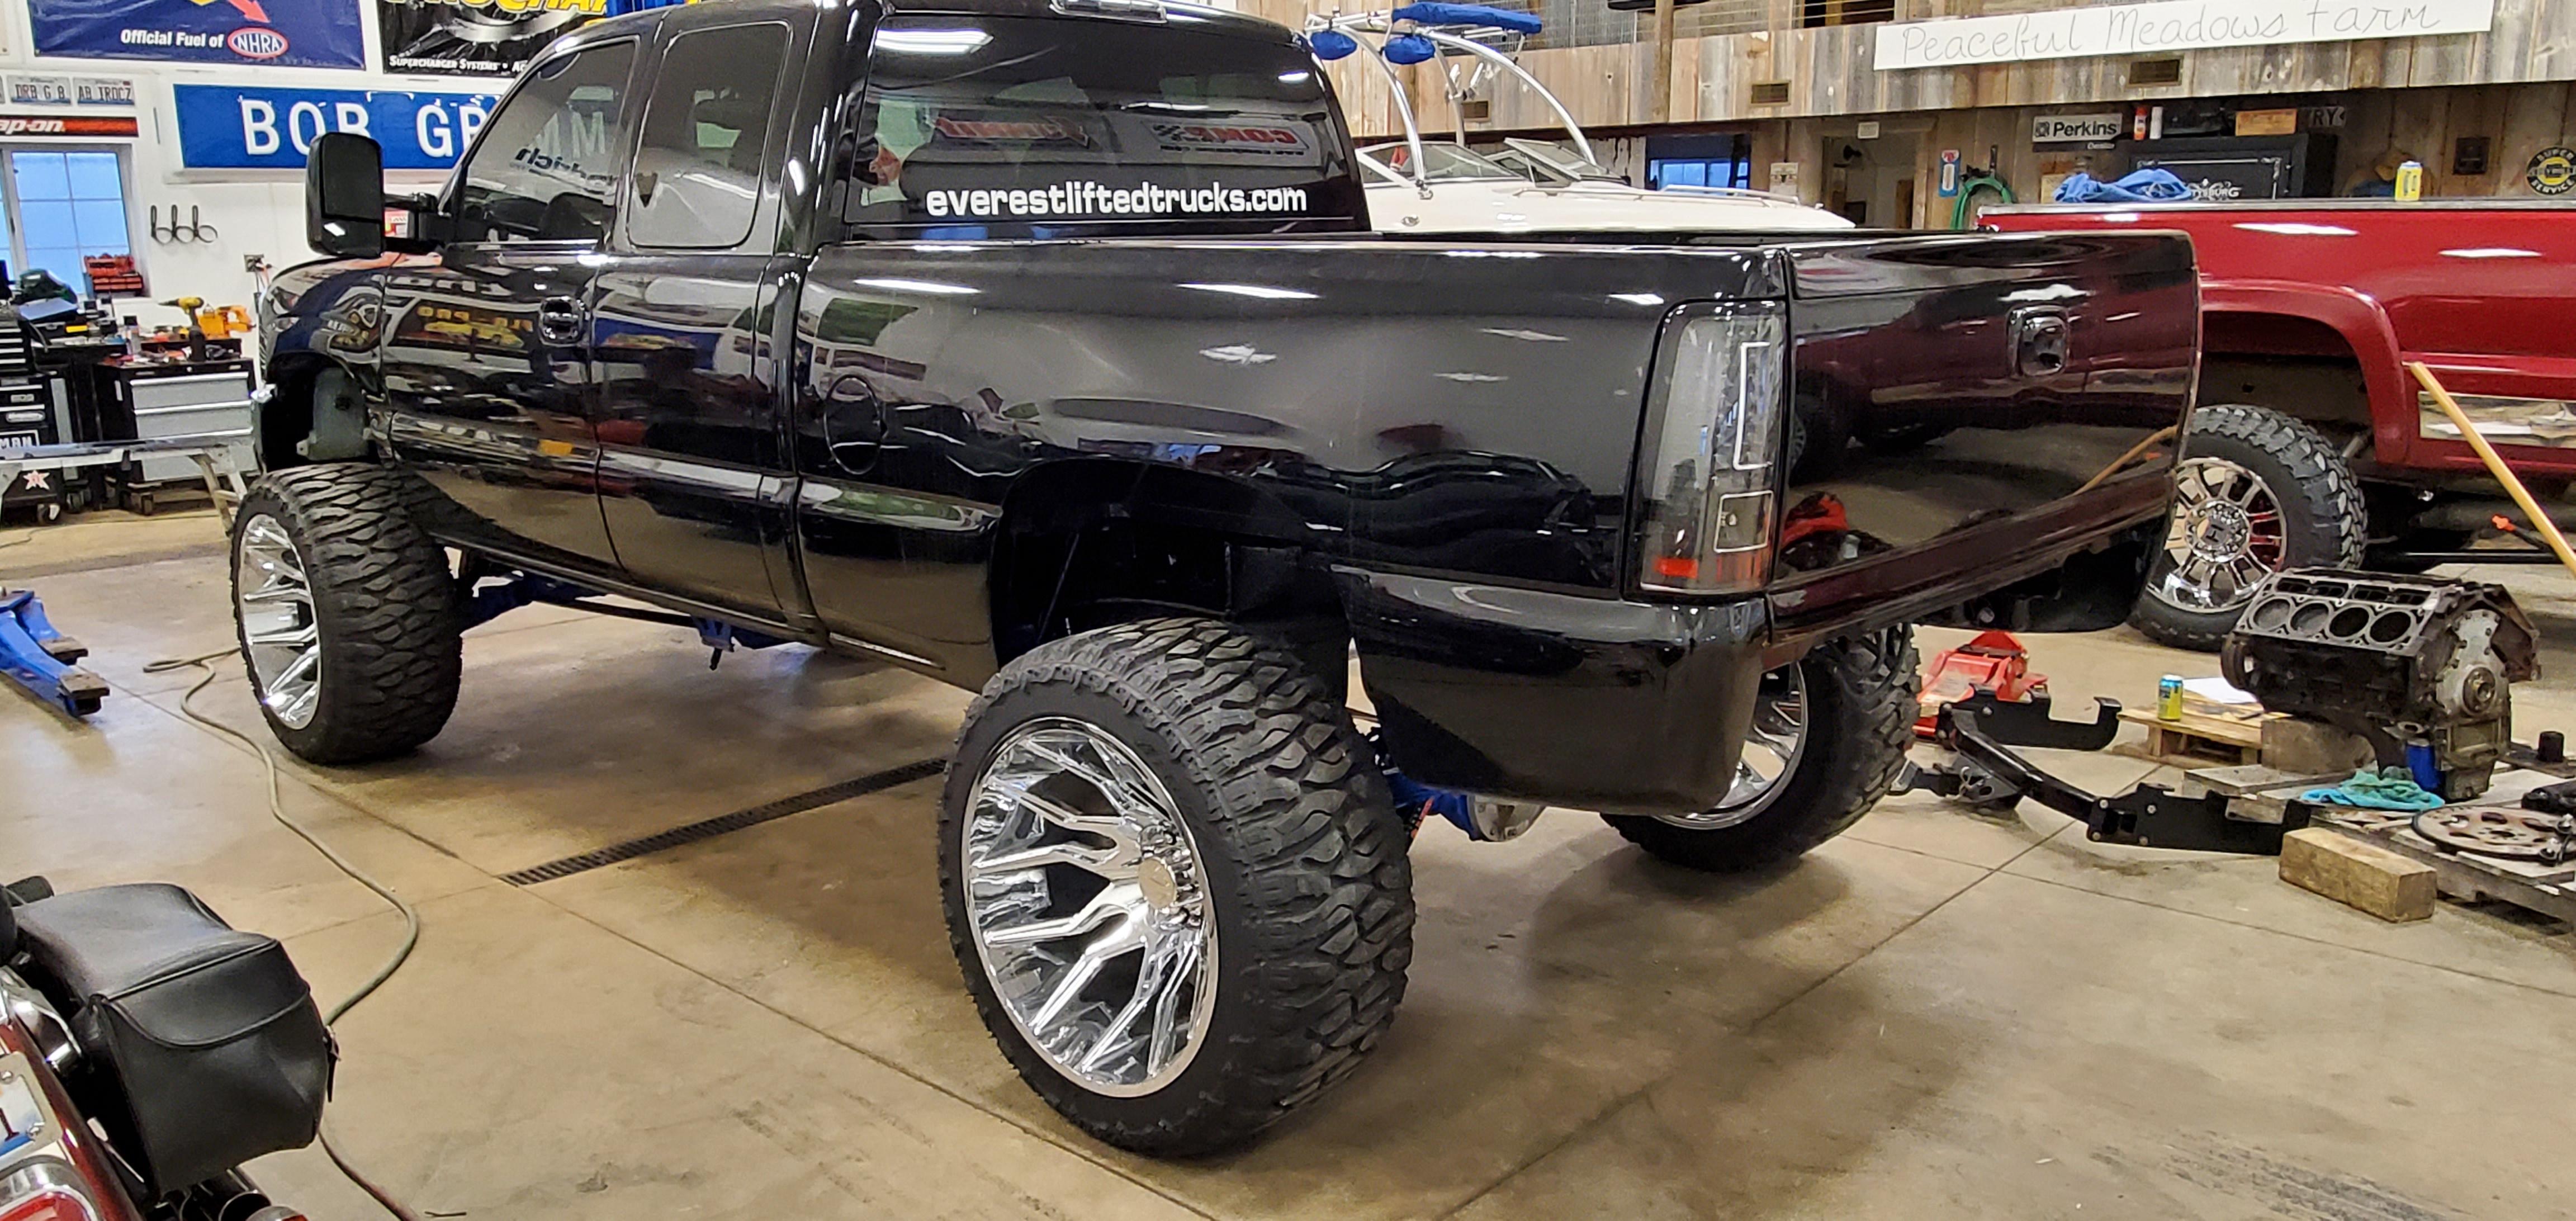
Anyways, moving on. I set the bed back on next, and was happy the truck was looking like a truck again. Stoked.


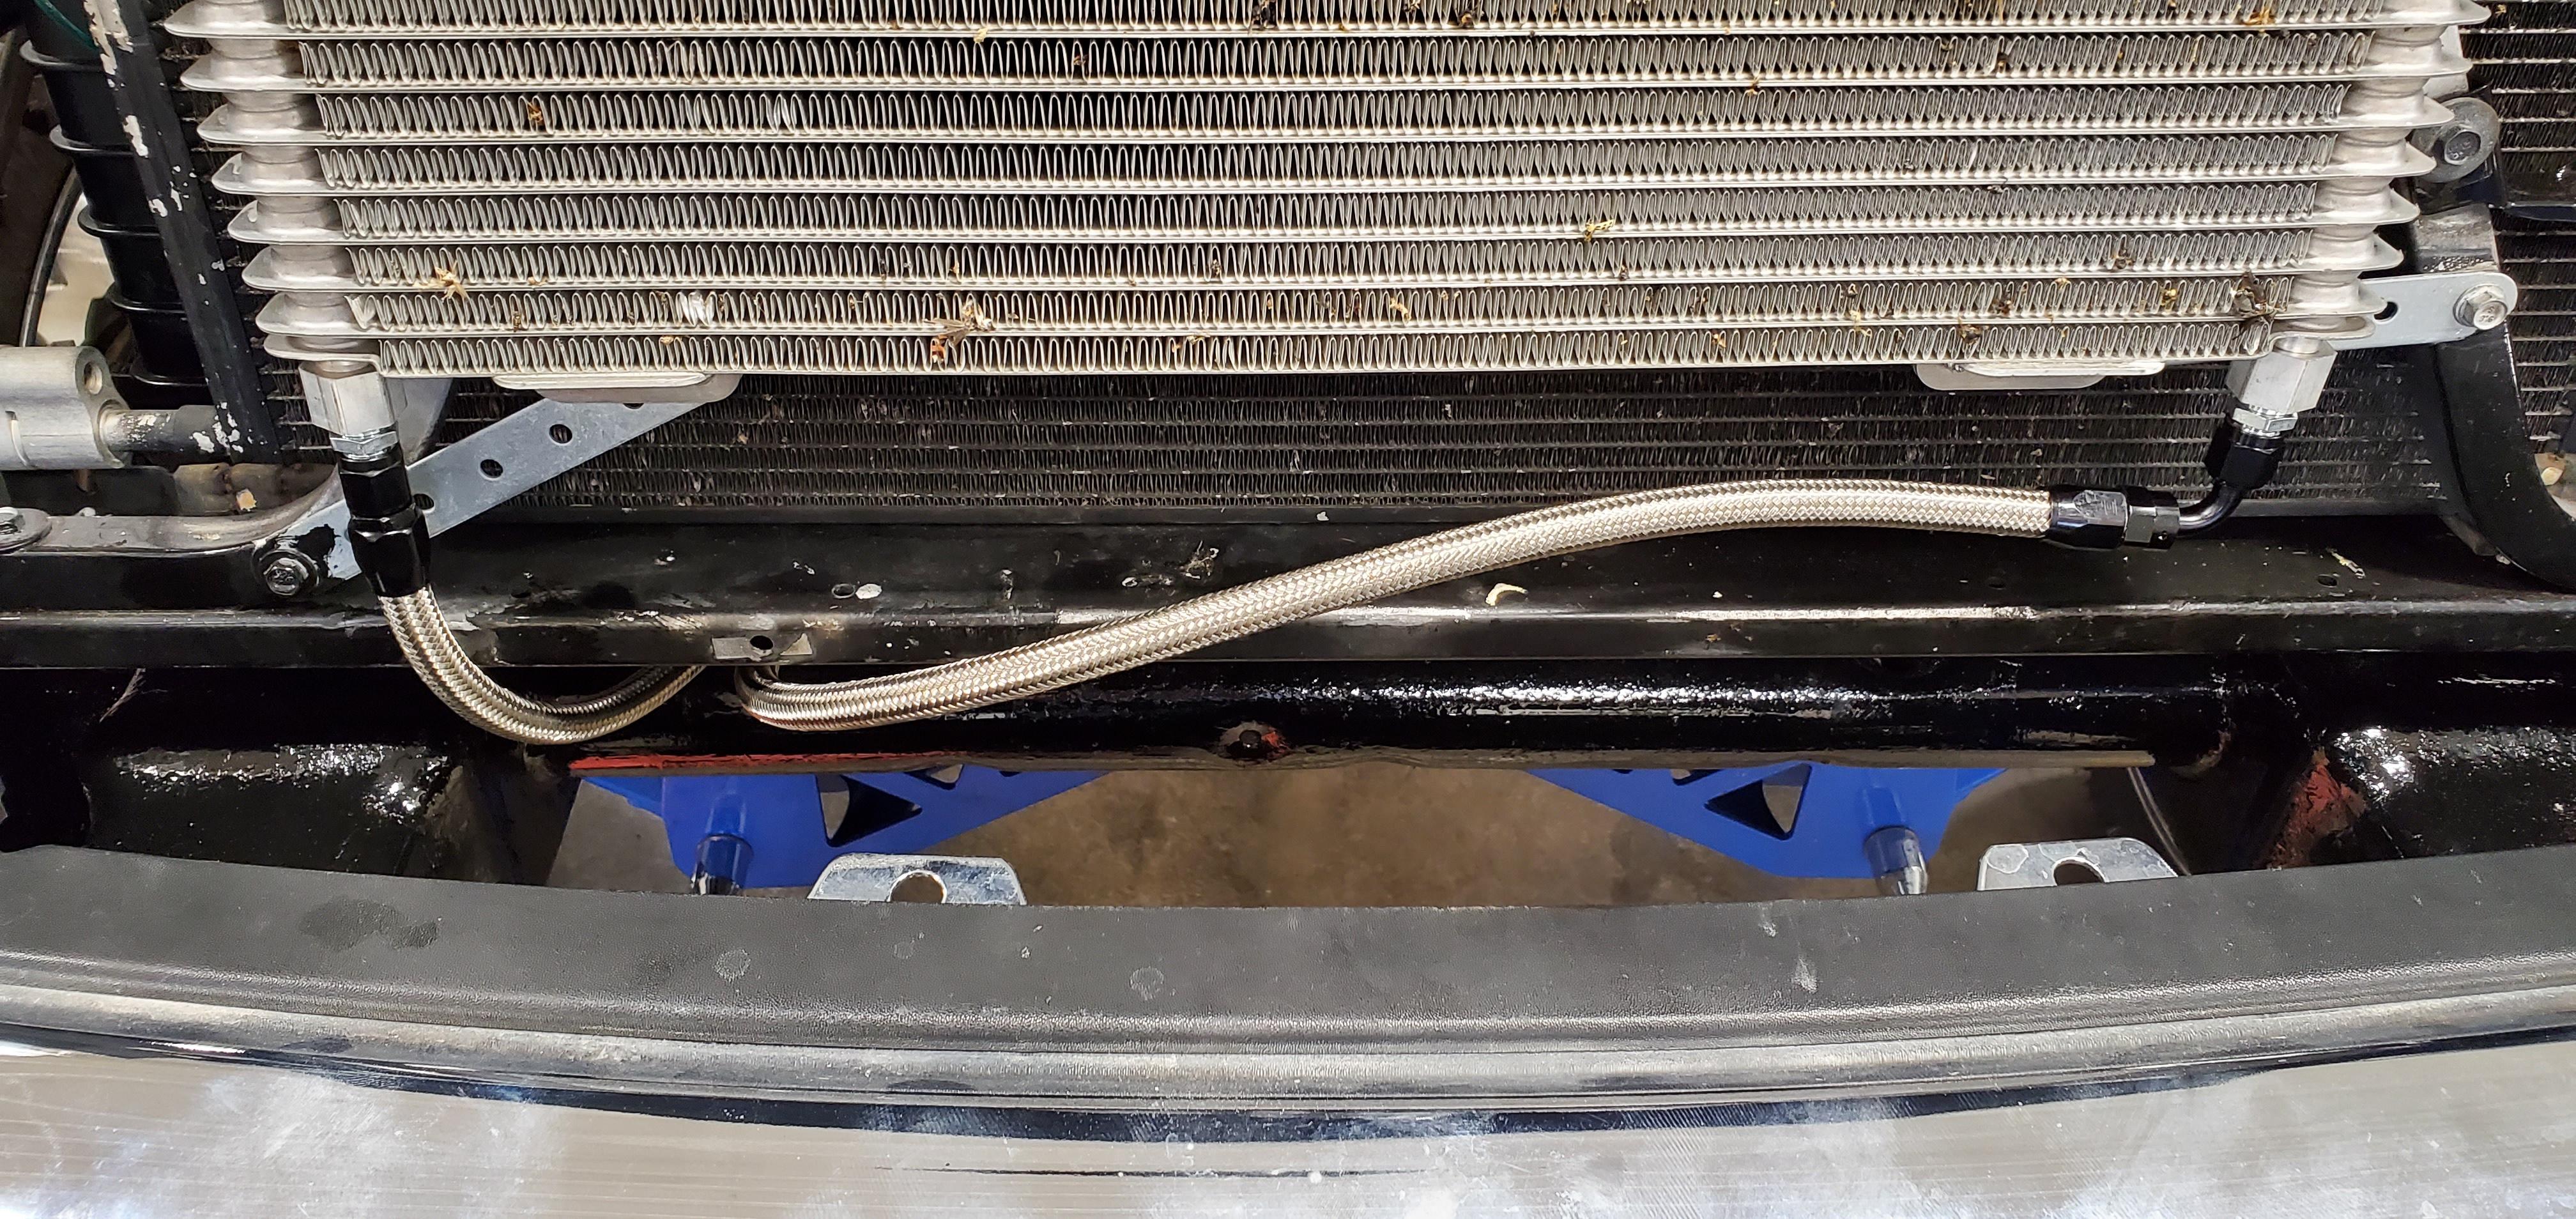
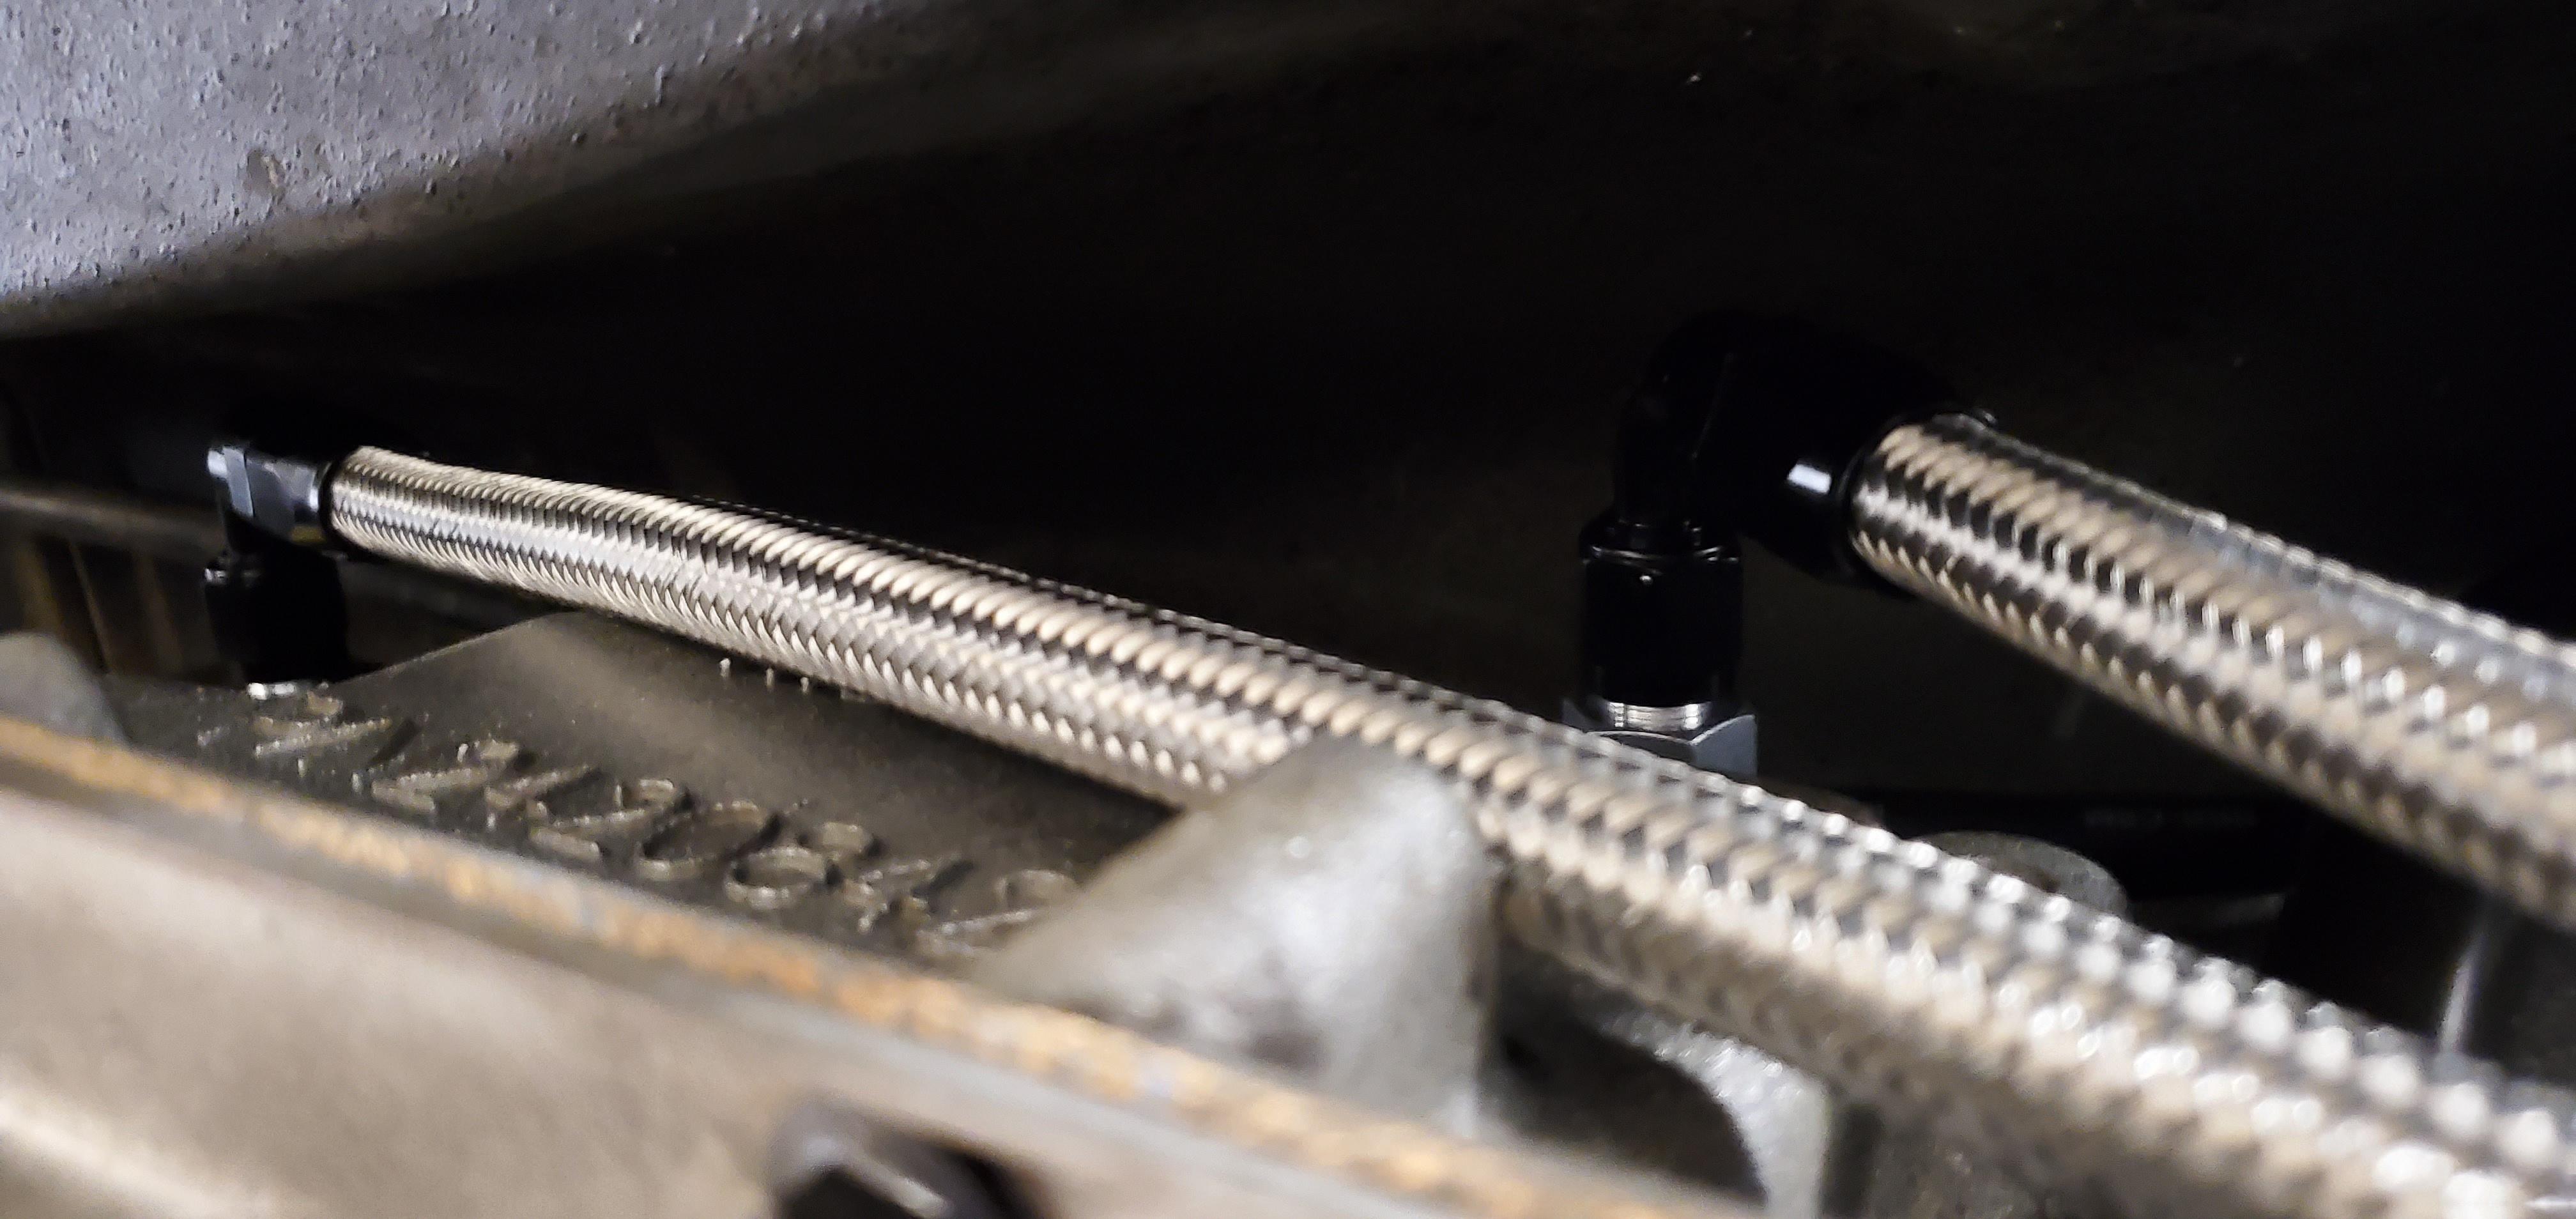
Now that the cab was back on, I could hook up the A/C, radiator, steering, and also make up my trans cooler lines. I used -6AN hose and Russell fittings. I promise I used clamps to secure them in place, they just aren't on in these pictures.

Roll pan installed as well because the rear bumper was getting pretty rusted out on the inside. I know some guys aren't big on roll pans on lifted trucks, or on roll pans in general, but I think they make the back of the truck look super clean. Not to mention the truck looks even taller with a pan on it.


Which reminds me of something I completely forgot to mention. Along with the rusted out crossmember I had to fix on the frame, when I pulled the cab off, all 4 center cab mounts on the frame were very badly rusted out. With the help of a friend who does fab work and is a much better welder than I am, we cut out some replacement mounting plates and welded those to the frame. I'll insert the best picture I have of them after we welded them in, I was preoccupied that night and took zero pictures of that process. Oops.
Anyways, moving on. I set the bed back on next, and was happy the truck was looking like a truck again. Stoked.
Now that the cab was back on, I could hook up the A/C, radiator, steering, and also make up my trans cooler lines. I used -6AN hose and Russell fittings. I promise I used clamps to secure them in place, they just aren't on in these pictures.
Roll pan installed as well because the rear bumper was getting pretty rusted out on the inside. I know some guys aren't big on roll pans on lifted trucks, or on roll pans in general, but I think they make the back of the truck look super clean. Not to mention the truck looks even taller with a pan on it.