
V6 to V8 swap for '86 C10
 Jan 9, 2006 | 12:44 PM
#61

Originally Posted by ZRO26T
Go the extra mile since the motor's out of the way. I had 20 years of dirt, oil, & gunk to clean, but it's much better now. Keep us posted! 
Looks like the temps this week will be warm for Jan, so I think I might splurge and turn on the shop heat for the night for the paint to cure. I'd like to do the framerails with POR-15 (I love this stuff), and fog the firewall with some good spray paint last I heard VHT was some of the best around. I'll hit the inner fenders in the spring to stop their decay. I've used Krylon and Rust Oleum in the past, and they don't last, my street rod spent one winter on the lawn covered, and all the R-O'd parts spotted up with oxidation. I'd use the POR on the painted surfaces, but I expect it won't stick too well to the painted surface. We'll see.
I took all of my measurements from the old powertrain and the new powertrain and put it all into AutoCAD. If I keep the tail of the trans in the same location, my original bracket is off by only 15mm. The trans mount is off by 50mm, but I can weld on an additionaly bracket to make that work out. If I use my original bracket though, I will be really tight on the AC compressor. I'll post the drawing of what the bracket would look like as soon as I get a chance to finish drawing it up.
ZR026T: If I use the bracket you use, it puts the motor about 2" further forward than it needs to be. Have you mocked up where your trans is going to end up? If you have room, you might want to consider a 4L60E and save some $$ on fuel. The PCM is setup to run it already.. right?
Jan 9, 2006 | 03:22 PM
#62

Thread Starter
formerly 1BADC10 (12/14/2011)
iTrader: (2)
Joined: Aug 2005
Posts: 2,135
Likes: 0
From: TX
Originally Posted by beertestr
ZR026T: If I use the bracket you use, it puts the motor about 2" further forward than it needs to be. Have you mocked up where your trans is going to end up? If you have room, you might want to consider a 4L60E and save some $$ on fuel. The PCM is setup to run it already.. right?
Jan 9, 2006 | 09:59 PM
#63
Originally Posted by ZRO26T
Hey, man... where've you been? The 4L60E and 5.3L went in as one piece. The trans crossmember had to be moved forward a couple of inches, and all sits well. I just have to find time away from my wife & kids to get my butt under the truck, measure for a new driveshaft (possibly 6"+ longer) to replace the old one. Remember, I had a V6 originally. The V8 brackets forced a 4" move forward for me. On top of that, my conversion plates seemed to move the V8 2" more forward. I had a TH350 trans originally, and it had the 9" tailshaft (longer trans than the 4L60E). So, the trans crossmeber got moved up more. It's a darn good thing GM had the pre-drilled holes in the frame rail. If I remember correctly, I moved the trans crossmember forward 6". I'll have to get under truck to verify. BTW, still have room for 34" radiator and e-fans. SWEEEEEEEEEET!!!!
Your chassis and mine are very different, as all I need to do is pull the V6 engine brackets out, the V8 mounts bolt directly to the frame where the V6 brackets fit. I will take a pic now that the engine bay is empty.
If I add the numbers up right, it sounds like if you used the V6 brackets (-4 inches), and use the other holes on your adapter brackets, it will put your motor back like 6". Wow. Let me get this all straight. See if this sounds right to you. If you found a driveshaft out of a 86-87 pickup with the 700R4, and used the other holes in your bracket, I bet you would have everything lined up nicely, and might not need to get a driveshaft reworked. The last driveshaft I got from the boneyard was about $25.
Not to get you to undo work, but I think you might be able to come up with a combo that will keep you from modding a driveshaft. Around here, lengthening costs about $200, and shortening cost about $150 with balancing, dunno what it costs in your area.
Might be worth a little effort.
While at work today, I checked a motor that had an AC bracket on it, and since the AC lines go out the side, I think I can use my bracket, get my motor within 15mm of where it needs to be, probably reuse my driveshaft, and still clear for AC.
That will be what I do tomorrow night. I have MLK day off, and the wife is going to the inlaws cottage for the weekend. That means with a little thrashing, I might be able to get the motor in, maybe the fuel lines, and possibly... wait for it... have time to rework the engine harness... whoa..
Jan 10, 2006 | 06:01 AM
#64
Thread Starter
formerly 1BADC10 (12/14/2011)
iTrader: (2)
Joined: Aug 2005
Posts: 2,135
Likes: 0
From: TX
Originally Posted by beertestr
If I add the numbers up right, it sounds like if you used the V6 brackets (-4 inches), and use the other holes on your adapter brackets, it will put your motor back like 6". Wow.
Jan 13, 2006 | 11:17 AM
#65
No paint on the frame yet, though there is less grease on the frame. I had to pull the V6 frame brackets off, and there is no easy way to get to the nuts inside the crossmember unless you pull the lower control arms. I was able to snake a 1/2 breaker bar with a socket up in there to get the drivers side bracket off, but there is some sort of frae brace inside the crossmember on the right side only, and makes SEEING the nuts hard. I think I know what I need to do the job, so a trip to Sears is in order to get some longer 3/8" socket wrenches, breaker bar, or whatever else that has a flexible head to get up in there..
I am seriously thinking of using some steel 10 mm Riv-nuts on the frame to hold the motor mounts down. It should be pretty strong, but I am a little wary with the monster torque the 4.8L makes... Whaddaya think?
I am seriously thinking of using some steel 10 mm Riv-nuts on the frame to hold the motor mounts down. It should be pretty strong, but I am a little wary with the monster torque the 4.8L makes... Whaddaya think?
Jan 13, 2006 | 12:49 PM
#66
Thread Starter
formerly 1BADC10 (12/14/2011)
iTrader: (2)
Joined: Aug 2005
Posts: 2,135
Likes: 0
From: TX
And what year model truck ya have? 
I'll tell ya, I switched b/t my rachet & box-in wrench to get those frame bracket nuts & bolts off. I found the pics of my V6 & V8 brackets. Check 'em out:
V6 LH Bracket

V6 RH Bracket
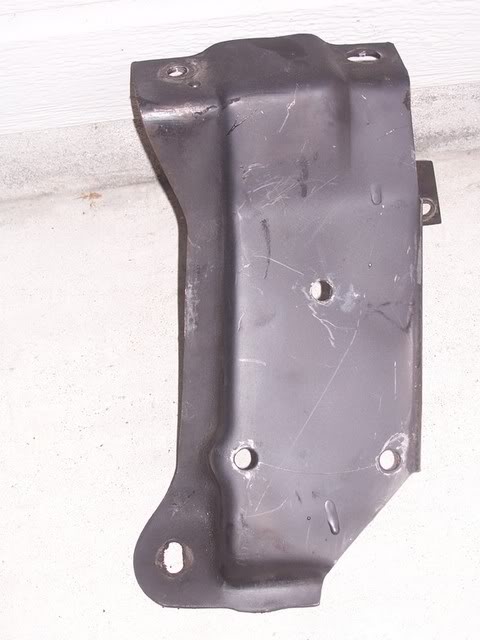
V8 LH Bracket
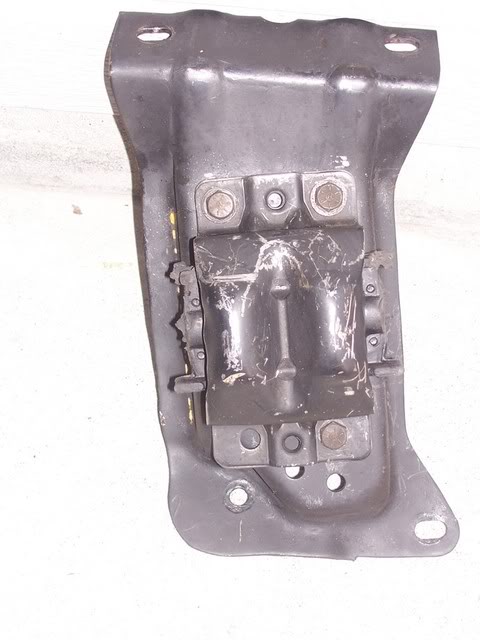
V8 RH Bracket

That should give you a much better idea as to what the difference is... Imagine my surprise when I actually saw the difference.
I'll tell ya, I switched b/t my rachet & box-in wrench to get those frame bracket nuts & bolts off. I found the pics of my V6 & V8 brackets. Check 'em out:
V6 LH Bracket
V6 RH Bracket
V8 LH Bracket
V8 RH Bracket
That should give you a much better idea as to what the difference is... Imagine my surprise when I actually saw the difference.
Jan 13, 2006 | 02:50 PM
#67
Originally Posted by ZRO26T
And what year model truck ya have?
I'll tell ya, I switched b/t my rachet & box-in wrench to get those frame bracket nuts & bolts off. I found the pics of my V6 & V8 brackets.
That should give you a much better idea as to what the difference is... Imagine my surprise when I actually saw the difference.
I'll tell ya, I switched b/t my rachet & box-in wrench to get those frame bracket nuts & bolts off. I found the pics of my V6 & V8 brackets.
That should give you a much better idea as to what the difference is... Imagine my surprise when I actually saw the difference.
Jan 29, 2006 | 09:16 AM
#69
Motor is in!!!
I fabbed some new adapter brackets and put my motor 15mm further back. Driveshaft fits fine. The added width of the adapter brackets required me to slot the engine brackets about 5/16" on each side (1/4" plate on a 45 degree angle is about 5/16" wide. I had to cut the locating fingers on the motor mounts to get the holes to line up. I think I will be talking to my buddy at the laser cutting shop to cut me some custom pieces. I think there's a benefit to having these pieces fit right, and that can only be done with a modified bracket.
The extra setback also helped an issue I saw with the drivers side manifold. The outlet was pointing partially at the rear mount for the lower control arm.
Got a brand new y-pipe (okay, like 10 miles), muff-tailpipe assembly, and stock airbox from the guy I got the 4.8L from originally.. all for the princely sum of $150. When he pulled the motor, he installed longtubes, a CAI box and had a true dual system custom fabbed.
Y-pipe will need a little work. Since the left side manifold flange is so close to the framerail, I had to pull the studs, and use bolts to install the y-pipe. The y-pipe hit the lower control arm mount, just barely. I will have to dimple to pipe a bit to get it to clear. If I did not move the motor back another 15mm, this would not have had a chance of working.
If I do make up custom brackets, I think I am going to build them to put the motor another 10mm higher in the truck. If I did that, then the y-pipe would clear the control arm bracket no problem.
Finally, the y-pipe interferes with the trans crossmember, but it's nothing that can be handled with a notch to crossmember.
Next up, fuel system. Gotta drop the tank, and install the new high pressure pump, change the filter, and then modify the steel fuel lines with the right fuel fittings. Then the lines go to inline tube for them to make me nice ones..
Oh, and there's still wiring to do..
Jan 29, 2006 | 09:03 PM
#70
Thread Starter
formerly 1BADC10 (12/14/2011)
iTrader: (2)
Joined: Aug 2005
Posts: 2,135
Likes: 0
From: TX
Good deal... where's the pics?!?!?!?!
Here's some of the wiring repairs from a goof-up during the first mock up. They're not the clearest, but you'll see the "uh oh" that had to be repaired.
Camshaft Position Sensor Connector (Pic 1)
Camshaft Position Sensor Connector (Pic 2)
Camshaft Position Sensor Connector (Pic 3)
Camshaft Position Sensor Connector (Pic 4)