
Shifting Issue...

 Sep 7, 2007 | 12:59 PM
#12

Thread Starter
formerly 1BADC10 (12/14/2011)
iTrader: (2)
Joined: Aug 2005
Posts: 2,135
Likes: 0
From: TX
Originally Posted by Tootall
Originally Posted by 1BADC10
in an effort to understand, what accommodations should be made for the valve supplied in FLT's Transgo 46-mod kit?
I've been trying to find more info about the vac mod. I know that the higher the shift, the more firm that it shifts. Instead of where mine is firm all the time.
I have the full TransGo HD2 kit. I have everything in it except for the washers (spacers) and the tinny springs on the ring kit. The internal springs on the ring that you put in.

I think we're on the same page now. I was confused as to what you were referring to.
 Sep 7, 2007 | 03:56 PM
#13
Originally Posted by 1BADC10
. . . the resistor that comes in the kit is supposed to jumper the solenoid leads, which is used to "trick" the PCM into thinking the right amount of voltage to the solenoid is acheived to get the desired pressure. . . . .
Hey what's this "resistor" that you're talking about. Is this the same as putting in a new boost valve?
Is this just part of Vince's kit, or part of the vac mod?
Sep 7, 2007 | 05:44 PM
#14
Thread Starter
formerly 1BADC10 (12/14/2011)
iTrader: (2)
Joined: Aug 2005
Posts: 2,135
Likes: 0
From: TX
Originally Posted by Tootall
Hey what's this "resistor" that you're talking about. Is this the same as putting in a new boost valve?
Is this just part of Vince's kit, or part of the vac mod?
Is this just part of Vince's kit, or part of the vac mod?
*edit*
I'll try to remember to take pictures when I pull the pan off.
Sep 10, 2007 | 08:53 AM
#15
Originally Posted by 1BADC10
I believe it's a part of the 46-mod kit. It comes with separate instructions on how to cut the plastic connector to install the lil doo-hickey, but I just removed the plastic piece, slid heat-shrink sleeves over the actual connectors, crimped lightly on the metal to help with holding the resistor in place, soldered the connector & resistor (to prevent sliding), and heat-shrank the sleeve to prevent potential for shorting (probably excessive, but I doo'd it anyhow).
*edit*
I'll try to remember to take pictures when I pull the pan off.
*edit*
I'll try to remember to take pictures when I pull the pan off.
hey cool thanks !
Sep 12, 2007 | 08:50 PM
#16
Thread Starter
formerly 1BADC10 (12/14/2011)
iTrader: (2)
Joined: Aug 2005
Posts: 2,135
Likes: 0
From: TX
Well... nothing visibly wrong so far...
I appreciate the little things... like this REMOVABLE drain plug! Pardon the dirtiness!


Tootall... you wanted to see the little brown resister... lookie there.


Now... for those that know I have a vibration issue, I am certain it's in the rear axle (carrier & gears, most likely). However, this CAN'T be good either!

If you don't see anything there, then how about this one?

If it's not one thing, it's another!
I appreciate the little things... like this REMOVABLE drain plug!
Pardon the dirtiness!Tootall... you wanted to see the little brown resister... lookie there.
Now... for those that know I have a vibration issue, I am certain it's in the rear axle (carrier & gears, most likely). However, this CAN'T be good either!
If you don't see anything there, then how about this one?
If it's not one thing, it's another!
Sep 13, 2007 | 08:47 PM
#18
Thread Starter
formerly 1BADC10 (12/14/2011)
iTrader: (2)
Joined: Aug 2005
Posts: 2,135
Likes: 0
From: TX
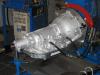
Oh, boy! Lookie what I found...


Where the heck did these come from? I noticed that they fell to the ground as I was pulling the trans away from the block. I'm clueless as to where these came from. There seems to be little metal ***** in the center of the input shaft. Could these have come from there?
Here's the TC.

Any ideas?
Where the heck did these come from? I noticed that they fell to the ground as I was pulling the trans away from the block. I'm clueless as to where these came from. There seems to be little metal ***** in the center of the input shaft. Could these have come from there?
Here's the TC.
Any ideas?
Sep 13, 2007 | 09:12 PM
#19
If I did not know better I would think some one was playing a joke on you. Was the converter in the trans when you removed it? Also are there eight ***** there? Are you sure that you put the ***** in the valve body when you installed it last? They did not come from the input shaft that I can cay for sure.
Sep 14, 2007 | 06:49 AM
#20
Thread Starter
formerly 1BADC10 (12/14/2011)
iTrader: (2)
Joined: Aug 2005
Posts: 2,135
Likes: 0
From: TX
I pulled back the trans with the TC still attached. With the way my exhaust is currently fabricated, I have to tilt the trans downward on the bellhousing end, and slide it forward (under the oil pan) in order to get the tail end from over the "h-pipe". In the near future, I'm going to get the exhaust redone b/c it's a pain to have to do this without a lift.
There are about seven or eight of those little ***** (or whatever). I'll have to count them when I get home today. Ha Ha... yes, the valve body check ***** are in their rightful place. These little ***** are two times smaller than those. They were all laying on the blanket I had under the truck (to catch residual trans fluid leakage during removal) before I removed the TC. I just thought this was offly wierd. Still curious as to where they came from though.
I'm going to try to get up early Saturday morning to disassemble everything (if anyone cares to drop by). It seems that the only time I get to do stuff like this is EARLY in the morning, or late in the evening. In between that, I'm a loving daddy.
There are about seven or eight of those little ***** (or whatever). I'll have to count them when I get home today. Ha Ha... yes, the valve body check ***** are in their rightful place.
These little ***** are two times smaller than those. They were all laying on the blanket I had under the truck (to catch residual trans fluid leakage during removal) before I removed the TC. I just thought this was offly wierd. Still curious as to where they came from though.I'm going to try to get up early Saturday morning to disassemble everything (if anyone cares to drop by). It seems that the only time I get to do stuff like this is EARLY in the morning, or late in the evening. In between that, I'm a loving daddy.