
14 bolt SF swap
 May 23, 2009 | 12:04 AM
#1

Thread Starter


Joined: Jan 2006
Posts: 16,282
Likes: 438
From: Huntsville, AL
Technical Details:
Wheel Mounting Surface (WMS)
- 4wd (OBS) 14 bolt, 67.5"
- 2wd (OBS) 14 bolt, 64.5"
- 4wd and 2wd? (NBS)10b, 68.5"
Spring perch width:
- NBS, ~49" center to center
- OBS 14b, ~47" center to center
Shock mount width:
- NBS 10b, ~28"
- Close to the same on OBS 14bolt, ~28"?
Yoke:
- 14 bolt yoke, 1350
- 10 bolt yoke, R3 SS4
U-Joint:
- If your driveshaft is a 1330 (I have the big aluminum one which is a 1330 with the 1.0625" caps), then you need a 1330 to 1350 conversion U-joint which I could only find on Jegs
- If your driveshaft is a 1310, you need the 348 conversion U-joint (1310 to 1350)
- If your driveshaft is an R3 SS4, you need the 447 U-Joint (ss4 to 1350)
- For most people, im guessing the ones with the two piece steel driveshafts, you need the 447.
Breather Hose:
- 14b, 5/16"
- 10b, 1/4"
Bolts 14b:
- Diff cover, 8x1.25x18mm
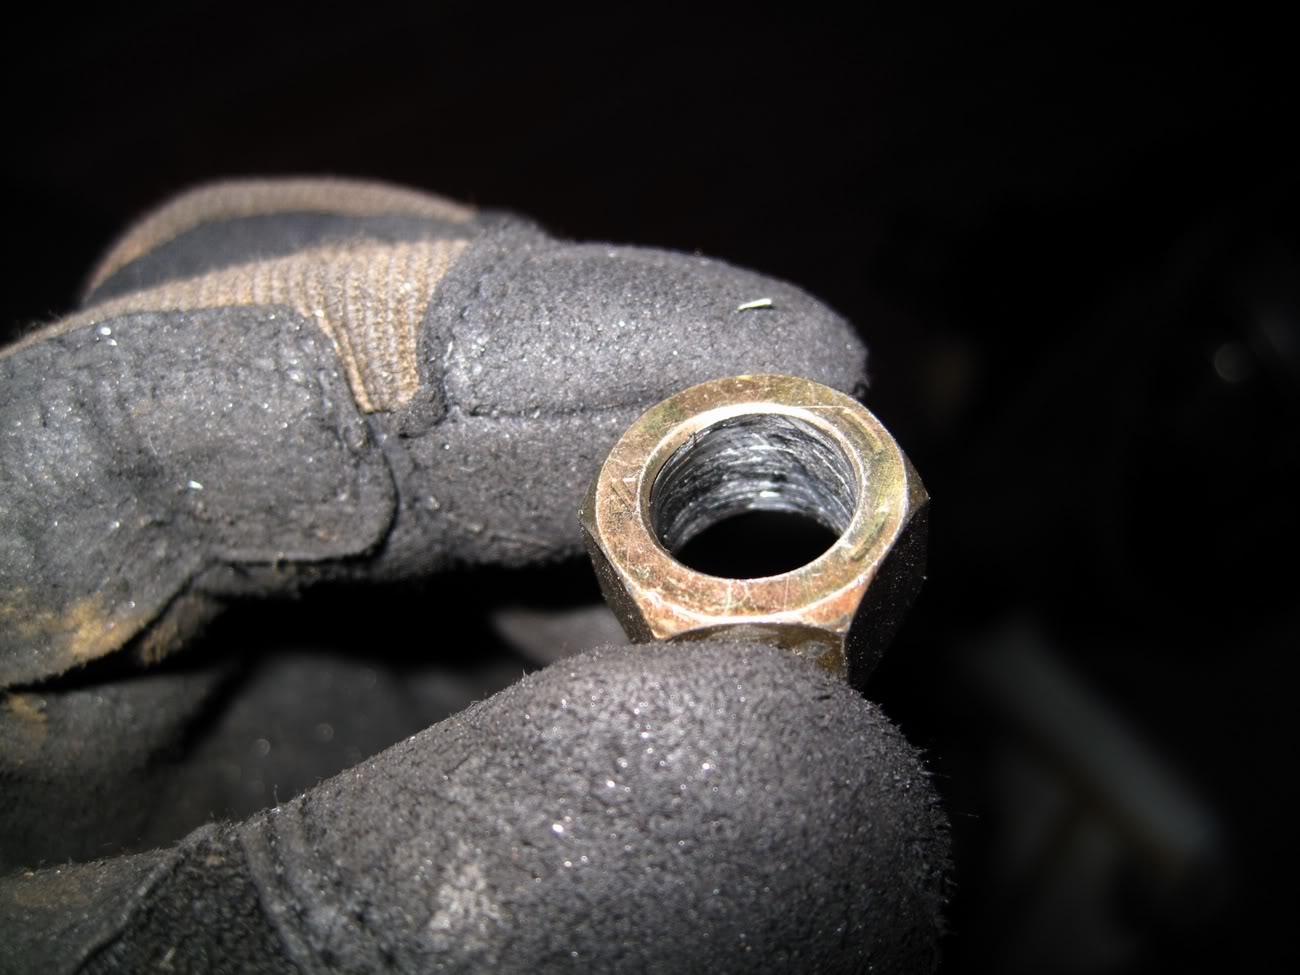
- Axle flange, 1/2x20x1"
Capacity:
- 14b, 2.5 quarts
- 10b, 2.5 quarts
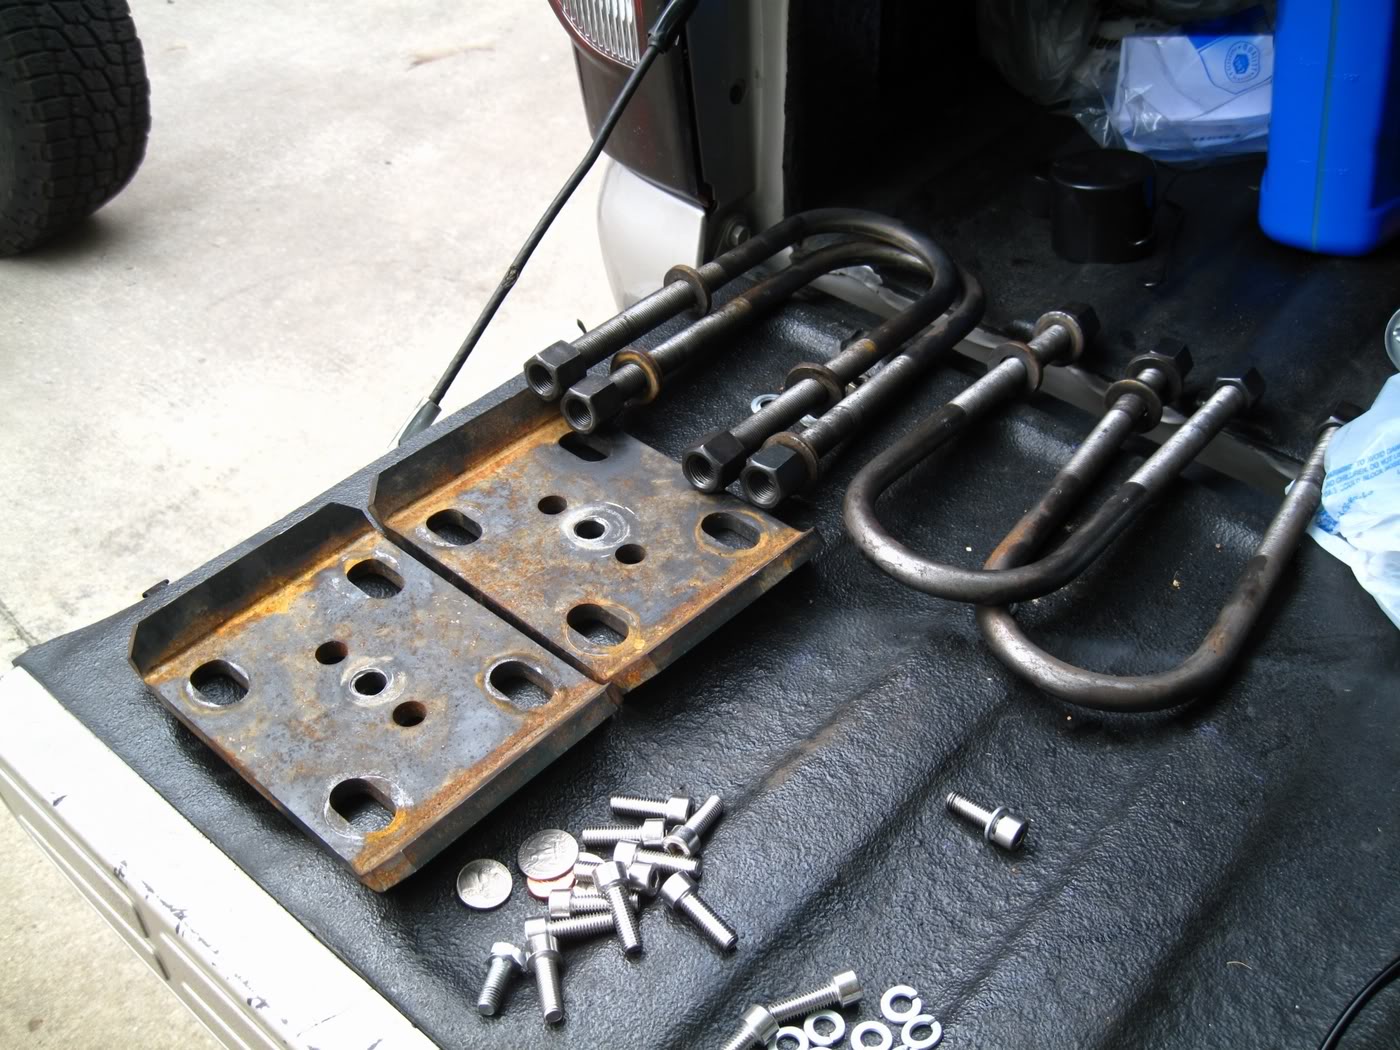
In anticipation of the swap, I ordered the "simple swap kit" from ruff stuff specialties. This included some monster grade 8 5/8" ubolts, 3/8" mouting plate for, 3/8" spring perches, and shock mounts. The only thing I didnt use was the shock mounts.
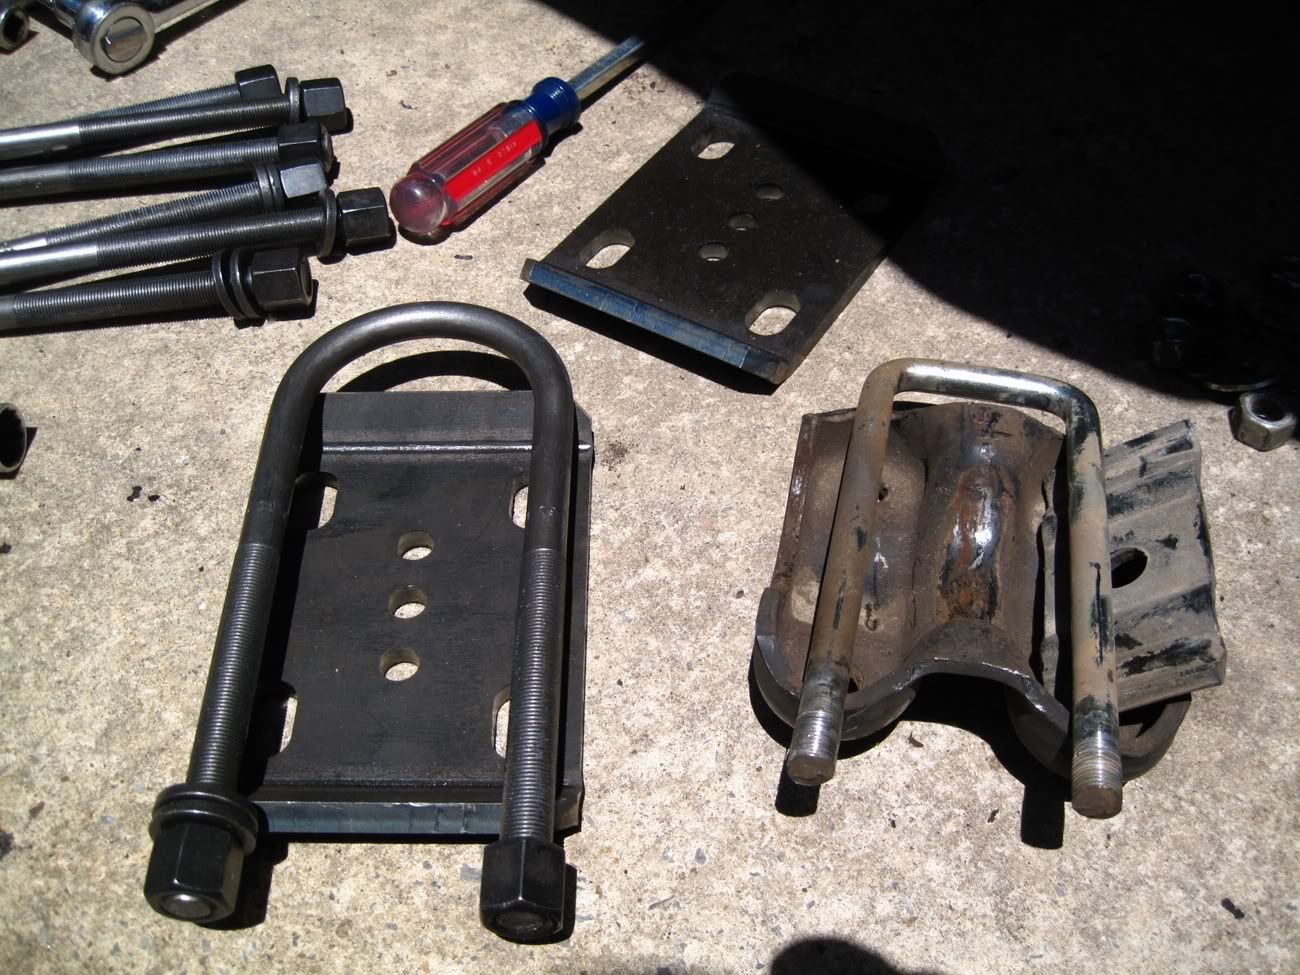
New stuff on left (perches were already welded), and the stock stuff on right.
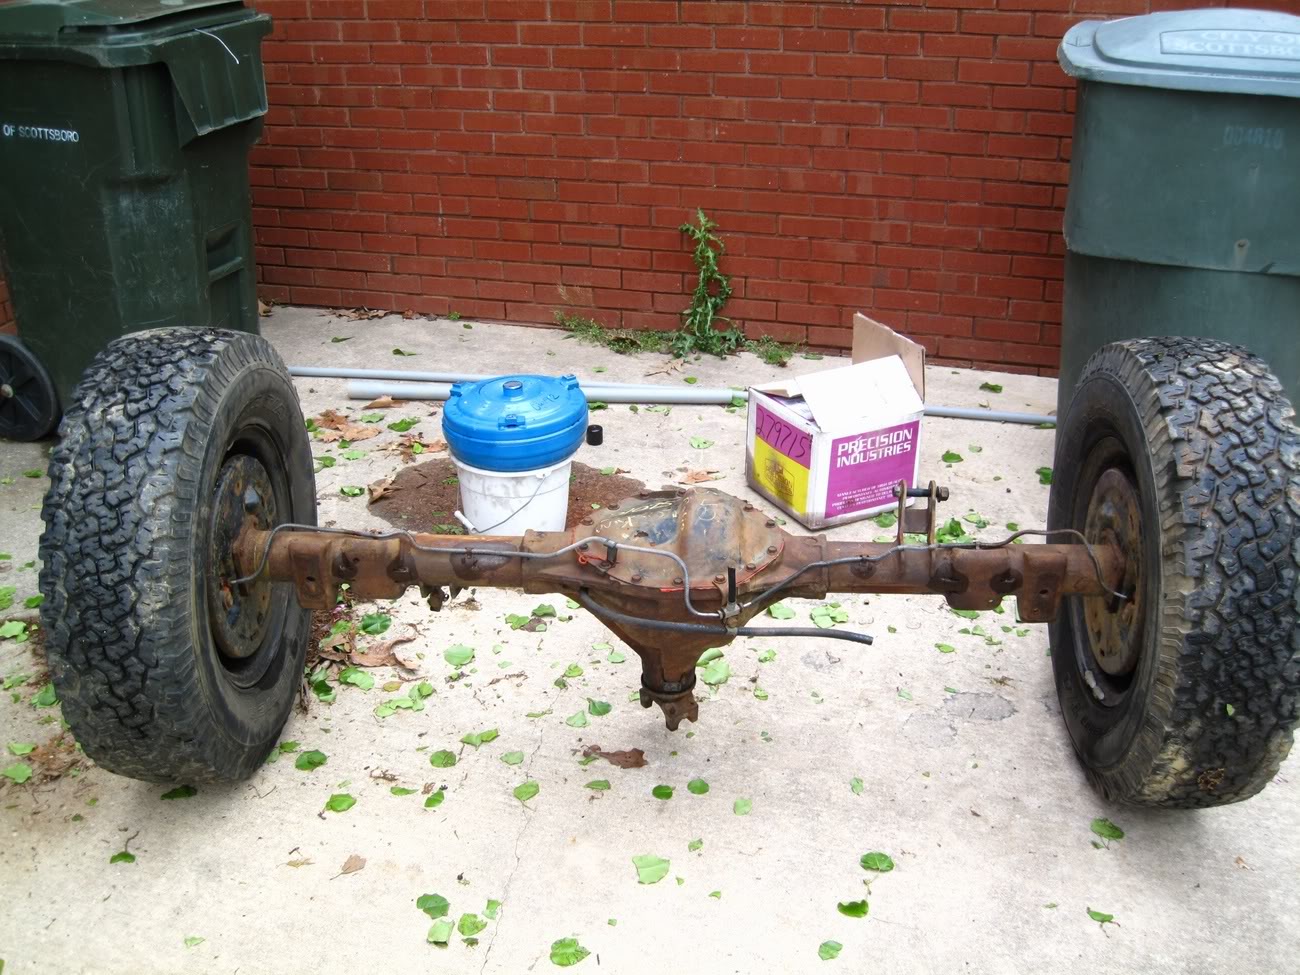
I drove 100 miles back in April to a salvage yard that had a 92 14bolt 6 lug axle from a 2500 truck, and bought it for $400. It had 2 tires on it already (one flat) and I realized it would be much easier to work with if it had tires, so I bought them for $20 each. I took it home and let it sit until I was done with finals (good thing too considering this build has taken me twice as long as expected).
As she sat until after finals,
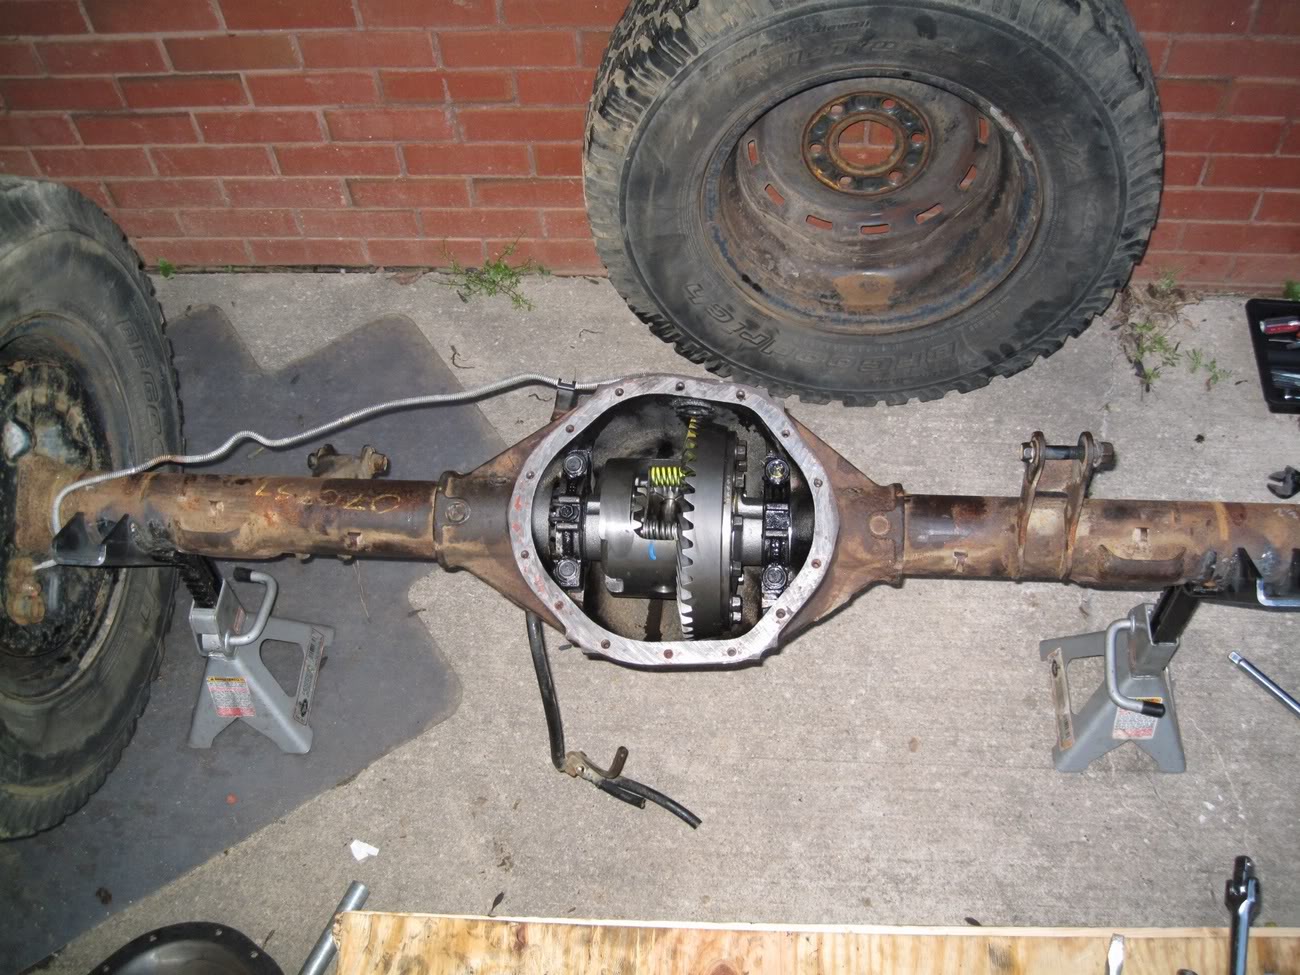
Once I got home from school, I took the axle to be rebuilt, regeared, and new ring and pinion set up. I did a full yukon rebuild, 4.56 yukon gears, and was SUPPOSE to be an eaton true-trac magically turned into an eaton LSD, which is still a good piece of hardware, but I found out about this the hard way. I had the old perches removed and the new ones welded on with the proper width at this time as well.
The next day I spent grinding away the years of crap built up to the outside using a wire brush attachment to my die grinder. This took a good while and I got pretty disgusting in the process. I highly recommend gloves and face protection is a must since there are metal shards being thrown about. I cant count how many times I heard dings on my face shield.
After grinding, I left the left side of the diff as a before to see the difference,
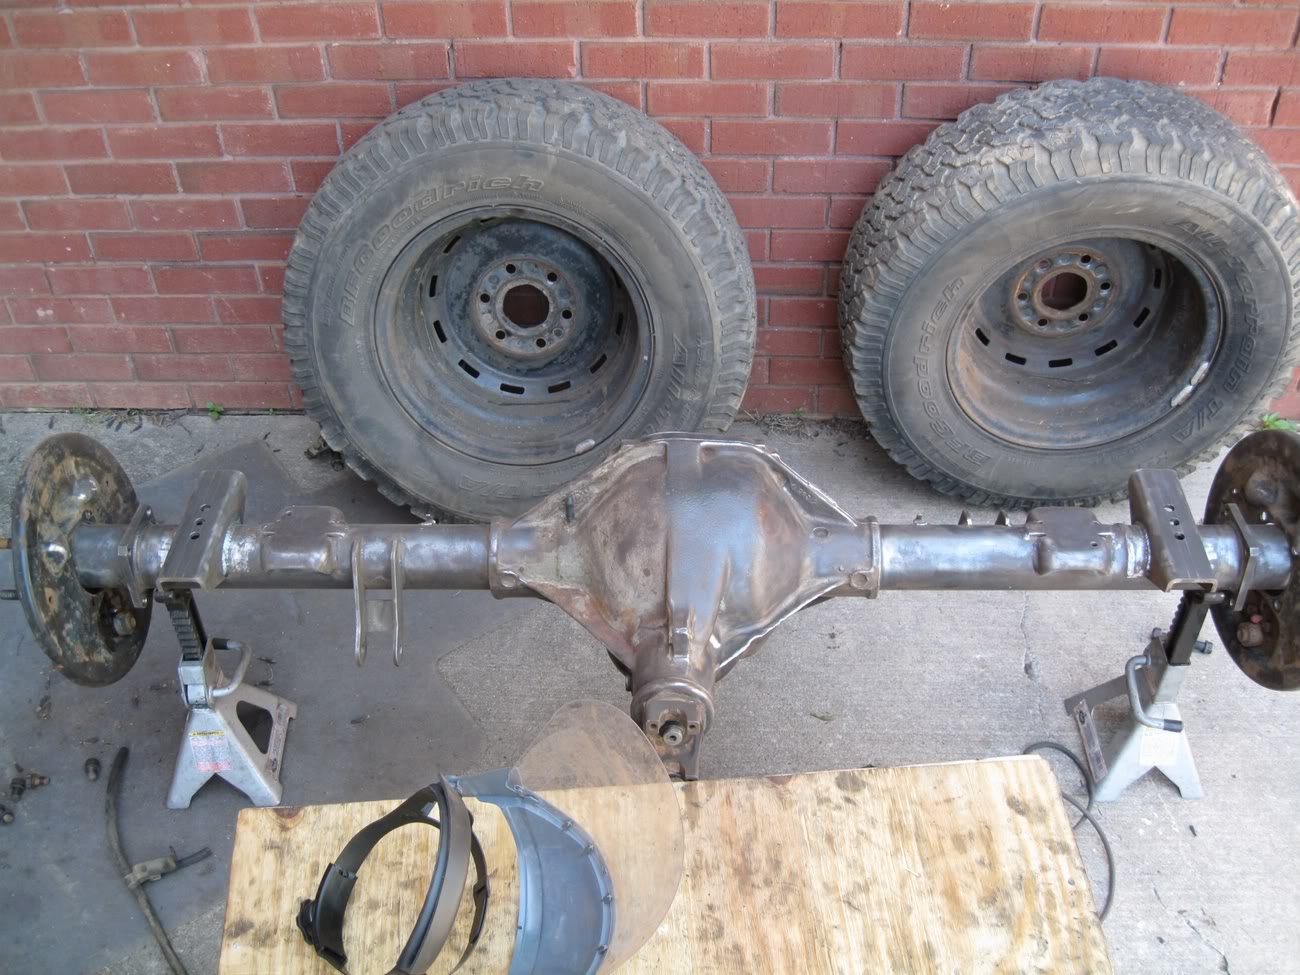
Next I hosed it down with brake cleaner and scrubed it with a shop cloth to get all the loose dirt off of it. Next I attached one wheel so I could stand it upright (easiest way to paint it) and sprayed 2 coats of rustoleam metal primer,
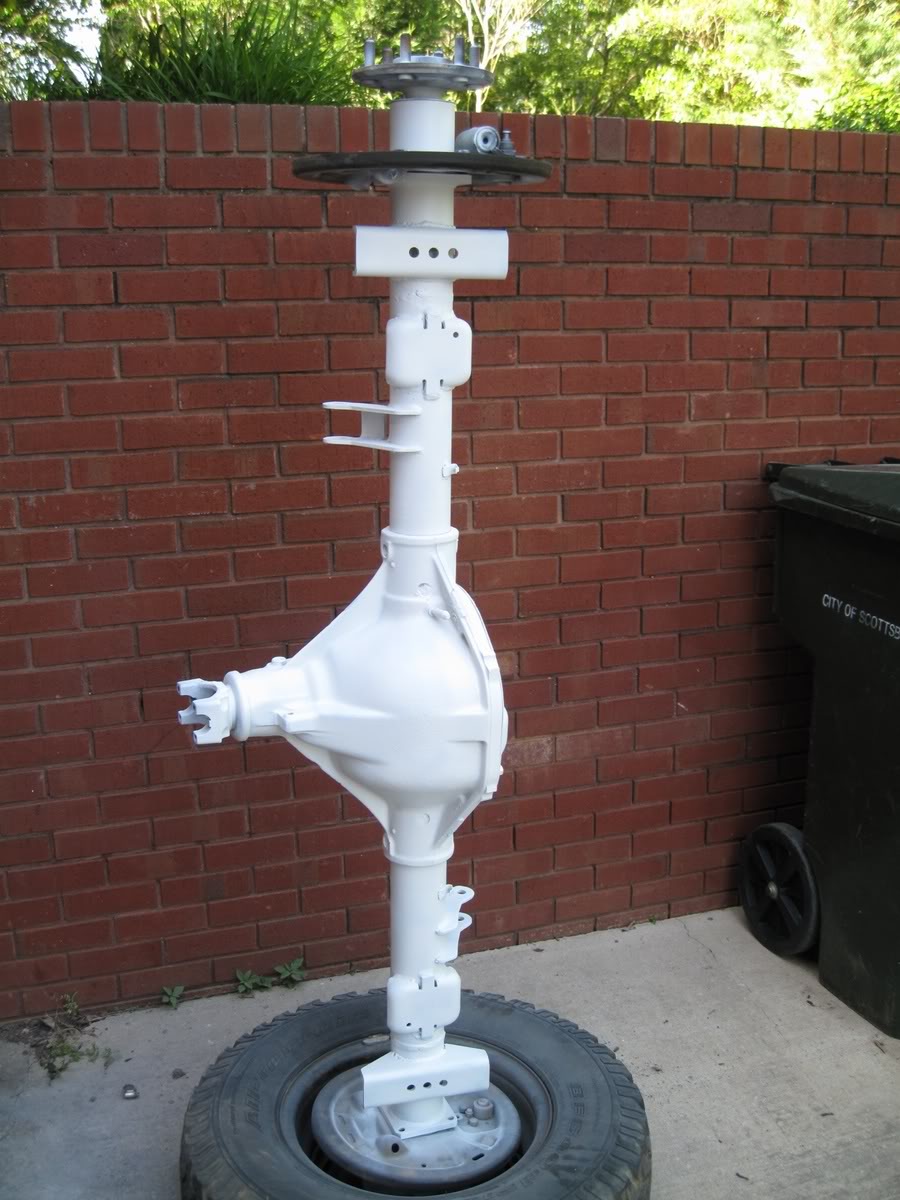
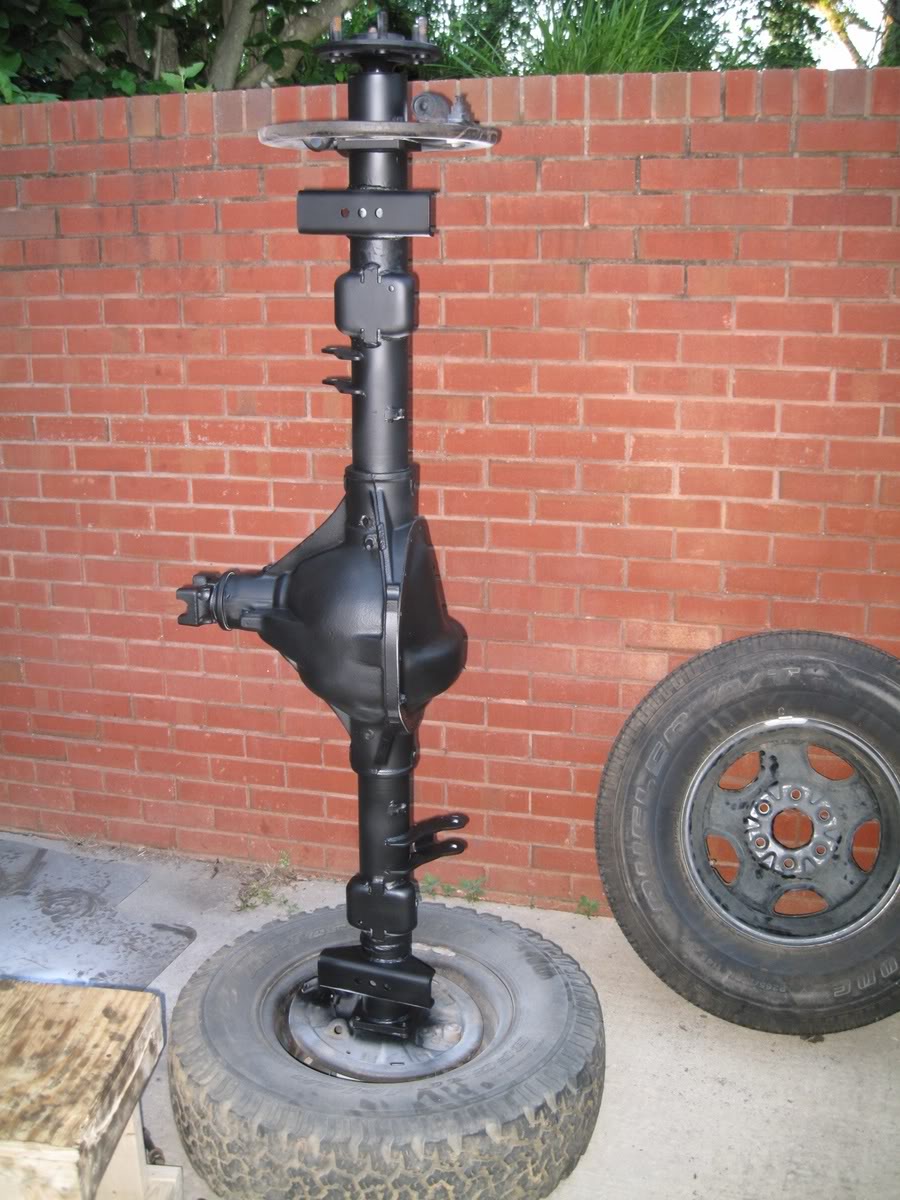
After that dried I sprayed 2 coats of rustoleam metal flat black. I knew it was going to get dinged up, but this help set a good base and got 90% of the paint work done.
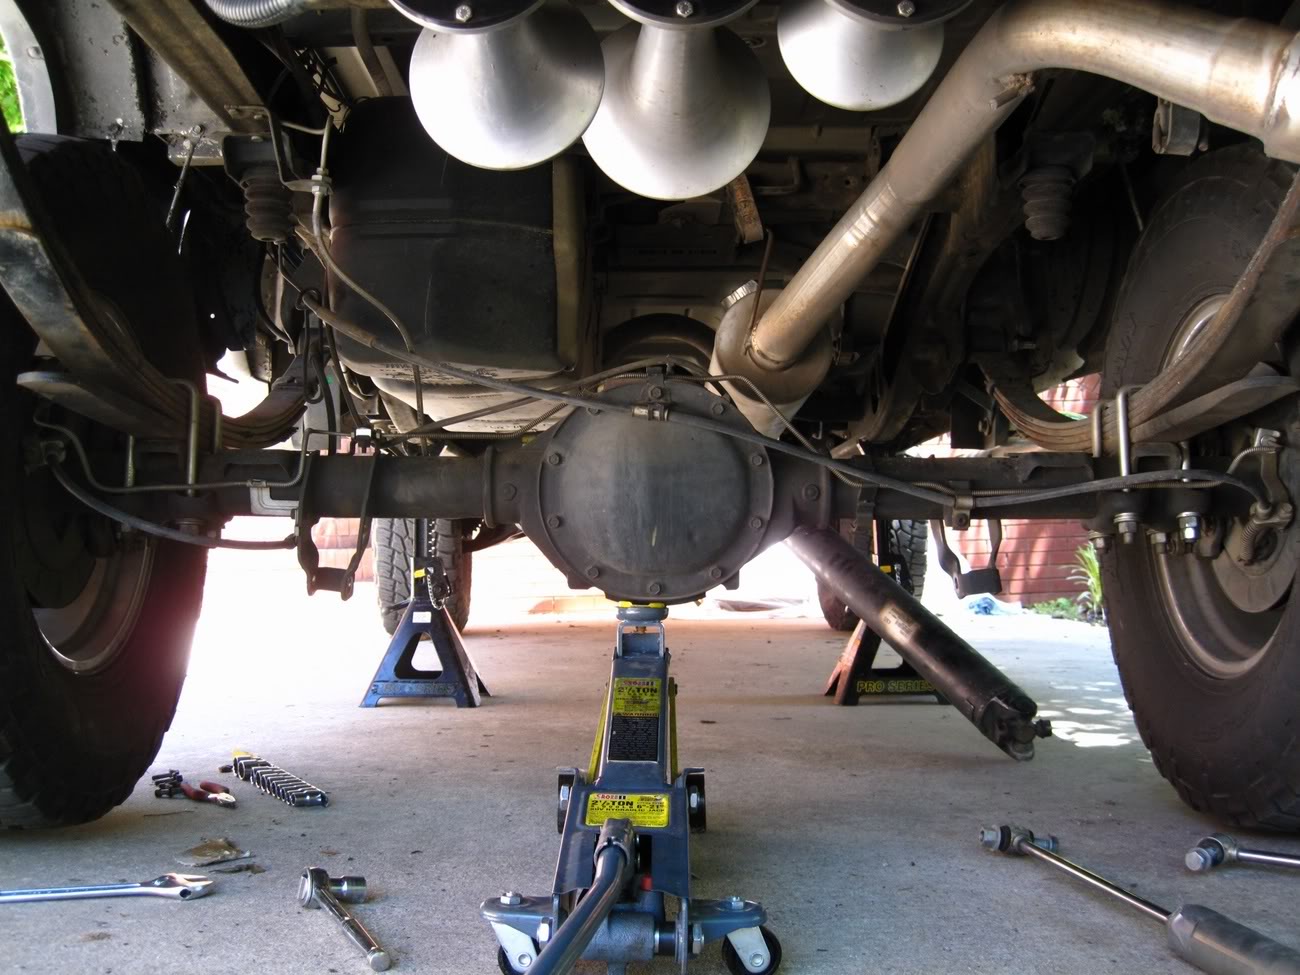
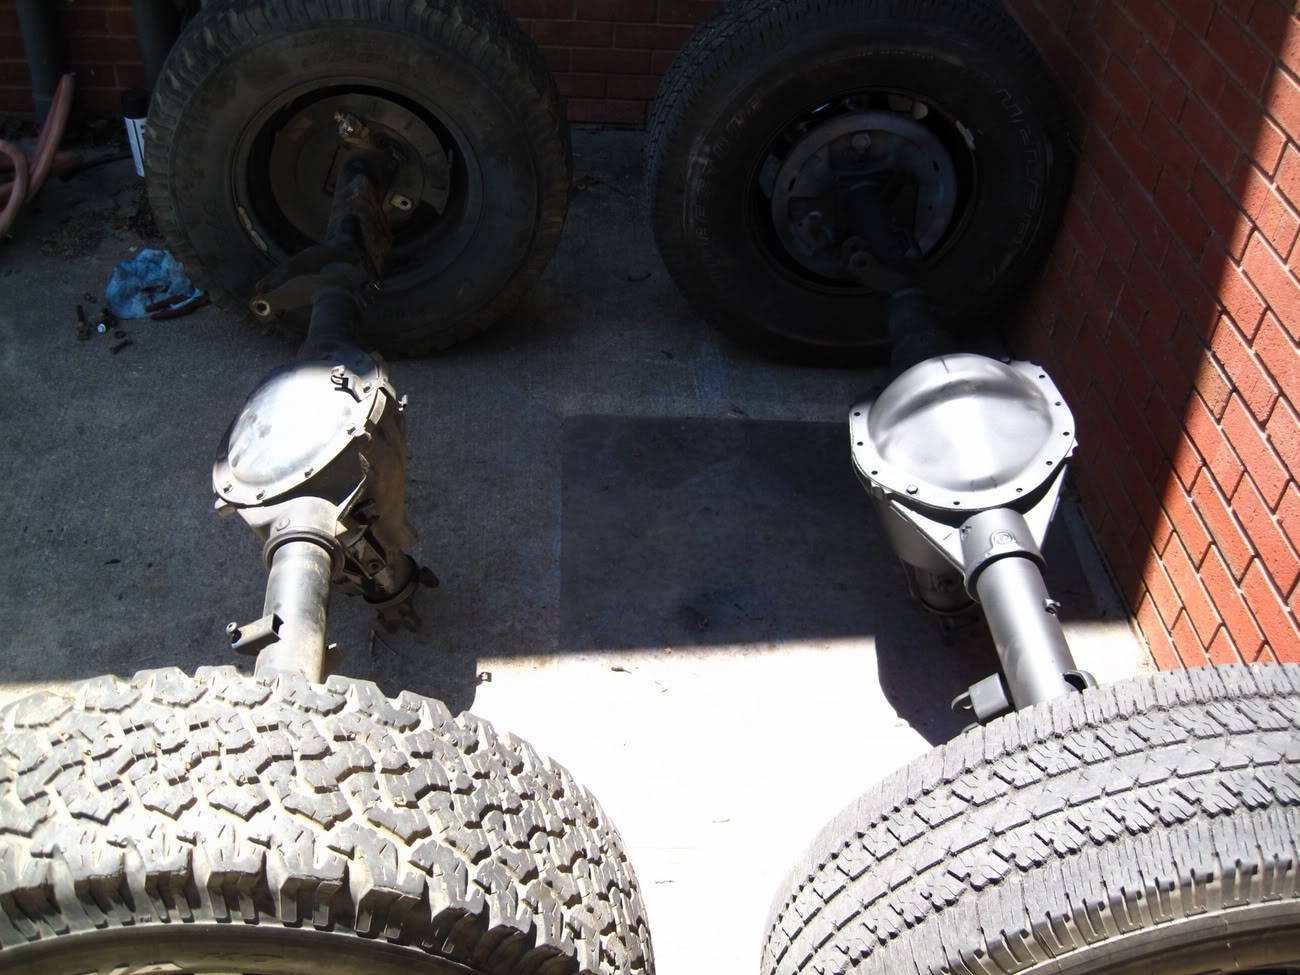
The next day I removed my 10b, taking plenty of before pictures so I could remember how all the lines went,
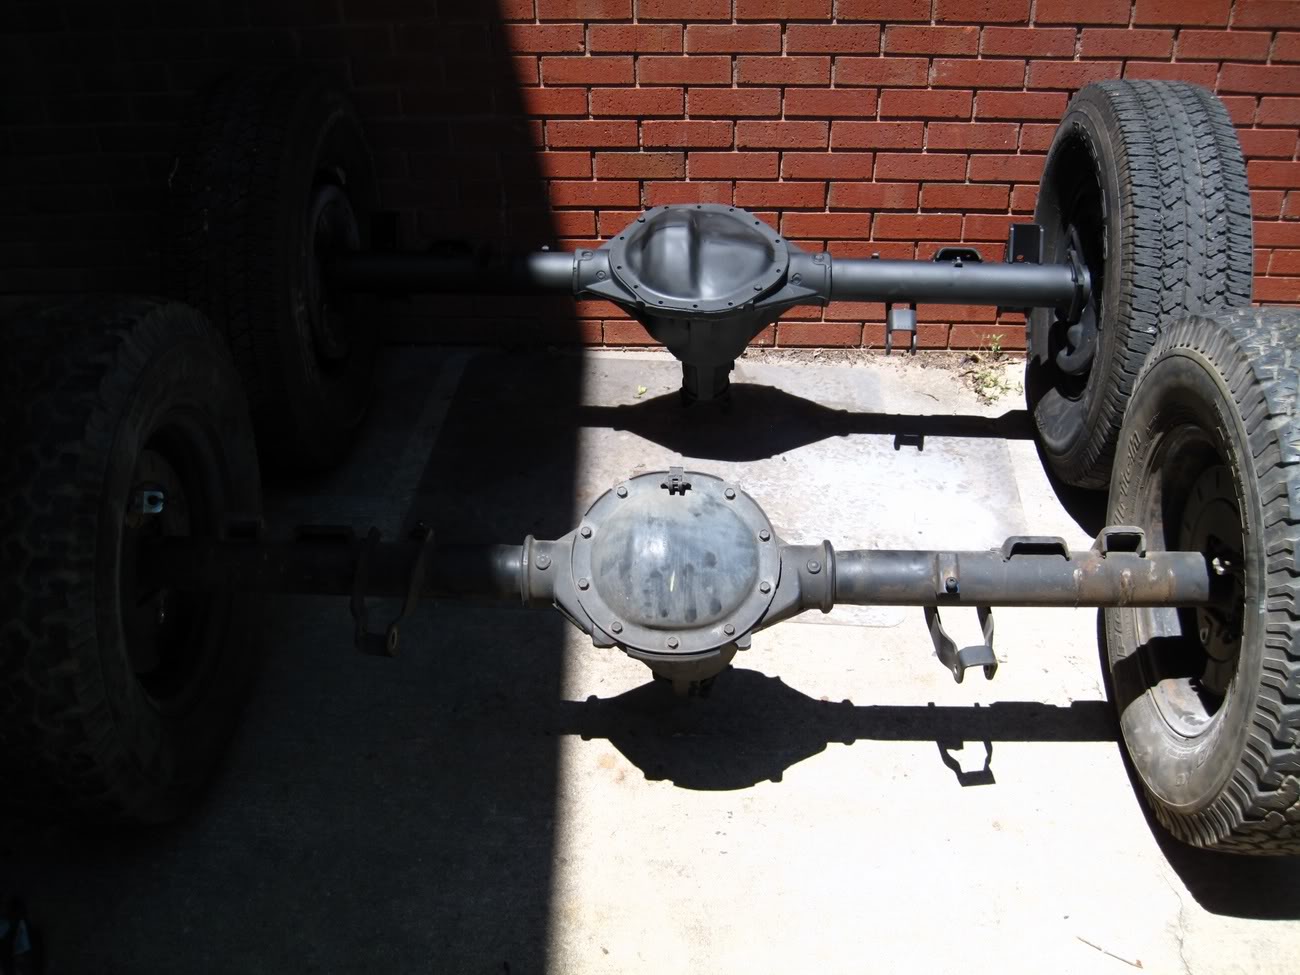
Rolled up next to the 14b,
My plan was to use the disc brakes off of the 10b on the 14b, so this meant I had to get the backing plate off of the 10b. The only way to do that is to pull the shaft, yay. Good practice for the 30 times I ended up doing it on the 14b.
Once I got it off, I had to figure out how much I was going to have to space it. Measurements put it right at 2.5", which turns out to be about perfect. I used long grade 8 bolts, nuts , and washers as spacers so I could figure out the correct distance. I had to drill out the inside of the nuts so they would fit over the unthreaded part of the bolt. Cobalt drill bits are exceptional at this, and there is no way I could have drilled all 40 (yes, four-tea) of the nuts without one. I also had to grind some of the washers off so they wouldnt hit the tube. After I did all that,
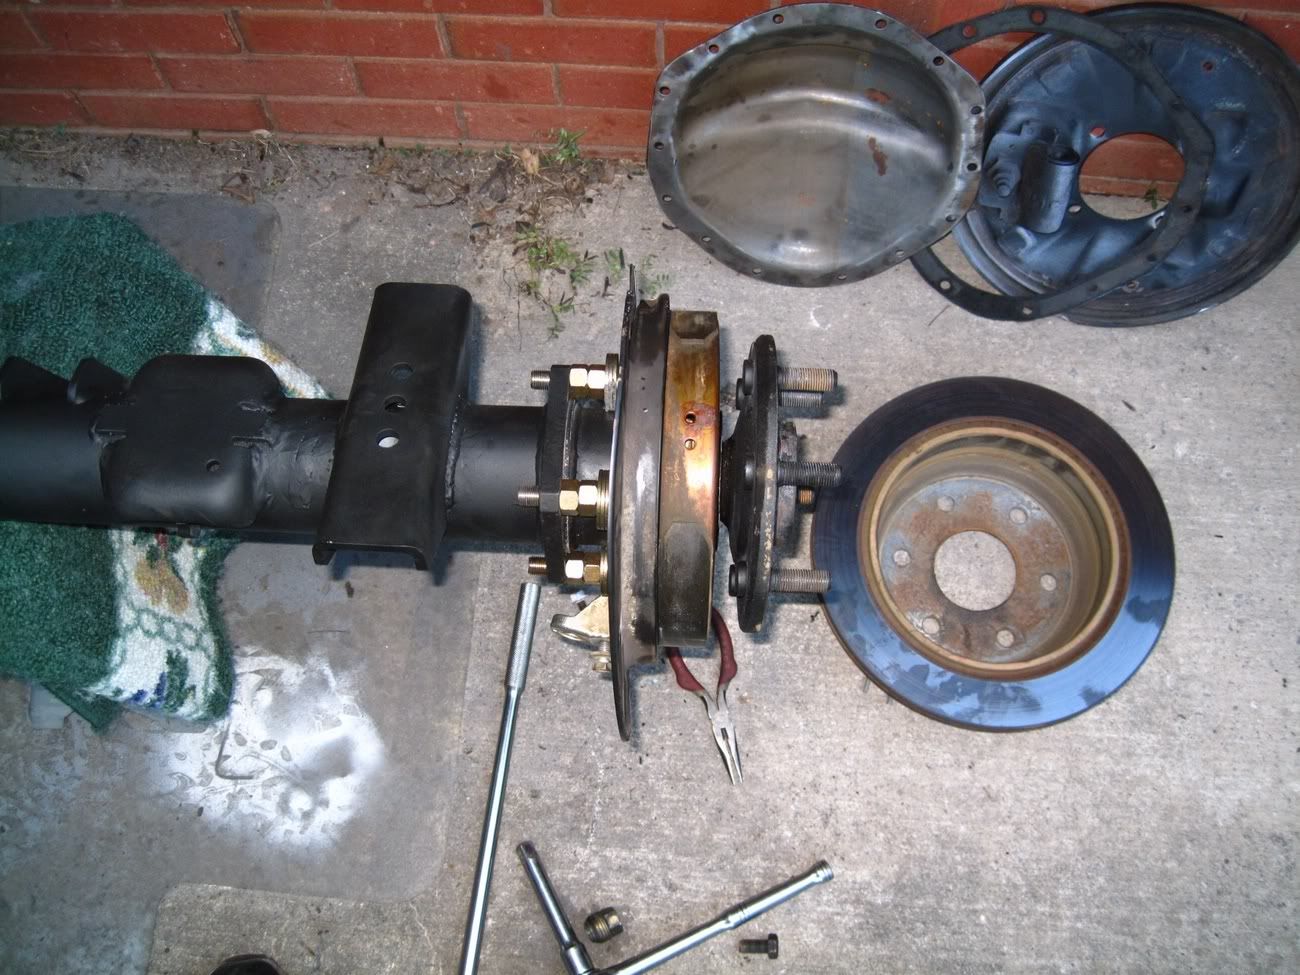
Drilling,
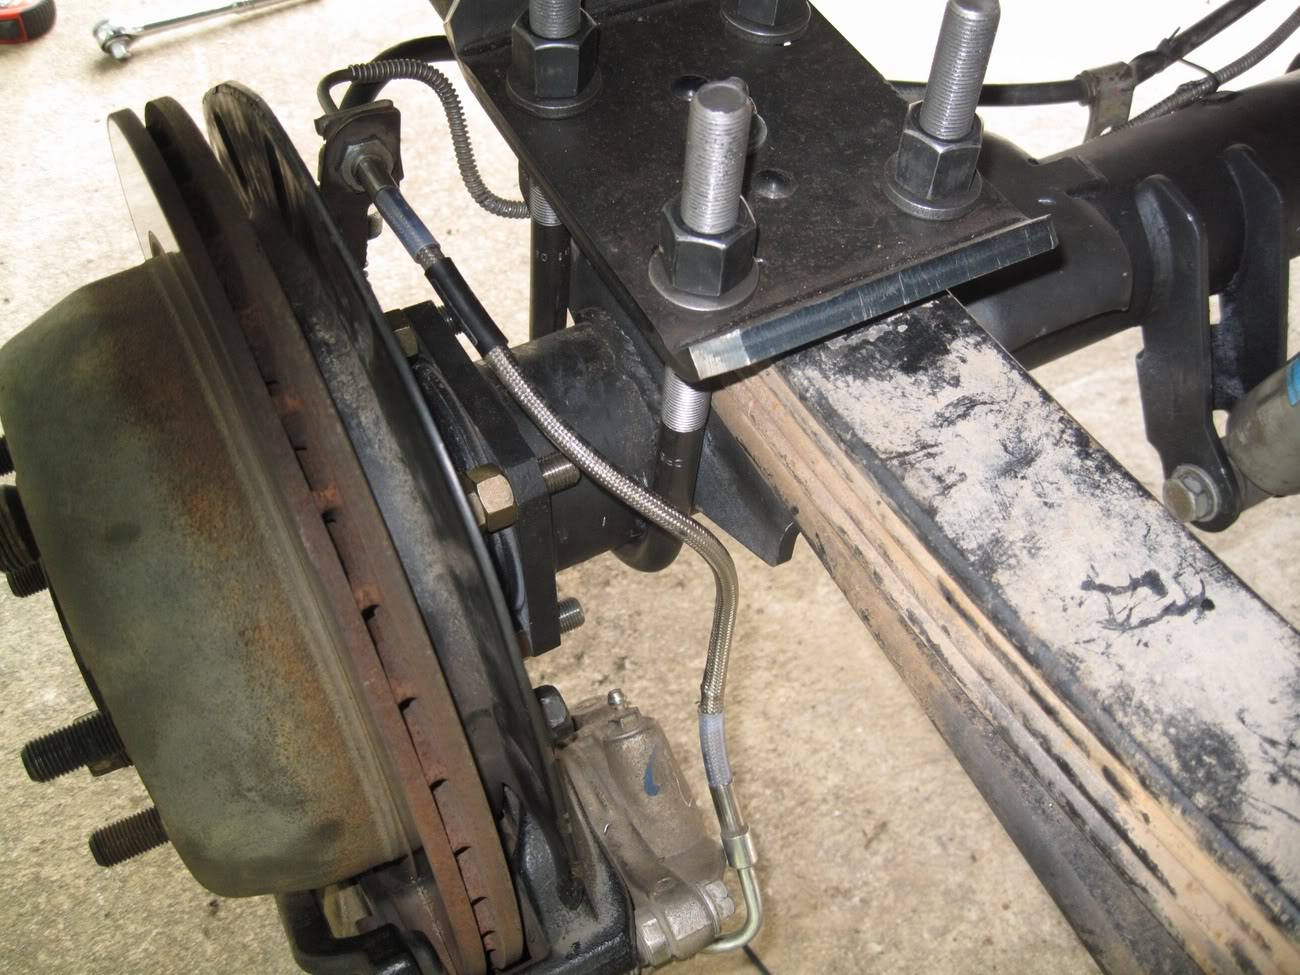
I have superlift 5" lift springs, and the spring bolt that is in the center and holds the leafs together is not very long, especially not long enough to go through my new mounting 3/8" mounting plate. I got 2, 3/8" allen head bolts about 3.5" long to use. I had to grind a small amount off of the head so they would fit into the perch holes, which is a tiny amount smaller than a 1/2" head on the bolt, and it was much easier to grind the heads, than try to drill a perch with a spring hanging 6" above it. Using 2 big C-clamps to hold the spring pack together makes switching out the bolt very easy.
The next issue, and the smallest I ran into was the axle breather hose. The 10b uses a 1/4" ID hose, and the 14b uses a 3/8" ID hose. There are several ways you can handle this, but I just got about 7' (right around the exact amount you will need), of heater hose from orileys which costs about $5. I ran it from the axle following the stock hose, up to near the gas filler hole. The end is covered with a cap to keep splashes and stuff from going down the hole, so what I did is cut the first 6" of the 10b hose off and slid it inside the 3/8" hose and taped around it to make a seal. The 1/4" hose already has a mount to hold it up there, and I found this solution simple and effective. Airflow isnt a problem since I could blow throw it easily, even though one end was 1/4". (no pic for this)
Most people say to use a 447 u joint. The precision 447 (or neapco 2-1153) is for a SS4 to 1350. All 14bolts are 1350 as far as I know, but it seems the the half tons have a whole range of sizes. Mine was a 1330 so the 447 ujoint didnt work. The aluminum driveshaft is a 1330 with small caps. The 1310 and 1330 have the same cap width, but different overall lengths, so if no one has the correct conversion joint (only one I can find is Strange Engineering #873-U1647), you can bastardized a 1350 and 1310 u joint to get a 1330 size that will work.
Along the same lines, my 14b didnt come with the U-joint straps. Apparently nobody makes ones that fit perfect except the dealer, and they charge like $20 for them. I picked up some at orileys (part # precision 360-10) for $6. The problem is the 10b straps are too long since the 1350 yolk is shorter and wider. The new straps were not an exact fit (millimeters too short), so I gave them a few love taps with the hammer and drilled slightly bigger holes, and perfect fit after that,
I plan to have a 1350 put on my driveshaft and have it high speed balanced.
NEW
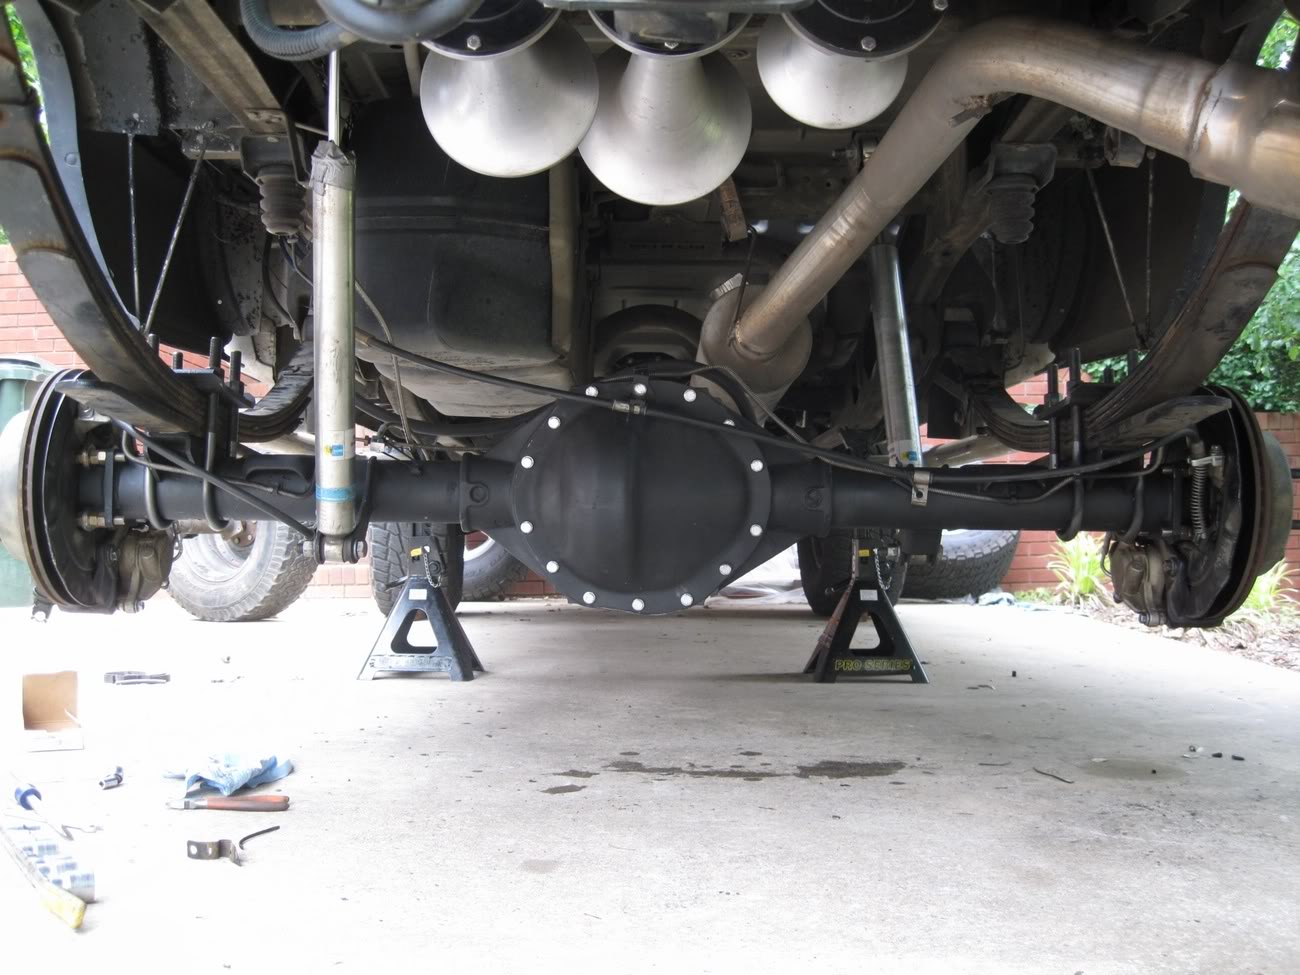
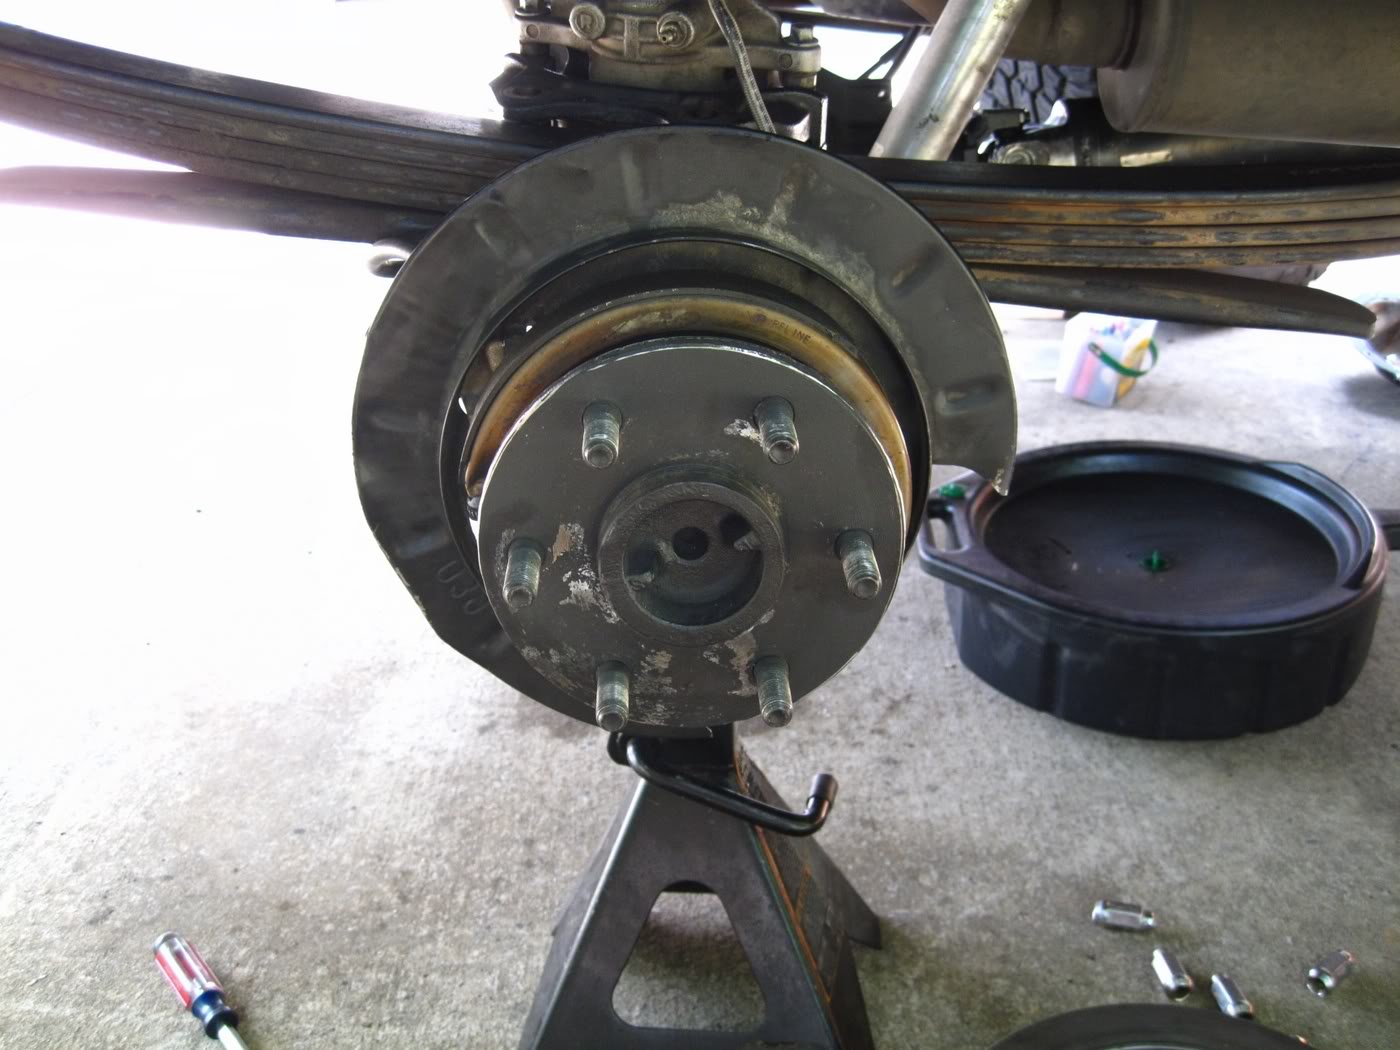
The 14b axle flanges need to be ground down to work with 10b rotors. I got lucky and drove for 3 months before I discovered this. I spent about 20 minutes on each flange working around the edge with a grinder to take some off so the rotors will fit. This is very important, because if the rotor does not sit flush, your wheel will sit crooked and this will happen. Link
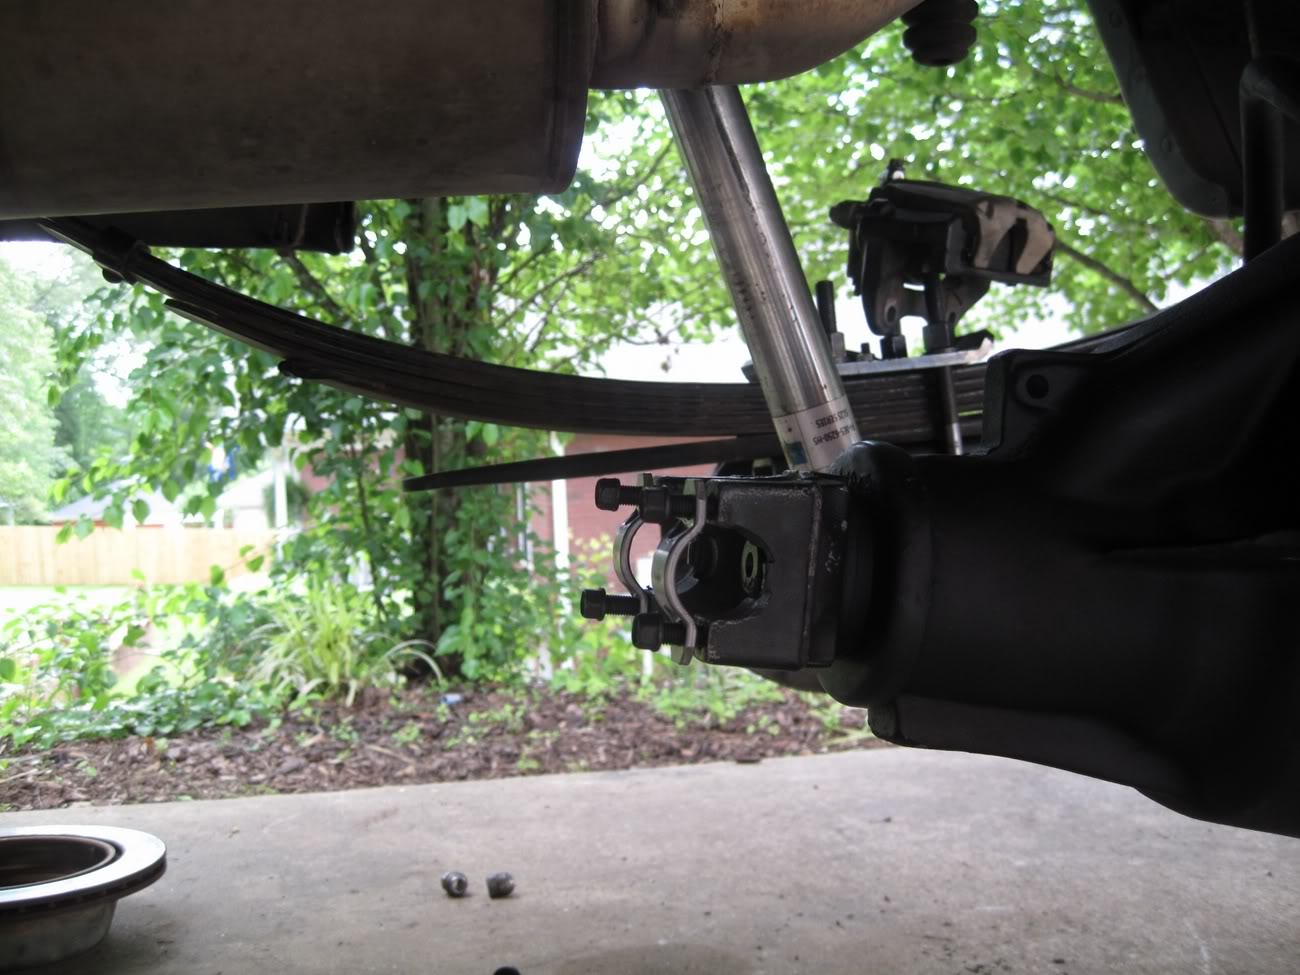
The flange for the 10b sits at a 45 degree angle relative to the axle, and the 14b flange sits level with it. So this means your calipers are either going to be on the bottom of the rotor, or your lines are going to be hanging below your axle if you are reusing the stock hardlines and ebrake lines like I am. I choose the former so that is why my calipers are so low (so the hoses wouldnt be exposed).
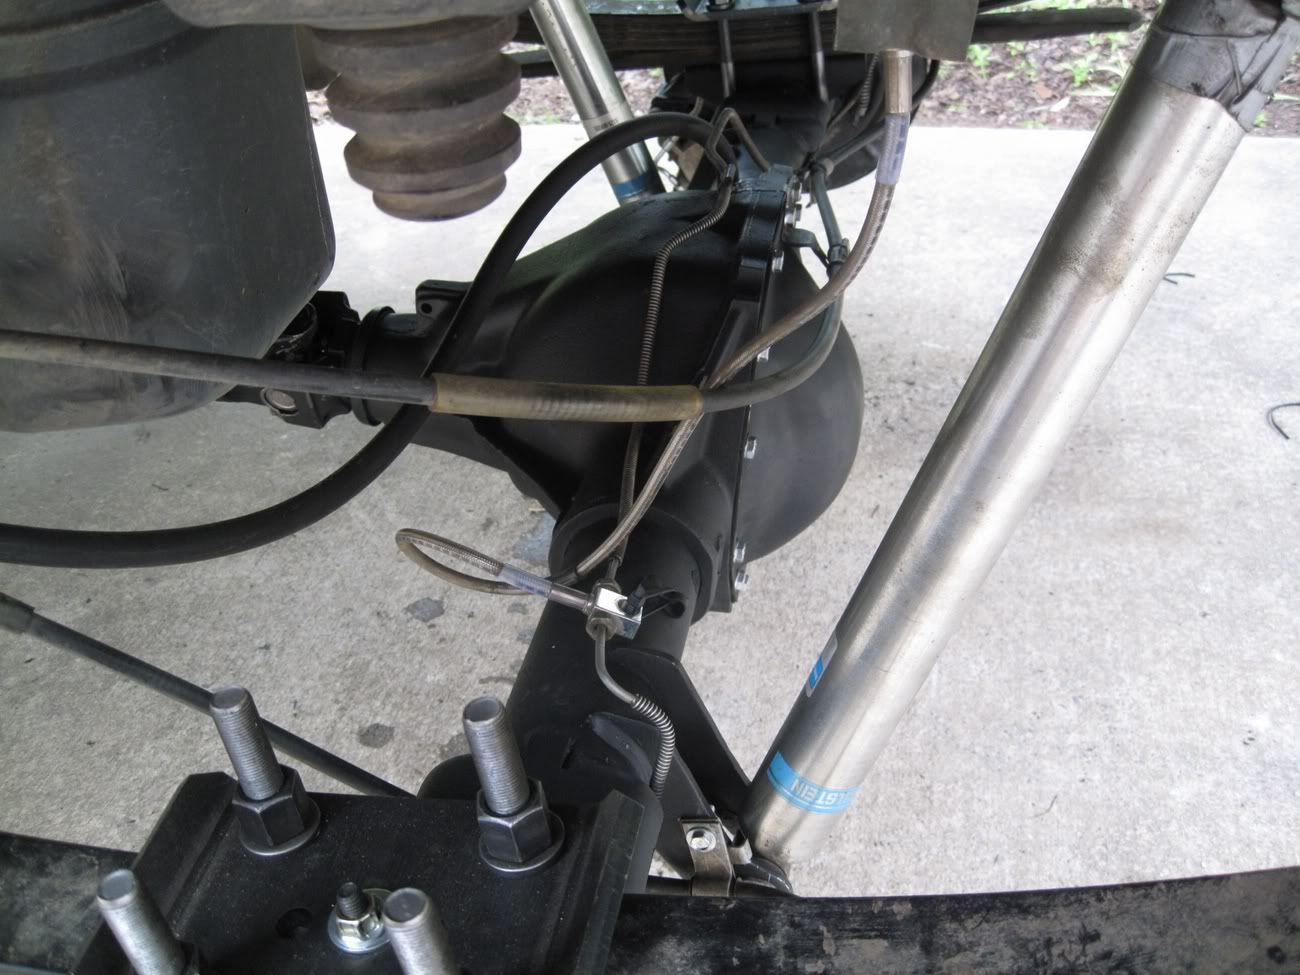
You may need to remeasure for shocks since the mounts are straight instead of inboarded and slightly closer. After you bolt everything back up and add fluid you are done!
Wheel Mounting Surface (WMS)
- 4wd (OBS) 14 bolt, 67.5"
- 2wd (OBS) 14 bolt, 64.5"
- 4wd and 2wd? (NBS)10b, 68.5"
Spring perch width:
- NBS, ~49" center to center
- OBS 14b, ~47" center to center
Shock mount width:
- NBS 10b, ~28"
- Close to the same on OBS 14bolt, ~28"?
Yoke:
- 14 bolt yoke, 1350
- 10 bolt yoke, R3 SS4
U-Joint:
- If your driveshaft is a 1330 (I have the big aluminum one which is a 1330 with the 1.0625" caps), then you need a 1330 to 1350 conversion U-joint which I could only find on Jegs
- If your driveshaft is a 1310, you need the 348 conversion U-joint (1310 to 1350)
- If your driveshaft is an R3 SS4, you need the 447 U-Joint (ss4 to 1350)
- For most people, im guessing the ones with the two piece steel driveshafts, you need the 447.
Breather Hose:
- 14b, 5/16"
- 10b, 1/4"
Bolts 14b:
- Diff cover, 8x1.25x18mm
- Axle flange, 1/2x20x1"
Capacity:
- 14b, 2.5 quarts
- 10b, 2.5 quarts
In anticipation of the swap, I ordered the "simple swap kit" from ruff stuff specialties. This included some monster grade 8 5/8" ubolts, 3/8" mouting plate for, 3/8" spring perches, and shock mounts. The only thing I didnt use was the shock mounts.
New stuff on left (perches were already welded), and the stock stuff on right.
I drove 100 miles back in April to a salvage yard that had a 92 14bolt 6 lug axle from a 2500 truck, and bought it for $400. It had 2 tires on it already (one flat) and I realized it would be much easier to work with if it had tires, so I bought them for $20 each. I took it home and let it sit until I was done with finals (good thing too considering this build has taken me twice as long as expected).
As she sat until after finals,
Once I got home from school, I took the axle to be rebuilt, regeared, and new ring and pinion set up. I did a full yukon rebuild, 4.56 yukon gears, and was SUPPOSE to be an eaton true-trac magically turned into an eaton LSD, which is still a good piece of hardware, but I found out about this the hard way. I had the old perches removed and the new ones welded on with the proper width at this time as well.
The next day I spent grinding away the years of crap built up to the outside using a wire brush attachment to my die grinder. This took a good while and I got pretty disgusting in the process. I highly recommend gloves and face protection is a must since there are metal shards being thrown about. I cant count how many times I heard dings on my face shield.
After grinding, I left the left side of the diff as a before to see the difference,
Next I hosed it down with brake cleaner and scrubed it with a shop cloth to get all the loose dirt off of it. Next I attached one wheel so I could stand it upright (easiest way to paint it) and sprayed 2 coats of rustoleam metal primer,
After that dried I sprayed 2 coats of rustoleam metal flat black. I knew it was going to get dinged up, but this help set a good base and got 90% of the paint work done.
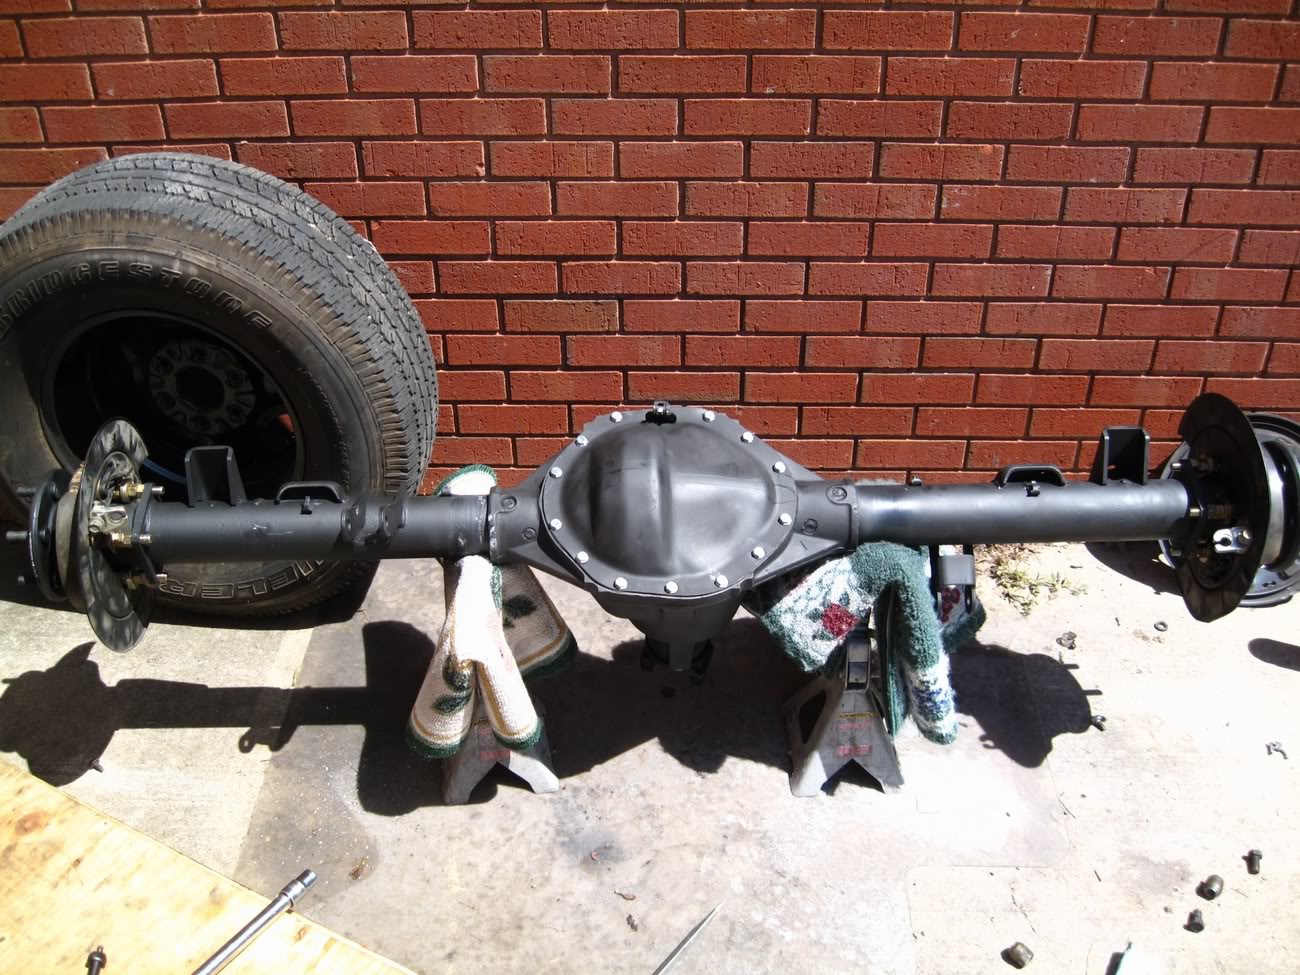
The next day I removed my 10b, taking plenty of before pictures so I could remember how all the lines went,
Rolled up next to the 14b,
My plan was to use the disc brakes off of the 10b on the 14b, so this meant I had to get the backing plate off of the 10b. The only way to do that is to pull the shaft, yay. Good practice for the 30 times I ended up doing it on the 14b.
Once I got it off, I had to figure out how much I was going to have to space it. Measurements put it right at 2.5", which turns out to be about perfect. I used long grade 8 bolts, nuts , and washers as spacers so I could figure out the correct distance. I had to drill out the inside of the nuts so they would fit over the unthreaded part of the bolt. Cobalt drill bits are exceptional at this, and there is no way I could have drilled all 40 (yes, four-tea) of the nuts without one. I also had to grind some of the washers off so they wouldnt hit the tube. After I did all that,
Drilling,
I have superlift 5" lift springs, and the spring bolt that is in the center and holds the leafs together is not very long, especially not long enough to go through my new mounting 3/8" mounting plate. I got 2, 3/8" allen head bolts about 3.5" long to use. I had to grind a small amount off of the head so they would fit into the perch holes, which is a tiny amount smaller than a 1/2" head on the bolt, and it was much easier to grind the heads, than try to drill a perch with a spring hanging 6" above it. Using 2 big C-clamps to hold the spring pack together makes switching out the bolt very easy.
The next issue, and the smallest I ran into was the axle breather hose. The 10b uses a 1/4" ID hose, and the 14b uses a 3/8" ID hose. There are several ways you can handle this, but I just got about 7' (right around the exact amount you will need), of heater hose from orileys which costs about $5. I ran it from the axle following the stock hose, up to near the gas filler hole. The end is covered with a cap to keep splashes and stuff from going down the hole, so what I did is cut the first 6" of the 10b hose off and slid it inside the 3/8" hose and taped around it to make a seal. The 1/4" hose already has a mount to hold it up there, and I found this solution simple and effective. Airflow isnt a problem since I could blow throw it easily, even though one end was 1/4". (no pic for this)
Most people say to use a 447 u joint. The precision 447 (or neapco 2-1153) is for a SS4 to 1350. All 14bolts are 1350 as far as I know, but it seems the the half tons have a whole range of sizes. Mine was a 1330 so the 447 ujoint didnt work. The aluminum driveshaft is a 1330 with small caps. The 1310 and 1330 have the same cap width, but different overall lengths, so if no one has the correct conversion joint (only one I can find is Strange Engineering #873-U1647), you can bastardized a 1350 and 1310 u joint to get a 1330 size that will work.
Along the same lines, my 14b didnt come with the U-joint straps. Apparently nobody makes ones that fit perfect except the dealer, and they charge like $20 for them. I picked up some at orileys (part # precision 360-10) for $6. The problem is the 10b straps are too long since the 1350 yolk is shorter and wider. The new straps were not an exact fit (millimeters too short), so I gave them a few love taps with the hammer and drilled slightly bigger holes, and perfect fit after that,
I plan to have a 1350 put on my driveshaft and have it high speed balanced.
NEW
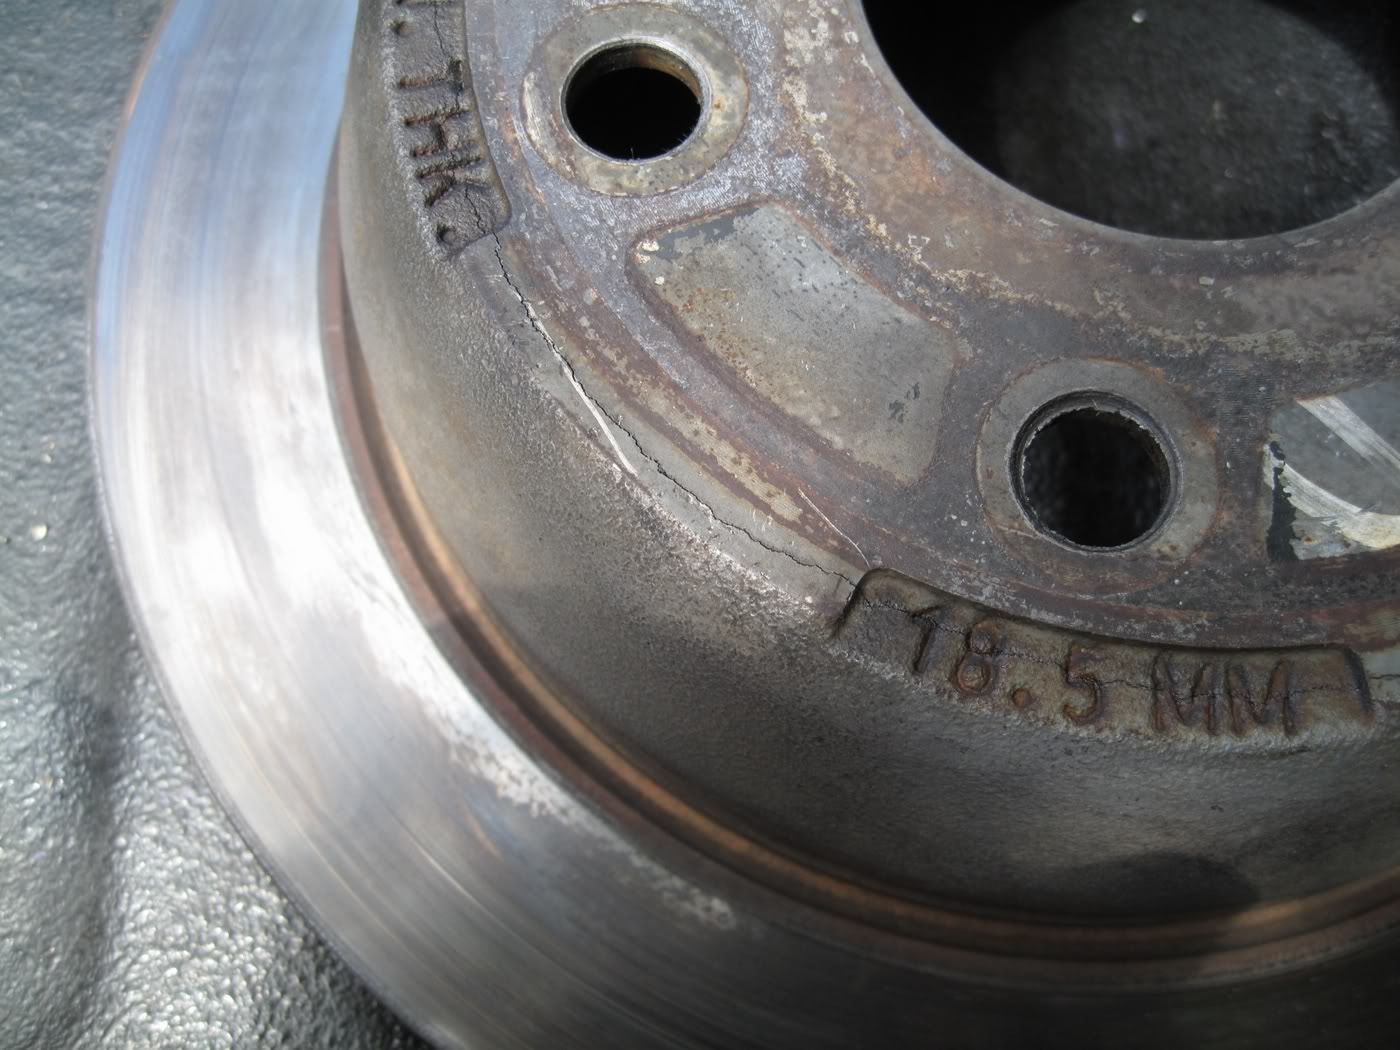
The 14b axle flanges need to be ground down to work with 10b rotors. I got lucky and drove for 3 months before I discovered this. I spent about 20 minutes on each flange working around the edge with a grinder to take some off so the rotors will fit. This is very important, because if the rotor does not sit flush, your wheel will sit crooked and this will happen. Link
The flange for the 10b sits at a 45 degree angle relative to the axle, and the 14b flange sits level with it. So this means your calipers are either going to be on the bottom of the rotor, or your lines are going to be hanging below your axle if you are reusing the stock hardlines and ebrake lines like I am. I choose the former so that is why my calipers are so low (so the hoses wouldnt be exposed).
You may need to remeasure for shocks since the mounts are straight instead of inboarded and slightly closer. After you bolt everything back up and add fluid you are done!
Last edited by 1FastBrick; Aug 15, 2014 at 09:42 PM. Reason: Correct Information Added TO WMS specs...

 May 23, 2009 | 09:19 AM
#3
Thread Starter
Joined: Jan 2006
Posts: 16,282
Likes: 438
From: Huntsville, AL
It is more work than I thought it would be, and I thought it would be plenty. Hopefully it will be worth it, and Ill have that piece of mind with not having to wonder if my 10b is going to explode.
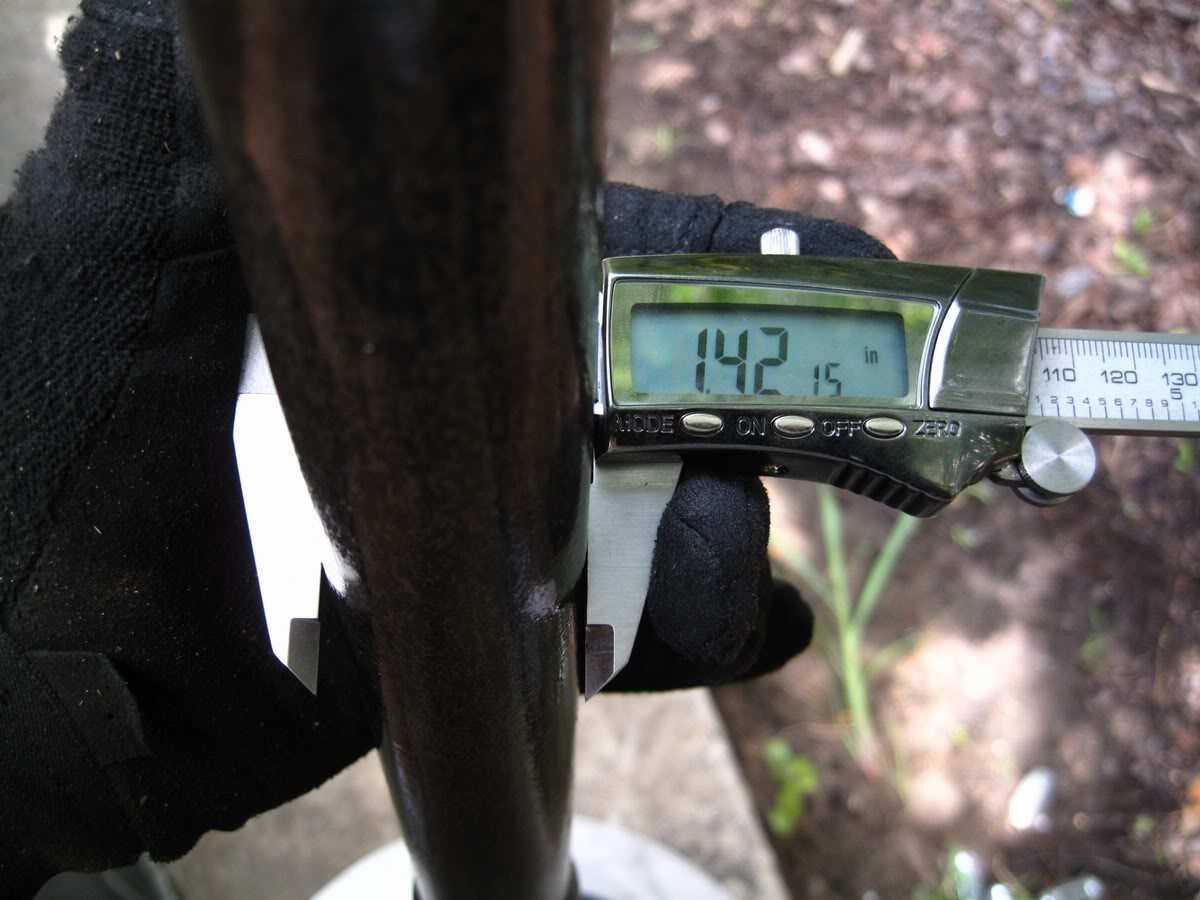
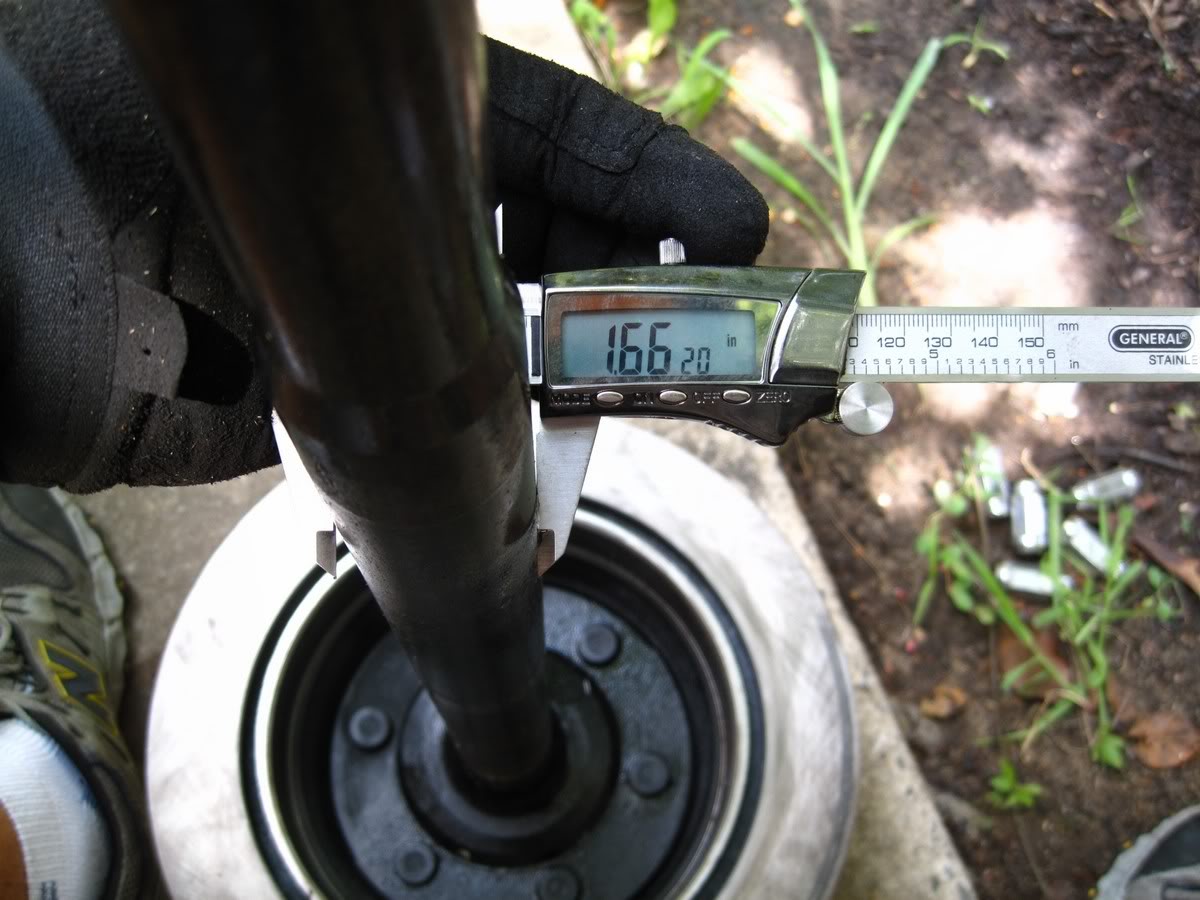
UPDATE 8/12/09
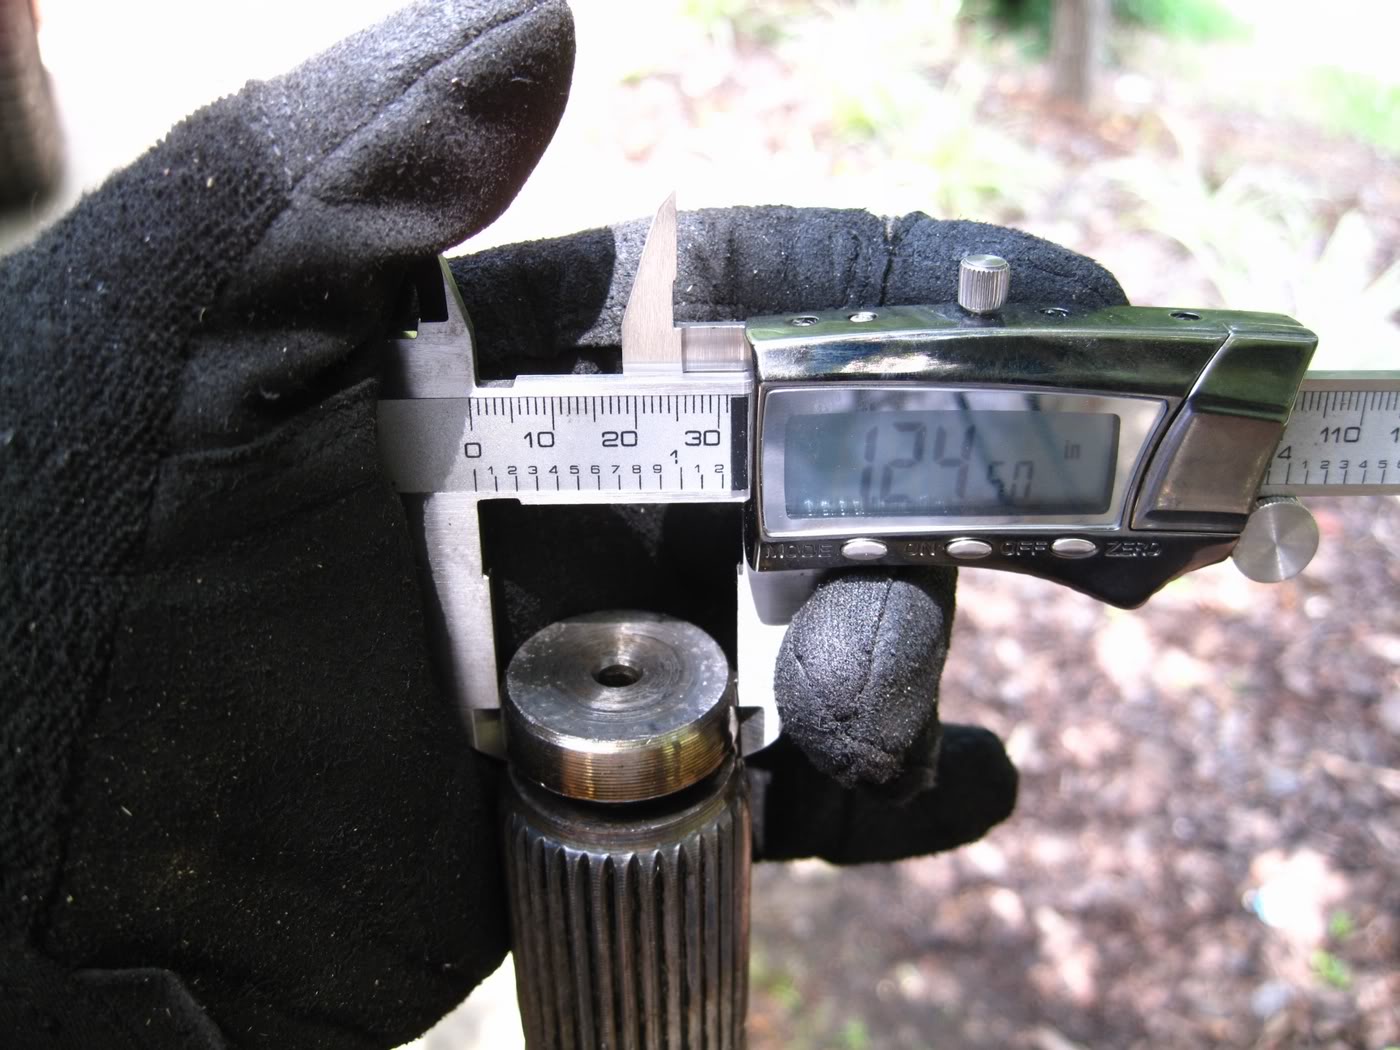
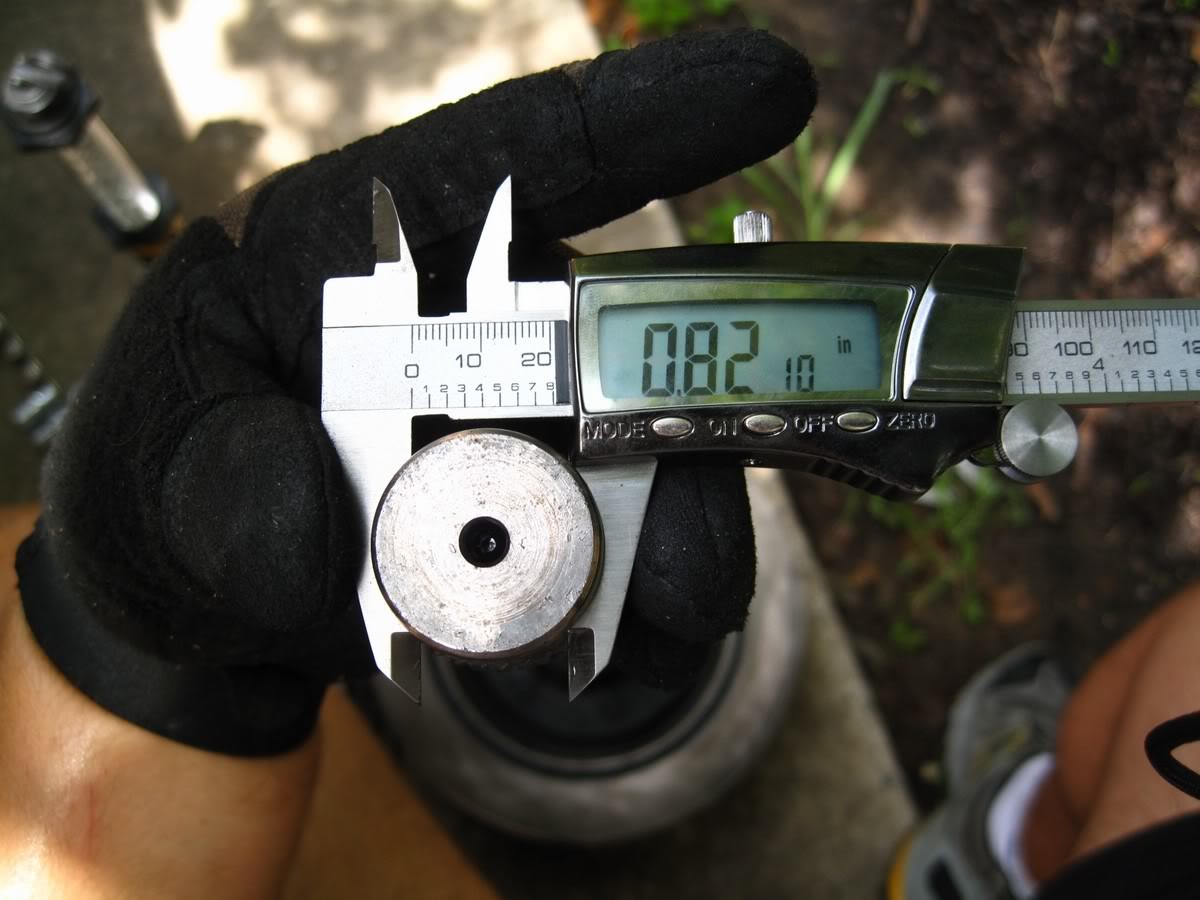
Here are some shaft measurements since I know some were interested about the size of the 14b shafts
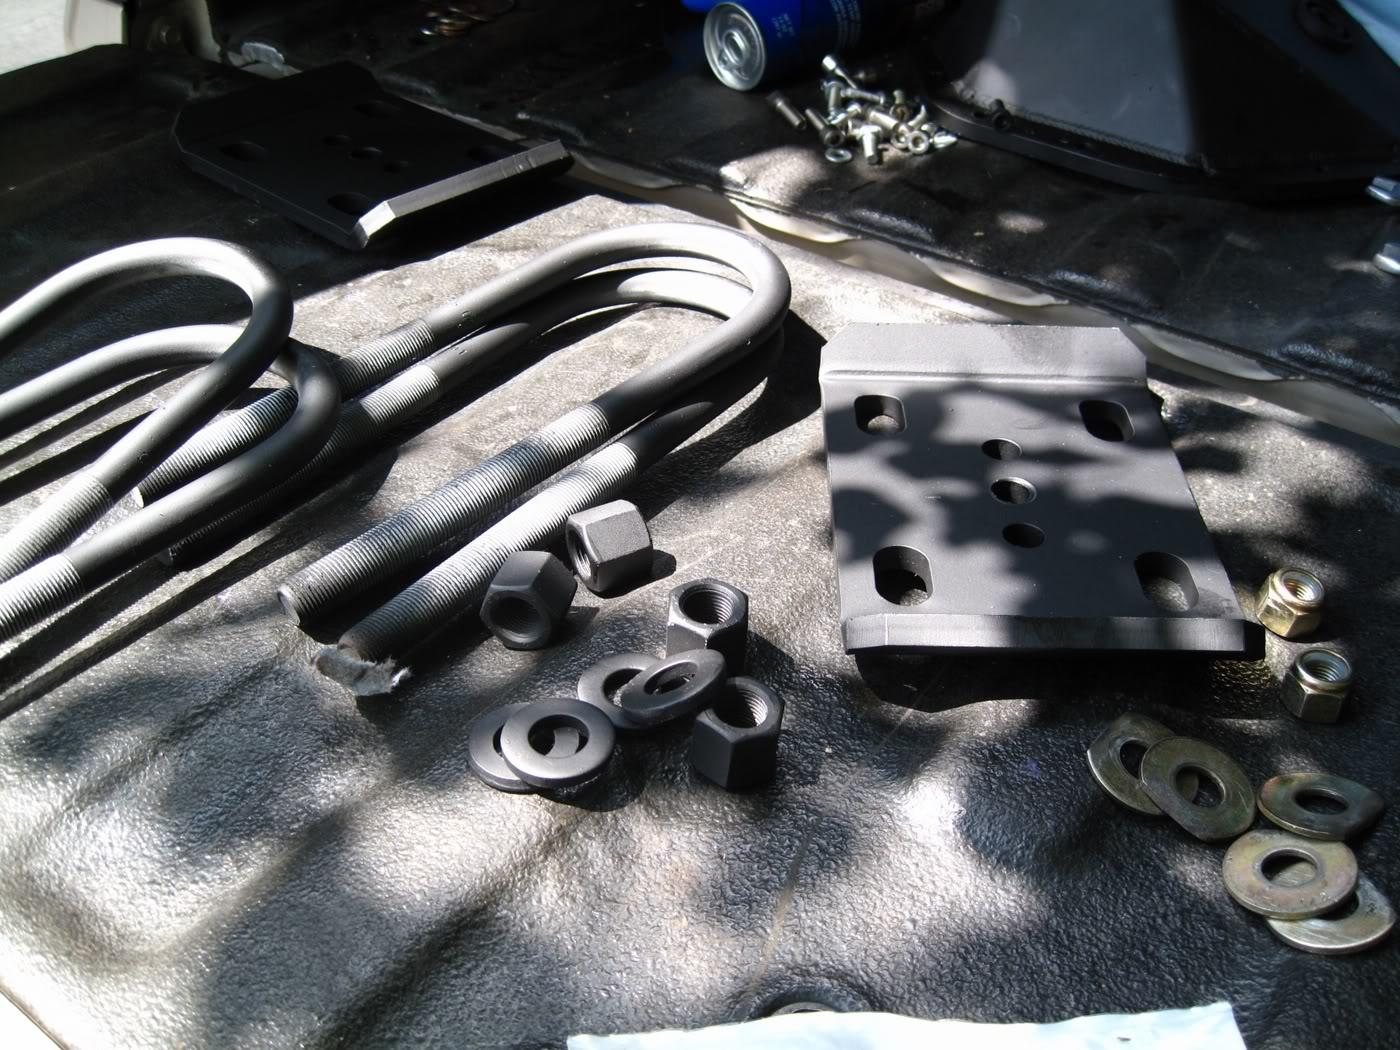
If you get the ruffstuff swap kit, be sure to paint it before you put it up since its not coated and will rust,
After some primer and paint (yea i know its a crappy picture),
Here is the flange after grinding so the rotors will fit. Its not much but it does need to be done,
I have a feeling that me not grinding the flanges and the rotors not sitting flush caused this,
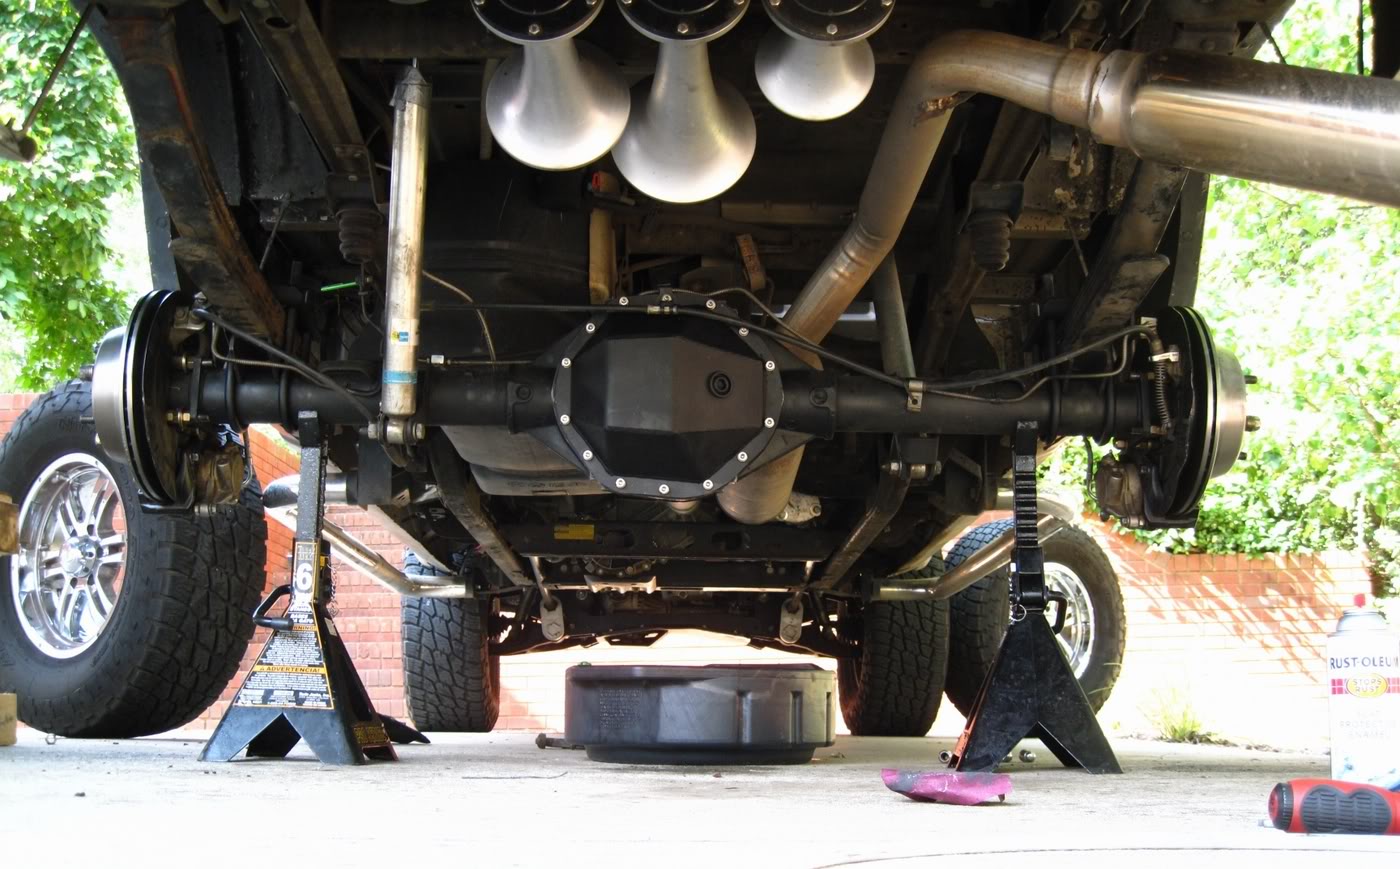
Also got a new cover. 3/8" steel flange, 1/4" steel face, 22 pounds.
UPDATE 8/12/09
Here are some shaft measurements since I know some were interested about the size of the 14b shafts
If you get the ruffstuff swap kit, be sure to paint it before you put it up since its not coated and will rust,
After some primer and paint (yea i know its a crappy picture),
Here is the flange after grinding so the rotors will fit. Its not much but it does need to be done,
I have a feeling that me not grinding the flanges and the rotors not sitting flush caused this,
Also got a new cover. 3/8" steel flange, 1/4" steel face, 22 pounds.
Last edited by Atomic; Aug 12, 2009 at 09:23 PM.
 May 24, 2009 | 02:03 AM
#5

Atomic, good compolation on your swap! If you need some original straps and bolts let me know. Although you did not specify, It looks like you used a 4x4 rear end for your swap.
FWIW; The wider 67.5 14 bolts came in 4x4 equiped heavy duty 1/2 tons with 6 lugs and light duty 3/4 tons in 6 and 8 lug configurations. They mostley came in 4x4 trucks and some 2wd Vans. The late 80's early 90's 2500 suburbans are usually good for The factory G80 Locker.
The Shorter 63.5 14 bolt cam in 2x4 applications mainly trucks. This was avalible in 5, 6, and 8 lug options.
The only way I currently know that you could get a 14 bolt from the factory with 5 lug was in the 454 SS option wich was a short production run from 90-93. They are rare but are out there from time to time.


 May 24, 2009 | 02:57 AM
#7
Thread Starter
Joined: Jan 2006
Posts: 16,282
Likes: 438
From: Huntsville, AL
The 14bolt is much stronger than the 10b in any form. In this case, a built 14b is near bullet proof for what I want to throw at it. My 10b had some chips on the spider gears I didnt know about until I pulled the cover to pull the shafts to get the backing plates off.
The main reason is for piece of mind. The 10b has a history of failing with larger than stock tires, and my nittos being 35x13 and weighing 120 pounds each arent exactly easy on an axle. With the 14b im not afraid to break em loose around a corner or any other time.
Im looking to have a 1350 joint put on my driveshaft so I wont have to use the conversion U joint and eliminating that weak link.
Trending Topics
 May 24, 2009 | 09:57 AM
#10

Very nice info! The 14 bolt should handle pleanty of abuse for years too come.
When swapping mine out under the burb, I had to modd some of the same area's.
Although I started with a NNBS SUV axle, the older ones are better for adding A/M axles to.
The Newer Modles come with smaller outer bearing journals vs. the standard size equipped in the older ones. All this equates to smaller non replacable axle shafts.
Since I Was soley intent on narrowing my axle for proper fitment, I purchased a similiar axle from an 89 W/T truck. I cut those ends off the tubes,grinded the welds down adn slid the bolt plate @ 2" forward for the disc brakes to work.
All in all I finished up with a bolt in 14 Bolt equipped with thicker High alloy A/M shafts combined with a tru-trac diff and OEM gears.
With over 7000lbs (truck and 4 adults) in 2wd the new blower smoked the rear tires all of 1st and half of second. What a smoke show!
in 4wd?? well the 4l65 lasted @ 5 seconds.
4l80 going on now.