
HOW TO: Replace knock sensors on a GMT800/GEN III V8
 Dec 7, 2010 | 09:35 PM
#11

Thread Starter

Joined: Nov 2009
Posts: 1,102
Likes: 1
From: Central NJ
That's what I was thinking, with the truck being black and all.
 My truck's a tidbit too filthy for pics at the moment, but I haven't put the winter wheels on it yet...so it's not out of the question...maybe some snow shots!

 Dec 14, 2010 | 09:56 PM
#14

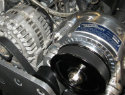
some of the techs where i work put a bead of rtv in front of the rear knock sensor hole and remove the foam from the rear of the intake to let the water run off the back of the engine better.
here a pic of where they put the bead of rtv

here a pic of where they put the bead of rtv
 Dec 15, 2010 | 02:46 AM
#15

formerly ByuTrukFreak
Joined: Mar 2006
Posts: 296
Likes: 0
From: Golden Meadow,LA
I couldn't figure how to get the connection off the knock sensor, so you might want to add that you have to squeeze the connection with a pair of needle nose pliers in a certain place to remove the plugs without breaking them.


 Oct 23, 2013 | 02:57 PM
#19

Staging Lane
Joined: Jan 2011
Posts: 52
Likes: 0
Thanks to DV2000NJ for this write up! I know it's more than 2 years old but this is the 1st time I've had to dig into a motor by myself. I know I know most of you guys dig in way deeper than this but for a daily driver for me this is as far as I have gone into a motor.
I've done transmissions, front and rear axles brakes stem to stern on may cars/trucks but when it came to motors I farmed it out.
Thank you again, your pics and step by step helped out tremendously.
I've done transmissions, front and rear axles brakes stem to stern on may cars/trucks but when it came to motors I farmed it out.
Thank you again, your pics and step by step helped out tremendously.

Thread
Thread Starter
Forum
Replies
Last Post
Fast86z
GM Engine & Exhaust Performance
4
Aug 23, 2015 12:35 AM
OHsixLS3
INTERNAL ENGINE MODIFICATIONS
8
Aug 10, 2015 07:19 PM