When you click on links to various merchants on this site and make a purchase, this can result in this site earning a commission. Affiliate programs and affiliations include, but are not limited to, the eBay Partner Network.
Got the racetronix hotwire kit updated with the 'new' plug and also got the fuel bucket wire connected with the plug that came with the fuel pump. no spliced wires makes it nice and clean.
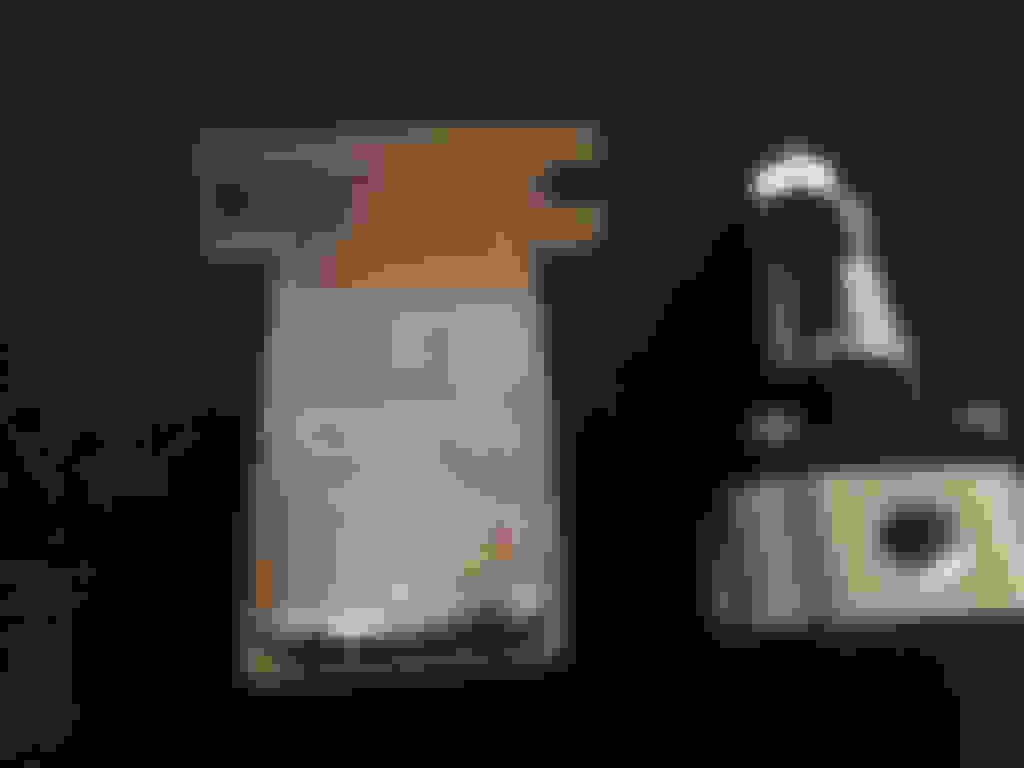
this is the connector that comes with the fuel pump. just needed to move this connector over to the fuel bucket wires.
pulled the terminals out
crimping on new terminals
ground wire in from bucket hat to new connector.
fuel bucket wiring updated and ready to plug directly into new fuel pump. now just need to secure the fuel pump somehow and attach the fuel sock..
Now ready to update the racetronix hotwire harness with the newer connectors . The male connector plugs into the top of the fuel pump and the female connector plugs into the factory wiring on the truck. These style connectors are the 'old' style and were recalled and replaced with the newer style. so I decided it would be a good idea to swap out the connectors
pulling the terminals out of the old connectors
after cutting off old terminal and isntalling wire on new terminal with new plug, fitting it into the 'new' connector
got one connector swapped, now just need to do the other one
all done . now my hotwire harness has the new connectors. last thing to do now is to update the truck connector with the new connector when i am installing this in the truck.
Got my vacuum manifold mounted and connected. was able to hide it under the engine cover. I drilled a hole in the plastic piece in the back and bolted the manifold down and this lined up perfectly with an unused threaded bolt hole in the top of the intake . this also lined up perfectly with the vacuum port i intended to use. it is the vacuum port that supplies the stock regulator on the rail. The bolt for the engine cover is close to the manifold and some of the excess plastic on the cover had to be trimmed to clear the manifold. trimmed it up and engine cover sits down completely and now the manifold is completely hidden from sight and very short runs of line to manifold. found some random hose that had 90 degree bends that I cut down to fit my application and could not ask for a better fit.
now that I have ports available I am ready to mount and install my aeromotive fuel pressure regulator into my factory return line. I just need to make a bracket so I can mount it...
Got my FPR installed finally. Made a little bracket that bolts the grounding studs on the fire wall . put some fuel lines together that plug into the existing rail and fuel line and went overboard with the vacuum line.
its installed and working with out any leaks but something I am not sure about is that the gauge on the FPR shows 45psi but the gauge (at the same time) on the rail shows 58psi... not sure what is going on there.
Here is the bracket I made. found a scrape piece of SS that I had cut into that shape and then I bent it so that the regulator sits straight.
bolted this up and measured what I needed to cut for my fuel lines. ended up being much shorter that I anticipated
Here I am putting on the other end of the hose . the 120 attaches to the fuel rail using a hard line to AN adapter and then this 120 screws into that. this will be the feed for the FPR.
this is the finished shortly line for the return side of FPR that will connect to the stock return line
Here everything is connected and truck is running. no leaks. you can see i got a 180 fitting for the vacuum line and that goes back to the vacuum block . you can also see the block off plug that is where the factory FPR used to be.
Truck idles as it should (its showing correct pressure at the rails - 58psi) . have not taken it out for a drive yet to see how it does under load/throttle. Still trying to understand why the FPR reads only 45psi instead of what the rail shows at 58...
Almost ready to stick the 450 pump in the tank! just need to finish that up.
figured out the fuel pressure discrepancy. unplugged the vacuum line from the regulator and the pressure went up. adjusted it roughly to 58psi and plugged the vacuum line back on. at idle the rail now shows 58~60psi. all is good in the hood.
Got my intercooler mounted up. took some black radiator paint and painted the transmission cooler and the intercooler for a stealth look. Can't even see it through the grill . the only place you can barely see it is through the two cutout holes in the bumper.
Because I mounted it in front of the transmission cooler I had to extend the brackets that came with the IC. Here I am placing it where it will be installed so I can figure out what I need to do with the brackets.
After getting the brackets figured out I painted the IC with some radiator paint
... and the transmission cooler and brackets. I wish i would have done this when I initially installed this - looks much better black in my opinion.
intercooler mounted up and ready to put the bumper and grill back on.
got the bumper back on with only bending a couple of metal tabs (not even sure what they are used for) . No trimming of the bumper was needed. The front of the intercooler sits about 5" away from the A-frame so i think that without the transmission cooler you could fit quite a thick intercooler in there without trimming.
bumper clearance after bolting the bumper back on and looks good
Here you can see the backet extensions and the space between the coolers
Nothing to see here...
something IS hiding back there
Still need to install my fuel pump, fuel pump harness, wire up and install my gauges, get and install a catch can, and extend my heater hoses and then I should be ready for the hot side!


 10-10-2016, 05:17 PM