When you click on links to various merchants on this site and make a purchase, this can result in this site earning a commission. Affiliate programs and affiliations include, but are not limited to, the eBay Partner Network.
I'm gonna use this as a spot to document my "restoration" of my 2000 RCSB truck.
A little background:
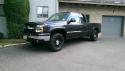
I bought this truck in December of 2004. It's a 2000 Silverado LS with the 5.3. It was in fantastic shape (minus the broken hinge on the jump seat) but had high mileage for the age (80k) but I was happy to get it for 7k out the door. It served daily duty along side my various toys including a DSM, an LS swapped rx7, and most recently a c5. It got relinquished to the sidelines about 5 years ago as I picked up a new daily. I held onto it because I just couldn't let it go. I had never put a dent in it and at the time it had no rust. But it was paid for so I parked it on the side of the house and only used it to haul stuff. Fast forward a few years and my son started driving so we freshened up the truck with new brakes/shocks/fuel pump/tires/tune up and I turned him loose. After three years of driving I got it back after he bought his own car. After discussing it with my wife, we have started to "bring her back to her former glory" and them some. The goal is a fun reliable driver. My vette is for going fast, so I don't plan on doing a turbo or heavily build NA motor...although a mild cam or bolt on LSA has been on my mind.
So that's basically what it looked like a couple months ago. I various damage came from a neighbor backing into it (front fender), a blowout in the rain that caused a spinout into a sign (bed) and he rear ended a car (not a hard hit he said, but the car took off as soon as it happened. A police report was filed as someone called it in, but nothing ever came of it. I'm guessing whoever was in the other car didn't want cops around).
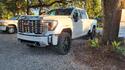
I sourced another bed that needed workout was definitely better than the one I had (but not as good as I thought) as well as various other panels and me and a buddy got to work.
Right on. Same color scheme as mine. Think I'm going to go with the GM Indigo blue all the way and get rid of the champagne gold bottom deal. never was a 2 tone personally.
I feel the same way, but of well. He never got hurt so I was OK with it.
Originally Posted by shootermwc
Right on. Same color scheme as mine. Think I'm going to go with the GM Indigo blue all the way and get rid of the champagne gold bottom deal. never was a 2 tone personally.
I am back and forth on the color. I was thinking about going all white, but my wife and daughter want to stay the same color. Unfortunately there is another solid blue one near me which kinda sours going that way for me. But time will tell.
I knew there was some rust in there so I grabbed a grinder and started seeing what I had to work with.
I cut out a section that had the rust I saw and then...
I found some more. I ordered new panels from LMC and this is what we ended up cutting out on this side.
I saw that there was some surface rust on the fender wells and I inquired with a buddy who's helping me (with a number of years of metal work under his belt) and he asked "How far you want to go down the rabbit hole?" With that, I cleaned up the liners as best as I could and gave them a generous coating of POR-15.
We flanged the lip for the metal to sit down in with the idea that it will be strong and for there to be less welding needed to form the metal together. The thought was flange the metal, use panel adhesive to bond them together, and finally rivet them tight so the adhesive has time to set up.
After that the real work began.
Now, one thing I hate is when you look at a vehicle going by, and the bodywork / paint waves at you. I asked him what causes this and he said "They didn't block it out worth a damn" I didn't want that on this truck, so we got to blocking. For those that don't know, it's the process of laying down a this layer of body filler, and than sanding off 95% of it with large straight blocks to eliminate any "waves" or dimples in the bodywork. Then you put a guide coat on which is just a black dust, but when you sand it you see the contrasts which equal low spots...so you add a little more filler or sand some more, depending on the situation. Either way, it's a tremendous amount of work, and it's the reason bodywork costs so much.
More to come...
So you just used panel adhesive to hold the patch in?
Welding is really the right way to do it, you want the metal as straight as humanly possible so you use the absolute least amount of filler
That and welding joins the panels as one eliminating the possibility of cracking the plastic filler (bondo) down the seam lines. It also stops the chance of corrosion forming between the panels. The process used above is how I apply body panels to Corvettes but using Claw Plast instead of plastic filler.
 06-15-2020, 11:58 AM