

Finaly gather all the parts.
 Dec 4, 2011 | 11:02 AM
#12

How do you plan on airing them back up once that magical dump valve does it's job? That 1gal tank won't be enough to take those two bags from empty to holding up the *** of a Tahoe... Definitely not with a trailer on it... But I'm sure you have some magical math in custm2500 world that says otherwise....
Your post is an example of the ignorance and rudeness that ruins all of my threads. I would expect as a mod you would be more apt to set an example.
Last edited by custm2500; Dec 4, 2011 at 11:18 AM.
Dec 4, 2011 | 11:41 AM
#13

Have you priced out CoolRide versus gathering up the parts and building it yourself? And why use a tank? Why not just a pump? I forget what company sells it but a 2-way momentary switch... one direction activates the pump and the other direction releases the air. I had a 1 Ton Dually at the a shop I managed with a 41 ft Car Hauler... and thats all it had... helper bags, a pump, and a switch in the center console... hell there was even a guage in the console to monitor presssure.
Cranking the bars down in the front... what does that do to the quality of the ride up front? How about drop spindles?
Thread edited for content...
Cranking the bars down in the front... what does that do to the quality of the ride up front? How about drop spindles?
Thread edited for content...
Dec 4, 2011 | 11:52 AM
#14
I have the bags($100 used from ebay), and most of the steel we have at work. I will only have $20-$30 in 2" tube unless my friend has some are home. Plenty of time but time is free.
The coolride kit is $600 with basic shocks, so yes I am way ahead building it.
The tank is just to have a back up. Especialy for the dump, I have to have 75+ psi to activate it. These aren't helper bags either.
Thanks for trying to keep it on topic.
The coolride kit is $600 with basic shocks, so yes I am way ahead building it.
The tank is just to have a back up. Especialy for the dump, I have to have 75+ psi to activate it. These aren't helper bags either.
Thanks for trying to keep it on topic.
Dec 5, 2011 | 09:39 PM
#16
Yes I am going to finish this project. I called and ordered the 2" pipe I need just didn't have time to go pick it up.
Not sure when I build the cups but hopefully this week some time. It has only taken me 4 months to buy the parts I have needed so far.
Not sure when I build the cups but hopefully this week some time. It has only taken me 4 months to buy the parts I have needed so far.
Dec 5, 2011 | 10:39 PM
#17

It has taken you 4 months to buy $100 worth of parts? How exactly are you attaching the cups without welding them?


 Dec 22, 2011 | 05:05 AM
#20
It is finaly done.
I didn't take any progress pics because my phone was dead.
To secure the upper bag mount I welded 3 bolts to the top of the bag mount that corespond to the three sloted holes in the factory spring perch. Used a sufficiantly sized washer and clamped it down. On the bottom I did similar but had to add small tabs to the bottom of the spring perch because the bag cup is nearly the same size as the axle spring perch.
The cool ride kit has one tab that comes of the side of the bag cup and you weld to the axle but liked my idea better and since I used bolts on the bottom I can go back to the coils in about 10-15 minutes. No welds to cut.
The only issue that came up is the valve I bought that is supposed to have a 15 seccond delay, doesn't. The guy behind the counter apparently didn't know what he was talking about(second shift so salesmen are all home when I went in). The shop I bought the valve from does have a 15 second delay valve but I already have this one mounted and it is much smaller. Therfore it fits perfectly because I have very little space. I am going to install some sort of restricter so the bags won't air up and deflate as quickly and it should be perfect. As of right now every little bump uses some air so my compressor is running much more then I would like(60-80%).
I didn't put wire loom on the hoses and wires yet because I wanted to confirm everything works flawlessly. It has been since saturday night and everything has been perfect, so possibly friday I will get it back in the air to slow the air down and take some pics.
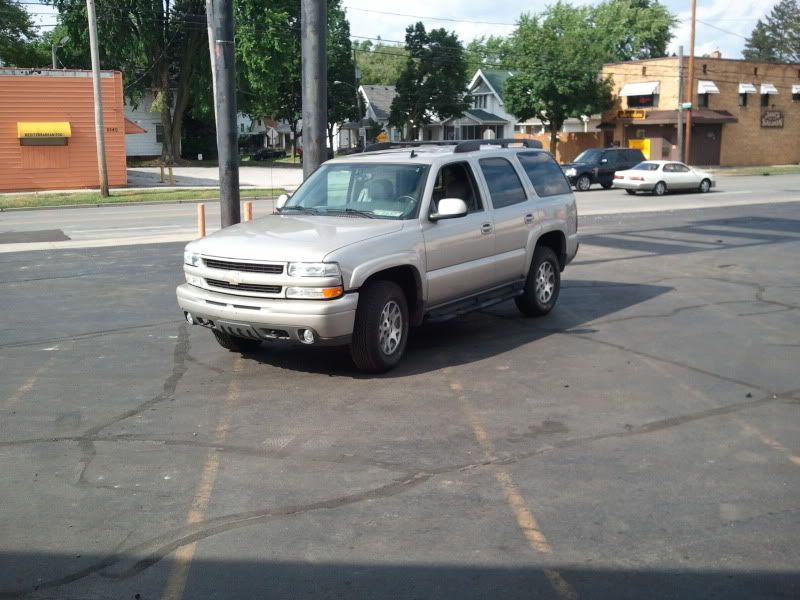
Here is how she sits.

Not that we haven't seen plenty but here is stock for comparison.
I didn't take any progress pics because my phone was dead.
To secure the upper bag mount I welded 3 bolts to the top of the bag mount that corespond to the three sloted holes in the factory spring perch. Used a sufficiantly sized washer and clamped it down. On the bottom I did similar but had to add small tabs to the bottom of the spring perch because the bag cup is nearly the same size as the axle spring perch.
The cool ride kit has one tab that comes of the side of the bag cup and you weld to the axle but liked my idea better and since I used bolts on the bottom I can go back to the coils in about 10-15 minutes. No welds to cut.
The only issue that came up is the valve I bought that is supposed to have a 15 seccond delay, doesn't. The guy behind the counter apparently didn't know what he was talking about(second shift so salesmen are all home when I went in). The shop I bought the valve from does have a 15 second delay valve but I already have this one mounted and it is much smaller. Therfore it fits perfectly because I have very little space. I am going to install some sort of restricter so the bags won't air up and deflate as quickly and it should be perfect. As of right now every little bump uses some air so my compressor is running much more then I would like(60-80%).
I didn't put wire loom on the hoses and wires yet because I wanted to confirm everything works flawlessly. It has been since saturday night and everything has been perfect, so possibly friday I will get it back in the air to slow the air down and take some pics.
Here is how she sits.
Not that we haven't seen plenty but here is stock for comparison.