

CTSV Supercharged '00 RCSB
 Dec 17, 2014 | 07:06 PM
#11
Thread Starter
TECH Apprentice
Joined: Jun 2011
Posts: 313
Likes: 71
From: memphis, tn
They came off a 2010 or 11 gmc acadia i think the guy said. Some of them are on the truck and SUVs.
If you search on here for GMC Clad 20's you should find others.
i can't wait to see them in the bronze with the flat black pain on the truck.
If you search on here for GMC Clad 20's you should find others.
i can't wait to see them in the bronze with the flat black pain on the truck.
Dec 18, 2014 | 09:23 AM
#12

Cool build!
Dec 18, 2014 | 12:14 PM
#13
Thread Starter
TECH Apprentice
Joined: Jun 2011
Posts: 313
Likes: 71
From: memphis, tn
Thanks Beau, means a lot.
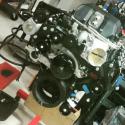
Here is the setup I'm looking at.
GM# 19303242
I can't find a picture of it anywhere other than the GM catalog, but basically, it keeps the alternator up high and has a remote reservoir for the P/S pump.
Here is the setup I'm looking at.
GM# 19303242
I can't find a picture of it anywhere other than the GM catalog, but basically, it keeps the alternator up high and has a remote reservoir for the P/S pump.
Dec 30, 2014 | 04:39 PM
#14
Thread Starter
TECH Apprentice
Joined: Jun 2011
Posts: 313
Likes: 71
From: memphis, tn
Found this as well from LSSimpleLSSimple email mrmurphy@msn.com with desired combonations
His facebook page is a little more detailed. This runs an F-body water pump and a 2 belt system rather than a 3 belt factory. Might Save some dough up front, but I'm curious how the end game would come out.....
His facebook page is a little more detailed. This runs an F-body water pump and a 2 belt system rather than a 3 belt factory. Might Save some dough up front, but I'm curious how the end game would come out.....
Dec 30, 2014 | 09:46 PM
#16
On The Tree
Joined: Feb 2013
Posts: 120
Likes: 0
From: norcal
I am in the same place you are, trying to figure out an accessory drive that moves the alternator to a more aesthetically pleasing location.
What I don't like about his kit is the very small amount of belt wrap around the crank pulley. When you add the supercharger, that becomes even more critical, since you have the extra load on the belt.
It is a very nice looking piece though, and I love the build you are putting together. Just throwing in my .02
Dec 31, 2014 | 09:24 AM
#17
Thread Starter
TECH Apprentice
Joined: Jun 2011
Posts: 313
Likes: 71
From: memphis, tn
I am in the same place you are, trying to figure out an accessory drive that moves the alternator to a more aesthetically pleasing location.
What I don't like about his kit is the very small amount of belt wrap around the crank pulley. When you add the supercharger, that becomes even more critical, since you have the extra load on the belt.
It is a very nice looking piece though, and I love the build you are putting together. Just throwing in my .02
What I don't like about his kit is the very small amount of belt wrap around the crank pulley. When you add the supercharger, that becomes even more critical, since you have the extra load on the belt.
It is a very nice looking piece though, and I love the build you are putting together. Just throwing in my .02
 Jan 5, 2015 | 06:08 PM
#19
Thread Starter
TECH Apprentice
Joined: Jun 2011
Posts: 313
Likes: 71
From: memphis, tn
since some of you have not seen any of the previous crap, I will bring a few up to speed on some of the interior stuff I have done over the past year while I have been scraping up money for this everchanging but now set in stone engine build of mine.
Laid brand new carpet myself (will never do that again!)
Had the dash stripped, primed, and painted satin black.
Covered over the factory carpet on the door panels with black vinyl.
Recovered my own headliner (absolute nightmare but much cheaper than new one) P.S. should have done it in something nicer material. Used Hancocks foam back headliner stuff and it just.... I don't like it now, haha.
Also hooked up some gauges in my pillar pod and rewired all my stereo equipment after giving a THOROUGH deep cleaning to a vehicle thats has been owned by 3 smokers. Replaced a lot of little broken stuf, A/C vents, Buttons, etc. And most recently added a center console, which will probably get painted or covered in black tweed. (yes black tweed is very 90's, no I don't care, that **** still looks cool when done right!)
More pictures when I get home tonight.