
just how hard was it to install a set of e fans?????
 Dec 16, 2006 | 09:30 PM
#1

Well, it only took a few hours.
step 1. get all the stuff needed to do the job, wife bitchen about
that could be Christmas funds she can spend
step 2. find time to do the job, a must when the wife has other plans,
Make her bitch more.
step 3. do the job, while wife is bitchen it's time to go, tell her to just
go shopping, you don't need me any way, I'm just going to stand their
And look stupid.
step 4. drink a cold beer when done. when wife starts again, get in her
Face with beer breath and say SHUT THE F&@* UP, enough is enough already.
the parts. wire 14 and 16 gauge, different colors, 40 amp relays, fuse holders, and 25 amp fuses,
2 14 inch fans and some sheet metal.
Hard part first, need a hot wire, took the dash apart and located the hot wires from the ignition switch.
Need the hot wire that is hot in the run position only.
That means the wire is dead in the start, off, and acc positions.
On my truck this was the orange wire.
poop the hood, located the harness boot in the fire wall, pushed it in just a little, poked in my red wire,
Spliced in one fuse link, pulled the slack back, and put the harness boot back in place.
Well, had to put the dash back together too.
Next I took out the fan shroud, how am I going to do this?
Why not use the stock shroud, so marked off 5/8 of an inch all the way around.
Pulled the little handle that held a hacksaw blade and went to cutting nice and neat.
A jig saw or a sawsal would have made it quicker but my cuts would have been crap.
after cutting i measured, 27 7/8 X 17 7/8, OK so i broke out the sheet metal and cut
29 X 19, at each corner I cut out a small peace 9/16 square.
from the inside of each corner I marked a line corner to corner that measured 27 15/16 X 17 15/16.
after this i bent the sheet metal on the lines, when finished it looks like a big cookie sheet with a 9/16 lip
all the way around.
laid this cookie sheet on top of the cut fan shroud, marked the places to cut out so the cookie sheet would lay flat with no problems, after doing this it fit perfect, so i drilled holes and used pop rivets
To join the cookie sheet to the fan shroud, when done I did a test fit, my god look at all of this room.
Took it back out and laid my 2 14 inch fans on top, perfect the fans laid side by side.
Marked out where the fans sit, marked my holes too, pulled in 1/2 inch and drew the area to be cut out.
Cut it out, drilled my holes, and mounted my fans, did another test fit, damn this looks good.
Took the fan off of the water pump, more room then I thought, **** got room to play with now.
With the fans mounted, and the shroud done, I installed the unit.
Time to do the wiring, the relays come with 4 plugs, 1 hot and 1 ground, and 2 for the power to pass through. Numbers are 30, 86, 87, 85. these were the numbers on mine.
Take the hot wire you ran from the dash and two short wires and clip them together.
From the back of my alternator I hooked up 2 hot wires each with it's own fuse link 25 amp.
Be sure to disconnect the battery, oh great, now you tell me.
to each bolt that holds the fan shroud i used them for grounds to the fans,
Plug the split hot wires from the dash in to 85.
Plug the grounds in too 86.
Plug the hot wires from the alternator in to 30.
And plug the hot wires to the fans in to 87.
Reconnected the battery.
Now it worked on the test light, lets test it out.
Stuck in my key and turned the ignition to run, the fans came on.
With the start relay pulled, turned the key to start, the fans went off.
Key back to run the fans are on.
Key to off, and the fans are off.
Key turned back to acc, the fans are off.
pics included of the finished work.

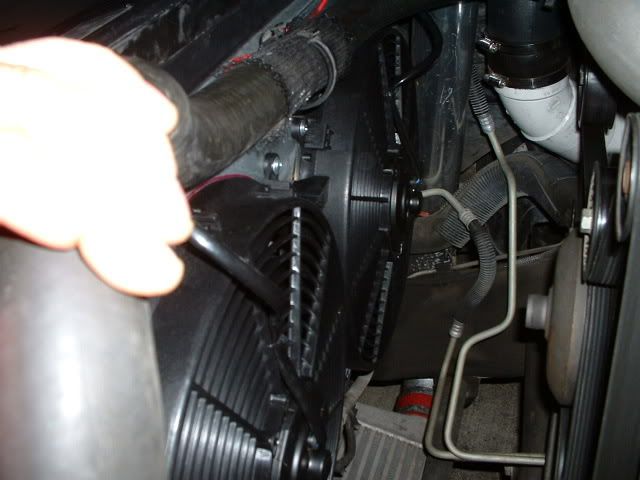

this was just too damn easy.
step 1. get all the stuff needed to do the job, wife bitchen about
that could be Christmas funds she can spend
step 2. find time to do the job, a must when the wife has other plans,
Make her bitch more.
step 3. do the job, while wife is bitchen it's time to go, tell her to just
go shopping, you don't need me any way, I'm just going to stand their
And look stupid.
step 4. drink a cold beer when done. when wife starts again, get in her
Face with beer breath and say SHUT THE F&@* UP, enough is enough already.
the parts. wire 14 and 16 gauge, different colors, 40 amp relays, fuse holders, and 25 amp fuses,
2 14 inch fans and some sheet metal.
Hard part first, need a hot wire, took the dash apart and located the hot wires from the ignition switch.
Need the hot wire that is hot in the run position only.
That means the wire is dead in the start, off, and acc positions.
On my truck this was the orange wire.
poop the hood, located the harness boot in the fire wall, pushed it in just a little, poked in my red wire,
Spliced in one fuse link, pulled the slack back, and put the harness boot back in place.
Well, had to put the dash back together too.
Next I took out the fan shroud, how am I going to do this?
Why not use the stock shroud, so marked off 5/8 of an inch all the way around.
Pulled the little handle that held a hacksaw blade and went to cutting nice and neat.
A jig saw or a sawsal would have made it quicker but my cuts would have been crap.
after cutting i measured, 27 7/8 X 17 7/8, OK so i broke out the sheet metal and cut
29 X 19, at each corner I cut out a small peace 9/16 square.
from the inside of each corner I marked a line corner to corner that measured 27 15/16 X 17 15/16.
after this i bent the sheet metal on the lines, when finished it looks like a big cookie sheet with a 9/16 lip
all the way around.
laid this cookie sheet on top of the cut fan shroud, marked the places to cut out so the cookie sheet would lay flat with no problems, after doing this it fit perfect, so i drilled holes and used pop rivets
To join the cookie sheet to the fan shroud, when done I did a test fit, my god look at all of this room.
Took it back out and laid my 2 14 inch fans on top, perfect the fans laid side by side.
Marked out where the fans sit, marked my holes too, pulled in 1/2 inch and drew the area to be cut out.
Cut it out, drilled my holes, and mounted my fans, did another test fit, damn this looks good.
Took the fan off of the water pump, more room then I thought, **** got room to play with now.
With the fans mounted, and the shroud done, I installed the unit.
Time to do the wiring, the relays come with 4 plugs, 1 hot and 1 ground, and 2 for the power to pass through. Numbers are 30, 86, 87, 85. these were the numbers on mine.
Take the hot wire you ran from the dash and two short wires and clip them together.
From the back of my alternator I hooked up 2 hot wires each with it's own fuse link 25 amp.
Be sure to disconnect the battery, oh great, now you tell me.
to each bolt that holds the fan shroud i used them for grounds to the fans,
Plug the split hot wires from the dash in to 85.
Plug the grounds in too 86.
Plug the hot wires from the alternator in to 30.
And plug the hot wires to the fans in to 87.
Reconnected the battery.
Now it worked on the test light, lets test it out.
Stuck in my key and turned the ignition to run, the fans came on.
With the start relay pulled, turned the key to start, the fans went off.
Key back to run the fans are on.
Key to off, and the fans are off.
Key turned back to acc, the fans are off.
pics included of the finished work.
this was just too damn easy.


 Dec 18, 2006 | 02:14 PM
#4

Step 1: Find some way to make $350
Step 2: Order Nelson fan harness
Step 3: Buy 05 take off E-fans for $250
Step 4: Install wiring and fans (about 1 hour)
Step 5: Flash PCM with your HPtuners to enable fans
Done. I already have the 34" radiator though so it made my swap easier and the truck looks like it came stock with them. Later
Dave
Dec 18, 2006 | 11:33 PM
#5
Originally Posted by Bowtie70SS
Step 1: Find some way to make $350
Step 2: Order Nelson fan harness
Step 3: Buy 05 take off E-fans for $250
Step 4: Install wiring and fans (about 1 hour)
Step 5: Flash PCM with your HPtuners to enable fans
Done. I already have the 34" radiator though so it made my swap easier and the truck looks like it came stock with them. Later
Dave
Step 2: Order Nelson fan harness
Step 3: Buy 05 take off E-fans for $250
Step 4: Install wiring and fans (about 1 hour)
Step 5: Flash PCM with your HPtuners to enable fans
Done. I already have the 34" radiator though so it made my swap easier and the truck looks like it came stock with them. Later
Dave
did not need to update the tune, i found the right wire.
did not need to buy a wiring harness, it was very easy to make my own.
did not need an 05 fan set up, cut and cover mine was a perfect fit.
if i had the 34 inch radiator i would have gone duel 16 inch fans instead if
duel 14 inch fans.
and it may not look stock but it still looks nice with all of this open room.
Dec 19, 2006 | 06:05 AM
#6
Hey I looked at going that route but I wanted it to look stock and except for the fan harness you can't tell. Also I let GM do all of the engineering for my setup except for the harness. I guess it depends on 2 things...the size of your radiator and your budget for the swap. Just curious how much air does your fan setup pull? Any heat problems when towing or on really hot days? Maybe I'll save the $$ next time and make my own
Dave
Dave


Thread
Thread Starter
Forum
Replies
Last Post
mr03silverado
GMT 800 & Older GM General Discussion
4
Jun 26, 2016 06:05 AM
mr03silverado
GMT 800 & Older GM General Discussion
10
Jul 17, 2015 02:15 PM