Got my Radix and a few ?'s
 Aug 12, 2005 | 02:02 AM
#1

Thread Starter
TECH Apprentice
Joined: Aug 2002
Posts: 331
Likes: 0
From: Orlando, FL
I just got my Radix from UPS and am installing it this weekend and I have a few questions.
1. Looking at my setup, what spark plugs should I install?
2. Where do I hook up my boost gauge to? (pics please)
3. Should I change my fuel filter at the same time?
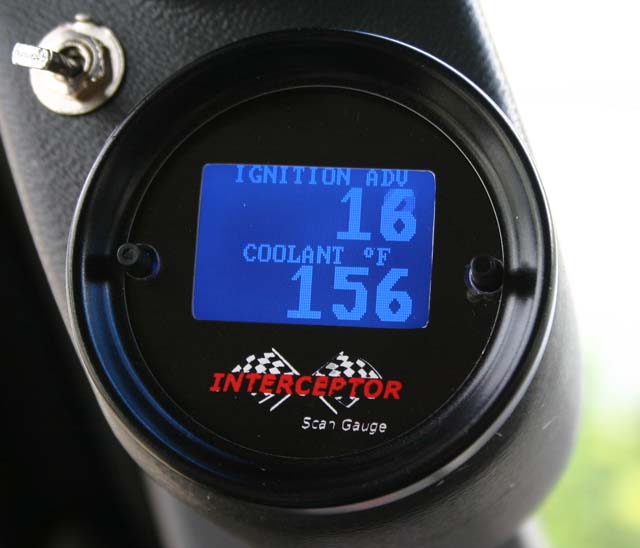
4. What is the best way to find out w/ my IAT's are? Is there a scanner that I can get that will use an existing sensor?
Thanks,
Damon
BTW if it matters, I have about 40k miles.
1. Looking at my setup, what spark plugs should I install?
2. Where do I hook up my boost gauge to? (pics please)
3. Should I change my fuel filter at the same time?
4. What is the best way to find out w/ my IAT's are? Is there a scanner that I can get that will use an existing sensor?
Thanks,
Damon
BTW if it matters, I have about 40k miles.
Aug 12, 2005 | 04:55 AM
#2


"Looking at my setup, what spark plugs should I install?"
When you ordered you should have completed a calibration form. If you needed to go to another heat range plug they should have instructed you to do so.
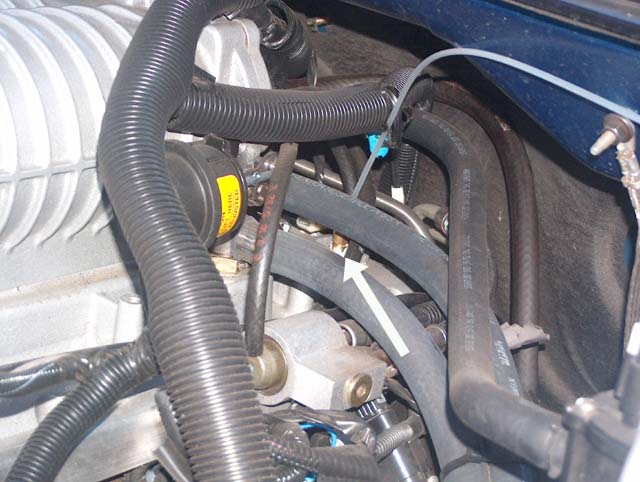
1. Where do I hook up my boost gauge to? (pics please)
No pic, but not really needed. On the drivers side rear of the manifold there is a nipple with a rubber plug over it, that is it, right next to a brass pipe plug.
2. Should I change my fuel filter at the same time?
According to what year truck you have, if there is no external filter the new fuel pump will have the filter on it. If you have an external filter, "Yes".
3. What is the best way to find out w/ my IAT's are? Is there a scanner that
I can get that will use an existing sensor?
I use my old Predator hand held programmer's live diagnostics feature. I am not sure if the Superchips's unit can do this or not. Read up on it.
Make sure you get help setting the blower down onto the intake gaskets. A drop and\or slip or slide here will be a real headache later. You will need a small torque wrench with variouse depth sockets to get at the rear, and passenger side rear bolts to torque them down. 89 inch pounds.
Read the instructions. Good luck.
When you ordered you should have completed a calibration form. If you needed to go to another heat range plug they should have instructed you to do so.
1. Where do I hook up my boost gauge to? (pics please)
No pic, but not really needed. On the drivers side rear of the manifold there is a nipple with a rubber plug over it, that is it, right next to a brass pipe plug.
2. Should I change my fuel filter at the same time?
According to what year truck you have, if there is no external filter the new fuel pump will have the filter on it. If you have an external filter, "Yes".
3. What is the best way to find out w/ my IAT's are? Is there a scanner that
I can get that will use an existing sensor?
I use my old Predator hand held programmer's live diagnostics feature. I am not sure if the Superchips's unit can do this or not. Read up on it.
Make sure you get help setting the blower down onto the intake gaskets. A drop and\or slip or slide here will be a real headache later. You will need a small torque wrench with variouse depth sockets to get at the rear, and passenger side rear bolts to torque them down. 89 inch pounds.
Read the instructions. Good luck.
Aug 12, 2005 | 06:26 AM
#3

TECH Fanatic
Joined: Jul 2005
Posts: 1,396
Likes: 0
From: Galesburg Il
I'm in the process of installing my Radix now. I haven't wrenched for about 42 years prior to this week.... not enough to speak of anyway. Never heard of MAP, EVAP, ETC.
I"ve done most of the work myself with slow progress but no major problems. I had two guys help me set the unit down onto the heads and it went with only a minor problem which was that the wire loom on my 2002 5.3 had a ground strap running to the block on the passenger side clear at the back of the engine and leaving this connected made it difficult to pull the loom up far enough to get the Radix in without having to risk damage to the gaskets. We had to remove the ground but then it was not possible to reach that bolt to reinstall it.... had to find a new ground bolt.
Be sure to get the loom as far out of the way as possible. I ran it up under the windshield wipers.
I'm getting help to do the wiring. No way I'm cutting into any wiring looms. I'm too clumsy....and just plain scared of the electronics.
I have a fuel filter up under the truck and the new fuel pump that comes with the Radix attaches to the frame at that point. I'm going to have to crawl under there today and do that installation and I'm thinking it's going to be difficult to drill a 21/64's hole in the frame laying on my back and it occurred to me last night that had I read through the instructions better before I started that I might have been able to do this part of the job prior to everything else and have done it up on a hoist somewhere.
Have some good electricians tape handy to retape some of the loom. Buy a in/pd torque wrench. I took the valve covers off and had the alternator gutted so I could have them powder coated to match the truck whille it was torn down... also the bracket that serves as the snout rest for the supercharger and a couple of other small items. I got some spray brake cleaner to clean up the coil brackets etc while they were off the truck and some carb/choke cleaner to clean up the throttle body.
The instructions are pretty good. Read them well! Take is slowly and HAVE FUN... it really is fun! I'd forgotten how much fun it is to do some wrenching.... but this dammed sure is a LOT different than rebuilding the 283 I had in my prized 56 Chevy..... back in the day.
Aug 12, 2005 | 06:31 AM
#5
TECH Fanatic
Joined: Jul 2005
Posts: 1,396
Likes: 0
From: Galesburg Il
Originally Posted by DamonCollins
I did answer a bunch of questions over the phone...but nothing was mentioned about changing heat range...so maybe I should keep stock.
Thanks, keep them coming.
Damon
Thanks, keep them coming.
Damon
My instructions say to keep the stock plugs. I got new ones while it was torn down.
Aug 12, 2005 | 08:07 AM
#6

Originally Posted by JimS
I'm in the process of installing my Radix now. I haven't wrenched for about 42 years prior to this week.... not enough to speak of anyway. Never heard of MAP, EVAP, ETC.
I"ve done most of the work myself with slow progress but no major problems. I had two guys help me set the unit down onto the heads and it went with only a minor problem which was that the wire loom on my 2002 5.3 had a ground strap running to the block on the passenger side clear at the back of the engine and leaving this connected made it difficult to pull the loom up far enough to get the Radix in without having to risk damage to the gaskets. We had to remove the ground but then it was not possible to reach that bolt to reinstall it.... had to find a new ground bolt.
Be sure to get the loom as far out of the way as possible. I ran it up under the windshield wipers.
I'm getting help to do the wiring. No way I'm cutting into any wiring looms. I'm too clumsy....and just plain scared of the electronics.
I have a fuel filter up under the truck and the new fuel pump that comes with the Radix attaches to the frame at that point. I'm going to have to crawl under there today and do that installation and I'm thinking it's going to be difficult to drill a 21/64's hole in the frame laying on my back and it occurred to me last night that had I read through the instructions better before I started that I might have been able to do this part of the job prior to everything else and have done it up on a hoist somewhere.
Have some good electricians tape handy to retape some of the loom. Buy a in/pd torque wrench. I took the valve covers off and had the alternator gutted so I could have them powder coated to match the truck whille it was torn down... also the bracket that serves as the snout rest for the supercharger and a couple of other small items. I got some spray brake cleaner to clean up the coil brackets etc while they were off the truck and some carb/choke cleaner to clean up the throttle body.
The instructions are pretty good. Read them well! Take is slowly and HAVE FUN... it really is fun! I'd forgotten how much fun it is to do some wrenching.... but this dammed sure is a LOT different than rebuilding the 283 I had in my prized 56 Chevy..... back in the day.
I"ve done most of the work myself with slow progress but no major problems. I had two guys help me set the unit down onto the heads and it went with only a minor problem which was that the wire loom on my 2002 5.3 had a ground strap running to the block on the passenger side clear at the back of the engine and leaving this connected made it difficult to pull the loom up far enough to get the Radix in without having to risk damage to the gaskets. We had to remove the ground but then it was not possible to reach that bolt to reinstall it.... had to find a new ground bolt.
Be sure to get the loom as far out of the way as possible. I ran it up under the windshield wipers.
I'm getting help to do the wiring. No way I'm cutting into any wiring looms. I'm too clumsy....and just plain scared of the electronics.
I have a fuel filter up under the truck and the new fuel pump that comes with the Radix attaches to the frame at that point. I'm going to have to crawl under there today and do that installation and I'm thinking it's going to be difficult to drill a 21/64's hole in the frame laying on my back and it occurred to me last night that had I read through the instructions better before I started that I might have been able to do this part of the job prior to everything else and have done it up on a hoist somewhere.
Have some good electricians tape handy to retape some of the loom. Buy a in/pd torque wrench. I took the valve covers off and had the alternator gutted so I could have them powder coated to match the truck whille it was torn down... also the bracket that serves as the snout rest for the supercharger and a couple of other small items. I got some spray brake cleaner to clean up the coil brackets etc while they were off the truck and some carb/choke cleaner to clean up the throttle body.
The instructions are pretty good. Read them well! Take is slowly and HAVE FUN... it really is fun! I'd forgotten how much fun it is to do some wrenching.... but this dammed sure is a LOT different than rebuilding the 283 I had in my prized 56 Chevy..... back in the day.
 Be absolutely sure you do not put that ground lug on anything other than a known chassis ground!!! Do not ground to the valve cover bolts, they are insulated, and won't ground! Have fun!
  Aug 12, 2005 | 09:45 AM
#7

JimS - you don't have to have that fuel pump upgrade to drive the truck. It just assists the stock fuel pump to keep the pressure up under high demand, but it doesn't change the pressure. You can skip the fuel pump part for now and drive the truck to a shop or garage that has a lift. Just drive it moderately until you get the pump upgraded. I drove mine for quite a while on just the stock pump, and I wasn't easy on it either.
Damon - Most people prefer going to a plug one heat range cooler. The most common one used is the NGK TR6 plug. Its copper and is supposed to be pre-gapped at .035 which is just fine for your blow application. I'd go ahead and do the plugs so its one less thing on your mind later on. Go ahead and change the fuel filter at same time. You'll have it off anyway doing the install.
What boost gauge did you get? It doesn't matter really. There is a small fitting on the drivers side rear on top of the Radix manifold. In the install instructions, look at the section / pics dealing with the fuel pressure regulator. When you put the regulator on the new fuel rail, you have to hook a small hose up to it connecting to the Radix manifold. Thats a spot you can use. Install a T in that hose to connect both the regulator and the boost gauge. Most Autometer gauges I've seen have the needed hose and T connections in the box.
To watch your IATs, you'll need some sort of scanner. It can be a handheld device like the Predator that TheRock was talking about, or it can be some software and cable that run off a laptop, which is the most common way. Autotap, EFILive, and HPTuners are popular choices in software scanning. These that come in real handy since you can record live data from your vehicle, it will read and reset codes on the dash. And if you buy the "tuning" packages from either EFILive or HPTuners, you'll be able to not only look at and log data, but also to make changes to a gazillion settings in the trucks computer. I personally use EFILive and am very pleased.
Trending Topics
Aug 12, 2005 | 12:23 PM
#9

Launching!
Joined: Apr 2003
Posts: 248
Likes: 0
From: Orange, CA
Originally Posted by DamonCollins
2. Where do I hook up my boost gauge to? (pics please)
4. What is the best way to find out w/ my IAT's are? Is there a scanner that I can get that will use an existing sensor?
http://www.aeroforcetech.com/GMtech.html