


4 link build
 Dec 31, 2009 | 10:35 PM
#11

Thread Starter


Joined: Feb 2002
Posts: 4,763
Likes: 8
From: Lawrenceburg, KY USA

- already have 305s (plenty of tire for my purposes)
- didn't want to relocate the fuel tank
- wanted to mount the bags over the axle to avoid panhard/bag issues
 Jan 1, 2010 | 11:46 AM
#13
Thread Starter
Joined: Feb 2002
Posts: 4,763
Likes: 8
From: Lawrenceburg, KY USA

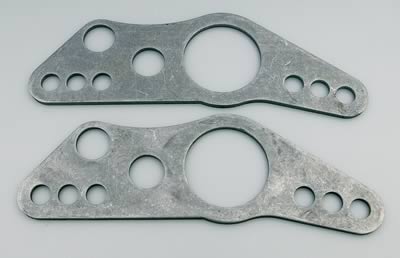
no kit, just a bunch of brackets from summit:
http://www.summitracing.com/parts/CEE-3412/
and
http://www.summitracing.com/parts/CEE-3410/
I'll figure out exactly where I'm going to mount the shocks this afternoon/tomorrow morning once everything else is set. Currently I'm thinking inside the frame on the back side of the axle (much like the stock left shock was). I will just flame cut some 1/4" plate which I'll drill and mill up to produce the bracket.
Last edited by 2001CamaroGuy; Jan 1, 2010 at 08:59 PM.
 Jan 1, 2010 | 01:57 PM
#16

To the OP. I understand everything you said and it makes sense. ive got very little experience with 4 links on a street car. all my involvement has been 9 second and faster drag cars. learn something new every day.
a lot of the time people doing a 4 link setup they will also narrow the rear. therefore the ends of the axle are cut off and you can just slide the brackets over the tubes. in his case you can cut the bracket to get it on and have no real adverse affects
a lot of the time people doing a 4 link setup they will also narrow the rear. therefore the ends of the axle are cut off and you can just slide the brackets over the tubes. in his case you can cut the bracket to get it on and have no real adverse affects
Jan 1, 2010 | 04:03 PM
#17
Thread Starter
Joined: Feb 2002
Posts: 4,763
Likes: 8
From: Lawrenceburg, KY USA
The axle holes in the brackets are for 3" and it looks like these truck 10bolts are something like 3.25", so the hole required a bit of grinding out (nothing major). Once the bracket was tacked to the axle tube, I went back and closed in the "open back" with a piece of 1/4" plate (just some little "straps" really) to tie everything together.

 Jan 15, 2010 | 01:02 AM
#19
Thread Starter
Joined: Feb 2002
Posts: 4,763
Likes: 8
From: Lawrenceburg, KY USA
So it's finished! (kind of...will explain in a sec)
First though...HOLY ****!!!!!!!!! That's about the best way to describe the change! The truck is so responsive and predictable. I have the A/S at 65% but will indeed be upping it since the tires just roast from a dig.
Power slide turns are a thrill in this thing. Punch it from a dig on a right hand turn and it feels like the truck is balanced on a pin. It just snaps over. Let off to let the tires catch and you're going places! It is like the truck is on rails all the way to 100 (most I have pushed it thus far).
Everyone makes such a big deal of rod ends but THEY WORK! They don't slack up, they don't shift, and they don't make noise (provided you use good ones).
Finally, with the leaf springs I found the truck to "buck" very badly on slight down hill grades. The cruise would click off (close the throttle) trying to not over speed. This would result in the leaf springs "slacking up" (think of a long freight train) causing a slight "buck". When speed dropped, the cruise would kick back in. This would cause the leaf springs to "pull out slack" causing another "buck". Going down the road with cruise was annoying as all hell. "buck buck buck buck" for miles.... BUT...no longer! Now the cruise clicks off and on without any "buck" since the rearend is not "bouncing around" under the body.
As far as the bags, they still need some "work" to finish them up. They are on but I really need to relocated them behind the axle to get full extension. The bags are designed to ride at about 8" but I'm having to run them about 6" to maintain ride height which is making them springy. I didn't know till after the fact that running bags lower then "design height" causes them to ride in a highly aggressive progression area (in regard to spring rate). It makes them really bouncy. I'm thinking over the next few weeks I'll make up a kind of cantilever bracket to mount the bag on. Still working that out.
I have not taken any "finished" pictures but here is what I do have.
These are the finished 4 link and the bags in place.
First though...HOLY ****!!!!!!!!! That's about the best way to describe the change! The truck is so responsive and predictable. I have the A/S at 65% but will indeed be upping it since the tires just roast from a dig.
Power slide turns are a thrill in this thing. Punch it from a dig on a right hand turn and it feels like the truck is balanced on a pin. It just snaps over. Let off to let the tires catch and you're going places! It is like the truck is on rails all the way to 100 (most I have pushed it thus far).
Everyone makes such a big deal of rod ends but THEY WORK! They don't slack up, they don't shift, and they don't make noise (provided you use good ones).
Finally, with the leaf springs I found the truck to "buck" very badly on slight down hill grades. The cruise would click off (close the throttle) trying to not over speed. This would result in the leaf springs "slacking up" (think of a long freight train) causing a slight "buck". When speed dropped, the cruise would kick back in. This would cause the leaf springs to "pull out slack" causing another "buck". Going down the road with cruise was annoying as all hell. "buck buck buck buck" for miles....
BUT...no longer! Now the cruise clicks off and on without any "buck" since the rearend is not "bouncing around" under the body.As far as the bags, they still need some "work" to finish them up. They are on but I really need to relocated them behind the axle to get full extension. The bags are designed to ride at about 8" but I'm having to run them about 6" to maintain ride height which is making them springy. I didn't know till after the fact that running bags lower then "design height" causes them to ride in a highly aggressive progression area (in regard to spring rate). It makes them really bouncy. I'm thinking over the next few weeks I'll make up a kind of cantilever bracket to mount the bag on. Still working that out.
I have not taken any "finished" pictures but here is what I do have.
These are the finished 4 link and the bags in place.
Last edited by 2001CamaroGuy; Jan 15, 2010 at 01:10 AM.
Jan 15, 2010 | 01:03 AM
#20
Thread Starter
Joined: Feb 2002
Posts: 4,763
Likes: 8
From: Lawrenceburg, KY USA
another picture of the bag in place and of the axle. last 2 are producing the frame mount for the panhard rod. 1st is drilling the holes on the mill. 2nd is after flame cutting and grinding to shape. I make all my "duplicate" brackets as one "block" by welding multiple plates together and cutting them as one. Then when I brake the welds I have identical pieces.
Last edited by 2001CamaroGuy; Jan 15, 2010 at 01:09 AM.