My new powerplant (408 with a healthy direct port shot)

 Jul 6, 2009 | 09:48 AM
#102

Alright, A quick update to my build is in order.
First off, I installed a second "stage" / nitrous kit that will be for fun on the street so to speak. This is a dry kit sprayed through the MAF.
First thing I did was source a filter with a metal cap so I can drill and install the nozzle effectively. Here is the end result:

I wasn't going to do a purge set-up on this however after realizing how far the nitrous needs to travel from the bottle through the intake and finally into the combustion chambers, I installed one. The following picture is how I mounted the main nitrous solenoid and purge. I chose to mount the solenoids inside the CAI filter box for some added flair and to hide as much wiring as possible.

I installed a 50 shot jet to start off with however will most likely go with a 75 when all said and done. I think I will have enough injector to safely fuel a 100 dry shot however I don't need that. If and when I pill up the direct port for a large shot, the dry kit will be used for the launch and the DP kit will come on progressively once the truck is moving well. Dumping a large shot at launch is bound to break parts pretty quick. The intent here is to make it as smooth as possible and still have the ability to play off the track. The DP and external fuel system is not really street friendly. Anyway, here is the mounting strategy with the jet installed and hooked up to the nozzle:

And finally all cleaned up with a plexi cover to show off the goods. I am not big on stickers however a nice themed decal sets it off well IMO:

O.K., bottles. I went with a dual 10# bottle set-up with billet bracketry. To clean up the bed a bit, I installed a bed rug for a clean look and to match the X-2000 bed cover liner. I don't have the lines hooked up in this picture so please ignore the sloppiness of the two braided lines...they will neatly tuck up when completed:

A closer shot of how I mounted the bottles. The bracketry allows for a choice of bottle positions with a simple pin change. The bottle bracket also doubles as a handy carrying handle when it is time for refills:

Every truck whether it be stock or highly modified needs a fire extinguisher. Here is one of mine (I have 2) mounted to the bed with a billet aluminum bracket. The fire extinguishers I use are from H3R Performance and are the "Halguard" or "Halotron" variety. This type is NHRA approved and doesn't spray a thick layer of white powder you will need to clean off later in the event of discharge.

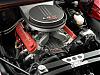
Random shot of the engine bay so far from the passenger side. I redid the catch can lines with some rubber hose and fancy anodized end caps as well as alot of wiring hiding and tucking. I am by far not done however it makes progress everytime I open the hood:

And from the drivers side. Please ignore the colors...my digi cam is just about dead (no that is not the new "Orange Top" optima battery!). In this pic you can see my quick improvement on the coolant hose from last time as well. When I get time, I will weld up a complete metal tube with bends rather than use rubber hose bends. Hey, its a work in progress, at least this looks a little better than that floppy stock hose. I also mounted the fues holder in a different location. Take note of the grounding wire I added to the alternator bracket. If you paint or powdercoat the bracket, be sure make a new solid ground and avoid issues like I had:

So I emptied my catch can for the first time a little while back (at 1500 miles) and this is the result:

That sludge is the crap that gums up the top half of your motor and also creates a nasty environment for your rotating assembly. As I drained the can, it started out as water (condensate) then the oily sludge came out. The sludge had a gasoline odor and was very dark. The quantity was small (2-3 tablespoons) however I am satisified on the performance of my crankcase venting system and catch can. You can read back in this build thread on how I constructed my particular venting system with the catch can.
First off, I installed a second "stage" / nitrous kit that will be for fun on the street so to speak. This is a dry kit sprayed through the MAF.
First thing I did was source a filter with a metal cap so I can drill and install the nozzle effectively. Here is the end result:
I wasn't going to do a purge set-up on this however after realizing how far the nitrous needs to travel from the bottle through the intake and finally into the combustion chambers, I installed one. The following picture is how I mounted the main nitrous solenoid and purge. I chose to mount the solenoids inside the CAI filter box for some added flair and to hide as much wiring as possible.
I installed a 50 shot jet to start off with however will most likely go with a 75 when all said and done. I think I will have enough injector to safely fuel a 100 dry shot however I don't need that. If and when I pill up the direct port for a large shot, the dry kit will be used for the launch and the DP kit will come on progressively once the truck is moving well. Dumping a large shot at launch is bound to break parts pretty quick. The intent here is to make it as smooth as possible and still have the ability to play off the track. The DP and external fuel system is not really street friendly. Anyway, here is the mounting strategy with the jet installed and hooked up to the nozzle:
And finally all cleaned up with a plexi cover to show off the goods. I am not big on stickers however a nice themed decal sets it off well IMO:
O.K., bottles. I went with a dual 10# bottle set-up with billet bracketry. To clean up the bed a bit, I installed a bed rug for a clean look and to match the X-2000 bed cover liner. I don't have the lines hooked up in this picture so please ignore the sloppiness of the two braided lines...they will neatly tuck up when completed:
A closer shot of how I mounted the bottles. The bracketry allows for a choice of bottle positions with a simple pin change. The bottle bracket also doubles as a handy carrying handle when it is time for refills:
Every truck whether it be stock or highly modified needs a fire extinguisher. Here is one of mine (I have 2) mounted to the bed with a billet aluminum bracket. The fire extinguishers I use are from H3R Performance and are the "Halguard" or "Halotron" variety. This type is NHRA approved and doesn't spray a thick layer of white powder you will need to clean off later in the event of discharge.
Random shot of the engine bay so far from the passenger side. I redid the catch can lines with some rubber hose and fancy anodized end caps as well as alot of wiring hiding and tucking. I am by far not done however it makes progress everytime I open the hood:
And from the drivers side. Please ignore the colors...my digi cam is just about dead (no that is not the new "Orange Top" optima battery!). In this pic you can see my quick improvement on the coolant hose from last time as well. When I get time, I will weld up a complete metal tube with bends rather than use rubber hose bends. Hey, its a work in progress, at least this looks a little better than that floppy stock hose. I also mounted the fues holder in a different location. Take note of the grounding wire I added to the alternator bracket. If you paint or powdercoat the bracket, be sure make a new solid ground and avoid issues like I had:
So I emptied my catch can for the first time a little while back (at 1500 miles) and this is the result:
That sludge is the crap that gums up the top half of your motor and also creates a nasty environment for your rotating assembly. As I drained the can, it started out as water (condensate) then the oily sludge came out. The sludge had a gasoline odor and was very dark. The quantity was small (2-3 tablespoons) however I am satisified on the performance of my crankcase venting system and catch can. You can read back in this build thread on how I constructed my particular venting system with the catch can.


 Jul 6, 2009 | 11:19 AM
#105
GFYS and STFU
iTrader: (8)
Joined: Jan 2007
Posts: 13,870
Likes: 4
From: Here and sometimes there too.
Beautiful work Kevin! Time very well spent! Curious about the coolant hose. Making it metal will look nice and will surely help radiate heat out of it but it's not gonna be one solid piece is it? That hose will need some room to flex along with the engine as she rocks back and forth on the mounts when under load. Just a thought!
Looking !! What's left to do?
Looking
!! What's left to do?
 Jul 6, 2009 | 01:55 PM
#108

Lookin good, I love the airbox setup with the solenoids mounted inside 
It's just like how a fbody is. The coolant line doesn't flex much because of its location relative to the axis the motor rotates under load. Looks much better than the massive snake-like stock hose.
Beautiful work Kevin! Time very well spent! Curious about the coolant hose. Making it metal will look nice and will surely help radiate heat out of it but it's not gonna be one solid piece is it? That hose will need some room to flex along with the engine as she rocks back and forth on the mounts when under load. Just a thought!
Looking!! What's left to do?
Looking
!! What's left to do?
Jul 6, 2009 | 01:56 PM
#109
That looks great Kevin!! Very clean install. I'm not a fan of stickers and decals either but that looks great  Where did you exit the purge at? Which injectors are you running again? I forgot.
Where did you exit the purge at? Which injectors are you running again? I forgot.