
Tranny Cooler

 Jun 6, 2005 | 05:35 PM
#12

Originally Posted by gonzo 6.0
I have heard of to many B&M coolers leaking at the seams.Mostly paying for the name.
 Jun 6, 2005 | 08:57 PM
#13

Originally Posted by David Cairns
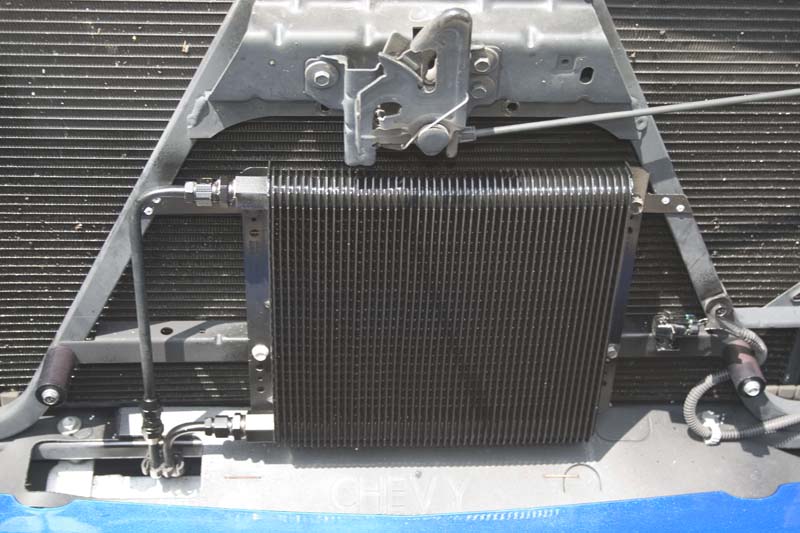
Here is what I did when I installed my B&M Transmission cooler a couple days ago.
B&M Coolers
70274 - SuperCooler rated at 29,200 BTU 11"x11"x1-1/2" (has female 1/2 NPT fittings).
I wanted to use all metal tubing, rather than hoses. I didn't want to trust hoses.
Overall view. I had to fabricate the upper brace from some aluminum angle stock. for the lower brace, I just flipped the stock brace backwards (trimming some excess angle so it would fit.
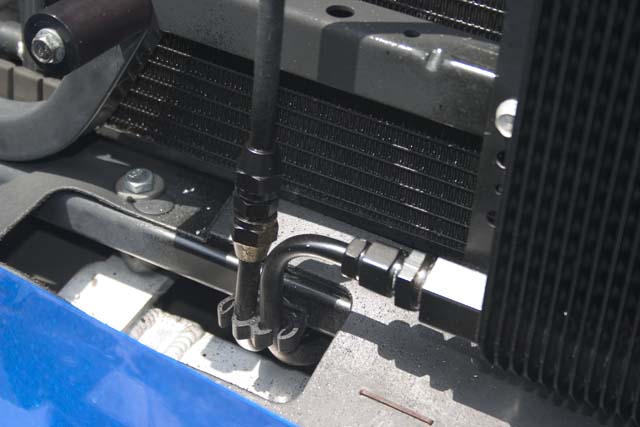
Close up of the plumping. From the cooler, it took an Edelman 210860 (1/2 male NTP to 3/8 female NTP) and then an Edelman 124660 (3/8 male NTP to 3/8 inverted flare). Wish I could have found and adapter to do it in one step . I had to cut the stock tubes with a small tubing cutter and then flare the ends. I used the left over piece of tubing to be the new route up to the top fitting on the cooler.
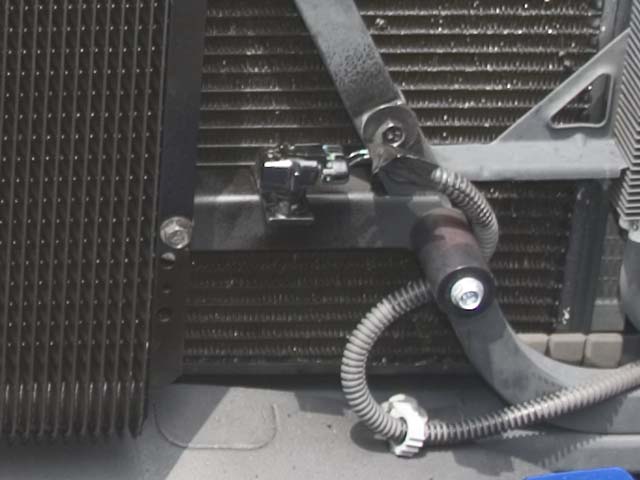
Since I flipped the cross brace around, I tacked a bit of aluminum bar onto it for mounting the outside air temp sensor. Gave it a shot of black paint, while I was at it. In case you are wondering, the big spacers on the bolts that hold the lower brace are left overs from the original heat exchanger for the Radix. I left them there in case I need to add something else in front.
B&M Coolers
70274 - SuperCooler rated at 29,200 BTU 11"x11"x1-1/2" (has female 1/2 NPT fittings).
I wanted to use all metal tubing, rather than hoses. I didn't want to trust hoses.
Overall view. I had to fabricate the upper brace from some aluminum angle stock. for the lower brace, I just flipped the stock brace backwards (trimming some excess angle so it would fit.
Close up of the plumping. From the cooler, it took an Edelman 210860 (1/2 male NTP to 3/8 female NTP) and then an Edelman 124660 (3/8 male NTP to 3/8 inverted flare). Wish I could have found and adapter to do it in one step
. I had to cut the stock tubes with a small tubing cutter and then flare the ends. I used the left over piece of tubing to be the new route up to the top fitting on the cooler.Since I flipped the cross brace around, I tacked a bit of aluminum bar onto it for mounting the outside air temp sensor. Gave it a shot of black paint, while I was at it. In case you are wondering, the big spacers on the bolts that hold the lower brace are left overs from the original heat exchanger for the Radix. I left them there in case I need to add something else in front.
Jun 6, 2005 | 09:25 PM
#14

TECH Veteran
Joined: Mar 2004
Posts: 4,632
Likes: 2
From: Sun Diego
Is there any reason the basic B&M 24000 GVW (P/N 70264) wouldn't work just fine? I mean, I don't even have a stock tranny cooler, so anything would be better than nothing, right? The reason I am looking into that cooler is because it comes with everything you need to hook it up...plus it is a tranny cooler, not a universal cooler, so it has the 'Low Pressure Drop (LPD)' feature.
Jun 6, 2005 | 09:39 PM
#15

I was told by many GM techs and I had my buddy that works for GM look up specs on what the tranny operating temps are 150 to 230 is what I was told. I wouldnt worry about it unless temps are exceeding 200-210.
If youve got 130k on the tranny as it is, why fix something if it isnt broken?
What temp is it operating at now?
If youve got 130k on the tranny as it is, why fix something if it isnt broken?
What temp is it operating at now?
Jun 7, 2005 | 09:18 AM
#16

Launching!
Joined: Apr 2003
Posts: 248
Likes: 0
From: Orange, CA
Originally Posted by 02sierraz71_5.3
why fix something if it isnt broken?
In my case, the SS with the Radix is pretty hard on the transmission. Plus, I plan to try towing a travel trailer this summer, so I was looking to upgrade the transmission cooler.
 Jun 7, 2005 | 09:25 AM
#18

Originally Posted by Wilde Racing

Here is what I did. My B&M is alittle smaller than David Cairns's. I wish I would have seen his set-up before I did mine.
Nothing wrong with this install.
Jun 7, 2005 | 09:52 AM
#19
Launching!
Joined: Apr 2003
Posts: 248
Likes: 0
From: Orange, CA
That looks good. As I was figuring out how to mount mine, I was wishing I had got the smaller one like yours. It would be plenty good for my needs and aligns with the existing fluid lines. I only would have needed to trim the ends of the lines and flare them, to hook it up.
Looking at your install some more, how did you get the cooler mounted to the lower bracket? Did you cut the angle off part of the lower bracket? If I see it right, you still have the lower bracket with the angle facing forwards, so the mounting tab from the cooler would not mate, unless you removed some of the angled part of the lower bracket. And did you ever find a way to get from 1/2 NTP to 3/8 inverted flare in one step? (your picture shops the lines unfinished).
Looking at your install some more, how did you get the cooler mounted to the lower bracket? Did you cut the angle off part of the lower bracket? If I see it right, you still have the lower bracket with the angle facing forwards, so the mounting tab from the cooler would not mate, unless you removed some of the angled part of the lower bracket. And did you ever find a way to get from 1/2 NTP to 3/8 inverted flare in one step? (your picture shops the lines unfinished).