AC system rebuild, 2001 suburban
 Jun 22, 2014 | 05:02 AM
#1
Thread Starter
TECH Fanatic

Joined: Jun 2011
Posts: 1,292
Likes: 5
From: Houston
This thread may not be "engine performance" related, however everyone appreciates AC performance � especially in Texas � so here is my writeup. I put it in this forum because it has by far the most views.
I recently rebuilt the AC system on my 2001 Suburban LT with rear air. The system had displayed the following symptoms:
Cycling on and off. Air would stay cold for a short time, then get warm, and repeat.
The AC belt tensioner jumped around too much, causing premature failure of the tensioner.
The coldest air temp I could get at the vent was 70-deg F.
I replaced all the main parts (minus the heat exchangers), and all new seals, oil, and freon. Here are the part numbers:
Compressor, Delphi P/N: CS20039 (cheapest source is Rock Auto, $100 less than local parts stores)
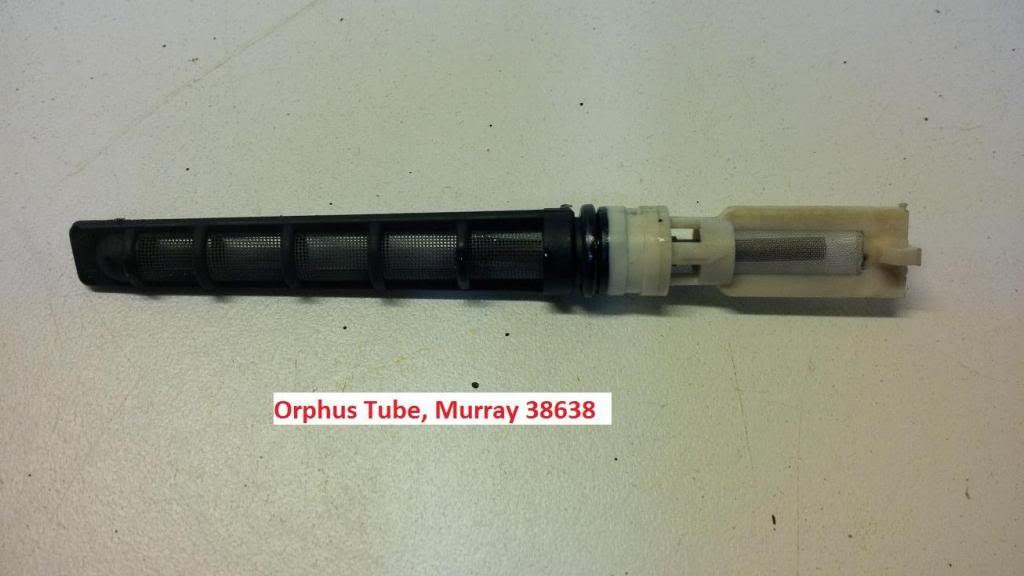
Orphus Tube, Murray P/N: 38638
Accumulator/Drier, Murray P/N: 703733
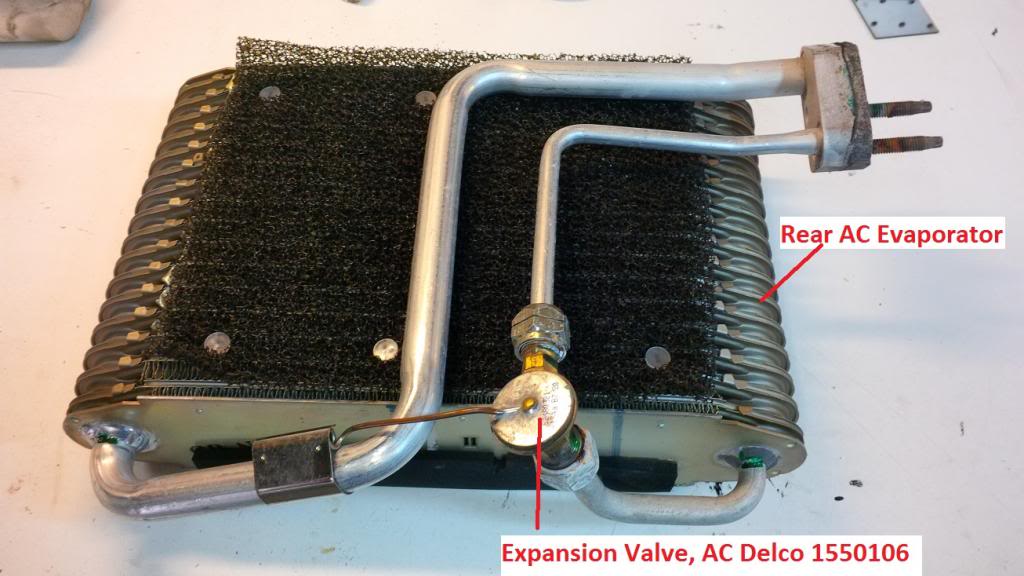
Rear Expansion Valve, AC Delco P/N: 1550106
High Pressure Switch, Murray P/N: 36655
High Pressure Switch, Murray P/N: 20055
Low Pressure Switch, Murray P/N: 37308
High Pressure Service Port, Murray P/N 59946
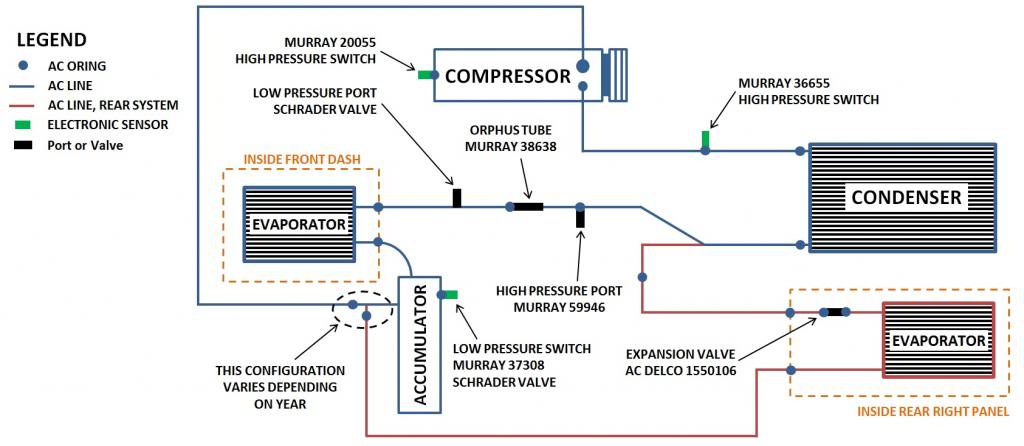
Here is the diagram of the whole system:
The first thing to pull out was the orphus tube. It was really clean for a truck with 130k miles.
Next I pulled out all hoses/tubes that were under the hood. I did not pull out the long hoses that go to the rear AC. These run the entire length of the truck.


I thoroughly flushed and cleaned every hose (including the rear AC hoses), blew out with compressed air, then plugged with earplugs or wads of paper towels.

Then I pulled out the accumulator (drier) and the insulation half-shells.

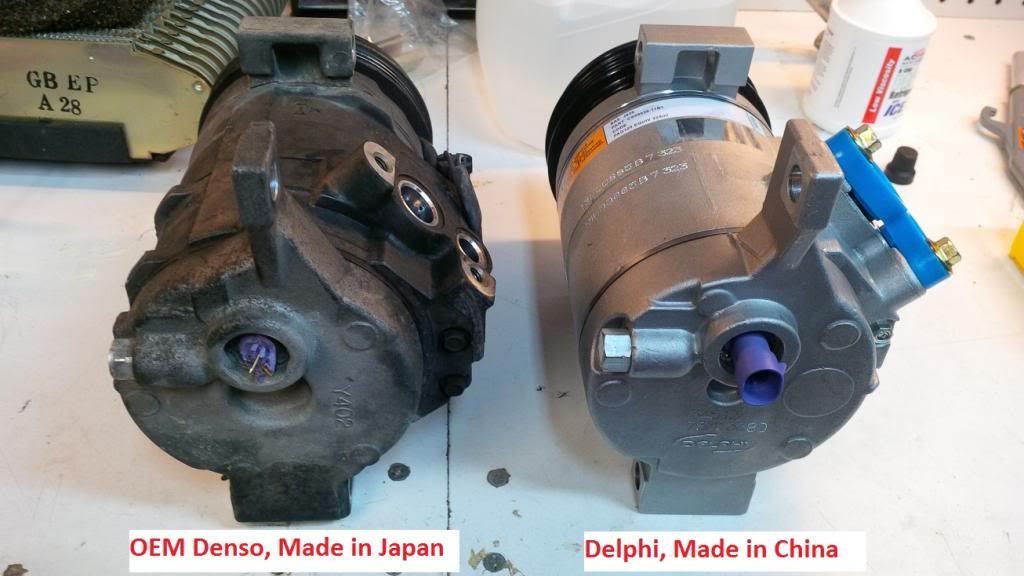
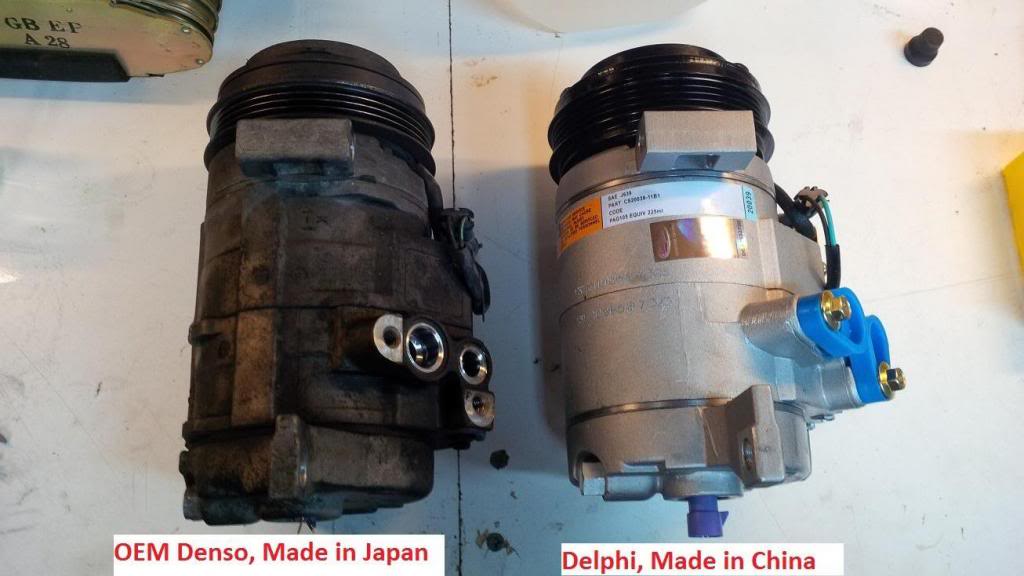
Then I pulled out the old compressor. Here are some comparison shots.
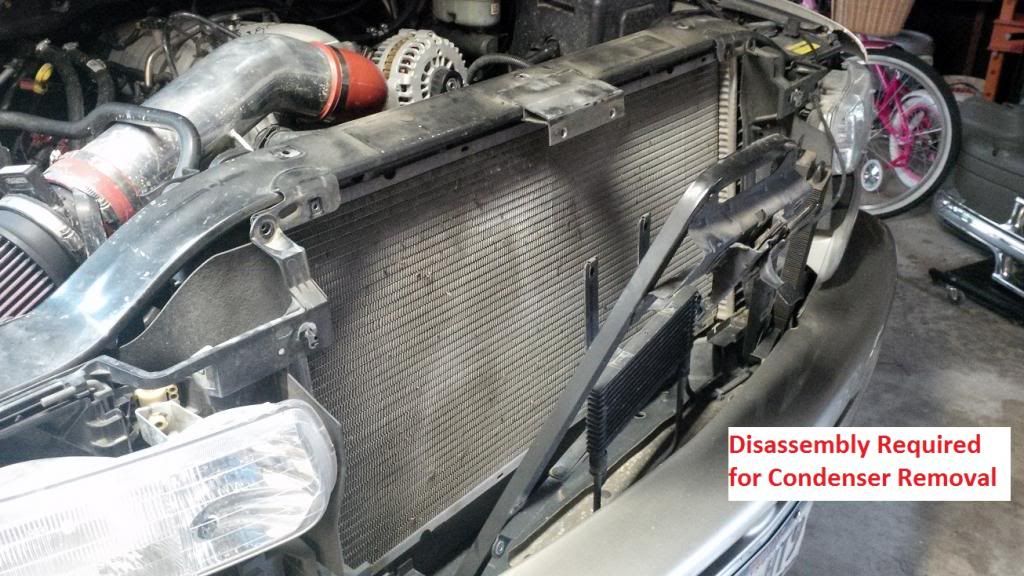
Next I decided to pull out the condenser for cleaning and flushing. I figured that since the condenser was immediately downstream of the compressor, if there was any junk or debris in the system, the condenser would catch it first.
Here is the disassembly required to remove the condenser:
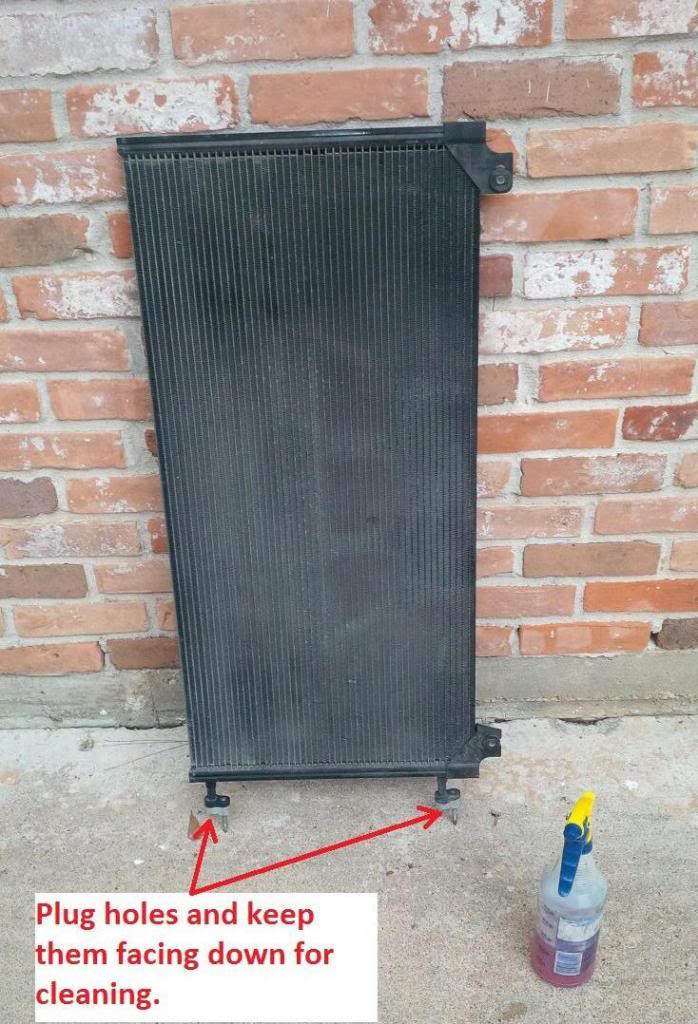
I cleaned the outside and flushed the inside. The inside was thoroughly cycled with compressed air afterwards. It turned out that there was no debris inside the condenser. Everything that came out was clean.
I did not remove the front AC evaporator, however I did blow with compressed air from the outlet port, and nothing but clean oil came out from the inlet port. This was my way of checking to ensure that this part of the circuit was clean and fit for use.
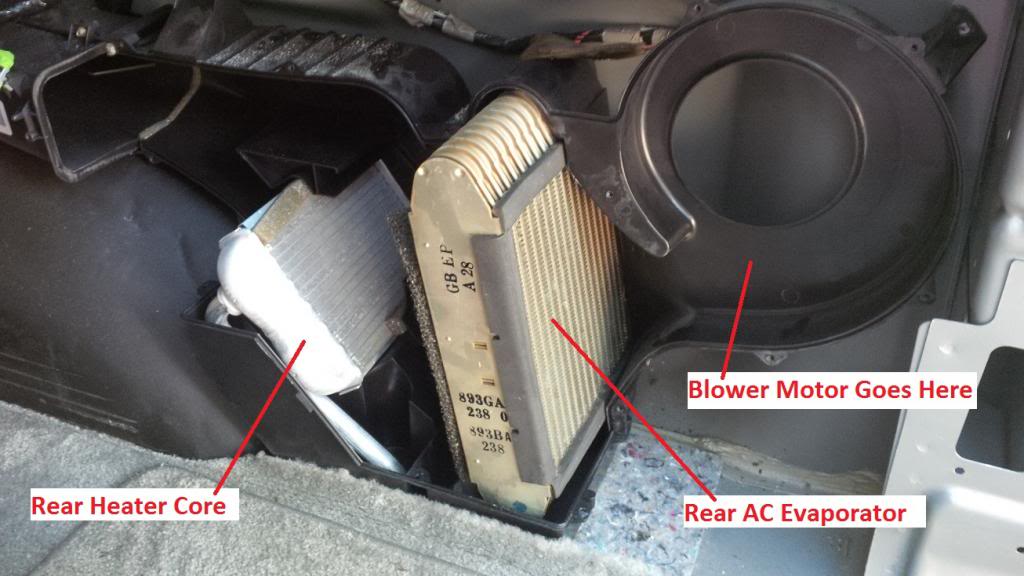
Here are some details on the rear AC system. This picture is with the rear assembly taken apart. There is an expansion valve attached to the rear evaporator that I opted to replace.
Here are the rear AC hoses underneath the assembly shown above. I �flushed and blew� both of these hoses as well.
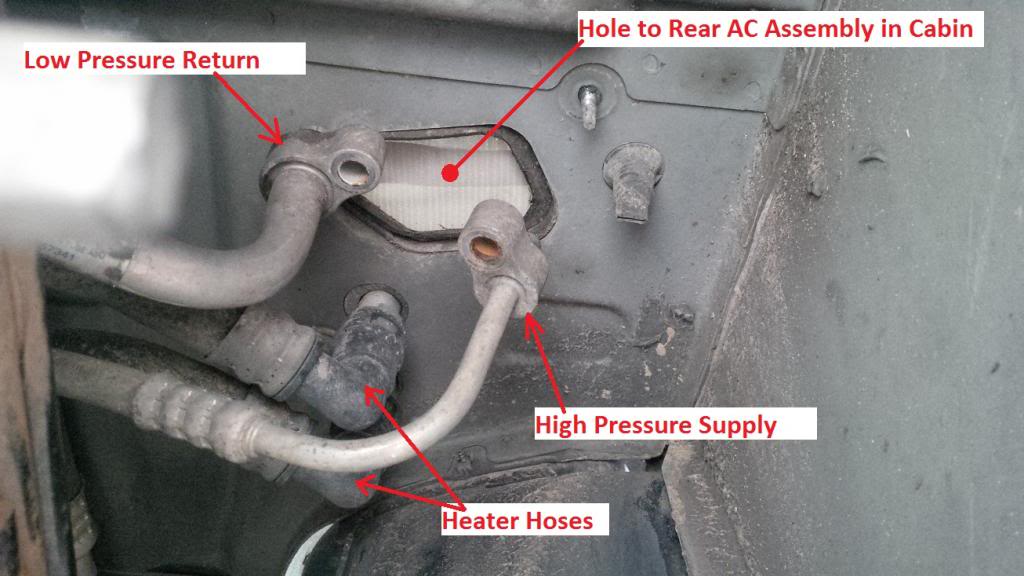
The rear evaporator can be removed without disconnecting the heater hoses, however it�s a little tricky. I replaced the expansion valve and cleaned/flushed the evaporator.
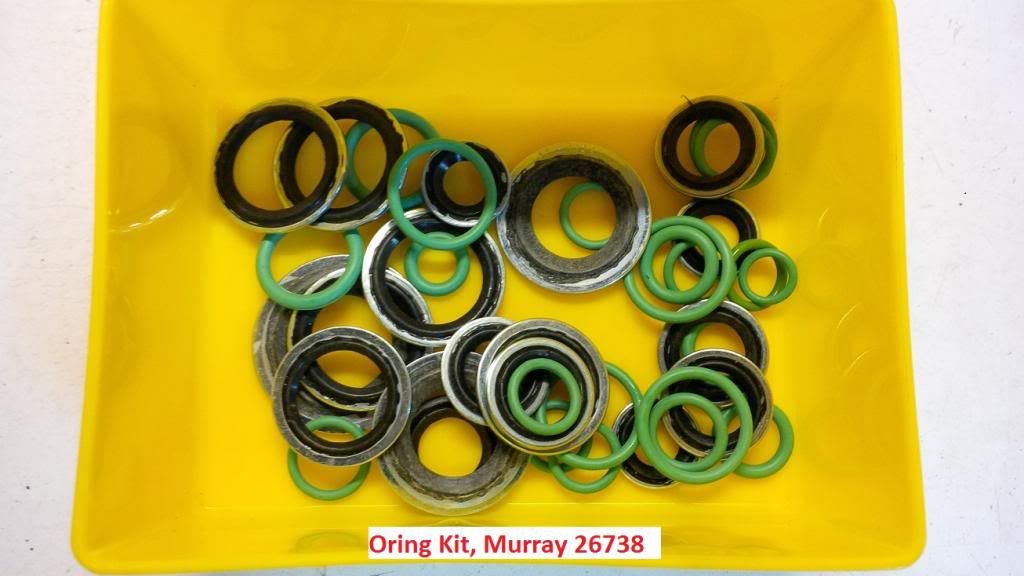
Now its time to start rebuilding. I bought one of the complete seal kits as shown below. I only ended up needing maybe 1/4th of these.
I replaced the Schrader valve at the low pressure service port. The only other Schrader valve in the system is under the low pressure switch on the accumulator, however the new accumulator comes with a new Schrader valve already installed.

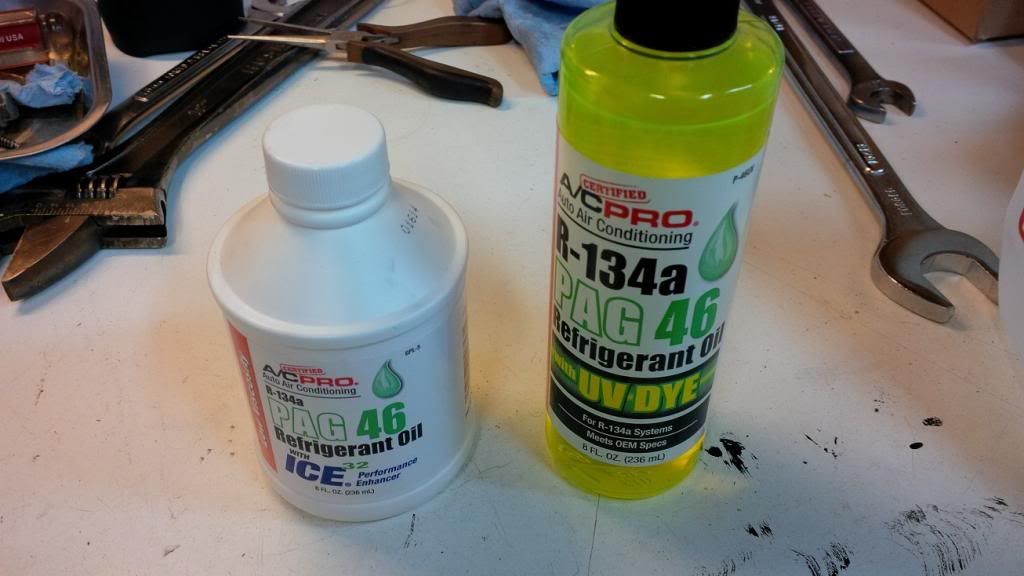
The system requires PAG 46 type oil. The compressor requires 11 oz, and its recommended to put an ounce or two into the accumulator and condenser also. Since the oil comes in 8 oz bottles, its required to buy 2 bottles. I recommend buying one with the dye, and another without. This way you can use the one without dye to lube all the new orings.
Also, the new compressor came with some oil already inside. I drained this oil and it was full of crud and particles. I replaced the oil with new stuff.
Here is the new accumulator (drier) with the new low pressure switch installed.

I put everything back together with all new seals (fresh oil on each seal). Then I hooked up a vacuum pump and held -29 inHg for about 45 minutes. The pump was rented for free from Autozone, the gauge set was purchased at Harbor Freight.
...continued on next post...
I recently rebuilt the AC system on my 2001 Suburban LT with rear air. The system had displayed the following symptoms:
Cycling on and off. Air would stay cold for a short time, then get warm, and repeat.
The AC belt tensioner jumped around too much, causing premature failure of the tensioner.
The coldest air temp I could get at the vent was 70-deg F.
I replaced all the main parts (minus the heat exchangers), and all new seals, oil, and freon. Here are the part numbers:
Compressor, Delphi P/N: CS20039 (cheapest source is Rock Auto, $100 less than local parts stores)
Orphus Tube, Murray P/N: 38638
Accumulator/Drier, Murray P/N: 703733
Rear Expansion Valve, AC Delco P/N: 1550106
High Pressure Switch, Murray P/N: 36655
High Pressure Switch, Murray P/N: 20055
Low Pressure Switch, Murray P/N: 37308
High Pressure Service Port, Murray P/N 59946
Here is the diagram of the whole system:

The first thing to pull out was the orphus tube. It was really clean for a truck with 130k miles.

Next I pulled out all hoses/tubes that were under the hood. I did not pull out the long hoses that go to the rear AC. These run the entire length of the truck.
I thoroughly flushed and cleaned every hose (including the rear AC hoses), blew out with compressed air, then plugged with earplugs or wads of paper towels.
Then I pulled out the accumulator (drier) and the insulation half-shells.
Then I pulled out the old compressor. Here are some comparison shots.


Next I decided to pull out the condenser for cleaning and flushing. I figured that since the condenser was immediately downstream of the compressor, if there was any junk or debris in the system, the condenser would catch it first.
Here is the disassembly required to remove the condenser:

I cleaned the outside and flushed the inside. The inside was thoroughly cycled with compressed air afterwards. It turned out that there was no debris inside the condenser. Everything that came out was clean.

I did not remove the front AC evaporator, however I did blow with compressed air from the outlet port, and nothing but clean oil came out from the inlet port. This was my way of checking to ensure that this part of the circuit was clean and fit for use.
Here are some details on the rear AC system. This picture is with the rear assembly taken apart. There is an expansion valve attached to the rear evaporator that I opted to replace.

Here are the rear AC hoses underneath the assembly shown above. I �flushed and blew� both of these hoses as well.

The rear evaporator can be removed without disconnecting the heater hoses, however it�s a little tricky. I replaced the expansion valve and cleaned/flushed the evaporator.

Now its time to start rebuilding. I bought one of the complete seal kits as shown below. I only ended up needing maybe 1/4th of these.

I replaced the Schrader valve at the low pressure service port. The only other Schrader valve in the system is under the low pressure switch on the accumulator, however the new accumulator comes with a new Schrader valve already installed.
The system requires PAG 46 type oil. The compressor requires 11 oz, and its recommended to put an ounce or two into the accumulator and condenser also. Since the oil comes in 8 oz bottles, its required to buy 2 bottles. I recommend buying one with the dye, and another without. This way you can use the one without dye to lube all the new orings.
Also, the new compressor came with some oil already inside. I drained this oil and it was full of crud and particles. I replaced the oil with new stuff.

Here is the new accumulator (drier) with the new low pressure switch installed.
I put everything back together with all new seals (fresh oil on each seal). Then I hooked up a vacuum pump and held -29 inHg for about 45 minutes. The pump was rented for free from Autozone, the gauge set was purchased at Harbor Freight.

...continued on next post...
Jun 22, 2014 | 05:04 AM
#2
Thread Starter
TECH Fanatic
Joined: Jun 2011
Posts: 1,292
Likes: 5
From: Houston
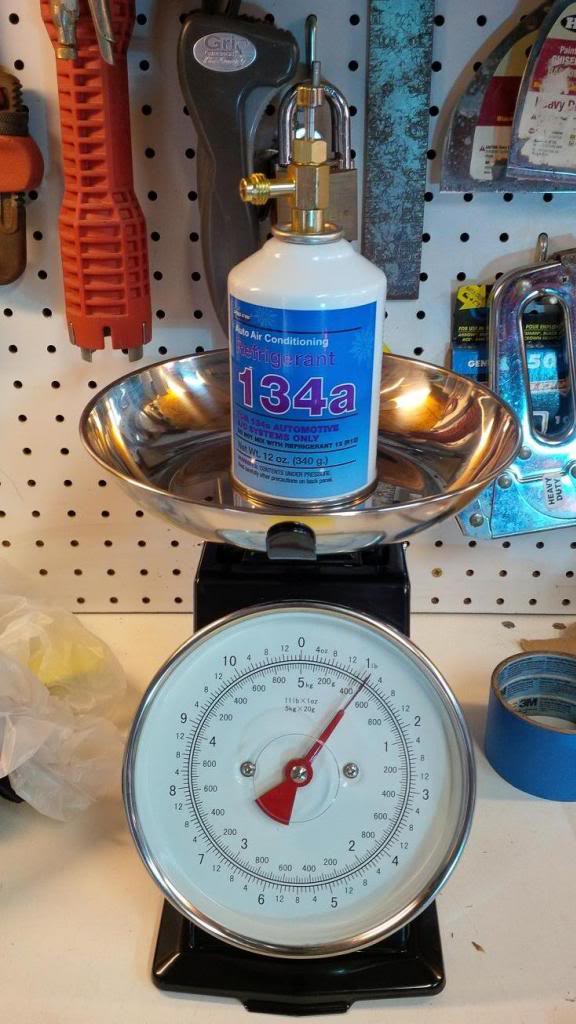
I bought the R134a Freon at Walmart. They had 12oz bottles for about $7 each. Next, to ensure I got the proper amount of Freon charge (48oz specification), I got a food scale and measured exactly how much from each bottle I put into the system. Of the 5 bottles I bought, 3 were at 12oz, and two were at 10oz of net fluid.
I'm confident that the scale is accurate within +/- 1oz. I tested it with various lead fishing weights in the sports/outdoor section at Walmart.
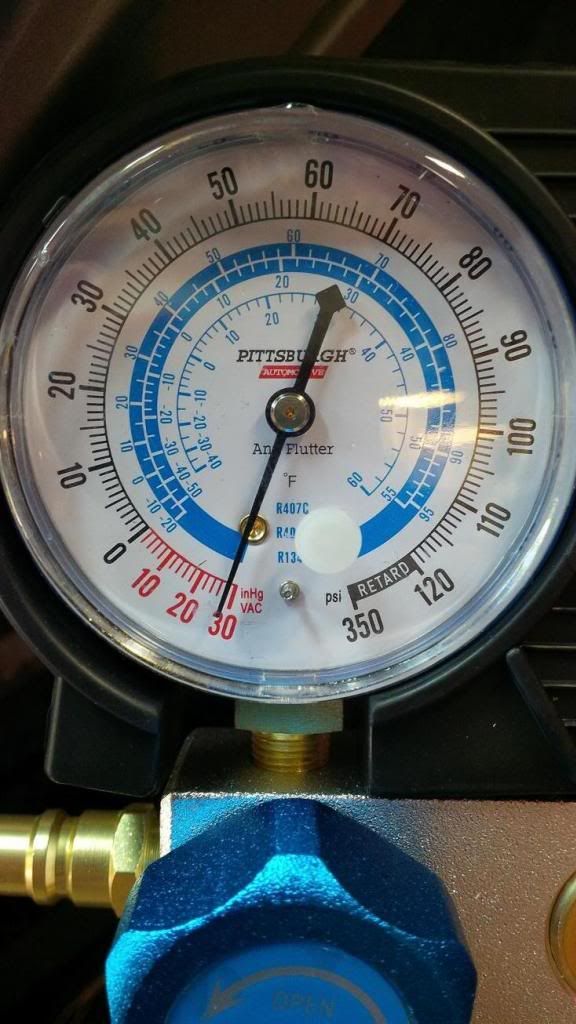
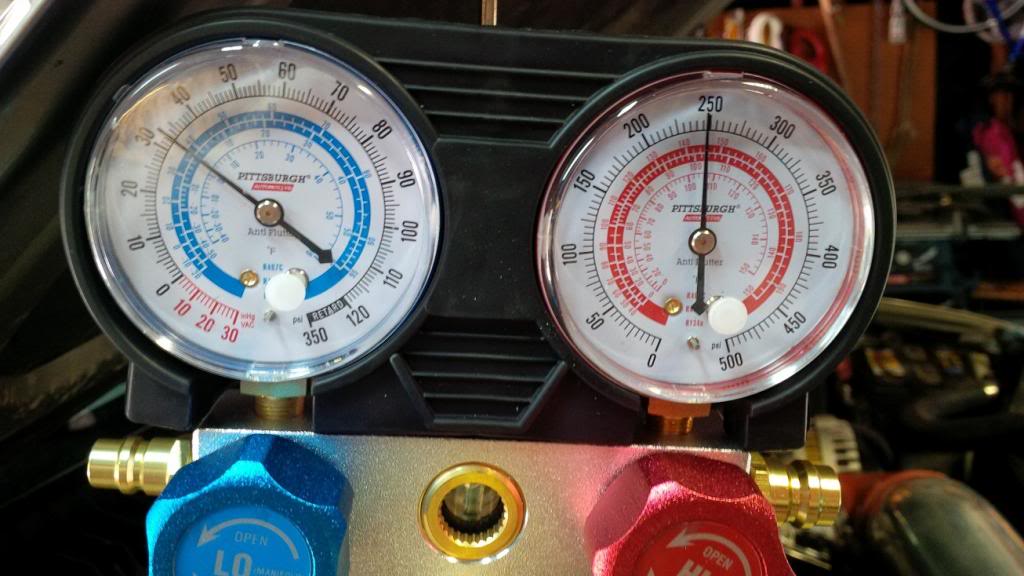
Here are the gauge pressures after I got 48oz of fluid into the system. This was at around 90-F with high humidity.
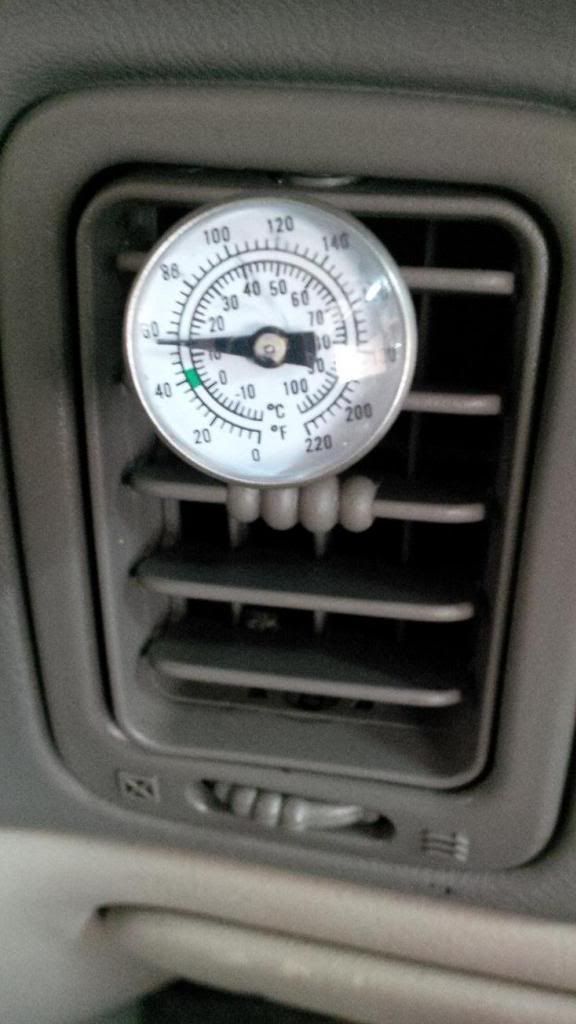
The lowest temperature at the vents was a steady 58-F. Considering how hot and humid the weather is right now, I think that is the best I can do. The system now feels like a new OEM system and the performance is excellent. I am extremely pleased with the results.
Thanks for reading, hopefully this helps some of you out there.

I'm confident that the scale is accurate within +/- 1oz. I tested it with various lead fishing weights in the sports/outdoor section at Walmart.

Here are the gauge pressures after I got 48oz of fluid into the system. This was at around 90-F with high humidity.

The lowest temperature at the vents was a steady 58-F. Considering how hot and humid the weather is right now, I think that is the best I can do. The system now feels like a new OEM system and the performance is excellent. I am extremely pleased with the results.

Thanks for reading, hopefully this helps some of you out there.
Jun 22, 2014 | 10:32 AM
#3

TECH Apprentice
Joined: Sep 2013
Posts: 320
Likes: 9
From: saudi arabia
i couldn't find a detailed instruction like your thread here about the ac system in our trucks-suvs
i tried a lot searching for something like this ,
thank you very much sir
i think this thread deserves a sticky
i tried a lot searching for something like this ,
thank you very much sir
i think this thread deserves a sticky

 Jun 22, 2014 | 05:34 PM
#6

Hold the engine RPM at around 2000, this should get you the best vent temp. Also, the temps are colder with the blower on low since there's less air moving thru the evaporator core allowing it to get colder, with a flush and recharge, I was able to get my 2007 blowing 41-42deg in 100+ ambient. I like how detailed all your threads are, good A/C is a must down here!!!
Jun 22, 2014 | 06:38 PM
#7


Awesome write up man. I'm currently in the process of reinstalling all my A/C parts and adding a custom line to keep away from my front mount turbo. Hopefully I'll be blowing cold air this week.
Trending Topics
Oct 5, 2014 | 10:11 AM
#8
Thread Starter
TECH Fanatic
Joined: Jun 2011
Posts: 1,292
Likes: 5
From: Houston
Well my AC journey has been very bumpy since this thread was started....
About 6 weeks after my system was up and running, the AC compressor clutch melted and disintegrated. I replaced with a new Denso compressor and everything seemed ok.
About 6 weeks after that, the new compressor seized!!
So at this point I'm pretty pissed off to say the least. I pulled out the compressor today, and I drained about 1oz of oil, this seems to be the cause of the seizure (low oil).
What should I do now? How do I make sure I put in the correct amount of oil in the new system?
Oct 5, 2014 | 03:52 PM
#9
Thread Starter
TECH Fanatic
Joined: Jun 2011
Posts: 1,292
Likes: 5
From: Houston
I pulled out the orphus tube and it was coated in glittery debris, so that is another classic sign of the compressor seizure.
I'm planning to replace everything including the condenser this time.
What brand AC compressor should I get? Any other good options besides Delphi or Denso?
I'm planning to replace everything including the condenser this time.
What brand AC compressor should I get? Any other good options besides Delphi or Denso?