2000 Chevy Silverado project "Charlie Murphy"
 06-25-2014, 07:48 AM
#321

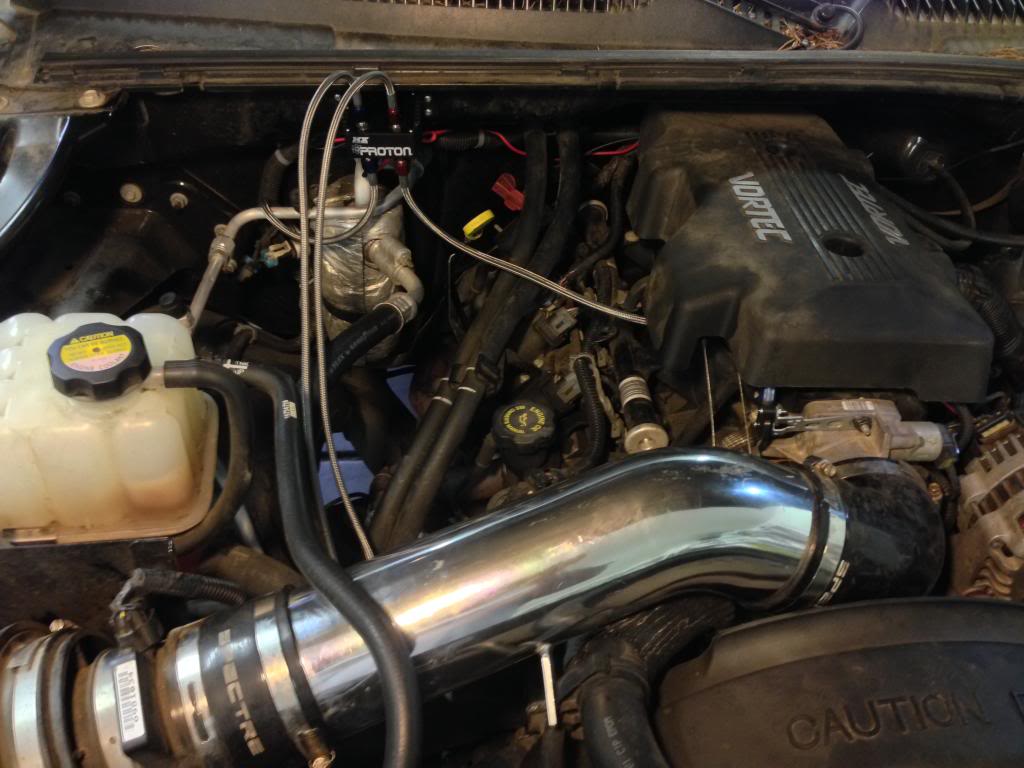
I finally had some time and started installing my nitrous kit.
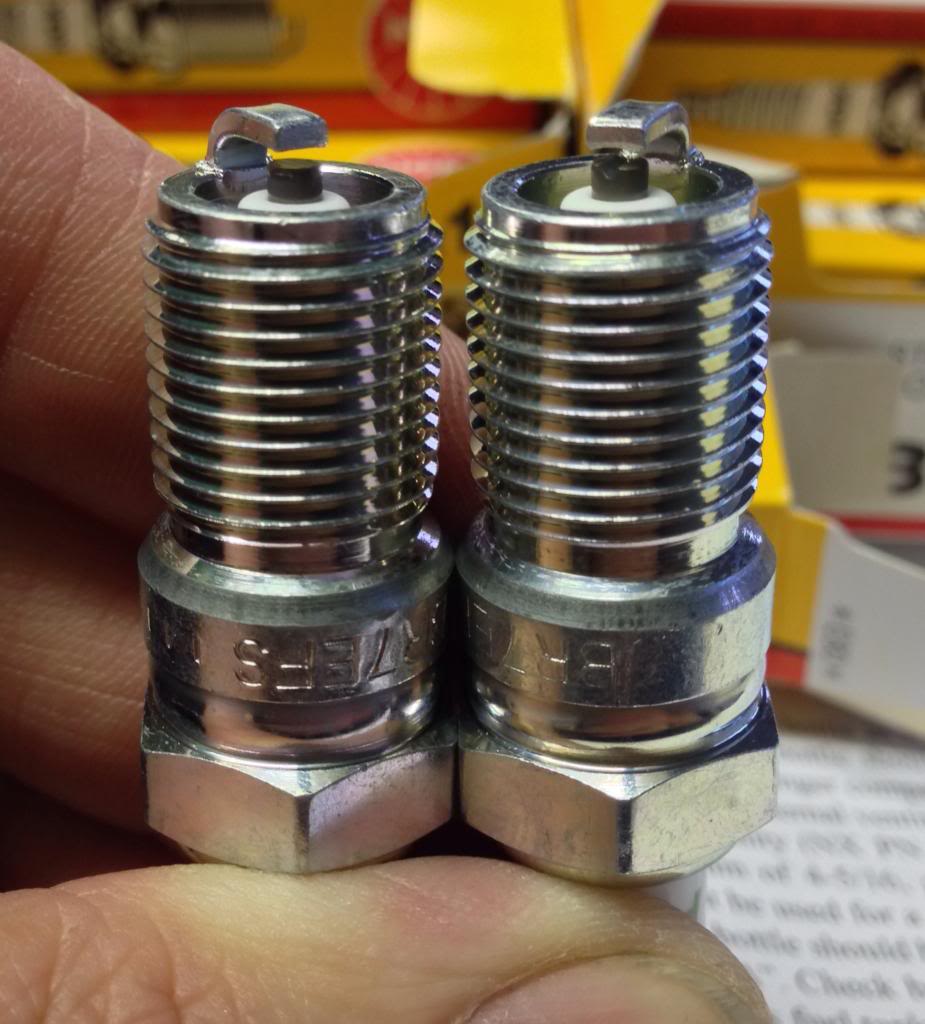
I've searched for spark plug recommendations and found 2 common ones, but wondered what the difference was.
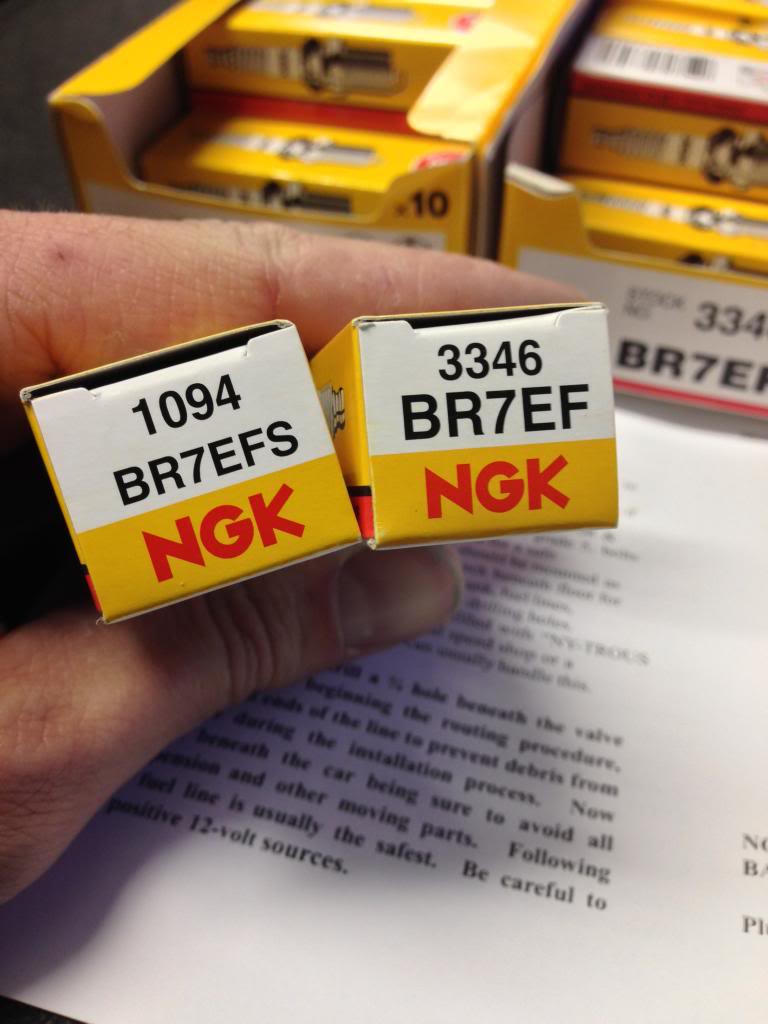
Well, the difference is, one is notched and one isn't. I'm not sure if there's an advantage or not.
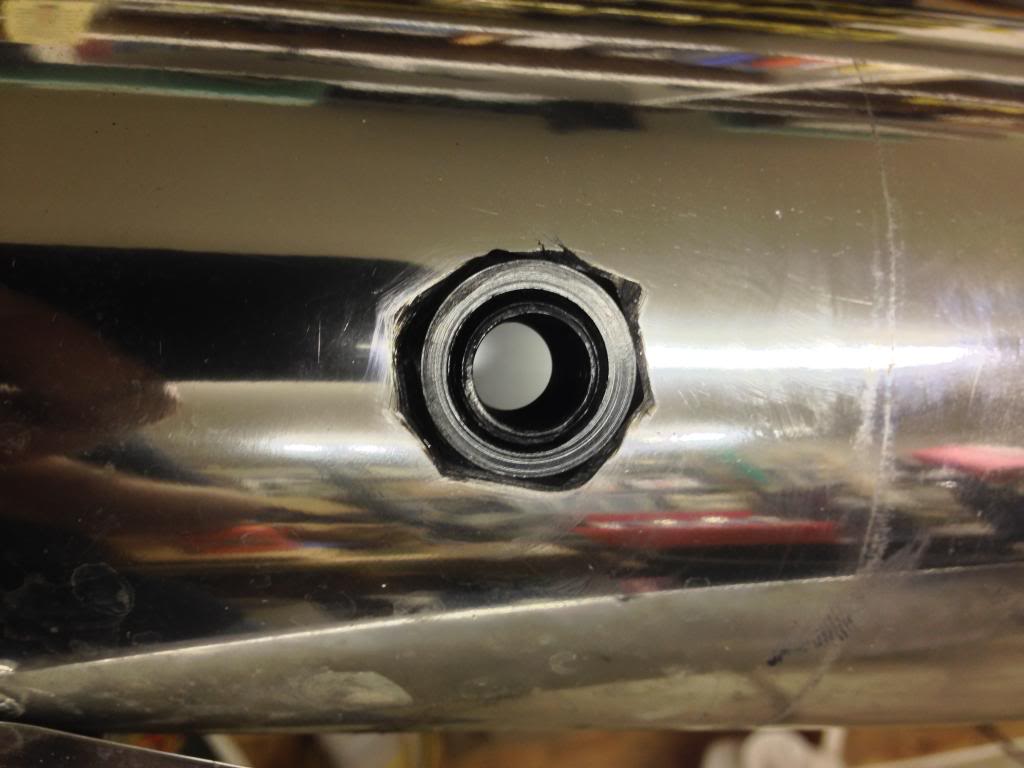
I drilled and mounted the mount for the fogger. I sealed it up with some gasket maker.

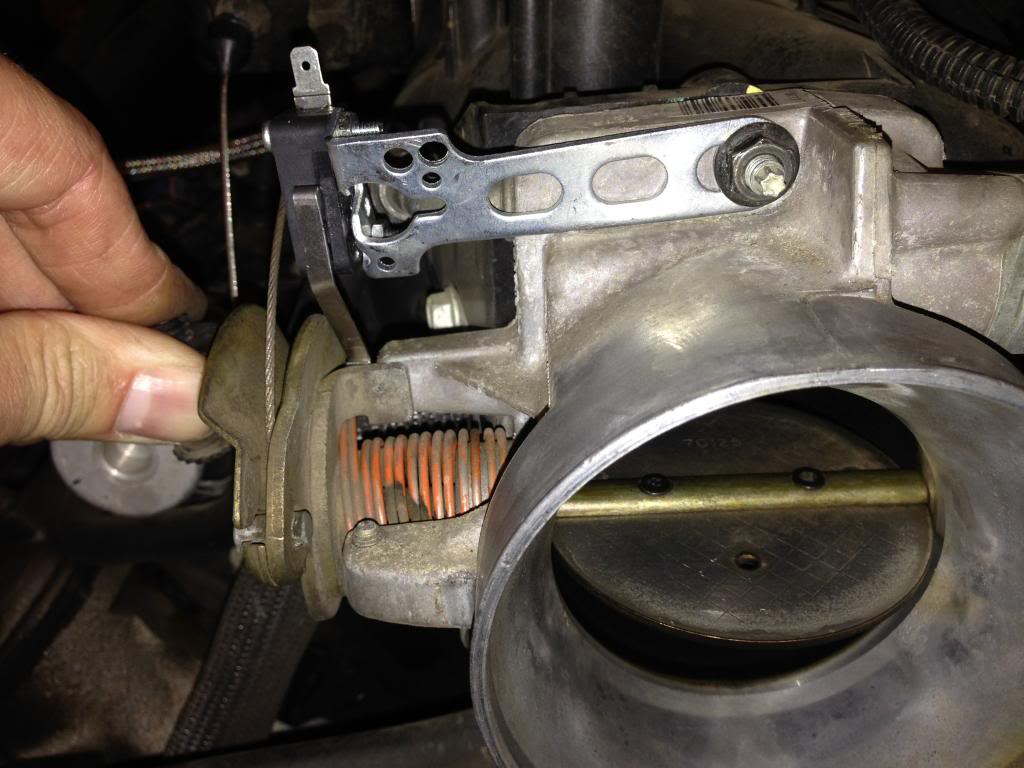
I looked over exactly how to mount the WOT switch. I considered mounting it on the gas pedal but there didn't seem to be any good way to do it.
I settled on mounting it on the throttle body. There's a stop cast into the throttle body housing, but the ear piece that meets it is wider than the stop. So I bent the switch mount and curled up the end of switch's arm. After a few tweaks, it looks like it'll work.
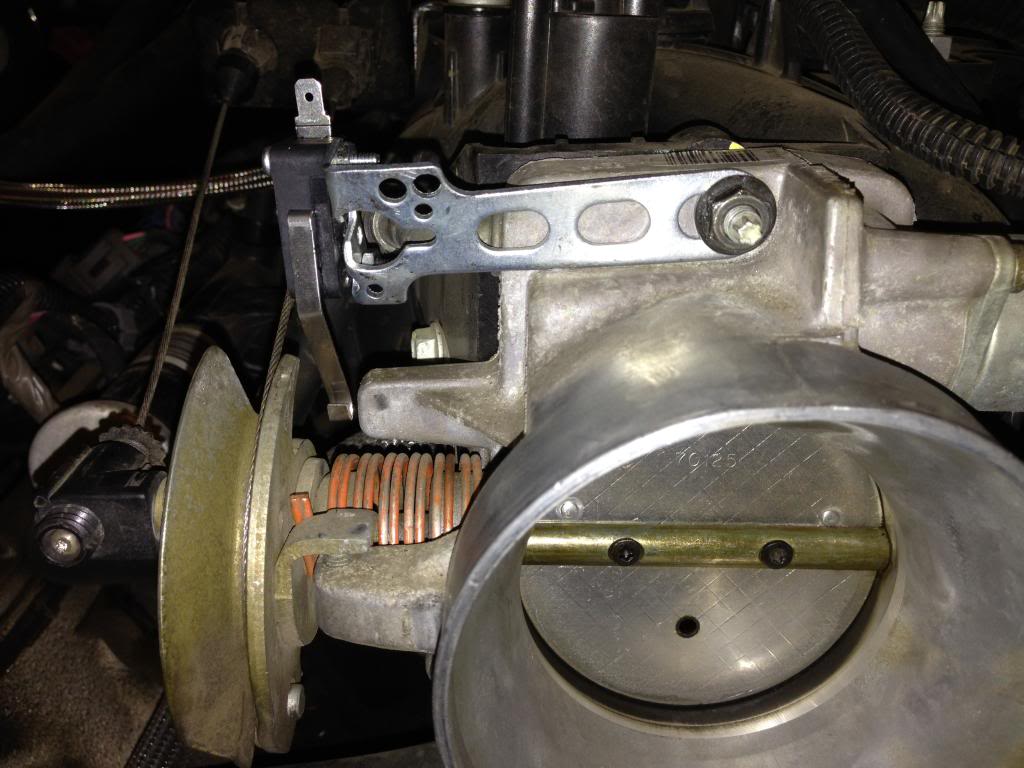
Open.
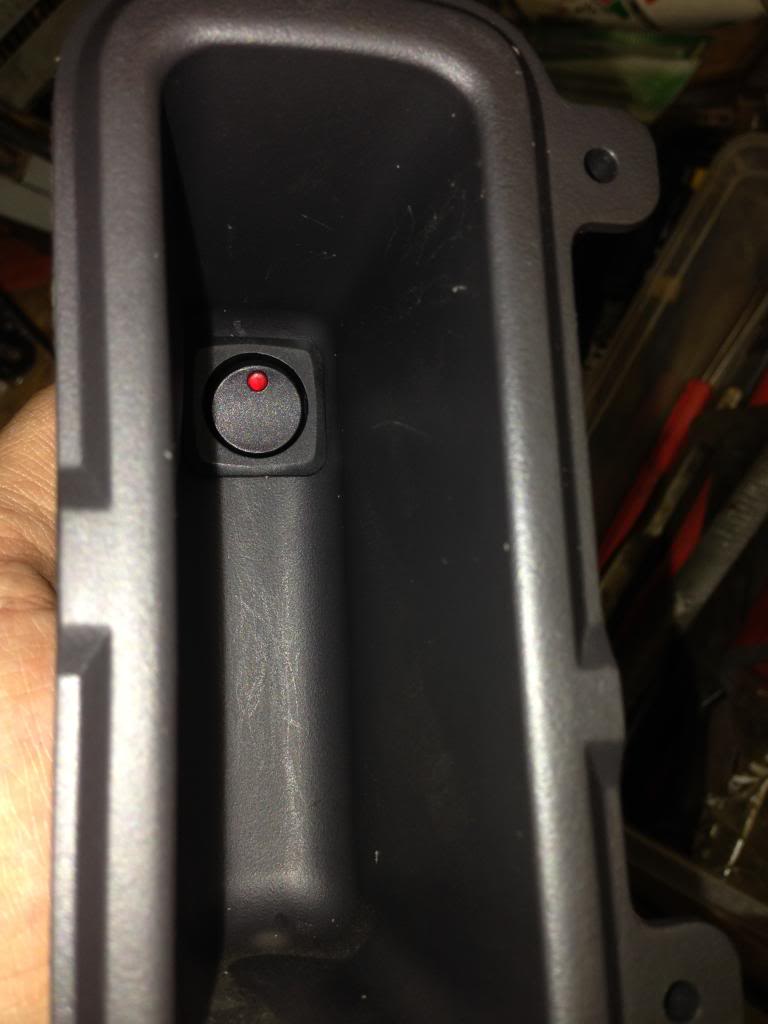
I moved over to the activation switch. I wanted it mounted in a spot that wasn't obvious so I mounted it up high in this little cubby thing. After I converted to AWD, I removed the 4WD switches and put this thing in there. You can't really store anything in there though.
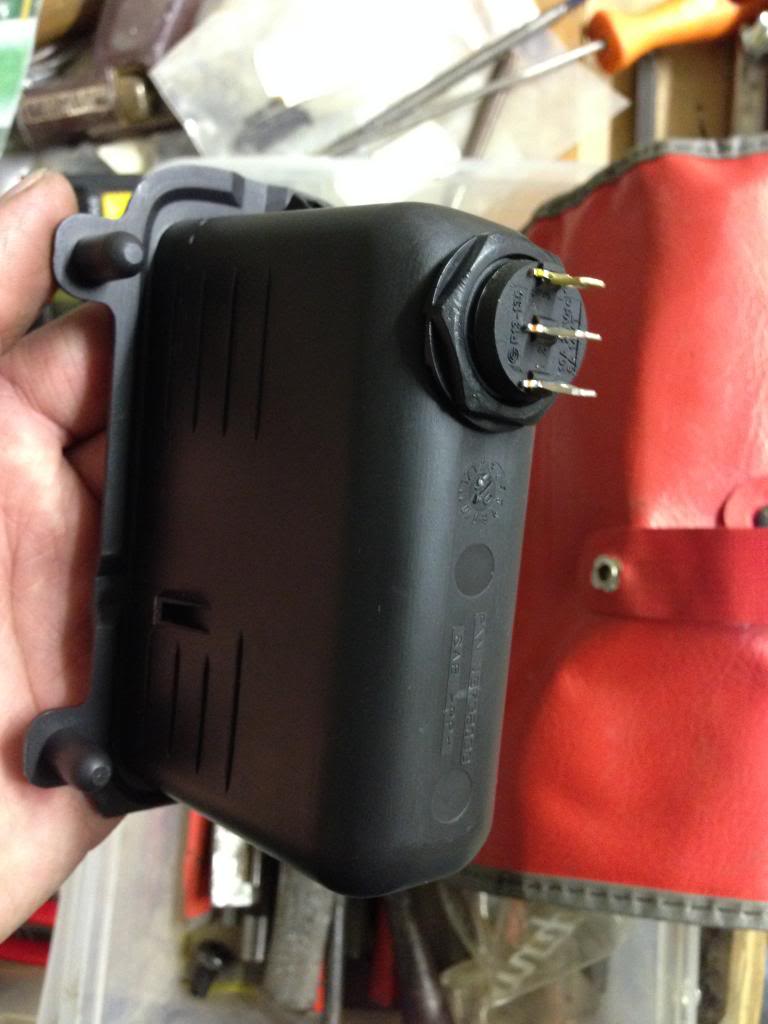
It's up high where it won't accidentally be switched.
That's all the farther I got. Hopefully I can get it finished up tomorrow. I'm going to start with a 50 shot to get the hang of it. Then go to 100, maybe 150.
Any advice on the spark plugs? Which version? What gap?

I've searched for spark plug recommendations and found 2 common ones, but wondered what the difference was.

Well, the difference is, one is notched and one isn't. I'm not sure if there's an advantage or not.

I drilled and mounted the mount for the fogger. I sealed it up with some gasket maker.


I looked over exactly how to mount the WOT switch. I considered mounting it on the gas pedal but there didn't seem to be any good way to do it.
I settled on mounting it on the throttle body. There's a stop cast into the throttle body housing, but the ear piece that meets it is wider than the stop. So I bent the switch mount and curled up the end of switch's arm. After a few tweaks, it looks like it'll work.

Open.

I moved over to the activation switch. I wanted it mounted in a spot that wasn't obvious so I mounted it up high in this little cubby thing. After I converted to AWD, I removed the 4WD switches and put this thing in there. You can't really store anything in there though.

It's up high where it won't accidentally be switched.

That's all the farther I got. Hopefully I can get it finished up tomorrow. I'm going to start with a 50 shot to get the hang of it. Then go to 100, maybe 150.
Any advice on the spark plugs? Which version? What gap?
Last edited by iregret; 06-25-2014 at 01:26 PM.
 06-26-2014, 01:34 AM
#322
I gapped my cooler plugs to .32 and installed them. I finished hooking up the relay and wired in the activation switch.
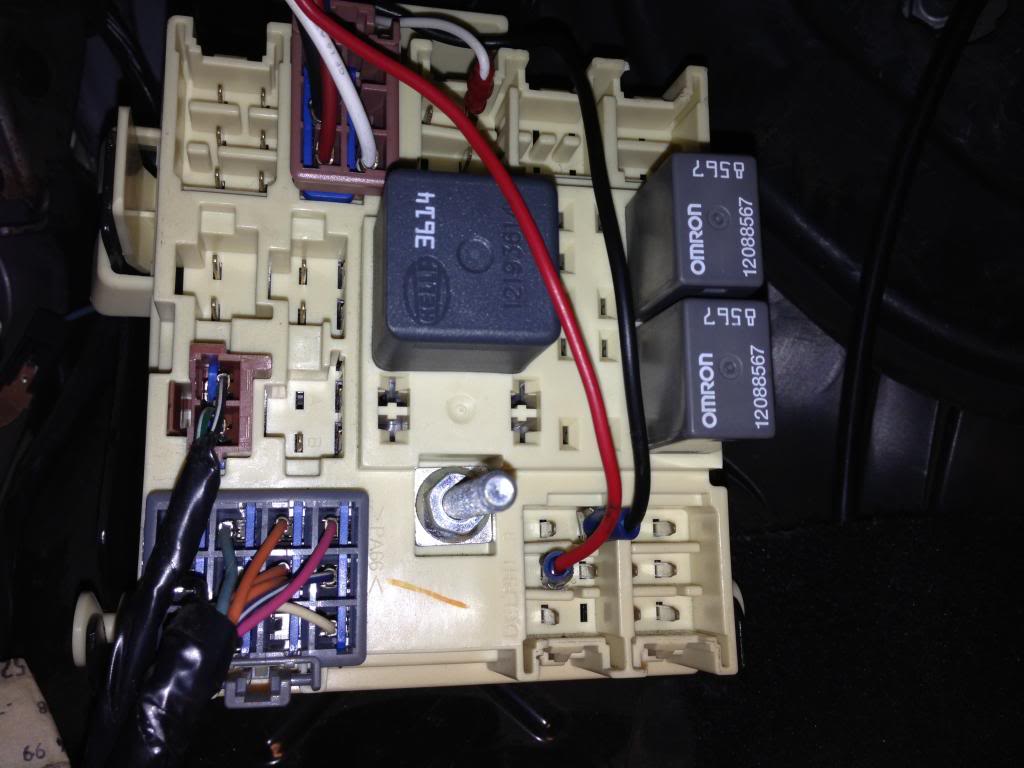
I poked around in this "fuse block"(?) and found a switched 12v source for the activation switch. This block is located near your left foot. It's where the trailer wiring gets hooked up.
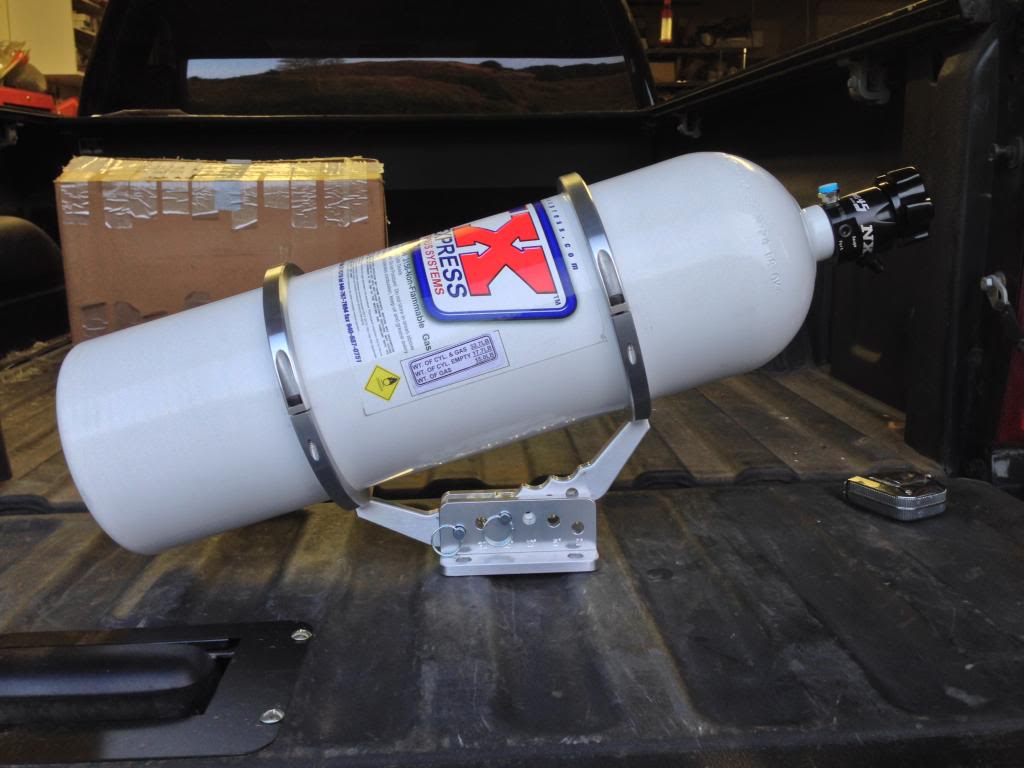
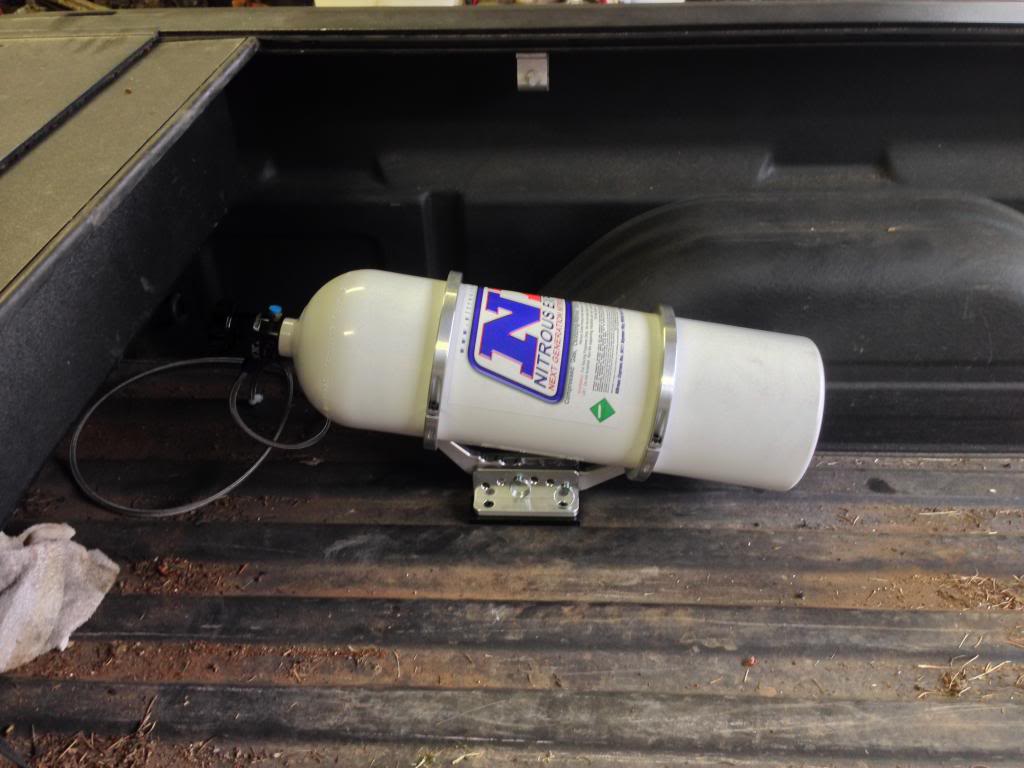
I built a spacer and mounted down my nitrous bottle. You have to look close, but the bottle mount is too narrow to mount on the high spots in the bed.
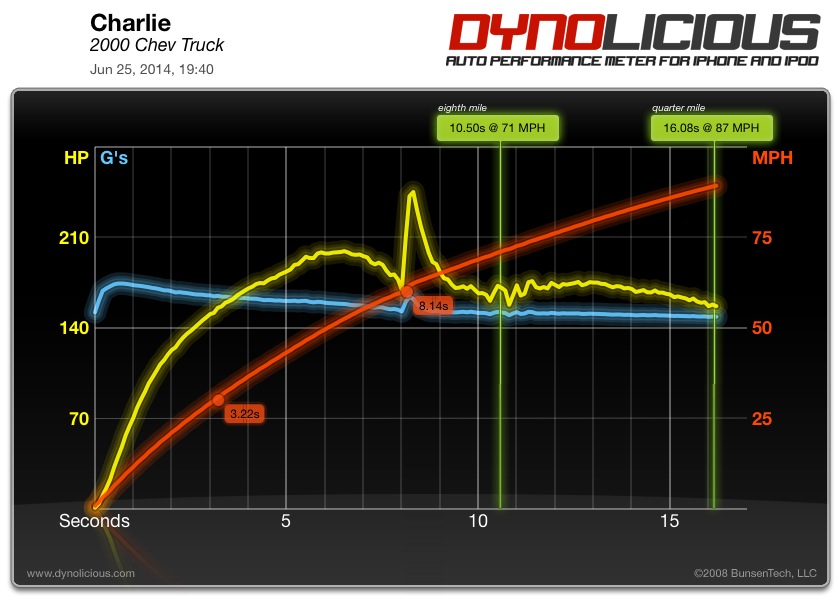
You'll have to ignore the numbers here and focus on the graph. I guessed on the trucks weight. If this puts in the ballpark at all, here's what I started with.
Acceleration
0-10 MPH: 0.95 sec
0-20 MPH: 2.00 sec
0-30 MPH: 3.22 sec
0-40 MPH: 4.62 sec
0-50 MPH: 6.18 sec
0-60 MPH: 8.14 sec
0-70 MPH: 10.42 sec
0-80 MPH: 13.21 sec
Elapsed Time
60': 2.75 sec @ 25.1 MPH
330': 7.09 sec @ 53.3 MPH
1/8 mi: 10.61 sec @ 70.5 MPH
1000': 13.64 sec @ 81.0 MPH
1/4 mi: 16.19 sec @ 87.4 MPH
Miscellaneous
Max Speed: 89.3 MPH
Max Acceleration: 0.49 G's
Peak Horsepower: 248 HP
100 hp shot
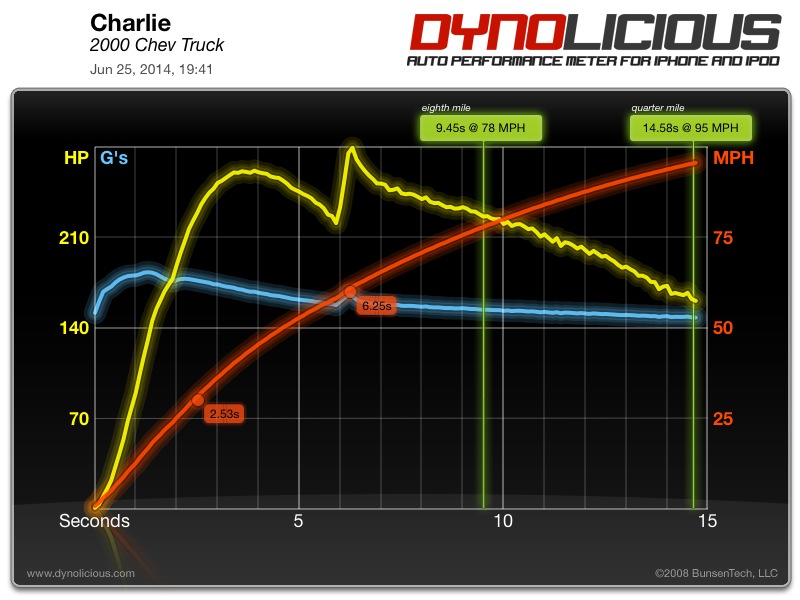
Acceleration
0-10 MPH: 0.90 sec
0-20 MPH: 1.67 sec
0-30 MPH: 2.53 sec
0-40 MPH: 3.50 sec
0-50 MPH: 4.70 sec
0-60 MPH: 6.25 sec
0-70 MPH: 7.95 sec
0-80 MPH: 10.11 sec
0-90 MPH: 12.82 sec
Elapsed Time
60': 2.54 sec @ 28.0 MPH
330': 6.36 sec @ 59.1 MPH
1/8 mi: 9.56 sec @ 78.1 MPH
1000': 12.33 sec @ 87.4 MPH
1/4 mi: 14.69 sec @ 95.0 MPH
Miscellaneous
Max Speed: 95.6 MPH
Max Acceleration: 0.62 G's
Peak Horsepower: 280 HP
I started with a 50 hp shot and was wondering if it was even working. LOL. So I stepped it up to 100hp.
I'm hesitant to go any farther without some data logging.
Not that I thought it would, but the 80E didn't so much as twitch. Anticlimactic actually. LOL. With AWD, can't even chirp a tire. Needs more power. The last time I played with nitrous was around 10 years ago. That was a RWD 1970 Nova. I remember it having all sorts of *****.
I know they're 2 completely different vehicles. My truck is AWD and weighs 2200 pounds more. Tire smokin, uncontrollable power was the last image I had in my head.

I poked around in this "fuse block"(?) and found a switched 12v source for the activation switch. This block is located near your left foot. It's where the trailer wiring gets hooked up.

I built a spacer and mounted down my nitrous bottle. You have to look close, but the bottle mount is too narrow to mount on the high spots in the bed.

You'll have to ignore the numbers here and focus on the graph. I guessed on the trucks weight. If this puts in the ballpark at all, here's what I started with.

Acceleration
0-10 MPH: 0.95 sec
0-20 MPH: 2.00 sec
0-30 MPH: 3.22 sec
0-40 MPH: 4.62 sec
0-50 MPH: 6.18 sec
0-60 MPH: 8.14 sec
0-70 MPH: 10.42 sec
0-80 MPH: 13.21 sec
Elapsed Time
60': 2.75 sec @ 25.1 MPH
330': 7.09 sec @ 53.3 MPH
1/8 mi: 10.61 sec @ 70.5 MPH
1000': 13.64 sec @ 81.0 MPH
1/4 mi: 16.19 sec @ 87.4 MPH
Miscellaneous
Max Speed: 89.3 MPH
Max Acceleration: 0.49 G's
Peak Horsepower: 248 HP
100 hp shot

Acceleration
0-10 MPH: 0.90 sec
0-20 MPH: 1.67 sec
0-30 MPH: 2.53 sec
0-40 MPH: 3.50 sec
0-50 MPH: 4.70 sec
0-60 MPH: 6.25 sec
0-70 MPH: 7.95 sec
0-80 MPH: 10.11 sec
0-90 MPH: 12.82 sec
Elapsed Time
60': 2.54 sec @ 28.0 MPH
330': 6.36 sec @ 59.1 MPH
1/8 mi: 9.56 sec @ 78.1 MPH
1000': 12.33 sec @ 87.4 MPH
1/4 mi: 14.69 sec @ 95.0 MPH
Miscellaneous
Max Speed: 95.6 MPH
Max Acceleration: 0.62 G's
Peak Horsepower: 280 HP
I started with a 50 hp shot and was wondering if it was even working. LOL. So I stepped it up to 100hp.
I'm hesitant to go any farther without some data logging.
Not that I thought it would, but the 80E didn't so much as twitch. Anticlimactic actually. LOL. With AWD, can't even chirp a tire. Needs more power. The last time I played with nitrous was around 10 years ago. That was a RWD 1970 Nova. I remember it having all sorts of *****.
I know they're 2 completely different vehicles. My truck is AWD and weighs 2200 pounds more. Tire smokin, uncontrollable power was the last image I had in my head.
 10-10-2014, 03:12 AM
#324
Registered User

Join Date: Oct 2014
Posts: 1
Likes: 0
Received 0 Likes
on
0 Posts
I haven't had a lot of time to work on my truck like I'd like to. I have gotten all of the powered and heated seat's wiring figured out.
I didn't take any close up shots of the actual harness itself. I have no need to have the memory function of the seats work, so I didn't wire that in, but basically it goes like this:
To power the seats you connect the 2 orange wires to 12v+ and the black wire to ground. You can tell which wires they are because they are larger than the others. (Like 10-12 gauge wires. Don't forget to install a fuse.) That's it for the powered seats.
To make the heated seats work you're going to need the switches out of the door handles. (Duh.) They have several wires on them, but all you need are the black, brown, and light blue. (Not the brown wire with a white stripe.)
The black wire goes to ground.
The brown wire goes to a switched 12 volt source.
The blue wire goes to the blue wire in the seat's harness.
That's it. That will make the heated seats work. Now if you wanted to you could wire the brown wire in with the orange ones. The problem with that is the heated sets would always stay on. I wanted the heated seats to automatically shut off when I turned the key off. Oh, and you can get a switched 12 volt source in the fuse panel under the steering wheel right beside the brake pedal.
Harness is almost done. All of this will be hidden in the center console. It's almost like those seats were meant to be there!

I just ran out of time. The powered seats work 100% and I need to make 3 connections for the heated seats to work on the passengers side.

What I'd like to do next is move on to stereo installation, but I need to make a new subwoofer box and order a digital sound processor. I really need to clean up the seats and console though. The last owners were pigs!
I didn't take any close up shots of the actual harness itself. I have no need to have the memory function of the seats work, so I didn't wire that in, but basically it goes like this:
To power the seats you connect the 2 orange wires to 12v+ and the black wire to ground. You can tell which wires they are because they are larger than the others. (Like 10-12 gauge wires. Don't forget to install a fuse.) That's it for the powered seats.
To make the heated seats work you're going to need the switches out of the door handles. (Duh.) They have several wires on them, but all you need are the black, brown, and light blue. (Not the brown wire with a white stripe.)
The black wire goes to ground.
The brown wire goes to a switched 12 volt source.
The blue wire goes to the blue wire in the seat's harness.
That's it. That will make the heated seats work. Now if you wanted to you could wire the brown wire in with the orange ones. The problem with that is the heated sets would always stay on. I wanted the heated seats to automatically shut off when I turned the key off. Oh, and you can get a switched 12 volt source in the fuse panel under the steering wheel right beside the brake pedal.
Harness is almost done. All of this will be hidden in the center console. It's almost like those seats were meant to be there!
I just ran out of time. The powered seats work 100% and I need to make 3 connections for the heated seats to work on the passengers side.
What I'd like to do next is move on to stereo installation, but I need to make a new subwoofer box and order a digital sound processor. I really need to clean up the seats and console though. The last owners were pigs!
01-20-2015, 11:17 AM
#325
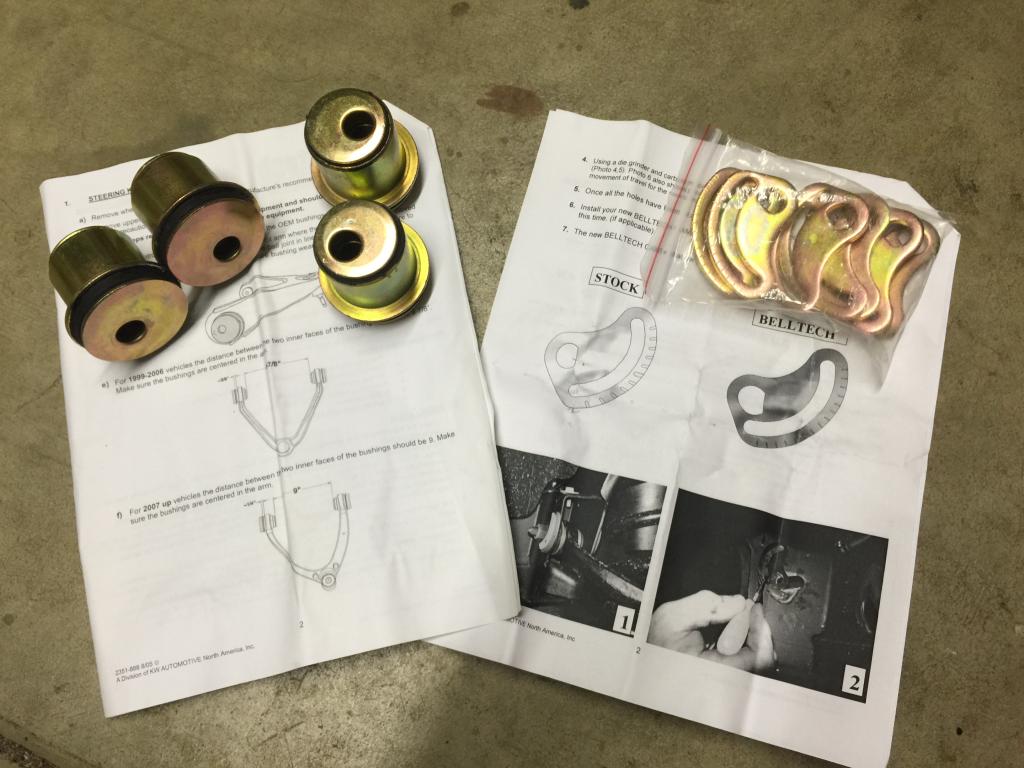
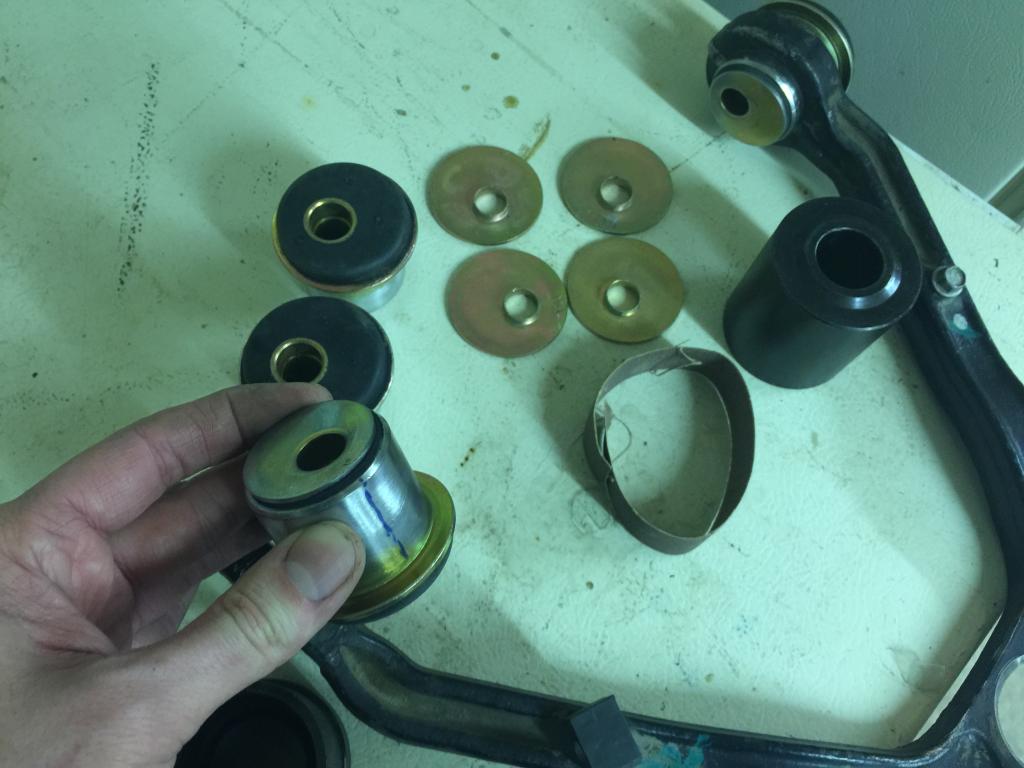
I finally got around to installing my Belltech alignment kit. (Offset bushings and plates, part numbers 4955, and 4951.)
From what I've read, I'll add 3� of adjustability using these.
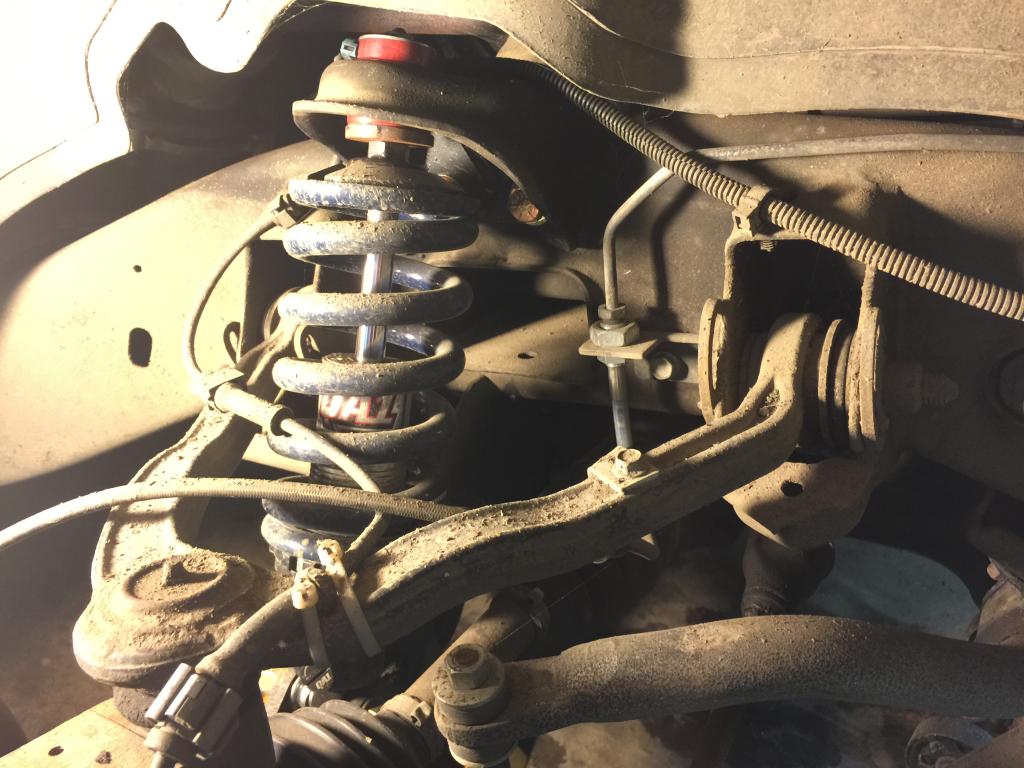
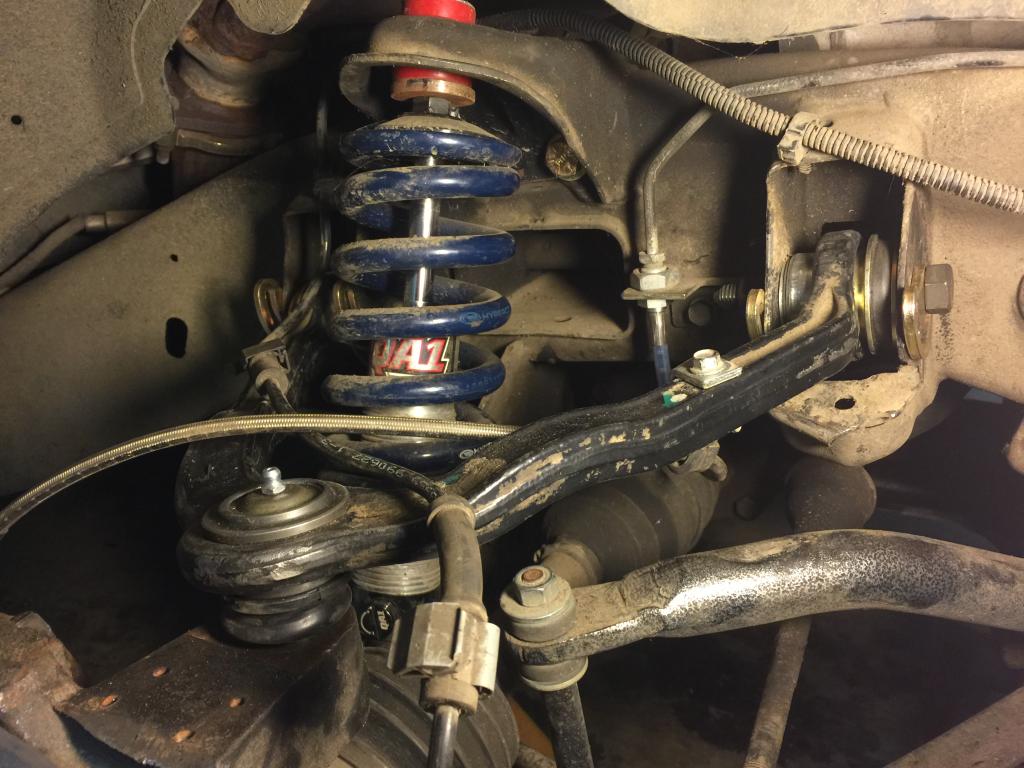
My front suspension setup is a bit unique. The coil overs shouldn't effect the alignment, I'm just low enough to require bushings/plates to maintain factory alignment specs. Matter of fact, I probably didn't need both the bushings and the plates.
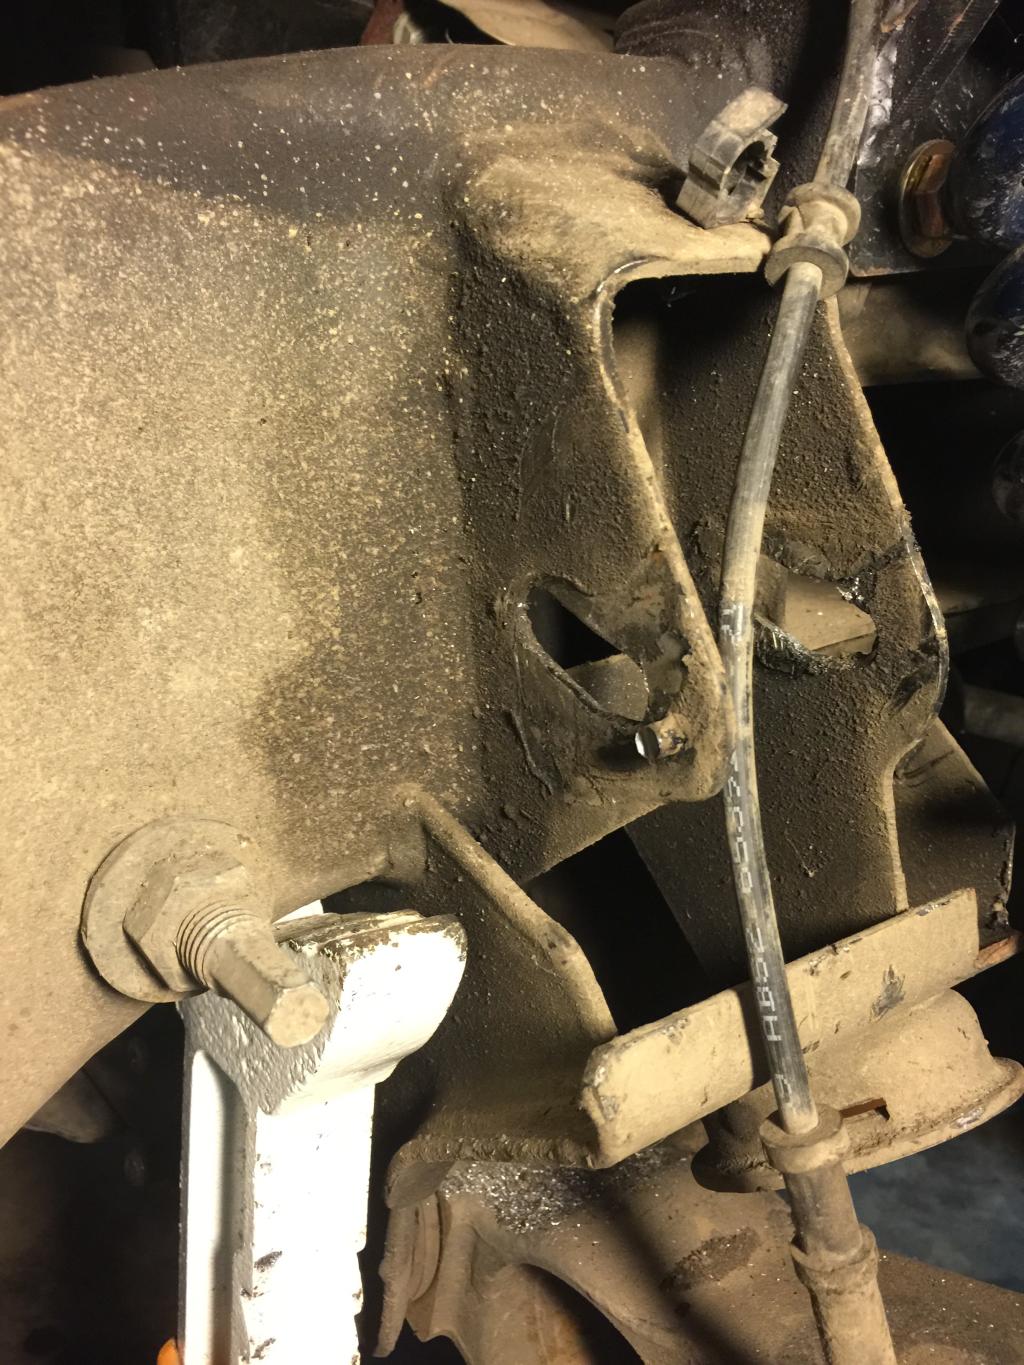
Here's where I started.
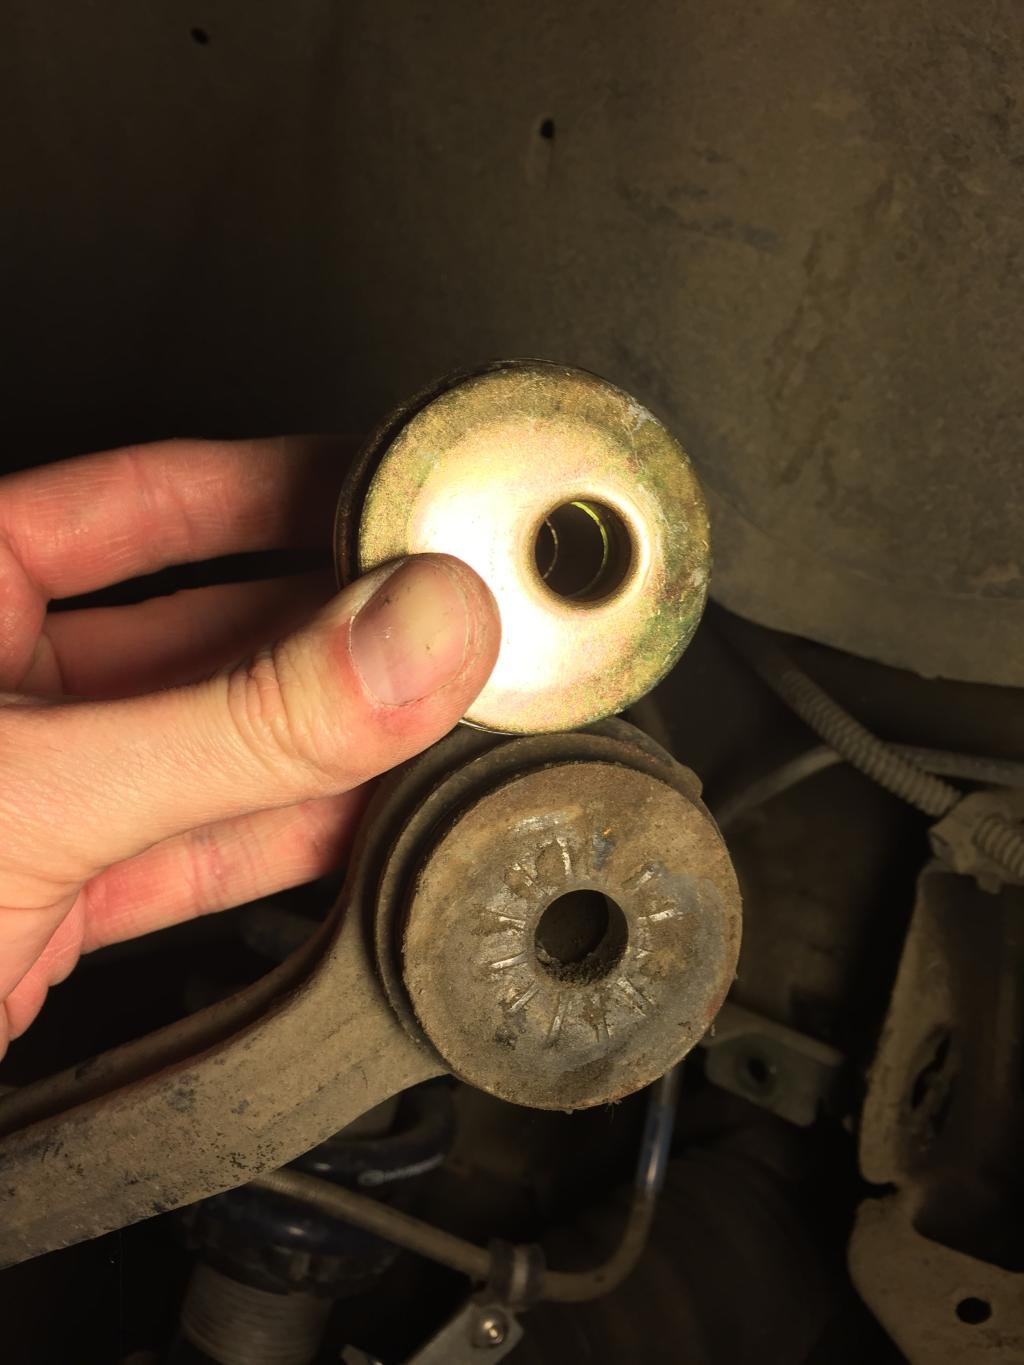
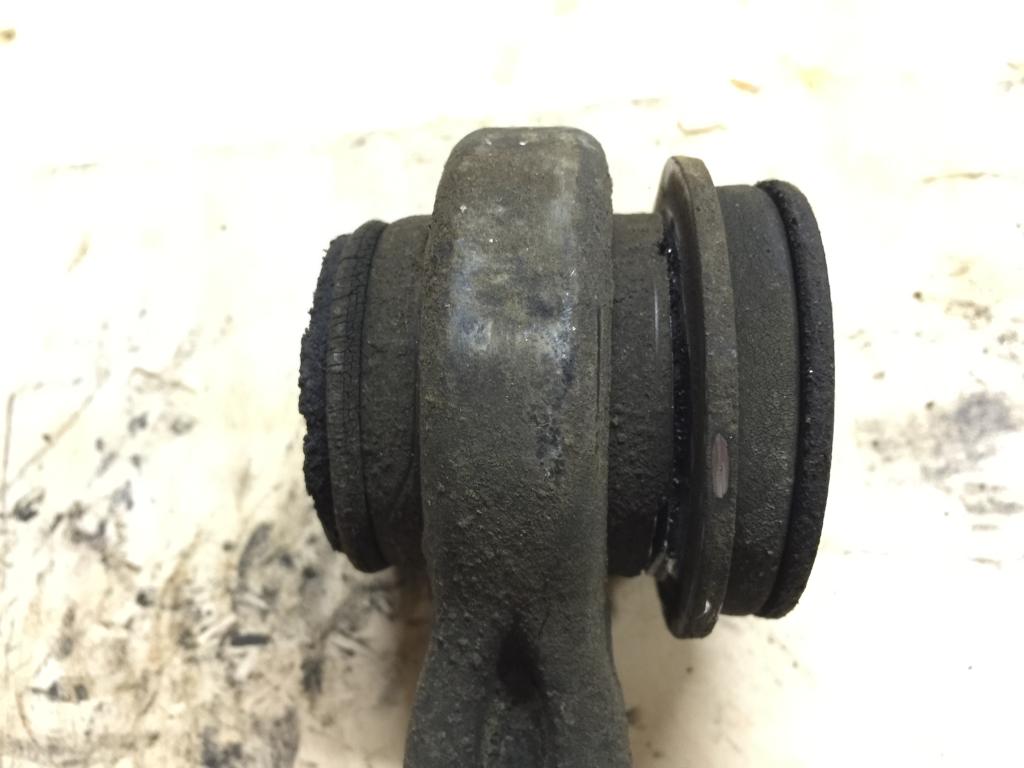
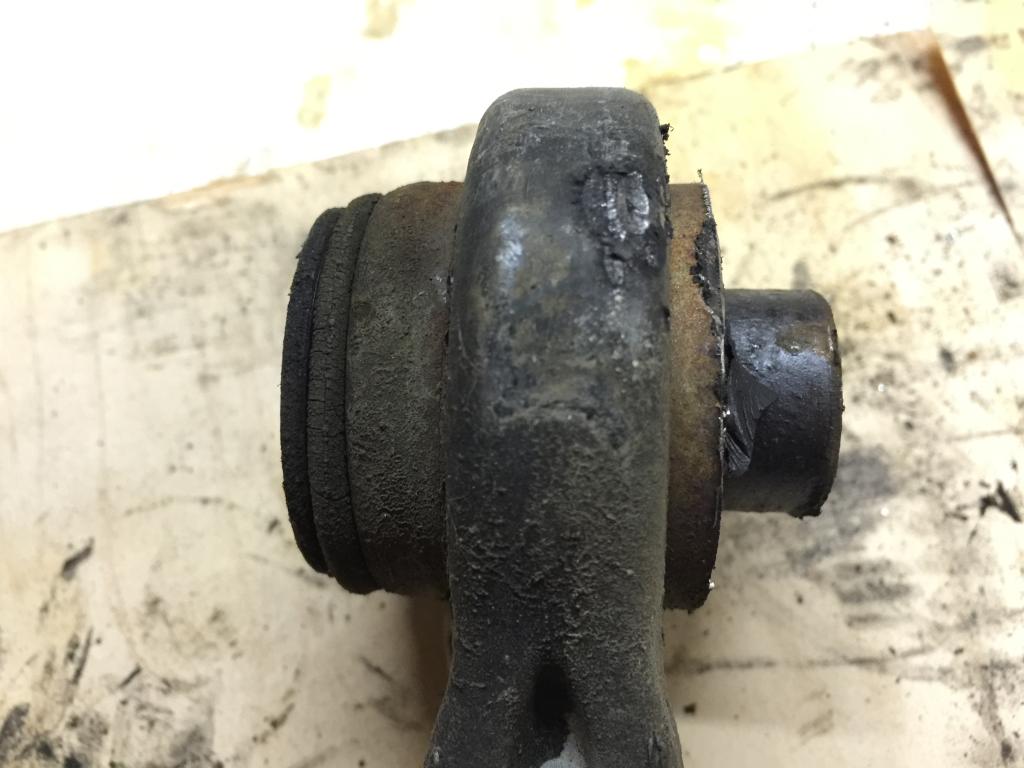
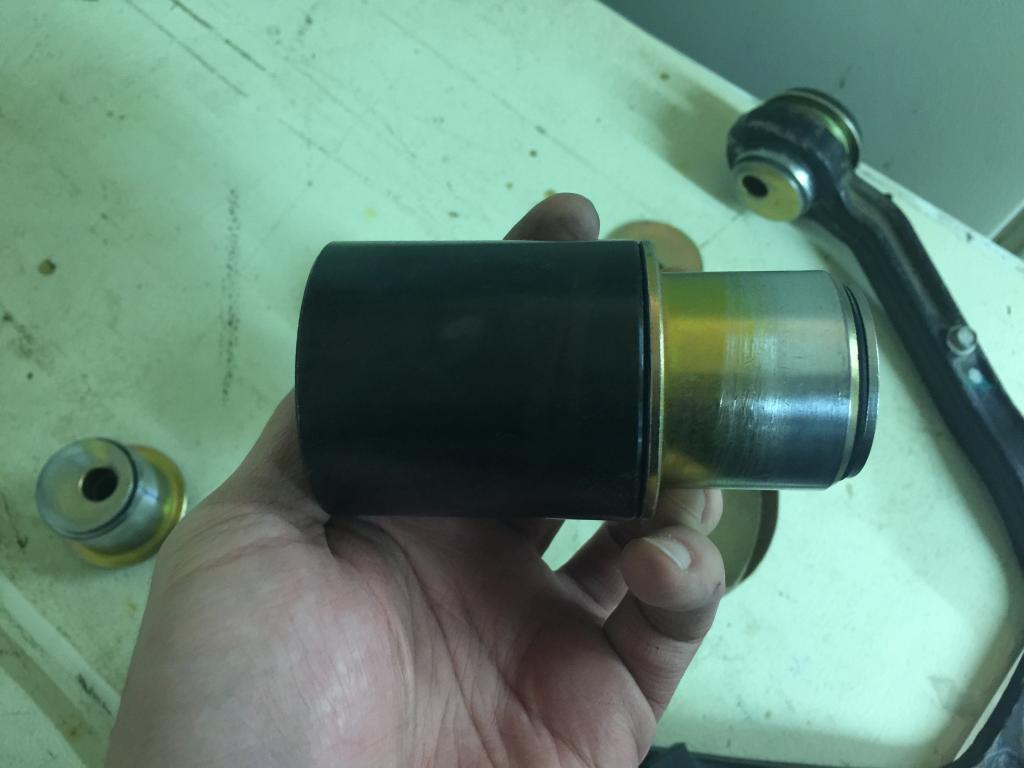
Here's a picture showing the offset bushing compared to the factory bushing.
My original plan was to unbolt the control arm and spin it around on the ball joint then use my harbor freight kit to press out the bushings. I tried that for 10 seconds before I realized there's no way I'm getting these out without a press.
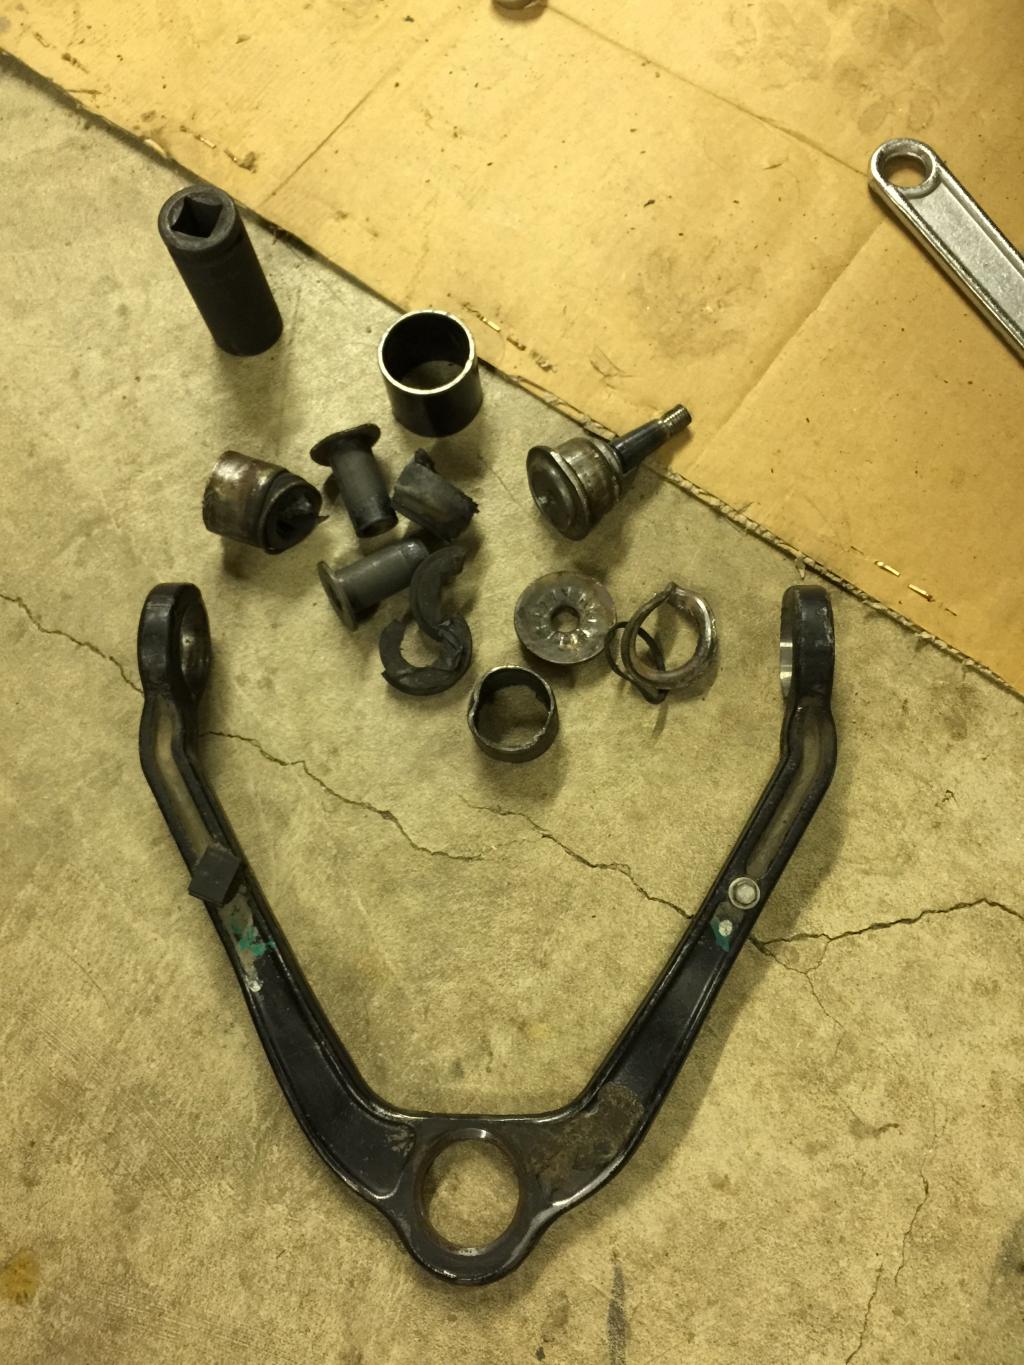
So, I had to remove the control arm entirely. I figured since I'm removing it I may as well replace the upper ball joints while I'm at it. I didn't do a ton of research or anything on ball joints. I just headed to Napa and bought what they had. $33 each.
After fighting the control arm for several hours, I came up with a way that's much quicker. First, I searched around and didn't really see a write up or anything. The problem is, you have to press these from the inside out and I couldn't get them to budge.
Long story short, it is much easier to just take an angle grinder with a cut off wheel and carefully cut the end off. You won't be able to cut all the way through because the inner part is hardened.
I did my best to cut as straight of a line as possible.
Then I used a chisel and removed the end part.
Now I can press from the outside in.
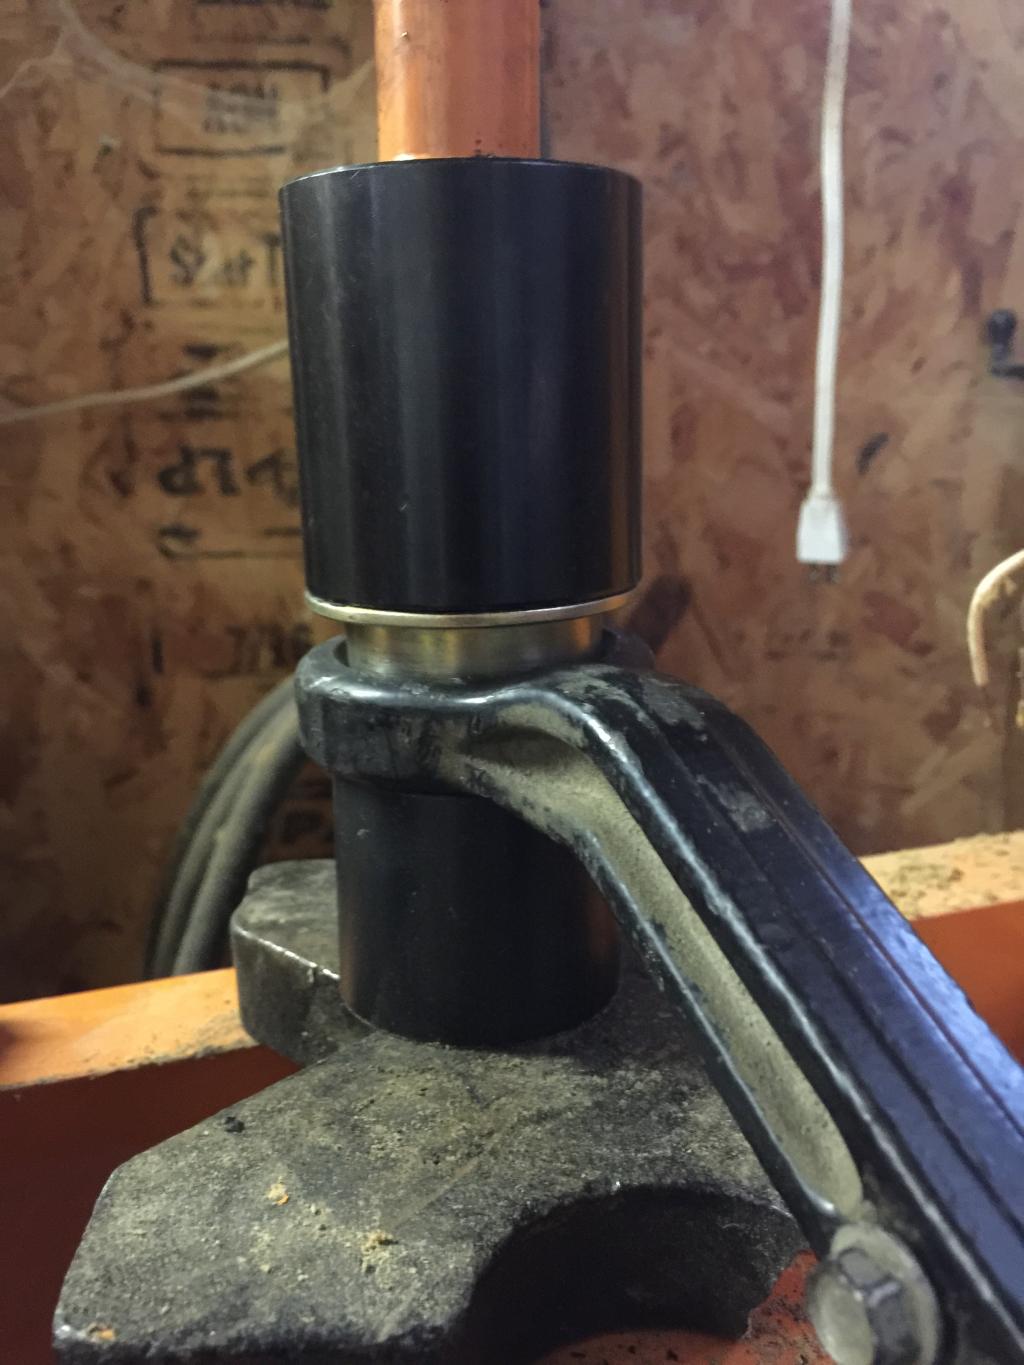
You'll want to make sure you use emery cloth on the control arm and the replacement bushing.
The one other thing I had to do was remove the end part of the bushing themselves. I couldn't get my adapter piece to fit in there otherwise and when I tried to press the bushing on the center part, it started to deform and come apart.
Once I removed the end piece, I could press the bushing properly.
The last thing you're going to have to do is a bit of grinding. In order to make the plate kit work properly, you need to clearance where the bolt goes through and cut down the nubs that the new plates slide on.
All done.
From what I've read, I'll add 3� of adjustability using these.

My front suspension setup is a bit unique. The coil overs shouldn't effect the alignment, I'm just low enough to require bushings/plates to maintain factory alignment specs. Matter of fact, I probably didn't need both the bushings and the plates.
Here's where I started.

Here's a picture showing the offset bushing compared to the factory bushing.

My original plan was to unbolt the control arm and spin it around on the ball joint then use my harbor freight kit to press out the bushings. I tried that for 10 seconds before I realized there's no way I'm getting these out without a press.
So, I had to remove the control arm entirely. I figured since I'm removing it I may as well replace the upper ball joints while I'm at it. I didn't do a ton of research or anything on ball joints. I just headed to Napa and bought what they had. $33 each.
After fighting the control arm for several hours, I came up with a way that's much quicker. First, I searched around and didn't really see a write up or anything. The problem is, you have to press these from the inside out and I couldn't get them to budge.
Long story short, it is much easier to just take an angle grinder with a cut off wheel and carefully cut the end off. You won't be able to cut all the way through because the inner part is hardened.
I did my best to cut as straight of a line as possible.

Then I used a chisel and removed the end part.


Now I can press from the outside in.

You'll want to make sure you use emery cloth on the control arm and the replacement bushing.

The one other thing I had to do was remove the end part of the bushing themselves. I couldn't get my adapter piece to fit in there otherwise and when I tried to press the bushing on the center part, it started to deform and come apart.
Once I removed the end piece, I could press the bushing properly.

The last thing you're going to have to do is a bit of grinding. In order to make the plate kit work properly, you need to clearance where the bolt goes through and cut down the nubs that the new plates slide on.

All done.
 01-21-2015, 05:44 AM
#326
Another awesome write up Justin !! I didn't even know these existed for the Silverado. I'll have to pick up a set. I already bought the Energy Suspension bushings but I'm pretty certain they are not adjustable. :-( I guess I'll put them up for sale and get a set of these.
01-22-2015, 08:36 AM
#327

Awesome work on the truck! It's coming together very nicely. Stance is just right and I'm digging the black.
Just realized you're local to me. I am at OSU finishing up an MS and travel to Portland almost every weekend. I'll keep an eye out for the truck.
I have a drivetrain swap going in my 95 and hope to add nitrous and learn to tune as well. I'll likely pick your brain when I do!
Just realized you're local to me. I am at OSU finishing up an MS and travel to Portland almost every weekend. I'll keep an eye out for the truck.
I have a drivetrain swap going in my 95 and hope to add nitrous and learn to tune as well. I'll likely pick your brain when I do!
01-23-2015, 05:09 AM
#328
Another awesome write up Justin !! I didn't even know these existed for the Silverado. I'll have to pick up a set. I already bought the Energy Suspension bushings but I'm pretty certain they are not adjustable. :-( I guess I'll put them up for sale and get a set of these.
Honestly though, it all depends on if you need more adjustability or not. I couldn't correct my alignment after lowering everything. Is your truck as low as you want it and can you get it to align within spec? If so, there's not much to be gained by putting these in. If you're close, you could probably just use the plates. They're a lot easier to install for sure.
Awesome work on the truck! It's coming together very nicely. Stance is just right and I'm digging the black.
Just realized you're local to me. I am at OSU finishing up an MS and travel to Portland almost every weekend. I'll keep an eye out for the truck.
I have a drivetrain swap going in my 95 and hope to add nitrous and learn to tune as well. I'll likely pick your brain when I do!
Just realized you're local to me. I am at OSU finishing up an MS and travel to Portland almost every weekend. I'll keep an eye out for the truck.
I have a drivetrain swap going in my 95 and hope to add nitrous and learn to tune as well. I'll likely pick your brain when I do!
Awesome that you're local. Kinda funny, I'm planning on quitting my job and heading back to school full time this year. I'll end up at OSU, but it'll take me a couple of years. I'm planning on dual enrollment with LBCC. This last year or so I've been taking math online. I'm in my mid 30's so going back to college full time is going to be strange for me. I'm planning on majoring in computer science. I've heard it's tough.
Let me know how the drivetrain swap goes. Another weird coincidence, I was just considering getting a 95-99 2 door Tahoe and swapping an LM7 in. Id like something bigger as a daily driver. I'm a pretty big guy and I'm tired of my Focus. Plus, I'm hoping when I get to OSU, I'll be able to park the Tahoe and ride my bike around Corvallis.
Do you think it's possible to get 20mpg with a 5.3 swapped OBS? What are your plans for your truck?
01-23-2015, 10:27 AM
#329
That's great man! I've known a few guys that have come back for a degree in their 30s and even 40s. It's never too late. The dual enrollment will also save you quite a bit. Most of the Engineering majors will be tough, but if you like what you're doing it's not too bad. I'm in mechanical engineering. There's always those classes you don't like, but you'll get through it.
The swap has been going on for 3 years now I think. I have a couple threads going at other forums on it, but really need to start one here since this is where I spend most of my time. Essentially it started as a swap from the 5.7 to a stock 01 5.3. Then it snowballed into head/cam/intake/LT 5.3, t56 (rebuilt by me), and 14 bolt rebuilt by me haha. Here's a link to one of the threads: OBS '95 5.7/NV3500 to '01 5.3/NV3500 - Chevy Truck Forum | GMC Truck Forum - GmFullsize.com
Another weird coincidence, I am getting rid of a focus myself in favor of something bigger (07 accord sedan V6 6 Speed manual).
I definitely think 20 MPG is possible. That's my goal! I was getting 17 MPG on the highway with my 5.7. And some guys are getting 23+ MPG with the newer engines in heavier nbs trucks so I'm sure I can get there.
01-28-2015, 10:22 AM
#330
That's great man! I've known a few guys that have come back for a degree in their 30s and even 40s. It's never too late. The dual enrollment will also save you quite a bit. Most of the Engineering majors will be tough, but if you like what you're doing it's not too bad. I'm in mechanical engineering. There's always those classes you don't like, but you'll get through it.
The swap has been going on for 3 years now I think. I have a couple threads going at other forums on it, but really need to start one here since this is where I spend most of my time. Essentially it started as a swap from the 5.7 to a stock 01 5.3. Then it snowballed into head/cam/intake/LT 5.3, t56 (rebuilt by me), and 14 bolt rebuilt by me haha. Here's a link to one of the threads: OBS '95 5.7/NV3500 to '01 5.3/NV3500 - Chevy Truck Forum | GMC Truck Forum - GmFullsize.com
Another weird coincidence, I am getting rid of a focus myself in favor of something bigger (07 accord sedan V6 6 Speed manual).
I definitely think 20 MPG is possible. That's my goal! I was getting 17 MPG on the highway with my 5.7. And some guys are getting 23+ MPG with the newer engines in heavier nbs trucks so I'm sure I can get there.
The swap has been going on for 3 years now I think. I have a couple threads going at other forums on it, but really need to start one here since this is where I spend most of my time. Essentially it started as a swap from the 5.7 to a stock 01 5.3. Then it snowballed into head/cam/intake/LT 5.3, t56 (rebuilt by me), and 14 bolt rebuilt by me haha. Here's a link to one of the threads: OBS '95 5.7/NV3500 to '01 5.3/NV3500 - Chevy Truck Forum | GMC Truck Forum - GmFullsize.com
Another weird coincidence, I am getting rid of a focus myself in favor of something bigger (07 accord sedan V6 6 Speed manual).
I definitely think 20 MPG is possible. That's my goal! I was getting 17 MPG on the highway with my 5.7. And some guys are getting 23+ MPG with the newer engines in heavier nbs trucks so I'm sure I can get there.
I've narrowed it down to either mechanical engineering, electrical engineering or computer science. What are your thoughts on those? I think I was born to be an engineer. I'm just not sure what I'd end up doing if I went mechanical or electrical. The computer science degree was what I wanted to do when I was younger and part of me is drawn back towards that.
The problem for me is, I like them all. I just like building stuff. Mechanical or electronic. lol
I finally had a chance to get my truck in and get the alignment taken care of. The guys at the shop didn't say a single word about the coil over set up. Matter of fact they complemented it on it's design saying they've seen some crazy stuff. (Hondas were mentioned. lol)
I got everything aligned within factory specs so it's time to take off the junk tires. I was only running those tires/wheels while I messed around with the suspension to see where I wanted it.
To get the back to sit level I ended up having to put 10 pounds of pressure in one airbag and 25 pounds of pressure on the other. From there, I adjusted the front coil overs to where they were 1.5 inches lower than the rear. I wanted a slightly raked look.
Here's my 18 inch wheels versus my 20 inch wheels. I still think the look isn't quite right, but it's close enough. Maybe if I had slightly larger tires on 20" wheels?

I turned to my next problem. My rear driveshaft is too short. It was a miscalculation on my part and ended up being about an 1 3/4" too short. I was hoping it wouldn't cause any issues, but it has. The yolk is about 6" long and more than 75% of it is in the transfer case. Still, it's causing a leak at the rear seal.
It ended up being worse than I thought. After crawling around and observing things, I decided the thing to do is pull the driveshaft and have the length corrected. I'm a bit disappointed that I have to do this twice, but it should be good now that I have the suspension where I want it.
It's kinda funny actually. The rear differential is pointing up and the rear of the transfer case is pointing down. It's nothing extreme and I haven't noticed any unusual vibrations. I'll measure the pinion angle when I get the driveshaft back and make sure it's where it should be.


Hopefully by the weekend I'll be able to daily drive my truck again. I need to put some miles on it and get a feel for everything.