On 3 Performance Downpipe Install Directions
 08-01-2014, 12:05 PM
#1
Former Vendor
Thread Starter

Join Date: Nov 2012
Posts: 482
Likes: 0
Received 0 Likes
on
0 Posts
I have a number of people when the kit was first released having issues with getting the downpipe installed and lined up. We pulled the first production kit and did notice that the bottom vband was impossible to install at first. It was difficult to line up at the wastegate and needed more adjustment. We first designed the kit with a 3" downpipe and then went to the 3.5" for production. That did lead us to this problem which has a very simple fix. Here is my original writeup:
I have posted this in the actual threads but I wanted it so people could easily find this and assist with installation.
A few customers have brought to our attention that the downpipe is very tight and hard to install the 2nd section of the downpipe going parallel with the truck floor. I wanted to test this and pulled a production kit from the shelf and installed it on our shop truck to see whats going on exactly. After testing, it would be very difficult to get it clamped and for sure would rattle. We have a very simple and easy fix for this and will send any current customers that have purchased this clamp to solve this.
Here are the photos showing the issues needing addressed:
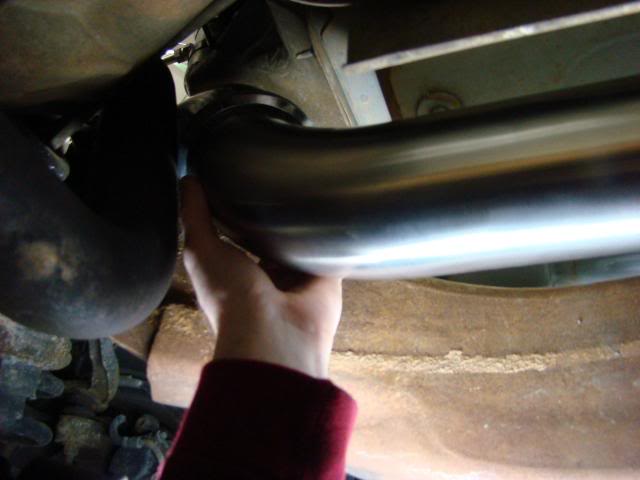
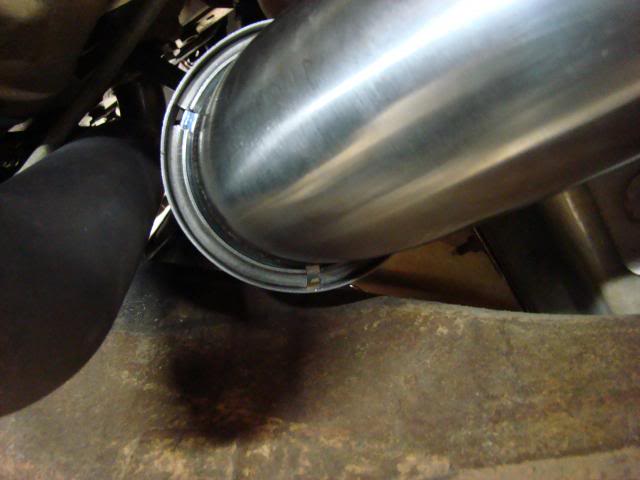
As you can see everything is lined up at the top still:
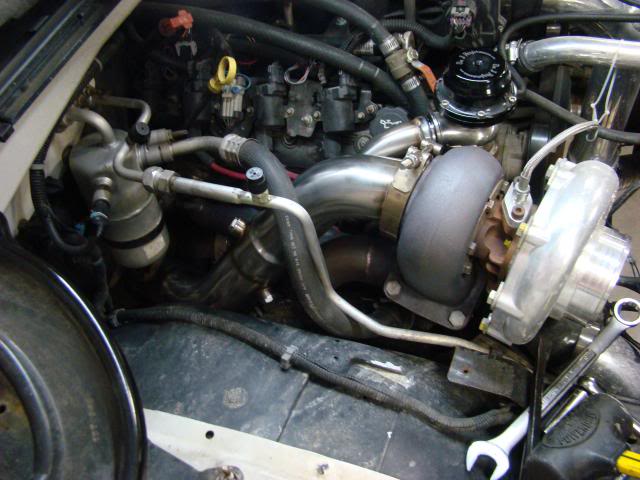
Before moving forward, if you have the tubing all wrapped (header and downpipe) the clearance between the 2 are very tight and might also throw off the turbo to downpipe. So in that one area where they are close, you might want to not wrap. We highly suggest that you don�t wrap the parts anyhow and get them coated if anything.
****All current kits are now made with the downpipe being 2pcs. No cutting is required. We also have a version like seen below with an externally dumped wastegate and new dump tube included as of 8-1-14. We still have both varieties with the gate re-circulated and dumped to atmosphere.
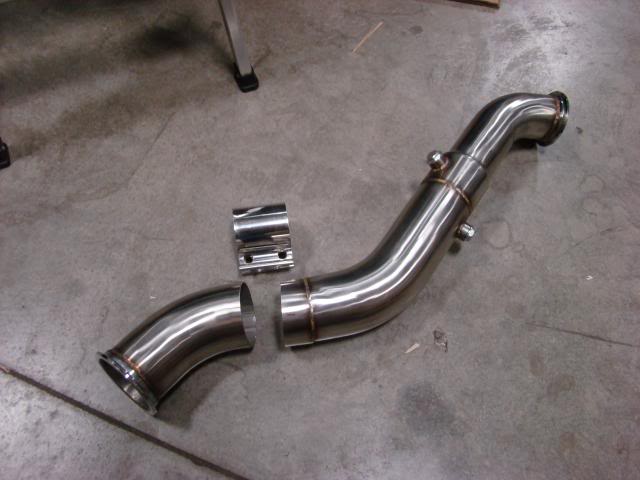
On to the solution, when installing the downpipe, you will need to make one cut. There is no welding involved so please do not be alarmed. Take a look at the photo and note the location of the cut, its ~1.25� past the weld. This straight section needed about 3/8-1/2� extra in length to push the lower v-band past the crossover pipe. The stainless steel lap band we will send out makes up for this difference and will provide clamping force between the two. We use this style is a lot of our systems post-turbo to allow for more adjustment.
This illustrates how the clamp will sit when installed on the truck. You mainly just want it right in the middle of the straight section so that the clamp isn�t on the bend.
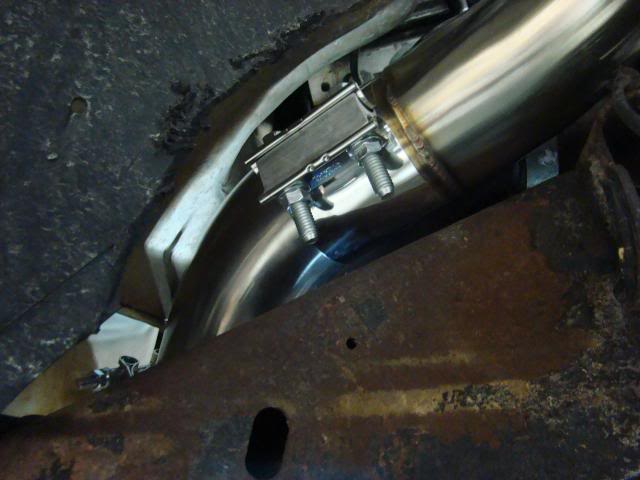
Now with that installed, you are able to clearly move the lower flange out past the crossover the needed room and clamp it down.
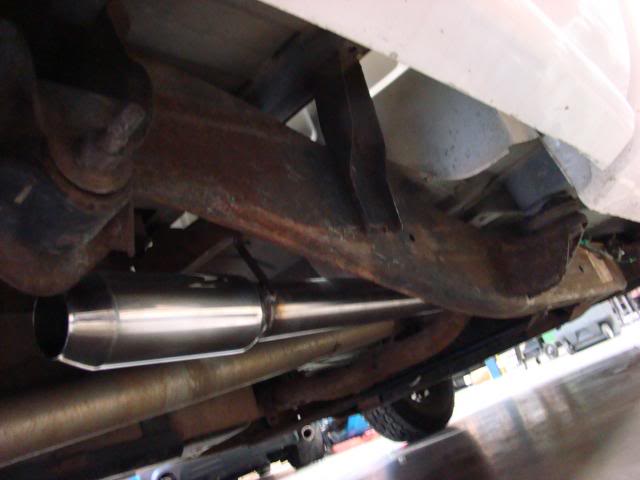
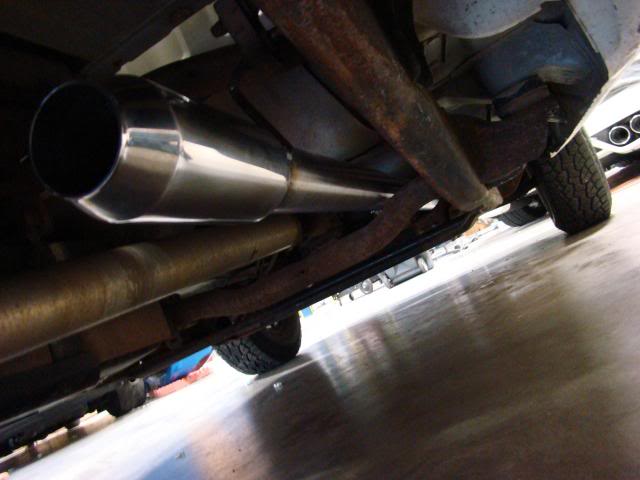
On my truck I went ahead and welded in a straight through muffler while I was at it and also just welded it to the stock hanger. Installs very clean this way, sounds good and keeps the exhaust past the cab. Im going to end up making a 90 off of this and come out of the bed right in front of the rear tire. We didn�t have a free lift so I was on jack stands and didn�t want to finish it today. Main objective was to make sure we had a solution for the customers and relay this info to everyone installing and future customers getting ready to install
Hope this helps clear everything up and any questions, please let us know.
I have posted this in the actual threads but I wanted it so people could easily find this and assist with installation.
A few customers have brought to our attention that the downpipe is very tight and hard to install the 2nd section of the downpipe going parallel with the truck floor. I wanted to test this and pulled a production kit from the shelf and installed it on our shop truck to see whats going on exactly. After testing, it would be very difficult to get it clamped and for sure would rattle. We have a very simple and easy fix for this and will send any current customers that have purchased this clamp to solve this.
Here are the photos showing the issues needing addressed:

As you can see everything is lined up at the top still:

Before moving forward, if you have the tubing all wrapped (header and downpipe) the clearance between the 2 are very tight and might also throw off the turbo to downpipe. So in that one area where they are close, you might want to not wrap. We highly suggest that you don�t wrap the parts anyhow and get them coated if anything.
****All current kits are now made with the downpipe being 2pcs. No cutting is required. We also have a version like seen below with an externally dumped wastegate and new dump tube included as of 8-1-14. We still have both varieties with the gate re-circulated and dumped to atmosphere.
On to the solution, when installing the downpipe, you will need to make one cut. There is no welding involved so please do not be alarmed. Take a look at the photo and note the location of the cut, its ~1.25� past the weld. This straight section needed about 3/8-1/2� extra in length to push the lower v-band past the crossover pipe. The stainless steel lap band we will send out makes up for this difference and will provide clamping force between the two. We use this style is a lot of our systems post-turbo to allow for more adjustment.

This illustrates how the clamp will sit when installed on the truck. You mainly just want it right in the middle of the straight section so that the clamp isn�t on the bend.

Now with that installed, you are able to clearly move the lower flange out past the crossover the needed room and clamp it down.

On my truck I went ahead and welded in a straight through muffler while I was at it and also just welded it to the stock hanger. Installs very clean this way, sounds good and keeps the exhaust past the cab. Im going to end up making a 90 off of this and come out of the bed right in front of the rear tire. We didn�t have a free lift so I was on jack stands and didn�t want to finish it today. Main objective was to make sure we had a solution for the customers and relay this info to everyone installing and future customers getting ready to install


Hope this helps clear everything up and any questions, please let us know.


Thread
Thread Starter
Forum
Replies
Last Post
lxcoupe
FORCED INDUCTION
8
07-21-2015 02:12 AM
FlowmasterMufflers
GM Engine & Exhaust Performance
0
07-17-2015 03:26 PM