When you click on links to various merchants on this site and make a purchase, this can result in this site earning a commission. Affiliate programs and affiliations include, but are not limited to, the eBay Partner Network.
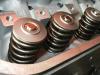
I wasn't going to powder coat everything on this motor since it does get driven a lot and will be a pain in the *** to keep clean, but I went ahead and did it and I'm glad I did
Ah, ok. We had one actually separate on the last motor. Some people weld them together where they are pressed together.
I am over it. I just use billet 1pc wheel now. I think they are about $150 but so much less hassle. Also I tack them to the crank to keep them from spinning. Especially when spinning above 6K.
Now it was time for what I've been waiting for. Time for the Procharger install! I've watched the guys install a couple of these, but they make all this stuff look easy. I was really impressed at how easy the stage 2 kit is to install. It's a very well laid out kit with great instructions and parts that fit together really well. I had the bracket and head unit installed in minutes. I got the kits that's made for the 07+ trucks which puts the intercooler behind the grille. We did some cutting and welding to put it exactly where we wanted, how we wanted. But I feel like it could still be installed in that location on this truck with the parts they sent and a little thought.
While doing this, we decided to move the battery to the rear of the truck mounted to the frame rail. I used 1/0 cable from KICKER to run the power and grounds. With the battery out of the way, I cut the pcm tray up and mounted the pcm in the factory batter location. None of that was necessary, but I wanted to relocate the battery for better weight distribution and it really cleaned up that front corner of the truck
I had a DW400 pump in the stock basket previously but knew it wasn't going to be enough for the new combo. Aeromotive will be building a triple pump setup, but I haven't got around to sending them a new tank to start the build yet. So for the time being, I bought a new sending unit, we installed a -12 bulkhead with a 3/4" aluminum tube welded to it that extends to right at 1/4" above the bottom of the tank. I used a -8 bulkhead for the return that also has a 3/4" aluminum tube welded to it for the return. For now I'm using a Magnafuel 4303 mounted the crossmember in front of the tank. This setup doesn't have any issues with priming and I've currently run it to around 1/8 tank and everything still seems fine. I wouldn't take a chance on racing it with the fuel level this low, but it's nice to know I can drive it around on most of the tank. I also installed an ethanol content sensor. I put it on the feed side but not really in the feed path (seems better in my brain to do it this way instead of necking down the feed or return to 3/8 from -8 or -10). So the fuel system is:
-12 from the tank to the pump
-8 from pump to 10 micron filter
1/8 to -6 out of pump fitting to ethanol content sensor -6 from sensor to 1/8 to -6 fitting in filter fitting
-8 from filter to Y that goes into -6 to the front of the rails
-6 from rear of rails to regulator
-8 from regulator back to the tank
Using DW2200cc injectors
That's pretty much where I'm at for now. All the big stuff is done. I swapped the P01 pcm out for a P59 so that I can have a 3bar OS AND Flex Fuel and just been trying to figure out the tune. It runs pretty good. E85 is actually only around E60 here currently so I'm trying to be a little conservative with fuel and timing. So far I've taken it to 7100rpm where it made around 13#. I'll prolly pulley down so that I can make around 15# at 6500ish and then should be really fun once I start shifting it up there around 7500 or so. I'll of course also have a nitrous kit ready to go just in case.
Put a few miles on it now. I think I’m ready to go ahead and pulley down. Not sure if I’ll do the 4.5 or 4.25. Should prolly just go ahead and do the 4.25...or even 4” lol
all the rubber hoses hoses on the passenger side drive me insane. But I don’t know what to do. They all have to be there lol
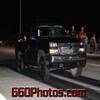
Drove it to work the other day. Checked the weather before I left the house and it looked clear. Then about 3pm and freak winter storm come thru and stranded me. If I could’ve got to my 20’s I would’ve just put them on and drove home. But I wasn’t trying to get the Bogarts that dirty, not mention driving on ice with slicks lol. I did end up putting the 20’s on just because once the weather cleared up. I can leave black marks and clouds of smoke from pretty much any mph lol
No video, but, caught a race with an R6 this morning on the way to work. Bike had cam, head work, tuned, and gearing. Said he short shifted trying to be cocky. But I ran out his life. Truck felt good. That’s the first time I’ve really stuck it and stayed in it for any length of time since we finished building it.
Oh. I'm not sure. I told the machine shop do whatever is needed so I don't have trouble with the wheel. We've had trouble with the wheel being installed wrong in the past on the truck with the last crank
They're billet ones from Moroso. They have these and then the taller ones like I have on the motor for my s10
What�s that �tank with an fittings� next to the carb?
that block/color scheme looks great too. Well done
Last edited by Petraszewsky; 01-08-2019 at 06:22 PM.


 01-02-2019, 12:02 AM