
Made up some floor mount brackets for my Ratchet Shifter
 Feb 4, 2011 | 02:20 PM
#1
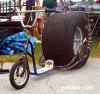
Just thought I'd throw up some quick photos of the floor mount brackets I made to fit a B&M Quicksilver Ratchet Shifter into the console in my Silverado. It's just under 3" tall and bent out of 16gage steel.
Haha, gotta have speedholes! I was gonna do more 1/8" holes in between and another row on the spring side, but didn't go too far since this won't even be visible when hidden under the console. I might have lost a few grams in the process though, haha!


It's very stout and stiff as is, from all angles. I was going to try to arc weld it all together (I'm still trying to learn how to weld), but I figured for this project it was just quicker to use the drill press & some bolts. Gonna put some big fender washers under the cab to make sure I don't transfer too much stress to the cab through the bolts holding this thing down!
mock up before drill massacre & paint


cover I made for the column shifter hole in the lower piece, and have an autometer gauge pod for manual truck on top.... not the prettiest, but it works.

I just have to run the shift cable now, then I'll work on removing all the old shifter brackets & linkage/cable, then install. Still unsure if I should bother relocating the tow/haul button or not, it's not tuned for anything right now....
I've got a cool old shifter **** that should be at home when I get there today too, hope I can make it work.
Oh, and also working on cutting the console cupholder in half, and bending a sheet into a 90deg to make a cover for the shifter on top, and a wall for the pocket/cupholder on the other side, and going to use the little rubber shifter surround that came with the quicksilver... I don't think I'll bother with the indicator window though.
Haha, gotta have speedholes! I was gonna do more 1/8" holes in between and another row on the spring side, but didn't go too far since this won't even be visible when hidden under the console. I might have lost a few grams in the process though, haha!
It's very stout and stiff as is, from all angles. I was going to try to arc weld it all together (I'm still trying to learn how to weld), but I figured for this project it was just quicker to use the drill press & some bolts. Gonna put some big fender washers under the cab to make sure I don't transfer too much stress to the cab through the bolts holding this thing down!
mock up before drill massacre & paint
cover I made for the column shifter hole in the lower piece, and have an autometer gauge pod for manual truck on top.... not the prettiest, but it works.
I just have to run the shift cable now, then I'll work on removing all the old shifter brackets & linkage/cable, then install. Still unsure if I should bother relocating the tow/haul button or not, it's not tuned for anything right now....
I've got a cool old shifter **** that should be at home when I get there today too, hope I can make it work.
Oh, and also working on cutting the console cupholder in half, and bending a sheet into a 90deg to make a cover for the shifter on top, and a wall for the pocket/cupholder on the other side, and going to use the little rubber shifter surround that came with the quicksilver... I don't think I'll bother with the indicator window though.
 Feb 10, 2011 | 08:02 PM
#3
ah yeah, forgot to update this thread, I pretty much finished the project, except a few little details.
I have more photos but they're all on my laptop and I'm on my phone right now. I'll try to post them up tomorrow...
And just a note on the column gauge pod, first of all my idea to use the manual truck version since I was removing my column stalk shifter didn't quite work out since the base piece for the stalk has to be left intact for various switches to function properly, and that base piece still sticks up from the column about a half inch too far, so I just had to dril a 5/8" or so hole for it to stick through. Still looks cleaner than if there were a big opening there though.
And also, since the aux gauce pod piece is made to go over the factory piece, it is just slightly larger and leaves a bit of an overhang lip over the bottom plastic piece, but this honestly doesn't bother me as bad as it seems to others who have posted about it on here...
I also attached mine with velcro, for ease of removal and installation and so it doesn't turn into a bg headache when I have to remove the dash bezel.
Oh yeah, and this shifter is FUN AS HELL! Love it.
Feb 10, 2011 | 08:31 PM
#4
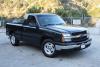
a couple quick photos from afar of shifter installed... without the cupholder/shifter cover that was still setting in clamps with epoxy and shoe goo at the time


and some of the pieces for the cupholder/shifter cover before assembling. I bent the odd piece out of some sheetmetal, I think 20something gage... It's kind of fragile, was hard to work that much. Paint matches pretty good.

the rubber surround piece is not set into the grooves here since it is not epoxied together yet, everything is just sitting on eachother so it looks a bit odd...

I also installed it so the pocket is at the front instead of at back like usual...
and here's an above shot of the B&M Quicksilver installed on my mount bracket in the console.

I just copied and pasted those photos from another forum, but I'll put up some other photos later too.
and some of the pieces for the cupholder/shifter cover before assembling. I bent the odd piece out of some sheetmetal, I think 20something gage... It's kind of fragile, was hard to work that much. Paint matches pretty good.
the rubber surround piece is not set into the grooves here since it is not epoxied together yet, everything is just sitting on eachother so it looks a bit odd...
I also installed it so the pocket is at the front instead of at back like usual...
and here's an above shot of the B&M Quicksilver installed on my mount bracket in the console.
I just copied and pasted those photos from another forum, but I'll put up some other photos later too.
 Feb 10, 2011 | 10:25 PM
#6

Real nice work man, this sort of swap is on my ever growing wish list lol. I had a B&M QuickSilver in my 71 Camaro and loved it. BTW, I keep the pocket at the front in my console cup holder also 


Trending Topics
Feb 10, 2011 | 11:06 PM
#8
oh the color is SEM Santa Fe.
OE....? or not....

...and seriously, have you ever seen an NBS with aftermarket seats? I ask because I haven't and I searched forever and asked questions and no love... only people with caged trucks and kirkeys and the like with harnesses...
It was not easy...
thanks bud, yeah the quicksilver is a nice piece! Wait 'til you see my new shift ****...
Feb 10, 2011 | 11:14 PM
#9
I might do the ceiling console too, and possibly the a-pillars since the headliner on this truck is already almost that same color! I'd also like to find some matching leather or vinyl to put on the door panels above the handle too, but really not sure where to get some...?
...just added a TTS dash pocket gauge panel that is empty waiting on a wideband and just painted an autometer cobalt minimonster white to go on the column next to the aeroforce.
Last edited by ShredSled; Feb 10, 2011 at 11:21 PM.