
engine/transmission cooler install (max 100 Kb pics)
 Jul 17, 2005 | 02:54 PM
#1
Thread Starter
TECH Resident
Joined: Mar 2005
Posts: 943
Likes: 0
From: Texas
After doing do some searches for engine oil cooler ,I found very little, so I descided to post my installation of my engine and transmission oil coolers. My installation was done a couple of years ago, so here goes with what I remember how I did it.
The oil coolers are B&M purchased from Summit. Since my Silverado 2500 did not come with the factory engine oil cooler I purchased an adapter from LG Motorsports. All the fittings and adapters used for this installation come from a hydraulic supply store.
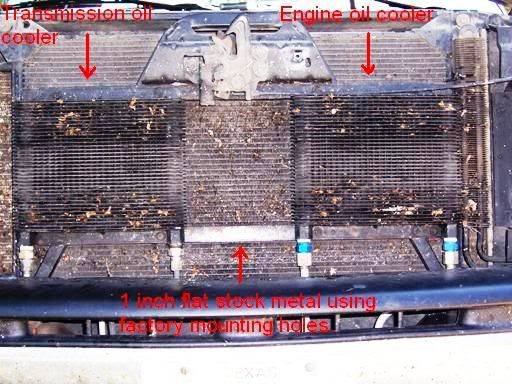
The following pic shows both coolers installed with 1 inch flat stock holding the coolers in place.
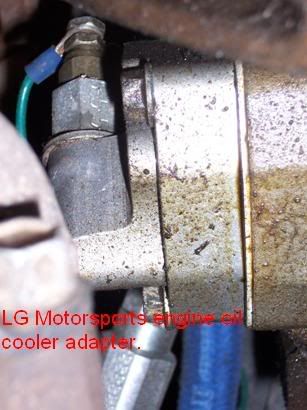
The aluminium tubes coming from the bottom of the engine oil cooler are bent, flared and connected to a bulkhead adapter. The bumper covers up the bulkhead mounting plates that are welded to under sided of the radiator core support. Aeroquip FC300 high oil temperature hose runs from the bulkhead adapters to the oil cooler adapter. The following pic shows the oil cooler adapter installed, the oil on the adapter is from the front diff.
This takes care of the engine oil cooler, now the transmission cooler was a little more involves since I wanted to use most of the factory metal lines. Since the factory metal lines are seamed tubing I had to fabricate an adapter that could be brazed on the line, since flaring the line was out of the question. I also descided to replace the factory rubber hose in the lines because of a small leak. The following two pics shows a JIC plug drilled out to accepted the metal lines.


The pic above shows a recess that was created to allow the metal line to bottom against, the recess is 1/4 inch deep by 3/8 inch for the line. After installing the fabricated adapter on the metal line I used an my trusty cutting torch with the rosebud attachment to heat the line and adapter. The braze I used is silver braze which gets pulled into the joint through capillary action, which provides a strong joint than regular bronze braze. The next pic shows the adapter brazed on the factory metal line.
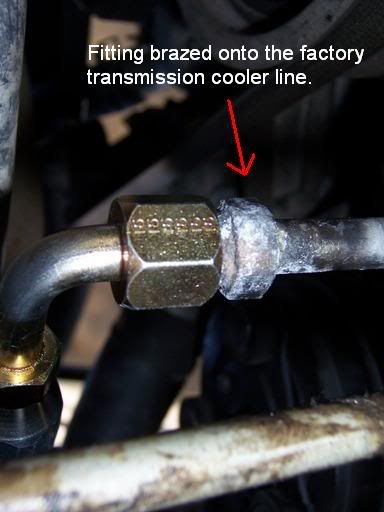
If you are wondering how strong the joint is, I did have the lines pressure tested to 300+ psi.
Both coolers took me about a weekend to install. The reason I went with steel hydraulic fittings instead of the aluminium was mainly because of price. All of the fittings, adapters and hose costed about 75 dollars with the hose being the most expensive at $4.50 per foot and I used about 10 feet. The Aeroquip FC300 high oil temperature hose is rated at 2250 psi and 300+ �F, this temperature is for the oil inside the line.
Here is a list of the parts I used:
3' - #6 (-6) Aeroquip FC300 hose
7' - #8 (-8) Aeroquip FC300 hose
1 - 90� #6 JIC reusable fitting
3 - straight #6 JIC reusable fitting
2 - #6 JIC bulkhead adapters
4 - #6 JIC flare nut and sleeve
3 - #6 JIC plug (fabricated metal line adapter)
2 - 1/2 NPT to #6 JIC adapter
2 - 90� #8 JIC reusable fitting
2 - straight #8 JIC reusable fitting
2 - #8 JIC bulkhead adapters
4 - #8 JIC Flared nut and sleeve
2 - 1/2 NPT to #8 JIC adapter
2 - #8 male unions
I think this takes cares of everything. So far I have no problems with coolers or any of the adapters. My engine oil stays about 180�F on the highway and gets up to 200�F in the city or towing, before it was pegging my Autometer gauge out at 250�F on the highway during the summer. I don't know my transmission temperature, but I will when I get my PML transmission pan to mount my temperature sensor.
I hope this will help for anyone wanting to install an engine oil cooler or upgrade their transmission cooler.
If there is any questions let me know so I can clarify them.
The oil coolers are B&M purchased from Summit. Since my Silverado 2500 did not come with the factory engine oil cooler I purchased an adapter from LG Motorsports. All the fittings and adapters used for this installation come from a hydraulic supply store.
The following pic shows both coolers installed with 1 inch flat stock holding the coolers in place.
The aluminium tubes coming from the bottom of the engine oil cooler are bent, flared and connected to a bulkhead adapter. The bumper covers up the bulkhead mounting plates that are welded to under sided of the radiator core support. Aeroquip FC300 high oil temperature hose runs from the bulkhead adapters to the oil cooler adapter. The following pic shows the oil cooler adapter installed, the oil on the adapter is from the front diff.
This takes care of the engine oil cooler, now the transmission cooler was a little more involves since I wanted to use most of the factory metal lines. Since the factory metal lines are seamed tubing I had to fabricate an adapter that could be brazed on the line, since flaring the line was out of the question. I also descided to replace the factory rubber hose in the lines because of a small leak. The following two pics shows a JIC plug drilled out to accepted the metal lines.
The pic above shows a recess that was created to allow the metal line to bottom against, the recess is 1/4 inch deep by 3/8 inch for the line. After installing the fabricated adapter on the metal line I used an my trusty cutting torch with the rosebud attachment to heat the line and adapter. The braze I used is silver braze which gets pulled into the joint through capillary action, which provides a strong joint than regular bronze braze. The next pic shows the adapter brazed on the factory metal line.
If you are wondering how strong the joint is, I did have the lines pressure tested to 300+ psi.
Both coolers took me about a weekend to install. The reason I went with steel hydraulic fittings instead of the aluminium was mainly because of price. All of the fittings, adapters and hose costed about 75 dollars with the hose being the most expensive at $4.50 per foot and I used about 10 feet. The Aeroquip FC300 high oil temperature hose is rated at 2250 psi and 300+ �F, this temperature is for the oil inside the line.
Here is a list of the parts I used:
3' - #6 (-6) Aeroquip FC300 hose
7' - #8 (-8) Aeroquip FC300 hose
1 - 90� #6 JIC reusable fitting
3 - straight #6 JIC reusable fitting
2 - #6 JIC bulkhead adapters
4 - #6 JIC flare nut and sleeve
3 - #6 JIC plug (fabricated metal line adapter)
2 - 1/2 NPT to #6 JIC adapter
2 - 90� #8 JIC reusable fitting
2 - straight #8 JIC reusable fitting
2 - #8 JIC bulkhead adapters
4 - #8 JIC Flared nut and sleeve
2 - 1/2 NPT to #8 JIC adapter
2 - #8 male unions
I think this takes cares of everything. So far I have no problems with coolers or any of the adapters. My engine oil stays about 180�F on the highway and gets up to 200�F in the city or towing, before it was pegging my Autometer gauge out at 250�F on the highway during the summer. I don't know my transmission temperature, but I will when I get my PML transmission pan to mount my temperature sensor.
I hope this will help for anyone wanting to install an engine oil cooler or upgrade their transmission cooler.
If there is any questions let me know so I can clarify them.
Last edited by cbrich; Oct 18, 2005 at 05:22 PM.
Jul 17, 2005 | 03:00 PM
#2

have you towed very much with this set up yet? i think there was someone on here that had two tranny coolers mounted in front of the rad and towed all the time. he was having issues with the engine getting warm when towing. his might have been due to the hills but not sure. oh yay. you need a bug zapper on that thing to. 


Thread
Thread Starter
Forum
Replies
Last Post
therock
GM Drivetrain & Suspension
4
Jul 25, 2015 09:23 AM
ferrellrooster
GM Drivetrain & Suspension
6
Jul 17, 2015 07:07 AM