
I dropped my 04, heres how......with PICTURES
 Sep 6, 2007 | 12:16 PM
#1
ok, I did some research and decided on this particular kit for my truck.

It is called a 2/4 drop for 99-06 trucks from Mcgaughys
First thing i did was pulled truck in and measured height.


So pretty much 34" in front and 36" in rear from the ground to wheel well lip.
Then I racked truck and since i was at work supposedly working. So I wanted to do each part and see what the difference was to the truck.
First up was the shackles they come with a 1 inch or 2 inch drop hole. I intended to drop it 4 total so I picked the 2 inch drop hole

On my particular truck it takes 2 21mm wrenchs to remove the bolts. I removed the bottom one first. Then let the truck down a little bit so it would push the shackle all the way up. So then I could slide out the upper bolt between the frame and bed.
Pretty much reverse the procedure to reinstall. Adjust vehicle height to line up holes.


It pretty much dropped it 1.5"

Since now the truck is about level I decided to do the spindles next.
This step is a little more involved. First remove wheel.

Then remove brake caliper with retention bracket. On my truck it was 2 bolts with 18mm heads. Next remove 10mm head bolt that holds the brake line to spindle.

and secure caliper somewhere out of your way I choose the top upper Control arm. Now you have the rotor to remove which should just slide off if the flimsy metal lock tabs have been removed. Now you should be looking at the wheel bearing with hub which is retained to the spindle by 3 15 mm headed bolts.

And on my particular truck I have abs sensors which are part of the hub as well. Remove the allen headed bolt which secures it to the hub.

Slide hub from spindle. Seperate heat shield so you can slide out abs sensor. Then you should have a pile of parts that should look something like this.

Next is an 18 mm nut on the tie rod end. I then use a 5 pound hammer and smack the spindle (NOT the tie rod) where the tie rod goes. It normally will drop out the tie rod end from spindle when you do that. Then there is another 18mm nut on the upper ball joint. Remove that. As previously described smack the spindle near the ball joint mount. And it should come free. On the bottom you have another nut which on my particular vehicle was 15/16. Again smack it to sperate from ball joint. Now the spindle should be seperated from vehicle.

Take new spindle and install threaded stud into top hole with some lock tite. Make sure you screw it in until it stops. If not it may come in contact with hub assy. Install new spindles onto vehicle. Reinstall hub assy making sure you start locknut before installing remaining Oe bolts to retain it. And make sure you feed abs wire into hole before tighten heat shield and hub assy.

Tighten allen bolt for abs sensor. Tighten upper and lower ball joint nuts. Reinstall Tie rod end and tighten nut. Now on lower ball joints some folks have mentioned having trouble tightening lower nut due to ball joint shaft spinning. Take an 8mm allen wrench and hold shaft while hand tightening nut with a 15/16 wrench.
Reinstall rotor. Reinstall caliper with bracket. Reinstall brake line with new bolt. Me personally I was not fond of this method. I am not sure why they didnt just drill and tap hole to fit OE bolt. So the hole is not tapped the bolts supplied cut there own threads. Be careful or you will snap the head off the smaller replacement bolt. (Guess how I figured this out) Reinstall wheel.


Again it only seemed to drop it and 1.5"

It is called a 2/4 drop for 99-06 trucks from Mcgaughys
First thing i did was pulled truck in and measured height.
So pretty much 34" in front and 36" in rear from the ground to wheel well lip.
Then I racked truck and since i was at work supposedly working. So I wanted to do each part and see what the difference was to the truck.
First up was the shackles they come with a 1 inch or 2 inch drop hole. I intended to drop it 4 total so I picked the 2 inch drop hole
On my particular truck it takes 2 21mm wrenchs to remove the bolts. I removed the bottom one first. Then let the truck down a little bit so it would push the shackle all the way up. So then I could slide out the upper bolt between the frame and bed.
Pretty much reverse the procedure to reinstall. Adjust vehicle height to line up holes.
It pretty much dropped it 1.5"
Since now the truck is about level I decided to do the spindles next.
This step is a little more involved. First remove wheel.
Then remove brake caliper with retention bracket. On my truck it was 2 bolts with 18mm heads. Next remove 10mm head bolt that holds the brake line to spindle.
and secure caliper somewhere out of your way I choose the top upper Control arm. Now you have the rotor to remove which should just slide off if the flimsy metal lock tabs have been removed. Now you should be looking at the wheel bearing with hub which is retained to the spindle by 3 15 mm headed bolts.
And on my particular truck I have abs sensors which are part of the hub as well. Remove the allen headed bolt which secures it to the hub.
Slide hub from spindle. Seperate heat shield so you can slide out abs sensor. Then you should have a pile of parts that should look something like this.
Next is an 18 mm nut on the tie rod end. I then use a 5 pound hammer and smack the spindle (NOT the tie rod) where the tie rod goes. It normally will drop out the tie rod end from spindle when you do that. Then there is another 18mm nut on the upper ball joint. Remove that. As previously described smack the spindle near the ball joint mount. And it should come free. On the bottom you have another nut which on my particular vehicle was 15/16. Again smack it to sperate from ball joint. Now the spindle should be seperated from vehicle.
Take new spindle and install threaded stud into top hole with some lock tite. Make sure you screw it in until it stops. If not it may come in contact with hub assy. Install new spindles onto vehicle. Reinstall hub assy making sure you start locknut before installing remaining Oe bolts to retain it. And make sure you feed abs wire into hole before tighten heat shield and hub assy.
Tighten allen bolt for abs sensor. Tighten upper and lower ball joint nuts. Reinstall Tie rod end and tighten nut. Now on lower ball joints some folks have mentioned having trouble tightening lower nut due to ball joint shaft spinning. Take an 8mm allen wrench and hold shaft while hand tightening nut with a 15/16 wrench.
Reinstall rotor. Reinstall caliper with bracket. Reinstall brake line with new bolt. Me personally I was not fond of this method. I am not sure why they didnt just drill and tap hole to fit OE bolt. So the hole is not tapped the bolts supplied cut there own threads. Be careful or you will snap the head off the smaller replacement bolt. (Guess how I figured this out) Reinstall wheel.
Again it only seemed to drop it and 1.5"
Sep 6, 2007 | 12:17 PM
#2
Ok time for the fun part. Now I thought it was going to be alot worse then it was. So I waited until the next day to this part. Next up is the front spring hangars. To get my additional 2 inch drop.

Now this step is much easier if you have lift access and an air hammer. It only took me an hour. But if you dont then it will be much harder.
You want to support the truck by the frame. And preferably support the rearend by a jack so you can adjust it to line stuff up. Then take air hammer and cut the heads off of the rivets.If you have a sharp flat blade for air hammer it will make it seem to easy to do. Then you will need a deep 15/16 and a shallow to keep the bolt from spinning.
(At this point of my adventure. My camera took a nose dive off of the lift and wouldnt work anymore. I was kinda frustrated with it because it would never take good close ups etc and I had been debating replacing it. So after that I did.
Ok, slide the bolt out towards center, and remove bracket. I took a punch bit and knocked the remains of the rivets out of the frame. Replace bracket with new one. They are not marked but if you hold it up to the frame you can figure out where they go and which way.

Reinstall leaf spring bolt. Then raise rearend up to line up bracket to frame. You will be reusing the upper 4 of the 6 mount holes. Install supplied nuts and bolts.
On the drivers side it is a little trickier. The gas tank is right up agaisnt the frame. So what I did was support the gas tank with a trani jack. Remove the 2 15 mm headed bolts. And then slide the gas tank over and down enough to get the nuts and wrench in between the frame and gas tank. Also on this side if you have a helper. One person can pull down on the spring and the other pull the bolt for leaf spring out.
After I finished that. I let the truck down to check everything out.
I noticed that the snubber was bottomed out.

So I took my sawzall and cut a few ribs off to look like this.

I may remove metal support washer and cut another rib off. But so far it seems to ride fine.
So time to take some measurements.


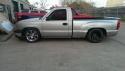
The front came down 2.5" while the rear came down 4.5".
The truck handles much better, and in my opinion looks much better.

I am still using the factory shock but in the rear it might be a good idea to replace it with a 4 inch drop shock. You dont need to change it in the front because the suspension doesnt change just the location of the hub bearing. Also in the (not to good) directions. It mentions trimming of front heat shields and grinding of the lower ball joint stud. I had no issues with either but I also have 20 inch wheels.
Now this step is much easier if you have lift access and an air hammer. It only took me an hour. But if you dont then it will be much harder.
You want to support the truck by the frame. And preferably support the rearend by a jack so you can adjust it to line stuff up. Then take air hammer and cut the heads off of the rivets.If you have a sharp flat blade for air hammer it will make it seem to easy to do. Then you will need a deep 15/16 and a shallow to keep the bolt from spinning.
(At this point of my adventure. My camera took a nose dive off of the lift and wouldnt work anymore. I was kinda frustrated with it because it would never take good close ups etc and I had been debating replacing it. So after that I did.
Ok, slide the bolt out towards center, and remove bracket. I took a punch bit and knocked the remains of the rivets out of the frame. Replace bracket with new one. They are not marked but if you hold it up to the frame you can figure out where they go and which way.
Reinstall leaf spring bolt. Then raise rearend up to line up bracket to frame. You will be reusing the upper 4 of the 6 mount holes. Install supplied nuts and bolts.
On the drivers side it is a little trickier. The gas tank is right up agaisnt the frame. So what I did was support the gas tank with a trani jack. Remove the 2 15 mm headed bolts. And then slide the gas tank over and down enough to get the nuts and wrench in between the frame and gas tank. Also on this side if you have a helper. One person can pull down on the spring and the other pull the bolt for leaf spring out.
After I finished that. I let the truck down to check everything out.
I noticed that the snubber was bottomed out.
So I took my sawzall and cut a few ribs off to look like this.
I may remove metal support washer and cut another rib off. But so far it seems to ride fine.
So time to take some measurements.
The front came down 2.5" while the rear came down 4.5".
The truck handles much better, and in my opinion looks much better.
I am still using the factory shock but in the rear it might be a good idea to replace it with a 4 inch drop shock. You dont need to change it in the front because the suspension doesnt change just the location of the hub bearing. Also in the (not to good) directions. It mentions trimming of front heat shields and grinding of the lower ball joint stud. I had no issues with either but I also have 20 inch wheels.

 Sep 6, 2007 | 01:44 PM
#5
Thanks guys. I ran it at gainesville last nite,  too bad it doesnt hook as good as it looks. Gotta go old skool and put some front runners and sticky tires and see if I can break something to run 15's LOL
too bad it doesnt hook as good as it looks. Gotta go old skool and put some front runners and sticky tires and see if I can break something to run 15's LOL


Trending Topics


Thread
Thread Starter
Forum
Replies
Last Post
zblee
GM Engine & Exhaust Performance
63
Jun 10, 2023 01:25 PM
hartinclay
GM Parts Classifieds
4
Aug 2, 2015 06:44 PM